When multiple jobs compete for the same compute resources, MaxCompute uses job priority to decide which jobs get resources first. Higher-priority jobs receive compute resources before lower-priority jobs and can preempt resources from lower-priority jobs that are already running. Use job priority to protect time-critical pipelines—for example, an ETL job that must complete before 6:00 AM—when the cluster is busy with lower-urgency workloads.
How it works
Every MaxCompute job has a priority value from 0 to 9. Lower numbers mean higher priority: priority 0 is the highest, and priority 9 is the lowest.
When compute resources are limited, MaxCompute schedules jobs in priority order. If a high-priority job arrives while resources are fully occupied by lower-priority jobs, it preempts those jobs to claim the resources it needs.
Default behavior when the priority feature is disabled:
All jobs: priority 9 (lowest)
PAI algorithm jobs: priority 1 (near-highest)
NULL priority in query results typically indicates a DDL task, which you can ignore.
Prerequisites
Before enabling job priority, ensure that you have:
Project owner or
Super_Administratorrole in the MaxCompute project(For quota-level enablement) A quota template and quota plan configured. See Configure quotas
Enable job priority
Before enabling job priority, audit existing job priorities using Information Schema and reset any non-9 values to 9. Skipping this step can cause jobs with existing high-priority settings to jump the queue unexpectedly.
Check existing job priorities
Run the following query in Information Schema to see the priority distribution across all jobs in a date partition:
SELECT  get_json_object(
            REPLACE(settings, '.', '_'),
            '$.odps_instance_priority'
        ) AS priority,
        task_type,
        COUNT(1) AS cnt
FROM    information_schema.tasks_history
WHERE   ds = '${bizdate}'  -- Replace with the date partition, for example 20200517.
GROUP BY get_json_object(
             REPLACE(settings, '.', '_'),
             '$.odps_instance_priority'
         ),
         task_type
ORDER BY cnt DESC
LIMIT   100;
Sample output:
+----------+-----------+-----+
| priority | task_type | cnt |
+----------+-----------+-----+
| 9        | SQL       | 4   |
| NULL     | SQL       | 1   |
| 2        | SQL       | 1   |
+----------+-----------+-----+
Jobs with NULL priority are DDL tasks — ignore them. For any jobs with priority values other than 9 (such as 2 in this example), identify their owners and reset their priorities before enabling the feature.
To find the details of jobs with a specific priority value:
SELECT  inst_id,
        owner_name,
        task_name,
        task_type,
        settings
FROM    information_schema.tasks_history
WHERE   ds = '${bizdate}'  -- Replace with the date partition, for example 20200517.
AND     get_json_object(
            REPLACE(settings, '.', '_'),
            '$.odps_instance_priority'
        ) = '${priority}'  -- Replace with the priority value to filter, for example 2.
LIMIT   100;
Key fields in the output:
| Field | Description |
|---|---|
SKYNET_ID | DataWorks scheduling node ID. Absent if the job was not submitted through DataWorks. |
SKYNET_ONDUTY | Present if the job is a periodic job. |
owner_name | Job owner. Use this to trace non-DataWorks jobs. |
After identifying jobs with non-9 priorities:
DataWorks jobs: Check whether the associated baseline is reasonable. If not, delete it. See Baseline management.
Non-DataWorks jobs: Contact the owner using
owner_nameanduser_agent. Remove the priority setting from the job code to restore the default priority of 9.
Enable priority at the project level
Only the project owner or a user with the Super_Administrator role can enable priority. Run the following command in the MaxCompute client:
setproject odps.instance.priority.enable=true;Priority takes effect immediately for all jobs in the project.
Enable priority at the quota level
Enabling priority at the quota level applies priority scheduling to all jobs running under that quota.
Log on to the MaxCompute console and select a region.MaxCompute console
In the navigation pane, choose Manage Configurations > Quotas.
Find the target quota and click Quota Configuration in the Actions column.
On the Basic Configurations tab, click Edit Basic Configurations.
Select the Enable Priority option for the target level-2 quota.
If the level-2 quota Type is Interactive, the Enable Priority option is unavailable by default.
Click OK.
Set job priority
Choose the method that fits your workflow:
| Method | Best for |
|---|---|
| MaxCompute client (SET command) | Ad hoc queries |
| MaxCompute client (CLI flag) | Ad hoc queries via script |
| Java SDK | Applications with custom priority logic |
| DataWorks baseline management | Periodic pipelines with SLA requirements |
| DataWorks node settings | Ad hoc queries in DataWorks |
Method 1: MaxCompute client — SET command
Run this command before your SQL statement in the MaxCompute client:
SET odps.instance.priority = <value>;
-- <value> is an integer from 0 (highest priority) to 9 (lowest priority).
Method 2: MaxCompute client — CLI flag
Pass the priority as a flag when submitting a SQL statement:
bin/odpscmd --config=<config-file> --project=<project-name> --instance-priority=<value> -e "<sql>"Method 3: Java SDK
Use the odps.instances().create(task, priority) method to set priority when submitting a job:
import com.aliyun.odps.Instance;
import com.aliyun.odps.LogView;
import com.aliyun.odps.Odps;
import com.aliyun.odps.OdpsException;
import com.aliyun.odps.account.Account;
import com.aliyun.odps.account.AliyunAccount;
import com.aliyun.odps.task.SQLTask;

public class OdpsPriorityDemo {
    public static void main(String[] args) throws OdpsException {
        // Load credentials from environment variables.
        // Never hardcode AccessKey credentials in your code.
        Account account = new AliyunAccount(
            System.getenv("ALIBABA_CLOUD_ACCESS_KEY_ID"),
            System.getenv("ALIBABA_CLOUD_ACCESS_KEY_SECRET")
        );

        Odps odps = new Odps(account);
        odps.setEndpoint("http://service.odps.aliyun.com/api");
        odps.setDefaultProject("<your-project-name>");

        SQLTask task = new SQLTask();
        task.setName("adhoc_sql_task_1");
        task.setQuery("select count(*) from aa;");

        // Submit the job with priority 5.
        // Priority values: 0 (highest) to 9 (lowest).
        Instance instance = odps.instances().create(task, 5);

        // Print the LogView URL to monitor job status (optional).
        LogView logView = new LogView(odps);
        System.out.println(logView.generateLogView(instance, 24));

        // Wait for the job to finish (optional).
        instance.waitForSuccess();
    }
}
For more details, see Java SDK overview.
Method 4: DataWorks baseline management
Use this method when you need a periodic pipeline and all its upstream jobs to finish within an SLA window. Baseline management sets priorities for all jobs in a pipeline at once — no need to configure each job individually.
DataWorks baseline priorities and their MaxCompute equivalents:
| DataWorks baseline priority | MaxCompute job priority | Notes |
|---|---|---|
| 8 (highest in DataWorks) | 1 | Highest practical priority |
| 7 | 2 | |
| 5 | 4 | |
| 3 | 6 | |
| 1 (default) | 8 | Default for DataWorks workflows |
| No baseline (ad hoc) | 9 | Default for DataWorks ad hoc queries |
Conversion formula: MaxCompute priority = 9 − DataWorks baseline priority
For more details, see Baseline management.
DataWorks ad hoc queries have no baseline by default, so the MaxCompute jobs they submit use the lowest priority (9). DataWorks workflows have a default baseline priority of 1, so their jobs use priority 8.
Method 5: DataWorks node settings
Set priority directly in a DataWorks node for ad hoc queries:
set odps.instance.priority = <value>;
-- <value> is the priority value from 0 (highest) to 9 (lowest).
View job priority
To check the priority of a specific job, open the job in Logview 2.0, go to the Json Summary tab, and locate the odps.instance.priority parameter.
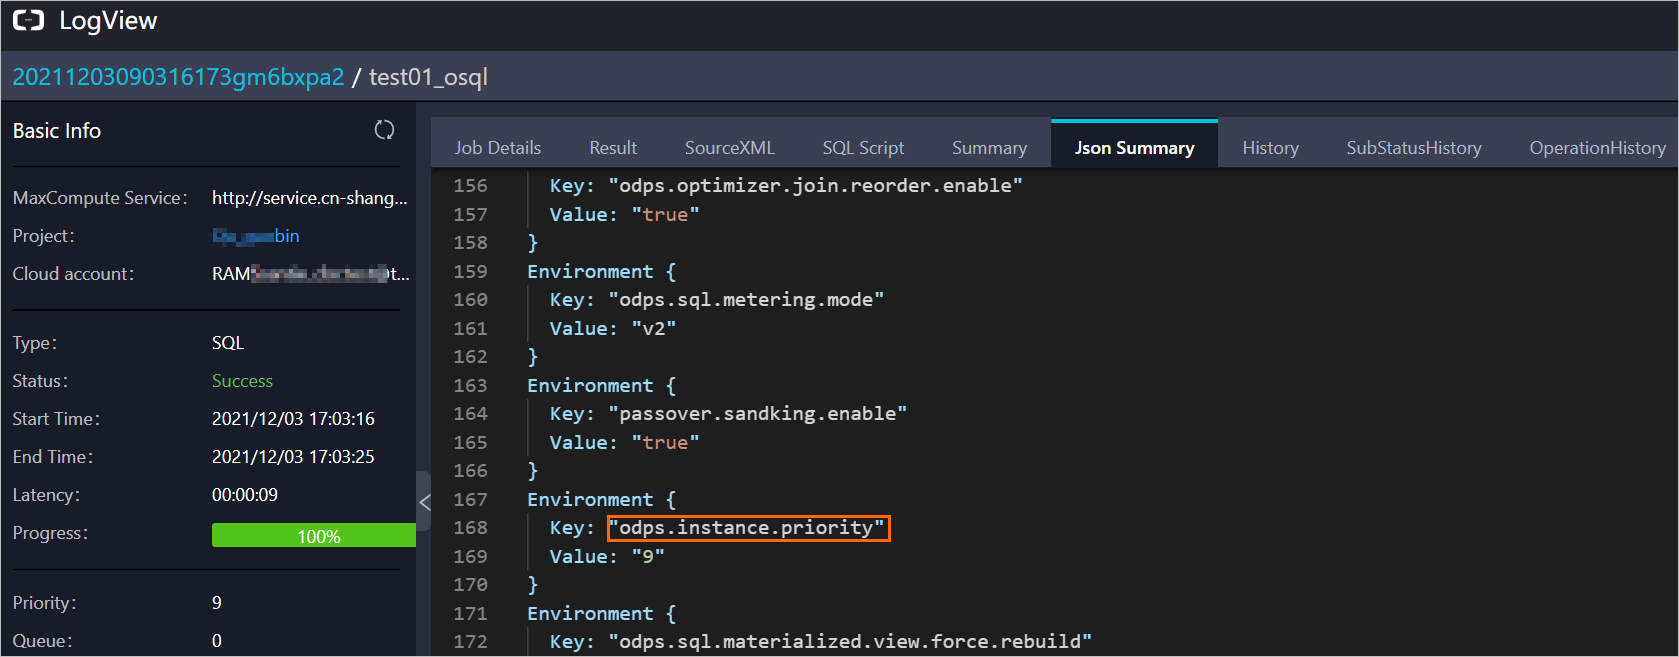
The priority shown in XML on the Logview page is not accurate. For projects with priority disabled, the system converts any non-9 priority value to 9 in XML to prevent unintended queue jumping. Always use the Json Summary tab for accurate priority information.