Key Management Service (KMS) allows you to configure alerts in the ActionTrail console. When exception events are detected, Alibaba Cloud sends alert notifications to users and user groups by using multiple notification methods. This way, the users and user groups can handle the events at the earliest opportunity. This topic describes how to configure alerts in the ActionTrail console.
Overview
ActionTrail supports built-in alert rules and custom alert rules.
Built-in alert rules: You can enable built-in alert rules based on your business requirements. To view built-in alert rules, log on to the ActionTrail console and go to the Alerts page.
Custom alert rules: You can use custom query statements to configure alerts for specific events that occur in different scenarios. This allows you to monitor the security of your business in a flexible manner. For more information about the SQL syntax, see Log search overview and Log analysis overview.
For example, if you use the SQL statement
event.serviceName:Kms and event.eventName:"ScheduleKeyDeletion" | select COUNT(*) as schedule_count, an alert is triggered when a key is deleted.
For more information about alerts, see Alert overview. For more information about KMS events that are supported by ActionTrail, see Audit events of KMS.
Step 1: Create a trail
Create a trail that meets the following conditions:
The trail delivers events from all regions.
The trail delivers all types of events.
The trail delivers events to Log Service.
For more information, see Create a single-account trail and Create a multi-account trail.
Step 2: Enable the advanced event query feature for the trail
Before you can use the alerting feature to detect events that are recorded by a trail, you must enable the advanced event query feature.
Log on to the ActionTrail console.
In the left-side navigation pane, click Trails.
On the Trails page, find the trail for which you want to enable the advanced event query feature and turn on the switch in the Advanced Event Query column.
You can enable the advanced event query feature for only one trail for each Alibaba Cloud account or Resource Access Management (RAM) user.
NoteIf you configure an alert for a trail, the alert configuration still takes effect after you disable the advanced event query feature for the trail. If you want to modify the configuration of an alert or disable an alert, re-enable the advanced event query feature.
Step 3: Create users and a user group
You can specify users and user groups as the recipients of alert notifications. In this example, two users named Alice and Kumer, and a user group named ActionTrailOM, are created. Then, users Alice and Kumer are added to the ActionTrailOM user group.
Create a user.
On the Alerts page, choose .
In the User Management section, click Add Users.
On the Add Users tab of the Create User dialog box, enter the user information and click OK.
In this example, the following user information is entered:
# ID, Username, Enabled, Country code-phone number, Receive text message, Receive phone call, Email
test01,Kumer,true,86-1381111*****,true,true,a***@example.net
test02,Alice,true,86-1381111*****,true,true,a***@example.net
The following table describes the parameters.
Parameter
Description
Example
ID
The ID of the user. The ID must be unique.
The ID must be 5 to 60 characters in length, and can contain letters, digits, underscores (_), hyphens (-), and periods (.). The ID must start with a letter.
test01 and test02
Username
The name of the user.
The name must be 1 to 20 characters in length and cannot contain the following special characters:
"\$|~?&<>{}''.Kumer and Alice
Enabled
Specifies whether ActionTrail can send alert notifications to the user. Valid values:
true
false
true
Country code-phone number
The country code and mobile phone number of the user. The country code must be 1 to 4 characters in length, and can contain only digits.
86-1381111***** and 86-1381112*****
Receive text message
Specifies whether ActionTrail can send text messages to the mobile phone number. Valid values:
true
false
true
Receive phone call
Specifies whether ActionTrail can send voice notifications to the mobile phone number.
true
false
true
Email
The email address of the user.
a***@example.net
Create a user group.
Click Alert Management and select User Group Management.
In the User Groups section, click Create.
In the Add User Group dialog box, configure the parameters and click OK.
The following table describes the parameters and provides sample parameter values.
Parameter
Description
Example
ID
The ID of the user group. The ID must be unique.
The ID must be 5 to 60 characters in length, and can contain letters, digits, underscores (_), hyphens (-), and periods (.). The ID must start with a letter.
group-01
Group Name
The name of the user group.
The name can be up to 20 characters in length and cannot contain the following special characters:
\$|~?&<>{}''".ActionTrailOM
Available Members
The users that you created.
Kumer and Alice
Selected Members
The users that you added to the user group.
Kumer and Alice
Enabled
Specifies whether ActionTrail can send alert notifications to the user group. Valid values:
If you turn on the switch, ActionTrail can send alert notifications to the user group.
If you turn off the switch, ActionTrail cannot send alert notifications to the user group.
Turn on the switch.
Step 4: (Optional) Create an alert template
By default, ActionTrail uses the SLS actiontrail builtin content template to send alert notifications to the specified alert contacts. You can also create custom alert templates based on your business requirements.
- On the Event Alerting page, choose .
- Click Create.
- In the Add Content Template dialog box, configure the ID and Name parameters.
Configure the alert template for each notification method and click Confirm.
Step 5: (Optional) Create an action policy
You can use action policies to manage the alert notification methods and the frequency at which alert notifications are sent. By default, ActionTrail uses the SLS actiontrail builtin action policy to send alert notifications to the specified alert contacts. You can also create custom action policies based on your business requirements. When you create a custom action policy, you can specify alert notification conditions, alert notification methods, and alert contacts.
- On the Event Alerting page, select Action Policy from the drop-down list.
- In the Action Policy section, click Create.
- In the Add Action Policy dialog box, set the ID and Name parameters.
- On the Primary Action Policy tab, create an action policy.
- Click the
 icon.
icon. - Configure a condition to send an alert notification and click OK.
Parameter Description Examples Condition Valid values: - All: The specified action policy is executed only if all alerts in a merge set meet the specified condition.
- Any: The specified action policy is executed if one or more alerts in a merge set meet the specified condition.
Any Conditional expressions Alerts that meet a conditional expression are processed based on the specified action policy. You can specify an object, an operator, and an object value for the conditional expression. - Object: Alibaba Cloud Account ID
- Operator: Equal to
- Object value: 154035569884****
Mode You can add multiple conditions in standard mode or advanced mode. Valid values:- Standard Mode: If you specify multiple conditions, the conditions are associated by using the AND operator.
- Advanced Mode: If you specify multiple conditions, you can use the AND or OR operator to associate the conditions. You can also group multiple conditions into one group by using parentheses. In addition, nested conditions are supported.
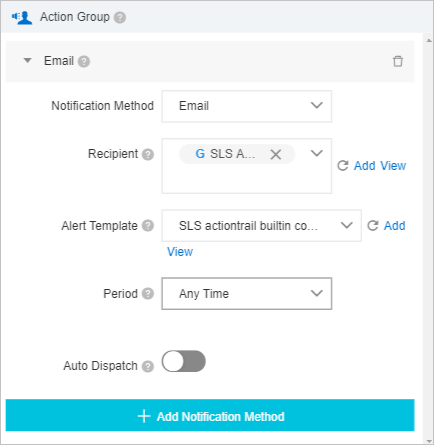
Standard Mode - Configure an action group. Set the parameters for notification methods. Available notification methods include text message, voice call, email, DingTalk, webhook, and Alibaba Cloud Message Center. For more information, see Notification methods.
- Click the
 icon for the Condition or Action Group dialog box to end the configuration. Note Click the icon if you want to add more conditions and action groups.
- Click the
- Click OK.
Step 6: Configure a built-in alert rule
By default, built-in alert rules are disabled. After you enable a built-in alert rule, ActionTrail detects events and triggers alerts based on the severity level that is preset in the alert rule. You can configure alert parameters based on your business requirements.
For example, you can configure the following alert rules for KMS: KMS Key Configuration Change Alert, Alert of Frequency of API Error, and Alert for Unauthorized API calls.
To view the details of an alert rule, you can move the pointer over the  icon next to the name of the alert rule.
On the Alerts page, click the Alert Rules/Incidents tab.
Find the alert rule that you want to enable and click Enable in the Actions column.
After the alert rule is enabled, the value in the Status column changes to Enabled.
Find the alert rule that you want to modify and click Settings in the Actions column.
In the Parameter Settings dialog box, set the parameters and click Save.
Parameter
Description
Example
Action Policy
The action policy that specifies the alert notification methods and the frequency at which alert notifications are sent.
Action Policy for Website Logs
Severity
The severity level of an event that triggers the alert rule.
High
NoteFor the Account Continuous Login Failure Alert rule, you can specify the maximum number of logon failures that are allowed. For the Alert for Unauthorized API calls rule, you can specify the maximum number of unauthorized API calls that are allowed.
Step 7: Configure a custom alert rule
In this example, an alert is triggered when a key is deleted. ActionTrail checks whether a key is deleted every hour within one day.
- On the Event Alerting page, click Create Alert.
In the Alert Monitoring Rule panel, configure an alert rule and click OK.
The following table describes the important parameters. For more information about other parameters, see Create an alert monitoring rule for logs.
Parameter
Description
Example
Check Frequency
Specify the frequency at which Log Service checks query and analysis results.
- Hourly: Query and analysis results are checked every hour.
- Daily: Query and analysis results are checked at a specified point in time every day.
- Weekly: Query and analysis results are checked at a specified point in time on a specified day of each week.
- Fixed Interval: Query and analysis results are checked at a specified interval.
- Cron: Query and analysis results are checked at an interval that is specified by a cron expression.
A cron expression can specify an interval that is accurate to the minute. The cron expression is based on the 24-hour clock. For example, 0 0/1 * * * specifies that query and analysis results are checked at an interval of 1 hour from 00:00.
Fixed Interval and 1 Hour
Query Statistics
Click Create. In the Query Statistics dialog box, configure the parameters for a query statement.
- Associated Report: On this tab, you can select a dashboard to monitor data.
- Advanced Settings: On the Advanced Settings tab, you can select Logstore, Metricstore, or Resource Data from the Type drop-down list to specify the type of data that you want to monitor.
- Logstore: Logs are stored. For more information about query and analysis configurations, see Query and analyze logs.
- Metricstore: Metrics are stored. For more information about query and analysis configurations, see Query and analyze metric data.
- Resource Data: The external data that you want to associate with the alert monitoring rule can be specified. For more information, see Create resource data.
If you set the Type parameter to Logstore or Metricstore and specify a query statement, you can specify whether to enable Dedicated SQL. For more information, see Enable Dedicated SQL.- Auto: By default, Dedicated SQL is not enabled. If the number of concurrent queries exceeds the upper limit or the query results are inaccurate, Log Service automatically retries the queries by using Dedicated SQL.
- Enable: Dedicated SQL is enabled for query and analysis.
- Disable: Dedicated SQL is disabled.
Logstore: a Logstore whose name is in the
actiontrail_<Trail name>formatTime Range: 1 Day(Relative)
Query:
event.serviceName:Kms and event.eventName:"ScheduleKeyDeletion" | select COUNT(*) as schedule_countUse the default values for other parameters.
Trigger Condition
Specify the trigger condition and alert severity.
- Trigger condition
- Data is returned: If data is returned in the query and analysis results, an alert is triggered.
- the query result contains: If the query and analysis results contain N data entries, an alert is triggered.
- data matches the expression: If the query and analysis results contain data that matches a specified expression, an alert is triggered.
- the query result contains: If the query and analysis results contain N data entries that match a specified expression, an alert is triggered.
- Severity
This parameter is used to denoise alerts and manage alert notifications. You can add severity-based conditions when you create an alert policy or an action policy. For more information, see Specify severity levels for alerts.
- If you specify one trigger condition, you can specify a severity for the condition. In this case, all alerts that are triggered based on the alert monitoring rule have the same severity.
- If you specify more than one trigger condition, you can specify a severity for each condition. You can click Create to specify additional trigger conditions.
For more information about the syntax of conditional expressions in alert monitoring rules, see Syntax of trigger conditions in alert rules.
Data is returned and Medium
After a custom alert rule is created, the status of the custom alert rule is Enabled.
Step 8: (Optional) Create a whitelist
If you want specific Alibaba Cloud accounts, RAM users, RAM roles, and IP addresses to be exempt from an alert rule, you can add them to a whitelist.
Not all alert rules support whitelist settings. You can check whether an alert rule supports whitelist settings in the ActionTrail console.
Find the alert rule for which you want to create a whitelist and click Whitelist in the External Configuration column.
In the Data Management dialog box, click Add.
In the Add Data dialog box, add the whitelist information by following the on-screen instructions. For example, you can enter a value in the format of 154035569884****.
Click Confirm.
After a whitelist item is added, you can click the buttons in the Actions column to modify or delete the item.