You can store passwords or SSH key pairs of Elastic Compute Service (ECS) instances in ECS secrets of Key Management Service (KMS). In this case, if you integrate Alibaba Cloud SDK, KMS Instance SDK, or a secret SDK into your applications and Alibaba Cloud services, your applications and Alibaba Cloud services can dynamically retrieve the secrets from KMS. You can configure secret rotation to reduce the risks of account password leaks. This topic describes how to manage and use ECS secrets.
ECS secret rotation
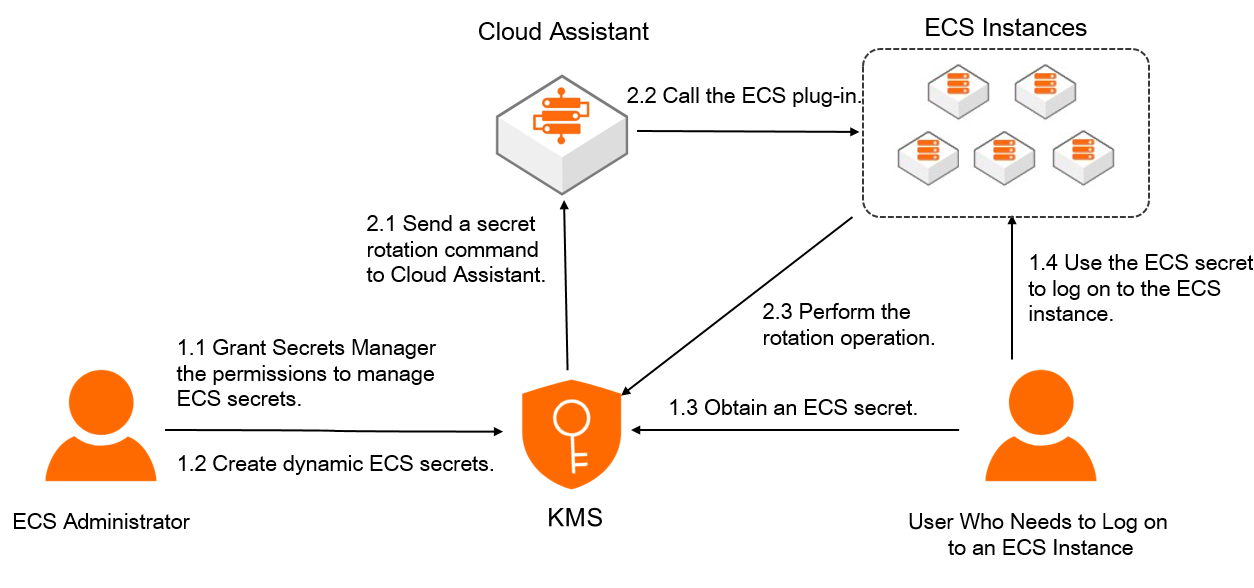
When automatic rotation or immediate rotation is triggered for an ECS secret, KMS sends a secret rotation command to Cloud Assistant. Then, Cloud Assistant calls the secret plug-in installed on the ECS instance for which the ECS secret is created to complete the secret rotation. After the ECS secret is rotated, you can use the new secret to log on to the ECS instance.
After an ECS secret is rotated, the password or SSH key pair of the associated ECS instance in the secret is updated. We recommend that you do not delete the ECS instance that is associated with a secret. If you do so, secret rotation may fail.
Usage notes
To use an ECS secret that is created for an ECS instance, you must grant KMS the permissions to manage passwords and SSH key pairs of the ECS instance. When you need to log on to the ECS instance, you can retrieve the secret from KMS.
If you manage passwords and SSH key pairs of ECS instances in KMS, we recommend that you do not modify or delete the passwords and public-private key pairs in Elastic Compute Service (ECS). If you do so, service failures may occur.
Do not create multiple ECS secrets for a single password or SSH key pair of an ECS instance. If you create multiple ECS secrets for a single password or SSH key pair of an ECS instance and one of the ECS secrets is rotated, the password or SSH key pair stored in the ECS secret changes. In this case, you cannot use the secret values of other ECS secrets to log on to the ECS instance.
Limits
Linux-based ECS instances support the rotation of passwords and SSH key pairs, whereas Windows-based ECS instances support the rotation of only passwords.
Prerequisites
A KMS instance is created and enabled. For more information, see Purchase and enable a KMS instance.
A symmetric key for encrypting secrets is created in a KMS instance. For more information, see Create a key.
An ECS instance is created. For more information, see Create instances.
If you use a Resource Access Management (RAM) user or a RAM role to manage ECS secrets, the AliyunKMSSecretAdminAccess system policy is attached to the RAM user or RAM role. For more information, see Grant permissions to RAM users or Grant permissions to a RAM role.
Step 1: Create an ECS secret
When you create a secret, you can configure automatic rotation for the secret. This helps reduce the risk of secret leaks.
Log on to the KMS console. In the top navigation bar, select a region. In the navigation pane on the left, choose .
Click the ECS Secrets tab, select the instance ID from the Instance ID drop-down list, and then click Create a secret. Then, configure the parameters and click OK.
Parameter
Description
Secret Name
The name of the secret. The secret name is unique within the current region.
Managed Instance
The existing ECS instance that you want to manage within your Alibaba Cloud account.
Managed User
The name of an existing user on the ECS instance, such as the root user for Linux operating systems or the Administrator user for Windows operating systems.
Initial Secret Value
The value cannot exceed 30,720 bytes in length, which is equivalent to 30 KB in size.
Password: the password of the user that is used to log on to the ECS instance.
Key Pair: the SSH key pair of the user that is used to log on to the ECS instance.
NoteEnter a valid secret value. If you enter an invalid secret value, the password or key pair that you retrieve from KMS cannot be used to log on to the ECS instance before the first time the ECS secret is rotated.
CMK
The key that is used to encrypt the current value of the secret.
ImportantYour key and secret must belong to the same KMS instance. The key must be a symmetric key. For more information about the symmetric keys supported by KMS, see Key specifications for symmetric and Asymmetric encryption.
If you are a RAM user or a RAM role, you must have the permissions to call the GenerateDataKey operation by using a key.
Tag
The tag that you want to add to the secret. You can use tags to classify and manage secrets. A tag consists of a key-value pair.
NoteA tag key or a tag value can be up to 128 characters in length and can contain letters, digits, forward slashes (/), backslashes (\), underscores (_), hyphens (-), periods (.), plus signs (+), equal sign (=), colons (:), at signs (@), and spaces.
A tag key cannot start with aliyun or acs:.
You can configure up to 20 key-value pairs for each secret.
Automatic Rotation
Specifies whether to enable automatic secret rotation.
Rotation Period
The interval of automatic secret rotation. This setting is required only when you enable automatic rotation. The value ranges from 1 hour to 365 days.
KMS periodically updates the secret based on the value of this parameter.
Description
The description of the secret.
The policy settings of the secret. For more information, see Overview.
You can use the default policy and then modify the policy based on your business requirements after you create the secret.
NoteWhen you create an ECS secret, the system automatically creates the AliyunServiceRoleForKMSSecretsManagerForECS service-linked role and attaches the AliyunServiceRolePolicyForKMSSecretsManagerForECS policy to the role. KMS assumes this role to manage and rotate ECS secrets.
You can log on to the RAM console to view the details of service-linked roles and policies. For more information, see View the information about a RAM role and View the information about a policy.
Step 2: Integrate an ECS secret into an application
KMS provides Alibaba Cloud SDK, KMS Instance SDKs, and the secret client for you to retrieve secrets. The secret client encapsulates secret caching capabilities, best practices, and design patterns. This simplifies the process for developers to integrate the secret client into applications. We recommend that you use the secret client. For more information, see Secret client. For more information about SDKs, see SDK references.
If you use SDKs to perform management operations, such as creating ECS secrets and modifying ECS tags, you can use only Alibaba Cloud SDK.
More operations
Rotate an ECS secret
You can configure automatic rotation for a secret to reduce the risk of secret leaks. If a secret is leaked, you can immediately rotate the secret in the KMS console to eliminate intrusion risks.
Log on to the KMS console. In the top navigation bar, select a region. In the navigation pane on the left, choose .
Click the ECS Secrets tab, select the instance ID from the Instance ID drop-down list, find the secret that you want to rotate, and then click Details in the Actions column.
Configure a secret rotation policy.
Automatic rotation: In the upper-right corner of the page, click Configure Rotation, enable or disable Automatic Rotation, and then click OK.
Immediate rotation: In the upper-right corner of the page, click Rotate Now. In the Configure Rotation dialog box, turn on or off Use Custom Secrets and then click OK.
If you turn on the switch, you must specify a new secret value.
If you turn off the switch, KMS automatically creates a 32-character random password or a RSA-2048 SSH key pair.
Delete an ECS secret
You can immediately delete a secret or create a scheduled task to delete a secret.
Before you delete a RAM secret, make sure that the RAM secret is no longer in use. If you delete a RAM secret that is in use, service failures may occur.
Log on to the KMS console. In the top navigation bar, select a region. In the navigation pane on the left, choose .
Click the ECS Secrets tab, select the instance ID from the Instance ID drop-down list, find the secret that you want to delete, and then click Schedule Deletion in the Actions column.
In the Schedule Deletion dialog box, select a method to delete the secret and click OK.
If you select Schedule Deletion, configure Retention Period (7 to 30 Days). When the scheduled deletion period ends, KMS deletes the secret.
If you select Delete Immediately, the system immediately deletes the secret.
During the scheduled deletion period, you can click OK in the Actions column to cancel the deletion.
Add tags to secrets
You can use tags to classify and manage secrets. A tag consists of a key-value pair.
A tag key or a tag value can be up to 128 characters in length and can contain letters, digits, forward slashes (/), backslashes (\), underscores (_), hyphens (-), periods (.), plus signs (+), equal sign (=), colons (:), at signs (@), and spaces.
A tag key cannot start with aliyun or acs:.
You can configure up to 20 key-value pairs for each secret.
Add tags for a secret
Solution | Description |
Method 1: Add tags on the Secrets page |
|
Method 2: Add tags on the Secret Details page |
|
Configure tags for multiple secrets at a time
Log on to the KMS console. In the top navigation bar, select a region. In the navigation pane on the left, choose .
Click a tab based on the type of your secret, select the required instance ID from the Instance ID drop-down list, and then select the desired secrets from the secret list.
Add tags: In the lower part of the secret list, click Add Tag. In the Add Tag dialog box, enter multiple Tag Key and Tag Value, and click OK. In the message that appears, click Close.
Remove tags: In the lower part of the secret list, click Remove Tag. In the Batch Remove dialog box, select the tags that you want to remove and click Cancel. In the message that appears, click Close.