This topic describes how to connect a simulated Message Queuing Telemetry Transport (MQTT) gateway device to IoT Platform by using MQTT.fx in Windows. This topic also describes how to submit device data by using topics.
Prerequisites
An IoT Platform Enterprise Edition instance is purchased. In this example, an Exclusive Enterprise Edition instance is purchased in the China (Shanghai) region.
The MQTT.fx tool is downloaded and installed.
In this example, mqttfx-5.2.0-windows-x64 is used. The third-party tool is not regularly updated. We recommend that you download the latest tool from the website in the preceding reference link.
A custom certificate is available.
In this example, the custom certificate contains the root certificate file named
root-ca.crt, the server-side private key file namedserver.key, and the server-side certificate file namedserver.crt.You can use OpenSSL to generate a custom certificate. For more information about how to generate the certificate, see Generate a custom certificate.
Background information
MQTT.fx is an Eclipse Paho-based MQTT client that is written in Java. MQTT.fx supports Windows, macOS, and Linux operating systems. You can use MQTT.fx to check whether a device can connect to IoT Platform. MQTT.fx also allows the device to communicate with IoT Platform by using topics.
The MQTT gateway allows devices to use one-party verification or third-party verification for authentication. Devices can use custom certificates, server-side verification, or messaging by using custom topics to pass the verification. This way, the devices can connect to and communicate with IoT Platform.
For more information about verification and communication between MQTT gateways and devices, see MQTT gateways.
Use MQTT.fx to connect a device (one-party verification)
Step 1: Create a gateway and a device
Create an MQTT gateway: Specify the content of the
server.keyfile in the Private Key of Server Certificate parameter, and specify the content of theserver.crtfile in the Server Certificate parameter.On the Gateway page, find the gateway that you created, copy the value in the Gateway URL column, and save the value.

Add multiple devices: In this example, a device is added. MQTT Username is
device_01and MQTT Password ishello123.
Step 2: Use MQTT.fx to connect a device
Start MQTT.fx, click Extras in the menu bar, and then select Edit Connection Profiles.
On the Edit Connection Profiles page, configure the parameters.
Specify the basic information in the following table. Use the default values for parameters that are not in the table.
Parameter
Description
Profile Name
Enter a custom name.
Profile Type
Specify a connection mode. Select MQTT Broker.
Broker Address
Enter an MQTT endpoint, which is the value of the Gateway URL parameter that you obtained when you created the gateway.
Broker Port
Enter a port number. The default value is
1883.Client ID
Optional. The ID of the device. The ID must be 1 to 64 characters in length. We recommend that you use the MAC address or serial number (SN) of the device as the ID.
Click User Credentials. On the tab that appears, select Use Username/Password and enter a username and a password.
In this example, the User Name parameter is set to the MQTT Username of the device, and the Password parameter is set to the MQTT Password of the device.
Click TLS/SSL, select Enable SSL/TLS, and then set the Protocol parameter to TLSv1.2.
Select CA certificate file, and then select the path of the
root-ca.crtfile.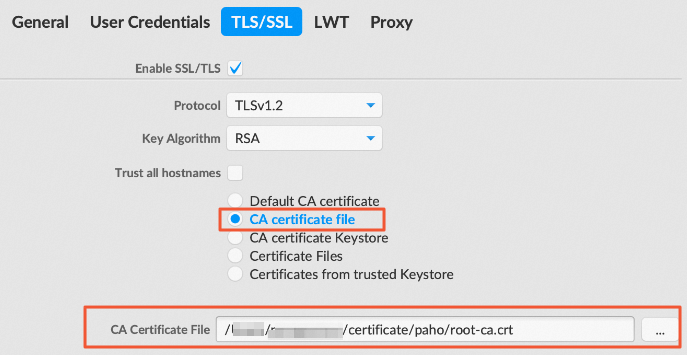
Click OK in the lower-right corner.
Click Connect.
If the indicator on the right side turns green, the connection is established. In the IoT Platform console, click the instance that you want to manage to go to the Instance Details page. Choose Devices > Devices. On the Device List tab, the status of
device_01is Online.
Use MQTT.fx to connect a device (third-party verification)
Step 1: Create a function in Function Compute to verify the device
In the top navigation bar, select a region. On the Services page, click Create Service.
In the Create Service panel, enter a service name. Example: IoT_Service. Then, click OK.
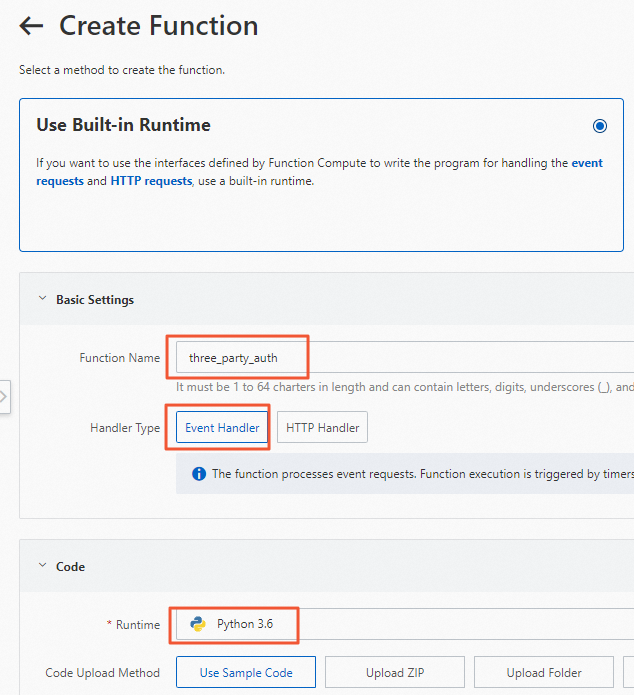
On the Functions page, click Create Function.
On the Create Function page, configure the parameters and click Create, as shown in the following figure.
On the Function Details page, replace the existing sample code with the following code and then click Deploy.
The verification function returns the value of the MQTT UserName parameter as the value of the deviceName parameter.
# -*- coding: utf-8 -*-
import logging
import json
import time
import enum
import random
import string

class Request:
    def __init__(self, json_str):
        self.clientId = None
        self.username = None
        self.password = None
        self.certificateCommonName = None

        for key, value in json.loads(json_str).items():
            setattr(self, key, value)

class Response:
    def __init__(self):
        self.deviceName = None
        self.result = 'true'
        self.message = 'success'

    def handler(self, request):
        # Verify the validity of the MQTT UserName and MQTT Password parameters based on your business requirements.

        self.deviceName = request.username


        return json.dumps(self.__dict__)

def handler(event, context):
    request = Request(event)
    return Response().handler(request)
Step 2: Create a gateway
Create an MQTT gateway: Specify the content of the
server.keyfile in the Private Key of Server Certificate parameter, and specify the content of theserver.crtfile in the Server Certificate parameter. Select IoT_Service for the Device-verified FC Service parameter, and select three_part_auth for the Device-verified FC Function parameter.On the Gateway page, find the gateway that you created, copy the URL in the Gateway URL column, and save the URL.

Step 3: Use MQTT.fx to connect a device
Start MQTT.fx, click Extras in the menu bar, and then select Edit Connection Profiles.
On the Edit Connection Profiles page, configure the parameters. The following table describes the parameters.
Specify the basic information in the following table. Use the default values for parameters that are not in the table.
Parameter
Description
Profile Name
Enter a custom name.
Profile Type
Specify a connection mode. Select MQTT Broker.
Broker Address
Enter an MQTT endpoint, which is the value of the Gateway URL parameter that you obtained when you created the gateway.
Broker Port
Enter a port number. The default value is
1883.Client ID
Optional. The ID of the device. The ID must be 1 to 64 characters in length. We recommend that you use the MAC address or SN of the device as the ID.
Click User Credentials. On the tab that appears, select Use Username/Password and configure the User Name and Password parameters. In this example, the User Name parameter is set to
threeParty_device_001.NoteThe value of the User Name parameter must be 4 to 32 characters in length, and can contain letters, digits, hyphens (-), underscores (_), at signs (@), periods (.), and colons (:). The value of the User Name parameter must be unique among all devices of a product.
The value of the Password parameter must be 1 to 32 characters in length, and can contain letters, digits, hyphens (-), underscores (_), at signs (@), periods (.), and colons (:).
Click TLS/SSL, select Enable SSL/TLS, and then set the Protocol parameter to TLSv1.2.
Select CA certificate file, and then select the path of the
root-ca.crtfile.
Click OK in the lower-right corner.
Click Connect.
If the indicator on the right side turns green, the connection is established. The verification function in Function Compute returns
threeParty_device_001as the value of the deviceName parameter.threeParty_device_001is used as the DeviceName of the device that is automatically created in the IoT Platform console. You can choose Devices > Devices to view the device status. In this example, the device status is Online.
Use custom topics to submit device data
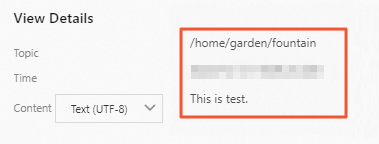
In the text editor, enter the message that you want to publish and click Publish.
Log on to the IoT Platform console. Find the instance that you want to manage, go to the Instance Details page, and choose Maintenance > Device Log. On the Device Log page, view the logs whose type is Device-to-Cloud Messages. For more information, see Query IoT Platform logs.