When you connect a device to IoT Platform by using a Message Queuing Telemetry Transport (MQTT) gateway, you can use a custom certificate to verify the device identity. Then, you can register the device by using the common name (CN) of the certificate. This topic describes how to connect a device to IoT Platform by using an MQTT gateway. In this topic, Alibaba Cloud Function Compute is used as an example to verify the device identity.
Usage notes
In this topic, the permissions of a common user are used to perform all operations. If you want to perform specific operations that require administrator permissions, run the sudo command.
Prerequisites
An Exclusive Enterprise Edition instance is purchased. In this example, an Exclusive Enterprise Edition instance is purchased in the China (Shanghai) region. For more information, see Purchase an Enterprise Edition instance.
Background information
MQTT gateways of IoT Platform allows you to use third-party verification of Function Compute, custom certificates, OCSP, and custom topics to verify and connect devices to IoT Platform and enable communication. This helps you implement multiple IoT business scenarios.
For more information about verification and communication between MQTT gateways and devices, see MQTT gateways.
Make preparations
In this example, Ubuntu 22.04 is used as a development environment.
Step 1: Generate a custom certificate
Log on to Ubuntu.
Run the following command to generate a root certificate file named
root-ca.crtfor the device and the server:openssl req \ -new \ -newkey rsa:2048 \ -days 365 \ -nodes \ -x509 \ -subj "/C=CN/O=Aliyun IOT/CN=IoT CA" \ -keyout root-ca.key \ -out root-ca.crtCreate a custom server-side certificate based on the
root-ca.crtroot certificate file.Run the following command to generate a server-side key file named
server.key:openssl genrsa -out server.key 2048Run the
touch openssl.cnfcommand to create a file namedopenssl.cnf.Run the
vi openssl.cnfcommand to open the openssl.cnf file, copy the following code to the file, press the Esc key, enter:wq, and then press the Enter key to save the file.[policy_match] countryName = cn stateOrProvinceName = optional organizationName = optional organizationalUnitName = optional commonName = supplied emailAddress = optional [req] default_bits = 2048 distinguished_name = req_distinguished_name req_extensions = req_ext x509_extensions = v3_req prompt = no [req_distinguished_name] commonName = Server [req_ext] subjectAltName = @alt_names [v3_req] subjectAltName = @alt_names [alt_names] DNS.1 = *.mqtt.iothub.aliyuncs.com DNS.2 = *.igw.iothub.aliyuncs.comRun the following command to generate a server-side request file named
server.csr:openssl req -new -key server.key -config openssl.cnf -out server.csrRun the following command to generate a server-side certificate file named
server.crt:openssl x509 -req -days 365 -sha256 -in server.csr -CA root-ca.crt -CAkey root-ca.key -CAcreateserial -out server.crt -extensions v3_req -extfile openssl.cnfRun the following command to verify the server-side certificate:
openssl verify -CAfile root-ca.crt server.crt
Create a device-side certificate based on the
root-ca.crtroot certificate file.Run the following command to generate a device-side key file named
client.key:openssl genrsa -out client.key 2048Run the following command to generate a device-side request file named
client.csrand set the CN parameter toClient_123:openssl req -new -key client.key -out client.csr -subj "/CN=Client_123"Run the following command to generate a device-side certificate file named
client.crt:openssl x509 -req -days 365 -sha256 -in client.csr -CA root-ca.crt -CAkey root-ca.key -CAcreateserial -out client.crtRun the following command to verify the device-side certificate:
openssl verify -CAfile root-ca.crt client.crt
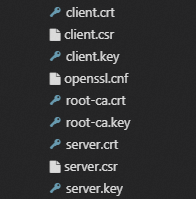
The following figure shows the custom certificate files that are generated.
Step 2: Create a Function Compute function to verify the device
In the top navigation bar, select a region. On the Services page, click Create Service.
In the Create Service panel, enter a service name. Example: IoT_Service. Then, click OK.
On the Functions page, click Create Function.
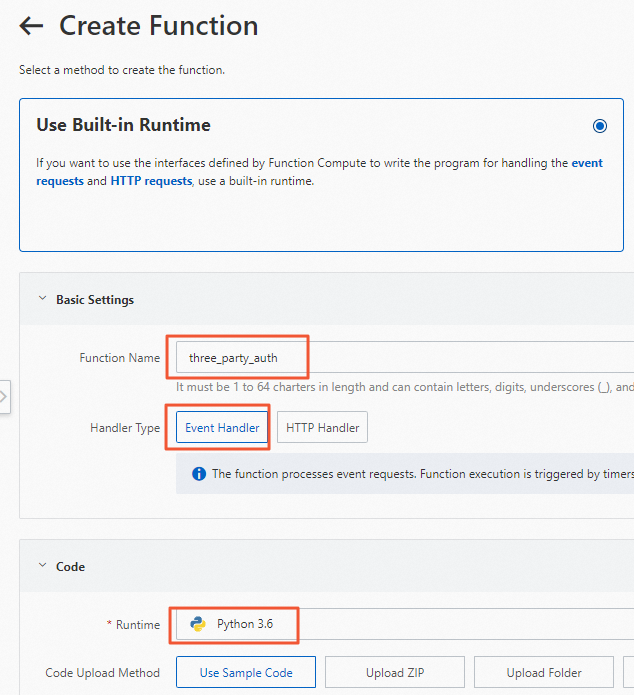
On the Create Function page, configure the parameters and click Create, as shown in the following figure.
On the Function Details page, replace the existing sample code with the following code and click Deploy.
The verification function returns the CN of the device-side certificate as the value of the deviceName parameter.
# -*- coding: utf-8 -*-
import logging
import json
import time
import enum
import random
import string

class Request:
    def __init__(self, json_str):
        self.clientId = None
        self.username = None
        self.password = None
        self.certificateCommonName = None

        for key, value in json.loads(json_str).items():
            setattr(self, key, value)

class Response:
    def __init__(self):
        self.deviceName = None
        self.result = 'true'
        self.message = 'success'

    def handler(self, request):
        # Return the CN of the device-side certificate as the value of the deviceName parameter.
        self.deviceName = request.certificateCommonName

        return json.dumps(self.__dict__)

def handler(event, context):
    request = Request(event)
    return Response().handler(request)
Step 3: Create a gateway
On the Overview page, click the card of the Exclusive Enterprise Edition instance.
In the left-side navigation pane, choose Devices > Gateway. On the Gateway page, click Add Gateway.
In the Add Gateway dialog box, configure the following parameters and click OK.
Set the Server Certificate parameter to the content of the
server.crtfile, the Private Key of Server Certificate parameter to the content of theserver.keyfile, and the Device Root Certificate parameter to the content of theroot-ca.crtfile. For more information about the parameters, see Create a gateway.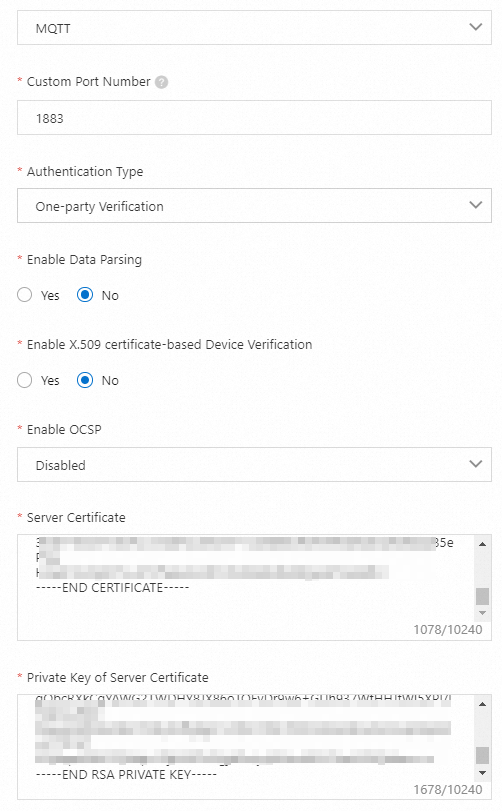
On the Gateway page, copy the URL in the Gateway URL column of the gateway.

Step 4: Develop a device-side program
Go to Ubuntu.
Run the following commands to install dependencies:
sudo apt-get install build-essential gcc make cmake cmake-gui cmake-curses-gui
sudo apt-get install libssl-dev
Run the following commands to install an open source Paho MQTT library:
git clone https://github.com/eclipse/paho.mqtt.c.git
mkdir build && cd build
cmake ../paho.mqtt.c -DPAHO_WITH_SSL=TRUE -DCMAKE_INSTALL_PREFIX="/usr/lib"
make -j
sudo make install && cd ..
Run the
touch aiot_mqtt_demo.ccommand to create a device simulator file namedaiot_mqtt_demo.c.Run the
vi aiot_mqtt_demo.ccommand to open the file. Copy the following code to the file:#include <stdio.h> #include <stdlib.h> #include <string.h> #include <unistd.h> #include "MQTTClient.h" int msgarrvd(void *context, char *topicName, int topicLen, MQTTClient_message *message) { printf("message recv < topic [%s], payload [%s]\n", topicName, (char *)message->payload); MQTTClient_freeMessage(&message); MQTTClient_free(topicName); return 1; } int main(int argc, char* argv[]) { MQTTClient client; MQTTClient_connectOptions conn_opts = MQTTClient_connectOptions_initializer; MQTTClient_SSLOptions ssl_opts = MQTTClient_SSLOptions_initializer; int rc; /* Create an MQTT client. Replace the information with actual information. */ const char *host = "ssl://iot-0****.igw.iothub.aliyuncs.com:1883"; const char *client_id = "12345"; MQTTClient_create(&client, host, client_id, MQTTCLIENT_PERSISTENCE_NONE, NULL); MQTTClient_setCallbacks(client, NULL, NULL, msgarrvd, NULL); /* Configure connection parameters, such as the certificate, username, and password. Replace the information with actual information. */ ssl_opts.trustStore = "root-ca.crt"; ssl_opts.privateKey = "client.key"; ssl_opts.keyStore = "client.crt"; conn_opts.ssl = &ssl_opts; conn_opts.username = "sdk_test01"; conn_opts.password = "hello123"; /* An MQTT connection is established. */ if ((rc = MQTTClient_connect(client, &conn_opts)) != MQTTCLIENT_SUCCESS) { printf("Failed to connect, return code %d\n", rc); exit(EXIT_FAILURE); } printf("connect success username %s, password %s\n", conn_opts.username, conn_opts.password); /* Subscribe to messages. */ MQTTClient_subscribe(client, "/user/aiot_mqtt_demo_downraw", 1); /* Generate a message and send the message on a regular basis. */ MQTTClient_message pubmsg = MQTTClient_message_initializer; const char *topic = "/user/aiot_mqtt_demo_upraw"; pubmsg.payload = "Hello Service!"; pubmsg.payloadlen = (int)strlen(pubmsg.payload); pubmsg.qos = 1; for(int i = 0; i < 100; i++) { MQTTClient_publishMessage(client, topic, &pubmsg, NULL); printf("message send > topic [%s], payload [%s]\n", topic, (char *)pubmsg.payload); sleep(10); } /* Close the connection and delete the MQTT client. */ MQTTClient_disconnect(client, 10000); MQTTClient_destroy(&client); return rc; }Replace the information in the preceding code with actual information, press the Ecs key, enter
:wq, and then press the Enter key to save theaiot_mqtt_demo.cfile.Parameter
Description
host
The endpoint of the MQTT gateway to which you want to connect the device. Format:
ssl://${Gateway endpoint}:${Port number}.Use the endpoint and port that are obtained from Step 3.client_id
Optional. The ID of the client. The client ID must be 1 to 64 characters in length. We recommend that you use the MAC address or serial number (SN) of the device as a client ID.
ssl_opts.trustStore
The path where the
root-ca.crtdevice-side root certificate file is stored.ssl_opts.privateKey
The path where the
client.keydevice-side file is stored.ssl_opts.keyStore
The path where the
client.crtdevice-side certificate file is stored.conn_opts.username
The username that is used to establish an MQTT connection.
The username must be 4 to 32 characters in length, and can contain letters, digits, hyphens (-), underscores (_), at signs (@), periods (.), and colons (:). The username must be unique in the product.
conn_opts.password
The password that is used to establish the MQTT connection.
The password must be 1 to 32 characters in length, and can contain letters, digits, hyphens (-), underscores (_), at signs (@), periods (.), and colons (:).
The following figure shows the libraries, certificate files, and code files that are generated and used in this example.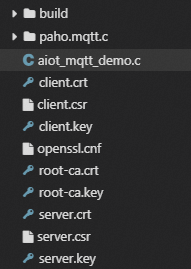
Step 5: Compile and run the program
Run the following commands to run the
aiot_mqtt_demo.ccode file:gcc -o aiot_mqtt_demo aiot_mqtt_demo.c -lpaho-mqtt3cs ./aiot_mqtt_demoAfter you run the code file, the value Client_123 of the deviceName parameter that is returned by the Function Compute function is used as the DeviceName of the IoT Platform device. Go to the Instance Details page of the instance that you want to manage in the IoT Platform console. In the left-side navigation pane, choose Devices > Devices, a device named
Client_123is automatically created and the device is in the Online state, as shown in the following figure.
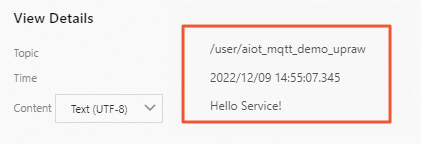
Optional. Go to the Instance Details page of the instance that you want to manage in the IoT Platform console. In the left-side navigation pane, choose Maintenance > Device Log. On the Device Log page, view the data that is submitted by the device.