This topic shows how to connect a JT/T 808 protocol device to IoT Platform using one-way authentication for a cloud gateway.
Prerequisites
A Premium Edition Enterprise instance has been purchased. This example uses a Premium Edition instance in the China (Shanghai) region. For more information, see Purchase an Enterprise instance.
Background information
The JT/T 808 protocol cloud gateway feature of IoT Platform lets you connect devices using TCP (not recommended due to low security) or TLS. When you use TLS, you can use features such as server-side one-way authentication, device-side OCSP, and secure bidirectional access for devices and servers. This topic shows how to connect JT/T 808 protocol devices using one-way authentication over TLS (recommended) and TCP (not recommended).
Preparations
The device-side development example in this topic uses the following development environment: Ubuntu 22.04 operating system.
Connection example (TLS, recommended)
Custom certificates
This example requires custom certificates, including a root certificate (root-ca.crt), a server-side certificate private key (server.key), and a server-side certificate (server.crt).
You can use OpenSSL to generate custom certificates. For more information, see Generate a custom certificate.
Create a cloud gateway product
Log on to the IoT Platform console.
In the upper-left corner of the console, select the region where your IoT Platform instance is located.
On the Instance Overview page, click the target Premium Edition instance.
In the navigation pane on the left, choose Device Management > Cloud Gateway and click Add Cloud Gateway.
In the dialog box that appears, configure the parameters. Set Server Certificate Private Key to
server.keyand Server Certificate toserver.crt. Then, click OK.For more information about the parameters, see Create a cloud gateway product (JT/T 808).
Gateway Name: Enter
JT808接入示例TLS.Protocol: Select JT/T 808.
Custom Port Number: Enter
7999.Authentication Type: Select One-Way Authentication.
Transport Protocol: Select TLS.
Enable Device X.509 Certificate Authentication: Select No.
Enable OCSP: Select Disabled.
After the cloud gateway is created, find it in the cloud gateway list, copy its Gateway URL, and save the URL.
The gateway URL format is
iot-xxx.igw.iothub.aliyuncs.com, and the port number is7999.
Add a cloud gateway device
In the navigation pane on the left, choose Device Management > Products. Find the cloud gateway product that you created and click Manage Devices in the Actions column.
On the Devices page, click Add Devices in Batches.
In the Add Devices in Batches dialog box, click Download .csv Template to download the template file.
In the dialog box, set Product to the cloud gateway. In the Batch Upload File section, click Upload File to upload the CSV template you filled in.
In the template, enter the Manufacturer ID, Terminal Model, and Terminal ID as shown in the following figure. Then, save the file.
For information about how to fill in the parameters, see Create a cloud gateway device (JT/T 808).
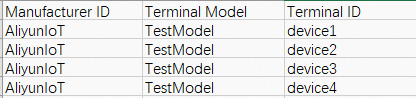
Return to the Add Devices in Batches dialog box, click Upload File to upload the file to the IoT Platform console, and then click OK.
After the device identities are imported, IoT Platform concatenates the uploaded Manufacturer ID, Terminal Model, and Terminal ID values into the format
${Manufacturer ID}_${Terminal Model}_${Terminal ID}and uses the result as the device name to create the device. The created device appears in the device list.After the devices are created, the status of all devices is Inactive.
Develop the device-side program
After you create the device, develop a device-side program to connect the device to IoT Platform. IoT Platform provides a C language software development kit (SDK) for the JT/T 808 protocol. This example uses the C SDK to develop a program that connects the AliyunIoT_TestModel_device1 device to IoT Platform.
Download the C language SDK for the JT/T 808 protocol and decompress the file to obtain the
jt808-c-sdkfolder.In the
jt808-c-sdk/jt808_tls_demo.cfile, modify the device connection and authentication information.NoteThe
jt808_tls_demo.cprogram file is used to develop device connections over TLS....... /* TODO: Replace the placeholders with the actual device information, including province, city, manufacturer, model, terminal ID, color, and license plate number. */ static jt808_register_t info = { .province = 0x1234, .city = 0x4567, .manufacturer = "AliyunIoT", .model = "TestModel", .terminal = "device1", .colour = 1, .lisence = "ZheC*****", }; /* TODO: The bound mobile phone number */ static char *mobile_num = "1*********8"; /* TODO: Replace the placeholders with the domain name and port of the cloud gateway endpoint. */ static char *host = "iot-0******.igw.iothub.aliyuncs.com"; static uint16_t port = 7999; /* The custom root certificate of the endpoint */ const char *jt808_ca_cert = \ { \ "-----BEGIN CERTIFICATE-----\r\n" "MIIDR*************************************************ZIhvcNAQEL\r\n" "BQAwM*************************************************ANBgNVBAMM\r\n" "BklvV*************************************************MxCzAJBgNV\r\n" "BAYTA*************************************************QgQ0EwggEi\r\n" "MA0GC*************************************************S8fWxBF+lw\r\n" "8GKH7*************************************************3Xco/COMjP\r\n" "Q69QH*************************************************wuYc0WMjlS\r\n" "cNO7G*************************************************BABPEIJeLR\r\n" "c6rJ7*************************************************F8nDOm0kUd\r\n" "kvAdK*************************************************t6BEh9AgMB\r\n" "AAGjU*************************************************NVHSMEGDAW\r\n" "gBT4S*************************************************0GCSqGSIb3\r\n" "DQEBC*************************************************+I42UNjbJa\r\n" "ZP9bn*************************************************G+S/Tv6BEn\r\n" "2v1/V*************************************************zNWlwapdvp\r\n" "DRMmf*************************************************Vh/FVBa7gn\r\n" "9DWlU*************************************************AGz0HkVQq6\r\n" "Ks4UI***************************Vzd+\r\n" "-----END CERTIFICATE-----\r\n" }; ......Parameter
Description
province
The province and city where the device is located. The values must comply with the JT/T 808-2019 protocol.
city
manufacturer
The Manufacturer ID, Terminal Model, and Terminal ID of the cloud gateway device that you added in the IoT Platform console.
model
terminal
colour
The color of the license plate, the license plate number, and the mobile phone number of the device owner. The values for the license plate color and number must comply with the JT/T 808-2019 protocol.
lisence
mobile_num
host
The endpoint of the JT/T 808 protocol cloud gateway. This is the domain name part of the Gateway URL for the cloud gateway product that you created.
port
The custom port number. The default value is
7999.jt808_ca_cert
The content of the root certificate
root-ca.crt.Log on to the Ubuntu operating system and upload the modified
jt808-c-sdkfolder.The directory structure of the jt808-c-sdk project is as follows.
jt808-c-sdk
├── core
├── demos
├── external
├── jt808
├── output
├── portfiles
├── LICENSE
└── Makefile
In the root directory
/jt808-c-sdk, run themakecommand to compile the sample program.make clean makeThe generated sample program
jt808-tls-demois stored in the./outputdirectory.Run the sample program.
./output/jt808-tls-demoUpon successful execution, the terminal outputs logs similar to the following example. Key milestones include: first TLS connection established, JT808 registration succeeded (token obtained), second TLS connection established, JT808 authentication succeeded, and subsequent heartbeat responses.
establish tcp connection with server(host='iot-xxx, xxx igw.iothub.aliyuncs.com', port=[7999])
success to establish tcp, fd=5
local port: 52448
[1678871231.212][LK-1000] establish mbedtls connection with server(host='iot-xxx xxx igw.iothub.aliyuncs.com', port=[7999])
[1678871231.641][LK-1000] success to establish mbedtls connection, (cost 39791 bytes in total, max used 42651 bytes)

[LK-1100] < 7E xxx                          78 |  xxx               x
[LK-1100] < 00 xxx                          56 |  xxx               V
[LK-1100] < 30 xxx                          52 |  xxx               R
[LK-1100] < 70 xxx                          41 |  xxx               A
[LK-1100] < 31 xxx                          51 |  xxx               Q
[LK-1100] < 31 xxx                          4E |  xxx               N
[LK-1100] < 6A xxx                             | jMzY=.~

[1678871231.687][LK-0000] aiot_jt808_register success
Return to the IoT Platform console for your instance. In the navigation pane on the left, choose Device Management > Devices. Find the target device and check its status. If the device status is Online, the device is connected to IoT Platform.
In the navigation pane on the left, choose Monitoring & O&M > Simple Log Service. Select the target product and view the Device to Cloud Messages.
In the Cloud Operations Log tab, filter by DeviceName
AliyunIoT_TestModel_device1. You can see multiple log entries with the business type Device to Cloud Messages and status code 200, indicating that messages were successfully published to topic$JT808/AliyunIoT/TestModel/device1/up(QoS=0).
Connection example (TCP, not recommended)
Create a cloud gateway product and device
Create a cloud gateway product (JT/T 808). In the Add Cloud Gateway dialog box, configure the parameters and click OK.
Gateway Name: Enter
JT808接入示例.Protocol: Select JT/T 808.
Custom Port Number: Enter
7999.Authentication Type: Select One-Way Authentication.
Transport Protocol: Select TCP.
After the cloud gateway is created, find it in the cloud gateway list, copy its Gateway URL, and save the URL.
The gateway URL format is
iot-xxx.igw.iothub.aliyuncs.com, and the port number is7999.Create a cloud gateway device (JT/T 808). Add the device as shown in the following figure.
Develop the device-side program
IoT Platform provides a C language SDK for the JT/T 808 protocol. This example uses the C SDK to develop a program that connects the AliyunIoT_TestModel_device1 device to IoT Platform.
Download the C language SDK for the JT/T 808 protocol and decompress the file to obtain the
jt808-c-sdkfolder.In the
jt808-c-sdk/jt808_basic_demo.cfile, modify the device connection and authentication information.NoteThe
jt808_basic_demo.cprogram file is used to develop device connections over TCP....... /* TODO: Replace the placeholders with the actual device information, including province, city, manufacturer, model, terminal ID, color, and license plate number. */ static jt808_register_t info = { .province = 0x1234, .city = 0x4567, .manufacturer = "AliyunIoT", .model = "TestModel", .terminal = "device1", .colour = 1, .lisence = "ZheA*****", }; /* TODO: The bound mobile phone number */ static char *mobile_num = "1**********"; /* TODO: Replace the placeholders with the domain name and port of the cloud gateway endpoint. */ static char *host = "iot-0******v-0****0.igw.iothub.aliyuncs.com"; static uint16_t port = 7999; ......Log on to the Ubuntu operating system and upload the modified
jt808-c-sdkfolder.In the root directory
/jt808-c-sdk, run themakecommand to compile the sample program.make clean makeThe generated sample program
jt808-basic-demois stored in the./outputdirectory.Run the sample program.
./output/jt808-basic-demoUpon successful execution, the device goes online and reports data. The terminal outputs logs similar to the following example.
root@xxx cZ:/opt/jt808-c-sdk# ./output/jt808-basic-demo
establish tcp connection with server(host='iot-xxx.igw.iothub.aliyuncs.com', port=[7999])
success to establish tcp, fd=3
local port: 51018

[LK-1100] < 7xxx                    '8 | ~.            /x
[LK-1100] < 0 xxx                   '8 | ..            ix
[LK-1100] < 4xxx                    '6 | Kl            >F
[LK-1100] < 7xxx                    \A | p)xxx         :J
[LK-1100] < 6 xxx                   '6 | lNxxx         >F
[LK-1100] < 6 xxx                   '9 | izxxx         NY
[LK-1100] < 3                          | 0YTU=#~

[1678694981.477][LK-0000] aiot_jt808_register success, token:dGFxxx
auth_key: dGlxxx                                          TU=
[1678694981.477][LK-1000] adapter_network_deinit
establish tcp connection with server(host='iot-0xxx70.igw.iothub.aliyuncs.com', port=[7999])
success to establish tcp, fd=3
local port: 51024

[LK-1100] < 7xxx                           xxx
[LK-1100] < 0xxx                           xxx

[1678694981.622][LK-0000] aiot_jt808_auth success

[LK-1100] < 7lxxx                          xxx
[LK-1100] < 0xxx                           xxx

[COMMON_ACK], xxx

[LK-1100] < 7lxxx                          xxx
[LK-1100] < 0xxx                           xxx

[COMMON_ACK], xxx
You can return to the IoT Platform console for your instance to view the device status and communication logs.