MQTT.fx is a Java-based MQTT client built on Eclipse Paho that supports Windows, Mac, and Linux. Use MQTT.fx to verify device connectivity with IoT Platform, subscribe to topics, and publish messages. This topic uses MQTT.fx on Windows to simulate an MQTT device connection to IoT Platform.
Prerequisites
- Create a product and a device, and obtain the MQTT connection parameters. Create a product and a device, Obtain the values of MQTT signing parameters.
This example uses the device certificate and MQTT connection parameters in the following table, as described in MQTT-TLS connection.
Parameter Value ProductKey a1***DeviceName device1DeviceSecret f35***d9eclientId a1***.device1|securemode=2,signmethod=hmacsha256,timestamp=2524608000000|username device1&a1***passwd 86761***21dmqttHostUrl a1***.iot-as-mqtt.cn-shanghai.aliyuncs.comport 1883 - Define a TSL model property for testing uplink and downlink communication. Define a TSL model for a product.This example defines the TSL model shown in the following figure:

Configure the MQTT.fx connection
- Download and install MQTT.fx.
This topic uses mqttfx-5.2.0-windows-x64 as an example. The actual UI may differ from the screenshots.Note Request a license for the MQTT.fx tool as required.
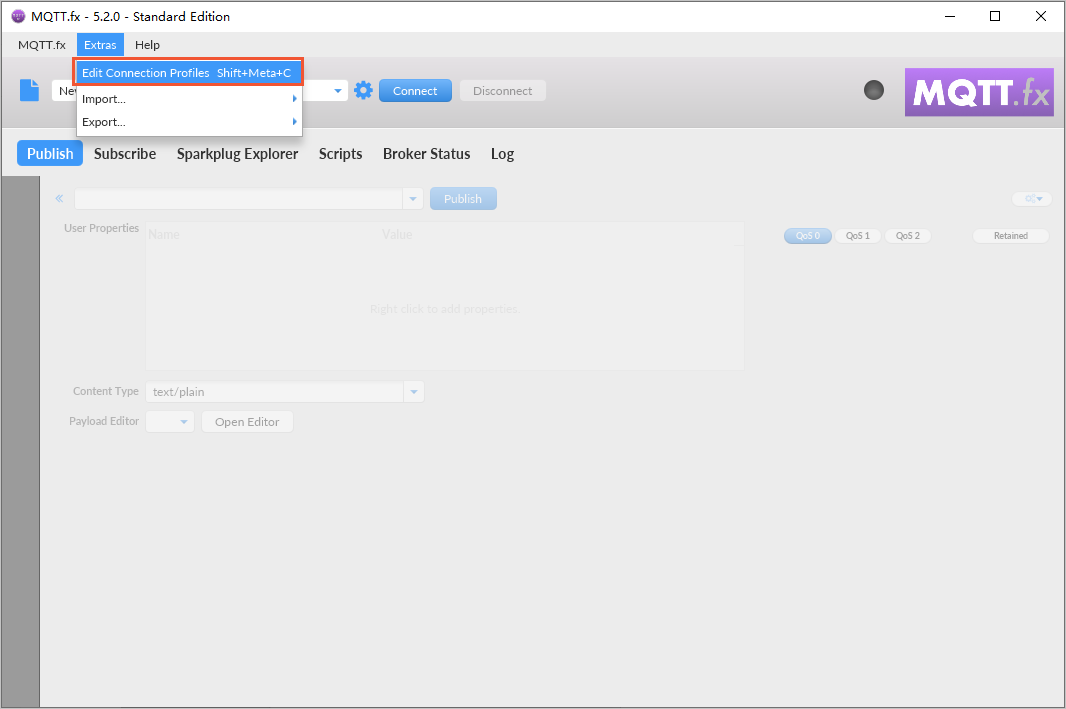
- Open MQTT.fx. In the menu bar, click Extras and select Edit Connection Profiles.
- On the Edit Connection Profiles page, configure the following parameters.
- Configure the basic information.
Parameter Description Profile Name Enter a custom name, such as iot connection. Profile Type For the ApsaraMQ for MQTT client connection, select MQTT Broker. Broker Address MQTT connection domain. Use the value from the Prerequisites section: a1***.iot-as-mqtt.cn-shanghai.aliyuncs.com. - a1*** is the ProductKey of the product in this example.
- cn-shanghai is the region in this example.
Do not include the port number.
Broker Port Set this to 1883. Client ID A protocol field of MQTT. Fixed format:
${ClientId}|securemode=${Mode},signmethod=${SignMethod}|timestamp=${timestamp}|.Enter the clientId value that you obtained in the Prerequisites section: a1***.device1|securemode=2,signmethod=hmacsha256,timestamp=2524608000000|.
Parameter description:
- ${ClientId}: The client ID of the device, app, or web client.Important This value must be custom and within 64 characters in length. For a device, use its MAC address or serial number (SN). This helps you identify different devices.
- ${Mode}: The security mode. Valid values are 2 (TLS direct connection mode, which requires you to configure SSL/TLS settings) and 3 (TCP direct connection mode, which does not require you to configure SSL/TLS settings).
- ${SignMethod}: The algorithm type. Supported values are hmacsha256, hmacmd5, and hmacsha1.
- ${timestamp}: The current time in milliseconds. You can leave timestamp empty.
In the connection parameters that are provided by IoT Platform, ${ClientId} defaults to a string that consists of
${ProductKey} + '.' + ${DeviceName}, ${Mode} defaults to 2, and ${SignMethod} defaults to hmacsha256. You can modify them as needed.Important- Do not confuse the Client ID in MQTT.fx with the ${ClientId} of the device.
- Do not omit the vertical bars (|) between parameters or at the end of the string.
- When you set the parameters, make sure that no spaces exist in or around the parameter values.
- After you enter the Client ID, do not click Generate.
General Uses the default value. Adjust based on your requirements. - Click User Credentials, select the Use Username/Password check box, and set User Name and Password.
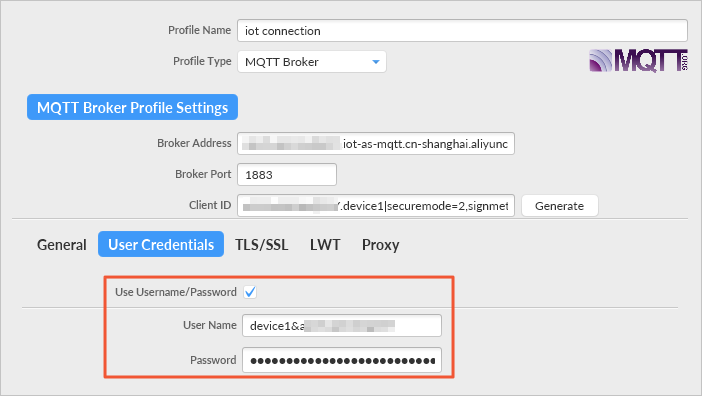
Parameter Description User Name Format: ${DeviceName}&${ProductKey}.Enter the username value that you obtained in the Prerequisites section: device1&a1***.
device1is the DeviceName of the device.a1***is the ProductKey of the device.
Password Generated by encrypting concatenated parameters using the DeviceSecret and the selected signing method. Enter the passwd value that you obtained in the Prerequisites section: 86761***21d.
Important- In some MQTT.fx versions, the password string is not displayed after you paste it. If the cursor moves to the end of the text box, the paste was successful. Do not paste the password again.
- The parameters and their values are case-sensitive.
- Client IDIf you modify the ${ClientId} or ${SignMethod}Client ID settings in the Client ID, you must recalculate the password. Ensure that the new password uses values that match the updated parameters. For information about parameter settings and calculation methods, see Calculate a password using a Node.js script.
- For TLS direct connection mode (securemode=2), click SSL/TLS, select the Enable SSL/TLS check box, and set Protocol to TLSv1.2.
Important For TCP direct connection mode (
securemode=3), you do not need to configure SSL/TLS settings. Proceed to the next step.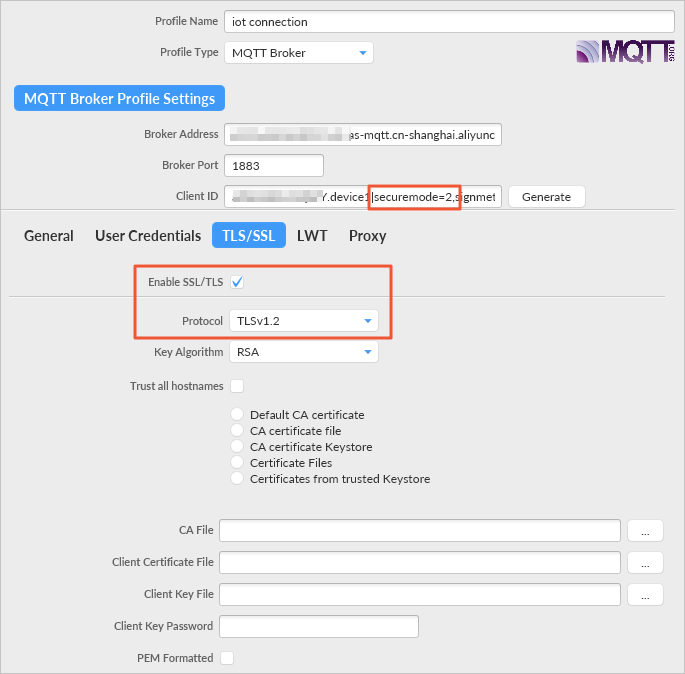
- Configure the basic information.
- After you finish the configuration, click OK in the lower-right corner.
- Click Connect.
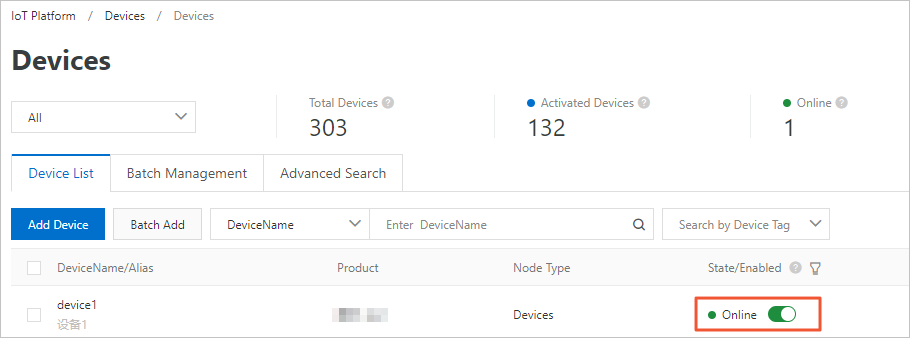
A green light on the right indicates a successful connection.

In the IoT Platform console, under the corresponding instance, choose . Select the product to view the status of the device. The device status should be Online.
The following sections describe how to test uplink and downlink communication using custom topics and TSL model topics. If your results differ from this example, the connection has failed. Correct the configuration based on the log information.
Communicate using custom topics
| Topic | Permission | Description |
/a1***/device1/user/update/error |
Publish | Uplink: The device publishes messages to IoT Platform. |
/a1***/device1/user/get |
Subscribe | Downlink: The device subscribes to receive messages from IoT Platform. |
Uplink communication
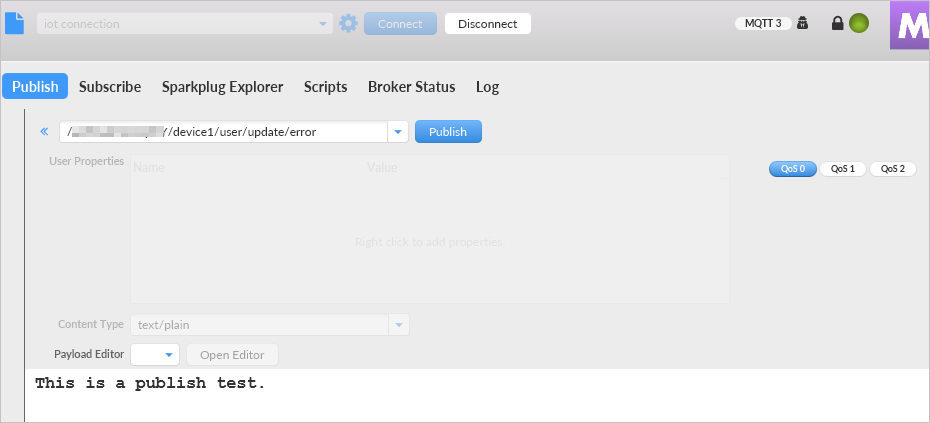
- In MQTT.fx, click Publish. In the Publish text box, enter a topic that has Publish permissions:
/a1***/device1/user/update/error. - In the text editor pane, enter the message content, and then click Publish.
- Log on to the IoT Platform console. On the Simple Log Service page of the instance, view the Device-to-Cloud Messages logs. Query IoT Platform logs.
Downlink communication
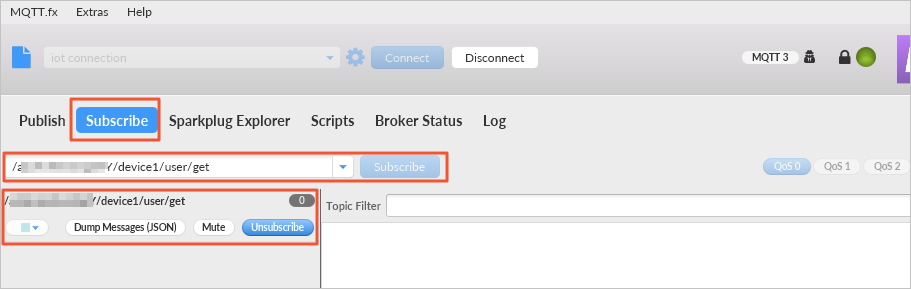
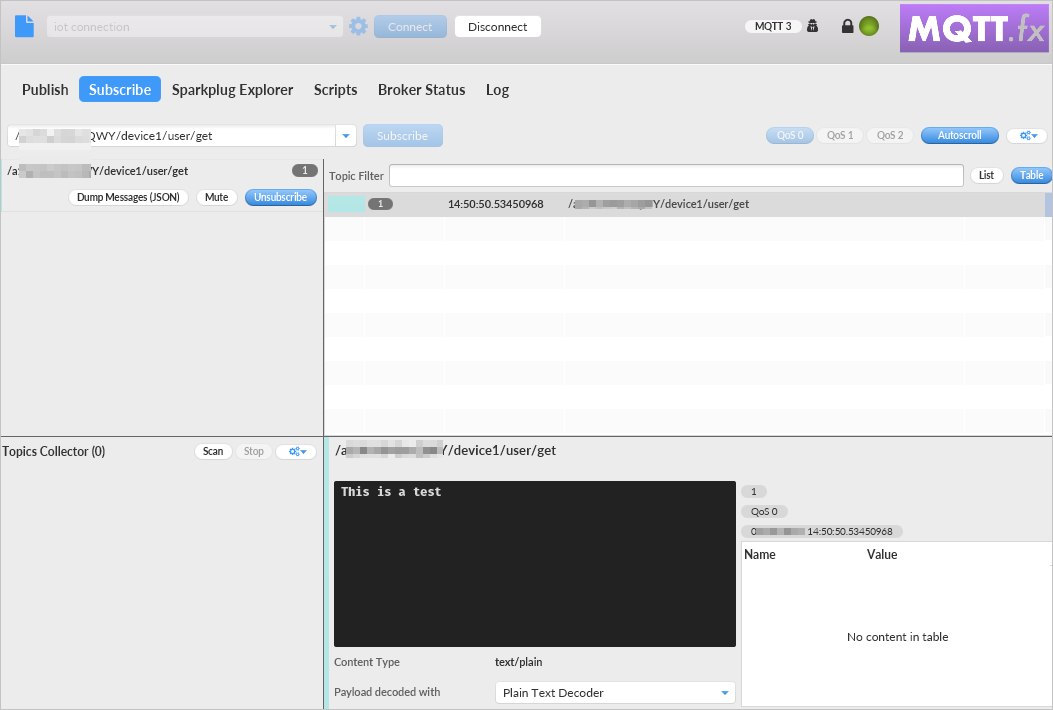
- In MQTT.fx, click Subscribe. In the Subscribe text box, enter a topic that has Subscribe permissions:
/a1***/device1/user/get. - Click Subscribe.
After the subscription is successful, the topic appears in the list.
- Log on to the IoT Platform console. Under the instance, choose .
- In the Actions column of the device, click View to go to the Device Details page.
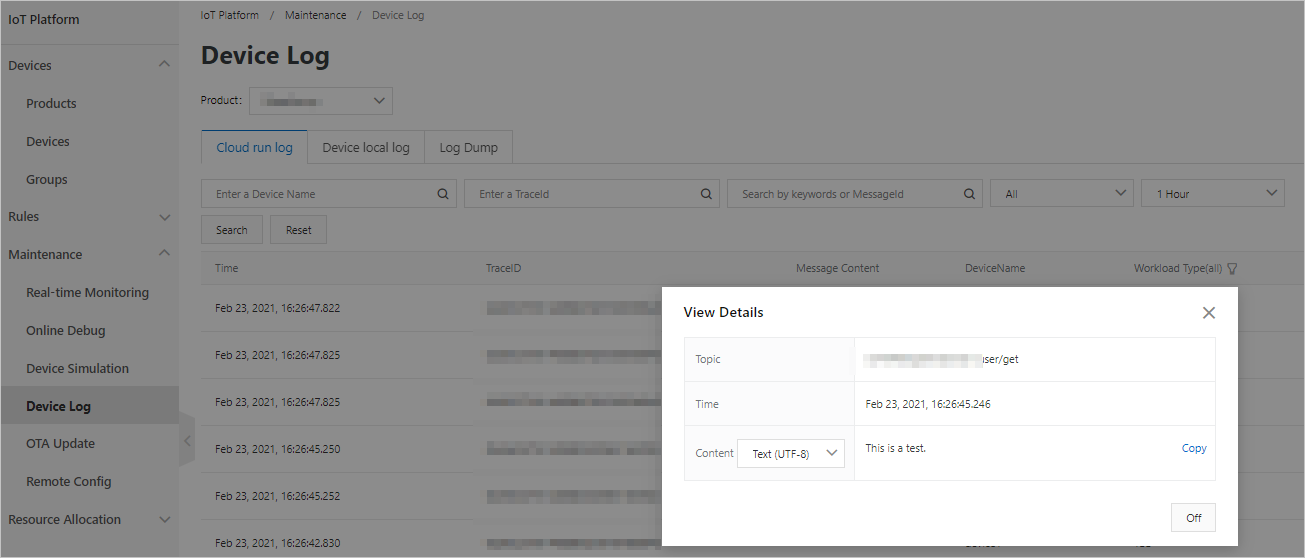
- Click the Topic List tab. In the Actions column of the subscribed topic, click Publish Message.
- Enter the message content, for example, This is a test., and click OK.
- Return to MQTT.fx to view the received message.
Communicate using TSL model topics
| Topic | Permission | Description |
/sys/a1****/device1/thing/event/property/post |
Publish | Uplink: The device reports property data to IoT Platform. |
/sys/a1****/device1/thing/event/property/post_reply |
Subscribe | Downlink: The device subscribes to receive property report responses from IoT Platform. |
/sys/a1****/device1/thing/service/property/set |
Subscribe | Downlink: The device subscribes to receive property set commands from IoT Platform. |
Device reports properties
- In MQTT.fx, click Subscribe. In the Subscribe text box, enter a topic that has Subscribe permissions:
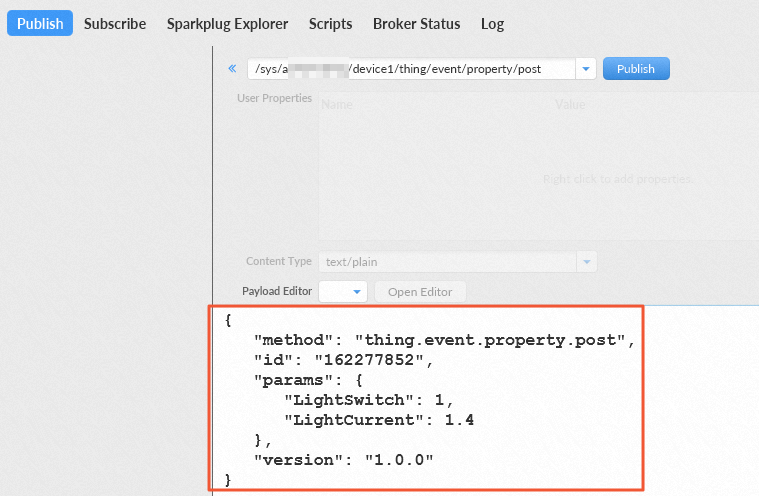
/sys/a1****/device1/thing/event/property/post_reply. - In MQTT.fx, click Publish. In the Publish text box, enter a topic that has Publish permissions:
/sys/a1****/device1/thing/event/property/post. - In the text editor pane, enter the property data that you want to report, and then click Publish.
The reported property data must use standard Alink JSON format, as described in Device reports properties. This example reports data for the LightCurrent and LightSwitch properties.
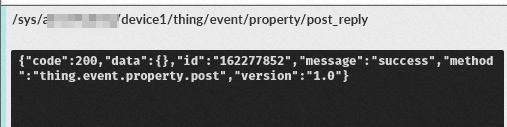
- In MQTT.fx, click Subscribe to view the response message that IoT Platform returns to the device.
As shown in the following figure, the device successfully reported the properties.
- Log on to the IoT Platform console. Under the instance, choose .
- In the Actions column of the device, click View. On the Device Details page, click TSL Model Data to view the device data.
Set device properties
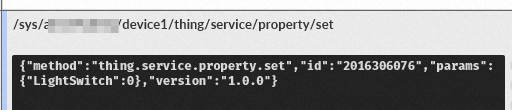
- In MQTT.fx, click Subscribe. In the Subscribe text box, enter a topic that has Subscribe permissions:
/sys/a1****/device1/thing/service/property/set. - Log on to the IoT Platform console. Under the instance, choose .
- Select the device to debug. On the Property Debugging tab, set Main Light Switch to Off-0.
- Click Set to send the instruction.
- In MQTT.fx, on the Subscribe tab, view the message that is received by the device.
View logs
- Log on to the IoT Platform console. On the Simple Log Service page of the instance, view operational logs including time, TraceID, and business type. Query IoT Platform logs.
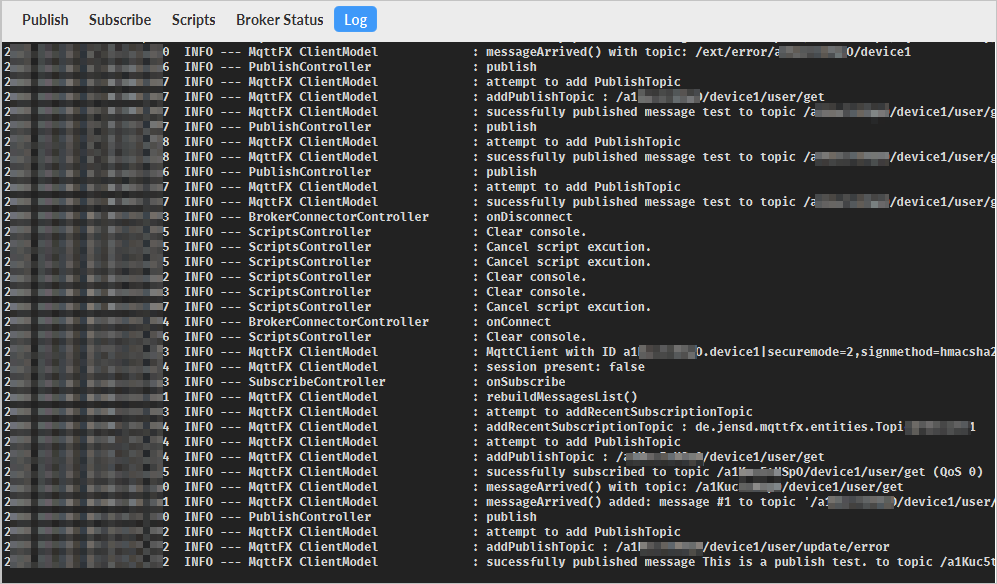
- In MQTT.fx, click Log to view operation logs and error logs.