This topic describes how to integrate Real-time Conversational AI audio and video agents into your iOS application.
Source Code Description
Download Source Code
You can download the source code from the GitHub open source project.
Source Code Structure
├── iOS  // Root directory for the iOS platform
│   ├── AUIAICall.podspec                // Pod description file
│   ├── Source                                    // Source code files
│   ├── Resources                                 // Resource files
│   ├── Example                                   // Demo code
│   ├── AUIBaseKits                               // Basic UI components
│   ├── README.md                                 // Readme
Environment Requirements
Xcode 16.0 or a later version. We recommend using the latest official release.
CocoaPods 1.9.3 or a later version.
A physical iOS device that runs iOS 11.0 or a later version.
Prerequisites
Develop relevant API operations on your server or deploy the provided server source code. For more information, see Deploy a project.
Run the Demo
After you download the source code, navigate to the Example folder.
In the Example folder, run the
pod install --repo-updatecommand to install the SDK dependencies.Open the
AUIAICallExample.xcworkspaceproject file and modify the package ID.You can open the agent scenario configuration file
/Resources/AUIAIMain.bundle/agent_scenes.json. Fill in the agent ID and its region based on the agent type. For example, when configuring a voice agent, locate the Scenes node whereagent_typeisVoiceAgent, and fill in the values for theagent_idandregionfields.// The following example shows how to configure a voice call agent { "agent_type": "VoiceAgent", "scenes": [ { "agent_id": "<Voice call agent ID>", "region": "<Region where the voice call agent ID is located>", "title": "Voice Call", "tags": [], "limit_seconds": 1800, "description": "", "asr_model_id": "xxx", "tts_model_id": "xxx", "voice_styles": [] } ] }NoteIf you want to test only one agent type, you only need to set the
agent_idandregionfield values for that agent type. For theregionvalue, see the Region ID column in the following table.Region name
Region ID
China (Hangzhou)
cn-hangzhou
China (Shanghai)
cn-shanghai
China (Beijing)
cn-beijing
China (Shenzhen)
cn-shenzhen
Singapore
ap-southeast-1
After you configure the agent, use one of the following two methods to launch it:
If AppServer is deployed: If you have deployed the AppServer source code provided by Alibaba Cloud on your server, go to the
AUIAICallAppServer.swiftfile and set your server-side domain name.// AUIAICallAppServer.swift public let AICallServerDomain = "Your application server domain name"If AppServer is not deployed: If you have not deployed the AppServer source code and want to quickly run the demo to test the agent, go to the
AUIAICallAuthTokenHelper.swiftfile. In this file, configure theEnableDevelopTokenparameter, retrieve the App ID and App Key for the ARTC application from the console, and generate the authentication token in the application.NoteThis method requires embedding your AppKey and other sensitive information into your application. It is for testing and development only. Never use this method in a production environment. Exposing your AppKey on the client side creates a serious security risk.
// AUIAICallAuthTokenHelper.swift
@objcMembers public class AUIAICallAuthTokenHelper: NSObject {

    // Set to true to enable Develop mode
    private static let EnableDevelopToken: Bool = true
    // Copy the RTCAppId from the console
    private static let RTCDevelopAppId: String = "RTC AppId used by the agent"
    // Copy the RTCAppKey from the console
    private static let RTCDevelopAppKey: String = "RTC AppKey used by the agent"

    ...
}
To obtain the AppID and AppKey for the ARTC application:
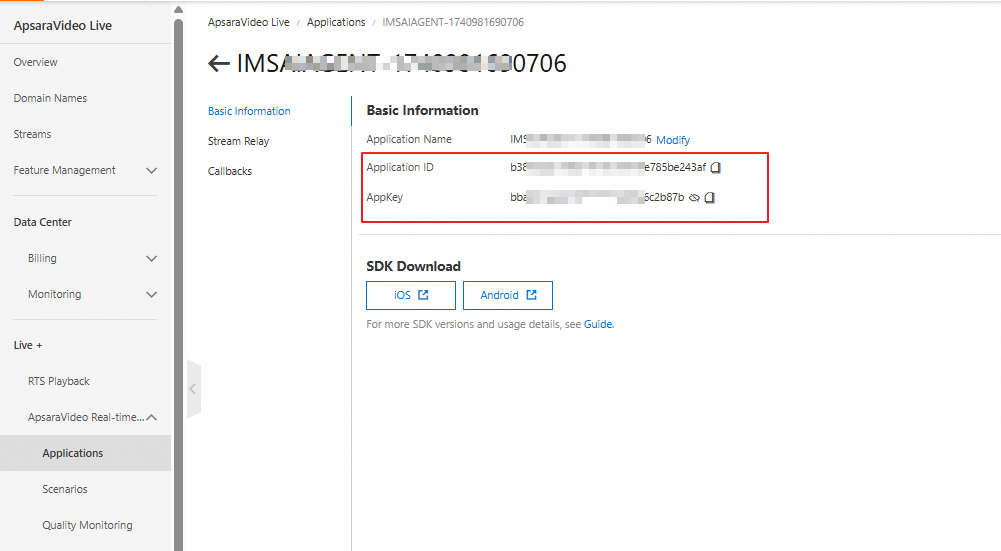
Go to the AI Agents page in the IMS console. Click an agent to go to the agent details page.

Click ARTC application ID. You are redirected to the ApsaraVideo Live console, where the AppID and AppKey are provided.
Select the Example target, and then compile and run the project.
Quickly Develop Your Own AI Call Feature
Follow these steps to integrate AUIAICall into your application and enable the agent audio and video call features.
Integrate Source Code
After you download the repository, copy the iOS folder to your application's code directory. Rename the folder to AUIAICall, place it at the same level as your Podfile, and then delete the Example and AICallKit folders.
Modify the Podfile to import the following:
AliVCSDK_ARTC: The client SDK for real-time audio and video interaction. You can also use AliVCSDK_Standard or AliVCSDK_InteractiveLive. For more information about integration methods, see iOS.
ARTCAICallKit: The SDK for the Real-time Conversational AI call scenario.
AUIFoundation: The basic UI components.
AUIAICall: The source code for the AI call scenario UI component.
# Requires iOS 11.0 or later platform :ios, '11.0' target 'Your App target' do # Integrate the appropriate audio and video terminal SDK based on your business scenario pod 'AliVCSDK_ARTC', '~> x.x.x' # Real-time Conversational AI call scenario SDK pod 'ARTCAICallKit', '~> x.x.x' # Basic UI component source code pod 'AUIFoundation', :path => "./AUIAICall/AUIBaseKits/AUIFoundation/", :modular_headers => true # AI call scenario UI component source code pod 'AUIAICall', :path => "./AUIAICall/" endNoteLatest ARTC SDK version: 7.10.0
Latest AICallKit SDK version: 2.11.0.
Run the
pod install --repo-updatecommand.The source code integration is complete.
Project Configuration
Add permissions for the microphone and camera. Open the project's
info.plistfile and add the microphone permission (NSMicrophoneUsageDescription), camera permission (NSCameraUsageDescription), and photo library permission (NSPhotoLibraryUsageDescription).In your project settings, on the Signing & Capabilities tab, enable Background Modes. If you do not enable background modes, you must manually handle the termination of calls when the application enters the background.
Source Code Configuration
You have completed the prerequisite steps.
Go to the
AUIAICallAppServer.swiftfile and set your server-side domain name.// AUIAICallAppServer.swift public let AICallServerDomain = "Your application server domain name"NoteIf you have not deployed AppServer, you can generate an authentication token in the application to quickly test the demo. For more information, see If AppServer is not deployed.
Call API
After you complete the preceding steps, you can launch AI calls from other modules or the homepage of your application using the component interfaces. You can also modify the source code to meet your business requirements.
// Import components
import AUIAICall
import ARTCAICallKit
import AUIFoundation

// Check if microphone permission is enabled
AVDeviceAuth.checkMicAuth { auth in
   if auth == false {
       return
   }

   // For userId, use the user ID after your app logs on
   let userId = "xxx"
   // Build the controller using userId
   let controller = AUIAICallController(userId: userId)
   // Set the agent ID. It cannot be nil.
   controller.config.agentId = "xxx"
   // Set the call type (voice, digital human, or visual understanding). It must match the agent ID type.
   controller.config.agentType = agentType
   // The region where the agent is located. It cannot be nil.
   controller.config.region = "xx-xxx"
   // Create the call ViewController
   let vc = AUIAICallViewController(controller)
   // Open the call interface in full screen
   vc.modalPresentationStyle = .fullScreen
   vc.modalTransitionStyle = .coverVertical
   vc.modalPresentationCapturesStatusBarAppearance = true
   self.present(vc, animated: true)
  }