This topic describes how to upload images to Image Search.
Background information
Image Search offers two methods for uploading images: using the API or SDK, or performing a batch operation with images from Object Storage Service (OSS).
-
If you need to upload only a few images, we recommend that you use the API or SDK. For more information, see AddImage.
-
If you are an enterprise user or need to upload many images that are not in Object Storage Service (OSS), use the ossimport tool to migrate them to an OSS bucket for a batch upload. See Procedure for details.
-
If you are an enterprise user or need to upload a large number of images that are already stored in an Object Storage Service (OSS) bucket, see Perform a batch operation.
ImportantTo use the batch operation feature of Image Search, you must ensure that your Image Search instance and OSS bucket are in the same region.
Ossimport
ossimport is an Object Storage Service (OSS) tool for migrating data to an OSS bucket. You can deploy it on a local server or an ECS instance to migrate data from on-premises storage or other cloud services to OSS.
Using ossimport to upload images provides the following benefits:
-
Keeps the image index in the search engine up to date.
-
Allows a single OSS bucket to serve multiple environments, such as development and production projects.
-
Helps you better organize and manage images from various sources based on your business needs.
-
Simplifies project management in complex environments, including development and User Acceptance Testing (UAT) projects.
-
Optimizes network bandwidth usage by uploading images once for use in multiple applications.
-
Enables you to standardize and scale your image management workflow.
Limitations
-
An image can be up to 4 MB in size.
-
An image's width and height must be from 101 to 4,096 pixels.
Procedure
Step 1: Download ossimport
ossimport supports the standalone deployment mode and distributed deployment mode.
-
Standalone deployment mode: This mode is recommended if you need to migrate less than 30 TB of data. You can deploy ossimport on any machine that can access the source data and OSS. Click ossimport to download.
-
Distributed deployment mode: This mode is recommended if you need to migrate more than 30 TB of data. You can deploy ossimport on multiple machines that can access the source data and OSS. Click ossimport to download.
To save time when migrating large volumes of data, deploy ossimport on an ECS instance in the same region as your OSS bucket. You can then use Express Connect to connect your source data server to your Virtual Private Cloud (VPC). Migrating data from multiple ECS instances to OSS over the internal network significantly improves efficiency.
Step 2: Activate OSS
For more information, see Activate OSS.
Step 3: Create a bucket
For more information, see Create a bucket in the console.
Ensure that your OSS bucket is in the same region as your Image Search instance.
Step 4: Create the increment.meta file
In the OSS path where your images are stored, create an increment.meta file. This file stores information related to the batch task.
The images referenced in the increment.meta file must be in the same bucket as the increment.meta file. Otherwise, the batch operation fails.
The filename increment.meta is required and cannot be changed. Image Search uses this specific name to read batch content.
Image Search supports batch operations on images in different paths within the same bucket. For example, assume the bucket is named
imagesearch, the increment.meta file is in the root directory of this bucket, the path isgirlCloth, and the image name isgirl_cloth8.jpg. In the meta file,PicNamemust be set to"PicName":"girlCloth/girl_cloth8.jpg". Note: Do not add a forward slash (/) beforegirlClothor aftergirl_cloth8.jpg. This logic applies to multi-level directories as well.You must include the file extension in the image names in OSS. For example, for an image named
girl_cloth10.jpg, you must specify"PicName":"girl_cloth10.jpg", not"PicName":"girl_cloth10". Otherwise, the processing fails.Each line in the
increment.metafile must represent a single image operation. Do not place multiple operations on the same line.
The following example shows a sample file in JSON format:
{"OperationType": "ADD","ProductId": "1000","PicName": "girl_cloth1.jpg","CategoryId": 0,"IntAttr": 0,"StrAttr": "value1","CustomContent": "k1:v1,k2:v2,k3:v3","Region": "20,40,60,80"}
{"OperationType": "ADD","ProductId": "1000","PicName": "girl_cloth2.jpg","CategoryId": 0,"IntAttr": 0,"StrAttr": "value2","CustomContent": "k1:v1,k2:v2,k3:v3","Region": "20,40,60,80"}
{"OperationType": "ADD","ProductId": "1001","PicName": "girl_cloth3.jpg","CategoryId": 1,"CustomContent": "k1:v1,k2:v2,k3:v3"}
{"OperationType": "ADD","ProductId": "1002","PicName": "girl_cloth4.jpg","CategoryId": 0,"CustomContent": "k1:v1,k2:v2,k3:v3","Crop": false}
{"OperationType": "ADD","ProductId": "1003","PicName": "girl_cloth7.jpg","CustomContent": "https://www.aliyun.com/imagesearch/girl_cloth7.jpg"}
{"OperationType": "ADD","ProductId": "1003","PicName": "girl_cloth6.jpg","CustomContent": "k1:v1,k2:v2,k3:v3"}
{"OperationType": "ADD","ProductId": "1006","PicName": "girlCloth/girl_cloth10.jpg","CustomContent": "k1:v1,k2:v2,k3:v3"}
{"OperationType": "DELETE","ProductId": "1004","PicName": "fengyi.jpg"}
{"OperationType": "DELETE","ProductId": "1005"}
The following example shows a sample file in CSV format:
The following table describes the fields.
Parameter | Type | Required | Description |
OperationType | String | Yes | The operation type.
|
ProductId | String | Yes | A unique identifier for the image. It can be up to 256 characters long. |
PicName | String | Yes | The name of the image in the OSS bucket. It can be up to 256 characters long. Important
|
CategoryId | Integer | No | For more information, see Category reference.
|
CustomContent | String | Yes | User-defined content. It can be up to 4,096 characters long. Note
The search results include this value. You can use this field to store an image URL or other additional information to link the image to your business data. |
IntAttr | Integer | No | An integer attribute used for conditional filtering. Note
Use integer attributes in a filter condition to filter search results. The |
StrAttr | String | No | A string attribute up to 128 characters long, used for conditional filtering. Note
|
Crop | Boolean | No | Specifies whether to enable subject identification. The default value is true.
|
Region | String | No | The subject area of the image. The format is Note If you set this parameter, the |
Step 5: Grant access to OSS
Image Search performs batch operations by using OSS. You must complete a one-click authorization the first time you use this feature. If you have already granted authorization, you can skip this step.
Step 6: Upload images
Log in to the Image Search console.
Select the target service type and instance.
Click the Batch Operation tab.
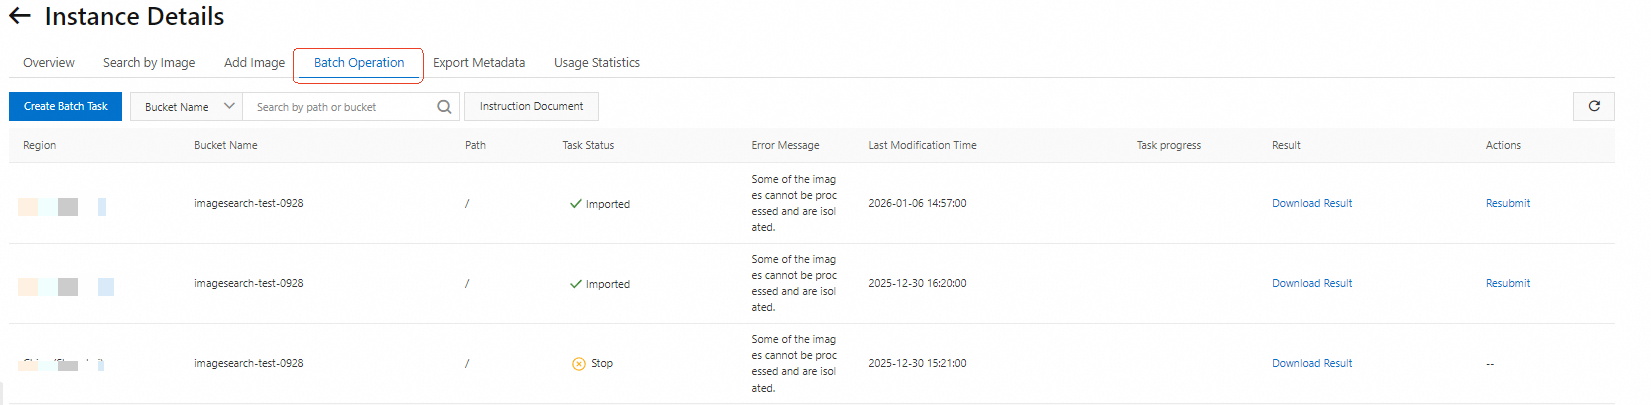
Click Create Batch Task.

Set the parameters for the batch task.
Region
The region where the instance resides.
Bucket name
The name of your OSS bucket.
ImportantEnsure that the OSS service and the created bucket are in the same region as your Image Search instance.
Data path
The storage path for the images to be uploaded and the increment.meta file.

Meta file
Self-written (recommended): A file that lists the images to be processed. The file must be named increment.meta. The system can check if the file exists. For more information, see Create an increment.meta file.
Automatic generation: This option automatically scans the specified data directory for all eligible image files based on the entered bucket name and data path. Use this option with caution. After the file is generated, you must download the meta file from the task list and upload it to the correct OSS path to start the batch task.
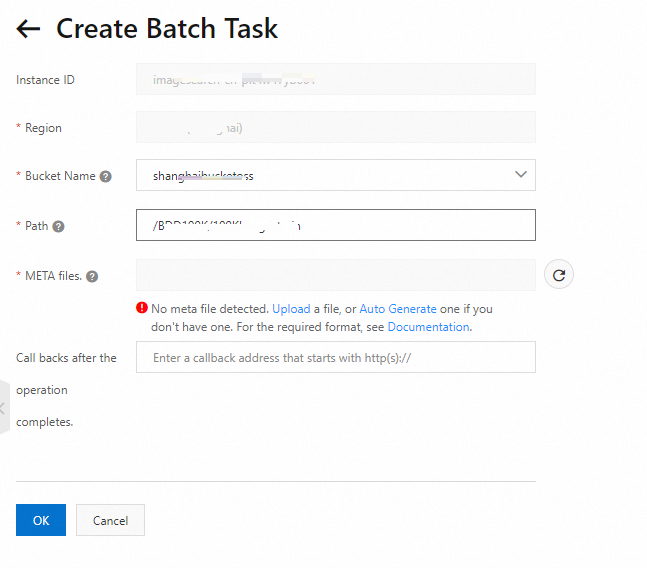 Note
NoteThe generated file contains only the required fields: OperationType (set to ADD), ProductId, and PicName. The values for PicName and ProductId are the same.
If you need to add other fields, download the generated file from the task list and modify it. For more information, see Create an increment.meta file.
Completion callback
Enter the callback URL. It must start with HTTP or HTTPS.
{
  "finishTime": "2021-05-19 17:50:00",
  "instanceId": "imagesearch-cn-xxxx",
  "instanceName": "instanceName",
  "message": "success",
  "processResultUrl": "https://image-search-task-info.oss-cn-shanghai.aliyuncs.com/yyyyyyyyyy",
  "status": "NORMAL",
  "taskId": 111
}
Field
Description
finishTime
The time the task completed, accurate to the second.
instanceName
The name of the Image Search instance.
instanceId
The ID of the Image Search instance.
status
The task execution result. NORMAL indicates success. FAIL indicates failure.
taskId
The task ID.
message
A description of the result.
successindicates that the task is successful.processResultUrl
The URL to download the error results.
Verify the results
After a task is complete, you can view its status.
-
On the Batch Operation tab, the task list shows the status of each task. If a task succeeds, its message is Success. If some images fail to be processed, the message indicates a partial failure; click Download Result to view the details. For a failed task, click View Incremental History for more information. To run a task again, click Resubmit in the Actions column. For more information about task failures, see What are the causes of an incremental task submission failure?
-
After uploading the images, test the search functionality. Go to the Search by Image tab for your instance. In the left pane, set the search type to SearchByPic, upload a search image, enable object detection and select Auto, set Number of results and Start position, and then click OK. The right pane displays the raw JSON response. Each record in the returned
auctionsarray includes fields such asscore(similarity score),picName(image name), andproductId(product ID). A higherscoreindicates greater similarity to the search image.