When your enterprise AI Agents need to access internal systems like CRM, ERP, or databases, each service would otherwise require its own identity verification logic, creating security gaps and operational overhead. Outbound authorization solves this by providing a standardized OAuth 2.0 framework so your Agents can securely authenticate to internal enterprise services with centralized access control.
Overview
When your AI Agent needs to query an internal CRM, submit orders to an ERP system, or retrieve data from an internal database, it must prove its identity and authorization to each service. Outbound authorization in Agent ID Guard centralizes this process so you don't need to build custom authentication code for every service integration. It provides:
OAuth 2.0 Client Credentials authentication: Your AI Agent authenticates to internal services using industry-standard OAuth 2.0 Client Credentials, eliminating the need to write custom authentication logic for each service.
Audience-based access isolation: Each enterprise service node has a unique audience identifier, ensuring that an Agent token issued for one internal system cannot be reused to access a different service outside its intended scope.
Fine-grained permission control: Define exactly which operations each Agent can perform on each enterprise service. Only the explicitly authorized scopes appear in the Agent's Access Token, preventing privilege creep.
Outbound authorization is designed for internal enterprise services that reside behind your firewall. If your Agent needs to access external services such as LLM providers or third-party SaaS APIs, use the standard application authorization flow instead.
Core concepts
Term | Description |
Agent node | A machine identity hosted in Agent ID Guard, mapped to an OAuth 2.0 M2M (machine-to-machine) application at the underlying layer. |
Enterprise service node | An outbound node in an Agent workflow that represents an internal enterprise system. It is associated with an OAuth 2.0 M2M application at the underlying layer. |
Audience | A logical identifier for an enterprise service, corresponding to the |
Scope | Defines the operations an Agent can perform on an enterprise service, corresponding to the |
Outbound authorization | Grants access permissions of an enterprise service to an Agent, enabling the Agent to obtain an Access Token for that enterprise service. |
How it works
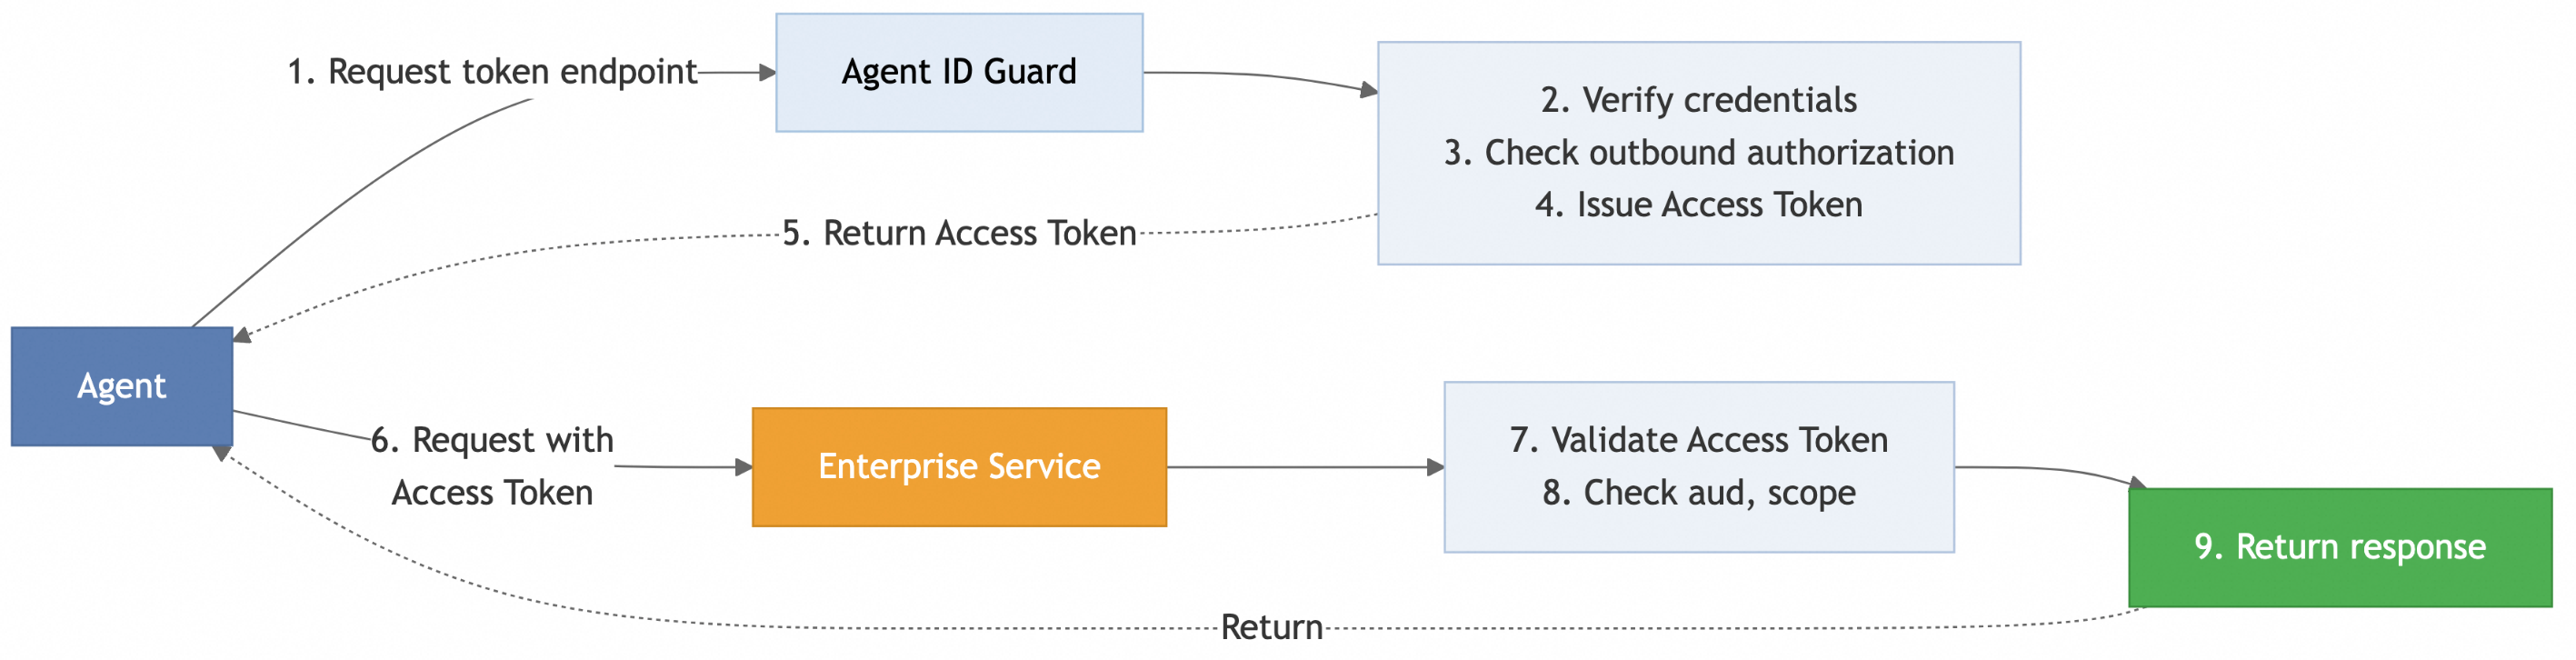
The workflow consists of the following steps:
Step | Description |
1. Request a token | The Agent sends a request to the Agent ID Guard token endpoint, using a Client Secret or public-private key pair as credentials, along with the target enterprise service's |
2. Verify client identity | Agent ID Guard validates the Agent's Client Secret or key pair to confirm the request comes from a registered, legitimate Agent. |
3. Validate outbound authorization | Agent ID Guard checks whether the Agent has been granted the requested scopes for the target enterprise service. Only authorized scopes are included in the Access Token; unauthorized scopes are automatically filtered out. |
4-5. Issue the Access Token | After validation passes, Agent ID Guard issues the Access Token. the |
6. Call the enterprise service | The Agent includes |
7-8. Validate the token | The enterprise service validates the Access Token expiration, |
9. Return results | If validation succeeds, the enterprise service returns the requested business data. If validation fails, it returns an error. |
Prerequisites
Before you begin, ensure you have:
An IDaaS EIAM Enterprise Edition instance with machine identity management enabled
Administrator permissions in the IDaaS EIAM console to configure outbound authorization
A registered Agent identity in Agent ID Guard. If you have not yet registered an Agent, see Register an Agent
Configure outbound authorization
Step 1: Add an enterprise service node
Log on to the IDaaS EIAM console.
In the left-side navigation pane, click Agent Identity Security to go to the Agent ID Guard list page.
Find the target Agent and click Operation column Edit to open the Agent details page. Then click the Agent module in the topology diagram.
Confirm that Agent identity registration is complete. A green checkmark icon appears to the right of the Agent module name, indicating that the Agent is ready for enterprise service node configuration.
In the upper-right corner of the topology diagram, click Add Node and select Enterprise Service from the dropdown menu.
NoteIf the Agent needs to access multiple internal enterprise systems, add a separate enterprise service node for each system.
Configure the Enterprise Service. Choose one of the following methods based on your needs:
Create a new enterprise service application
Create a new enterprise service application when none exists in the enterprise service application list for your business scenario.
Click Add Enterprise Service Application.
Configure the general settings:
Parameter
Description
Name
The display name in the console.
ResourceServer Identifier
The value you define here becomes the
audfield in the Access Token. The enterprise service uses this value for permission validation.Configure the permission settings:
Parameter
Description
Scope Name
The display name in the console.
Scope Value
The value you define here becomes the
scopefield in the Access Token. The enterprise service uses this value for permission validation.
Select an existing enterprise service application
If an enterprise service application that meets your business needs already exists in the list (for example, another Agent has been associated with the same enterprise service), select it directly from the list.
Step 2: Configure outbound authorization
In the Agent topology diagram, click the Outbound Authorization label on the connection between the Agent node and the enterprise service node.
In the outbound authorization panel that appears, click Add Authorization and select the permissions to grant to this Agent.
Click OK to complete the outbound authorization.
After configuration, verify the setup in the topology diagram:
A connection line appears between the Agent node and the enterprise service node, indicating that the authorization has been established.
Click the connection line to view the list of authorized scopes.
To verify end-to-end, make a token request to confirm the Agent can obtain a valid Access Token. Call the IDaaS token endpoint with the Agent's Client ID and Secret. A successful response confirms that outbound authorization is properly configured.
Only scopes that are explicitly selected during outbound authorization are included in the Access Token obtained by the Agent. Even if the enterprise service defines multiple permissions, the Agent receives only those that the administrator has explicitly authorized.