Use a custom domain name for your IDaaS EIAM logon page and user portal instead of the system-generated initialization domain name (for example, xxxx.aliyunidaas.com). This keeps your brand consistent across the sign-in experience and lets you enforce access policies—such as restricting logons to specific IP address ranges—through your domain proxy service.
Key concepts
| Term | Description |
|---|---|
| Initialization domain name | The domain name generated when you create an IDaaS EIAM instance, for example, xxxx.aliyunidaas.com. |
| Custom domain name | A domain name you own and add to your IDaaS EIAM instance, for example, xxxx.example.com. |
| Default domain name | The domain name the instance uses by default. Must be either the initialization domain name or a custom domain name. When automatic redirection is enabled, accessing the initialization domain name redirects to the default domain name. |
Potential impacts
Custom domain names affect the following features. Review and adjust their configurations before or after you set up a custom domain name to avoid disrupting your users.
| Affected feature | Constraint |
|---|---|
| Logon page and application portal | The logon and portal addresses include a domain name. |
| DingTalk identity provider — QR code logon and Workbench SSO | The DingTalk callback domain is always the initialization domain name. Do not change it. |
| SSO to IDaaS application portal or applications | The application home page address includes a domain name. |
| WeCom identity provider — QR code logon | The domain users access (user portal or direct application URL) must match the WeCom authorization callback domain. |
| WeCom — Webpage authorization logon and data synchronization | The domain users access must match the WeCom trusted domain. |
| OIDC and custom applications — Authorization and logout endpoints | Single custom domain: Set it as the default domain name and enable automatic redirection. Without redirection, users may need to log on again during SSO. Multiple custom domains: Each must match the user's logon page domain. |
| SAML applications — IdP metadata address and SSO URL | Same rule as OIDC applications. |
| WebAuthn | WebAuthn only works on the domain where the authenticator was registered. If a user registers on domain A, they cannot use that authenticator on domain B and must register a new one. |
Prerequisites
Before you begin, ensure that you have:
A dedicated subdomain for IDaaS EIAM (a top-level domain or second-level domain is recommended), for example,
login.example.comPermission to manage DNS records for that domain (required to add a CNAME record that verifies ownership)
Permission to configure a domain proxy service with an HTTPS certificate
A trial or Enterprise IDaaS EIAM instance. Try an instance if you do not have one, or upgrade your existing instance to the Enterprise tier
(Chinese mainland instances only) An ICP filing number for the domain
Choose a proxy option
Setting up a custom domain requires two steps: domain configuration in the IDaaS EIAM console, followed by proxy configuration with your chosen proxy service. The proxy service forwards requests from your custom domain to the initialization domain.
Choose the proxy option that fits your infrastructure:
| Option | Best for |
|---|---|
| Alibaba Cloud DCDN | Teams that want managed CDN acceleration and simplified certificate handling |
| Self-managed Nginx | Teams that already operate their own infrastructure or need full control over the proxy |
Add a custom domain name — Domain configuration
Go to Branding > Custom Domain Name > Add Custom Domain Name.
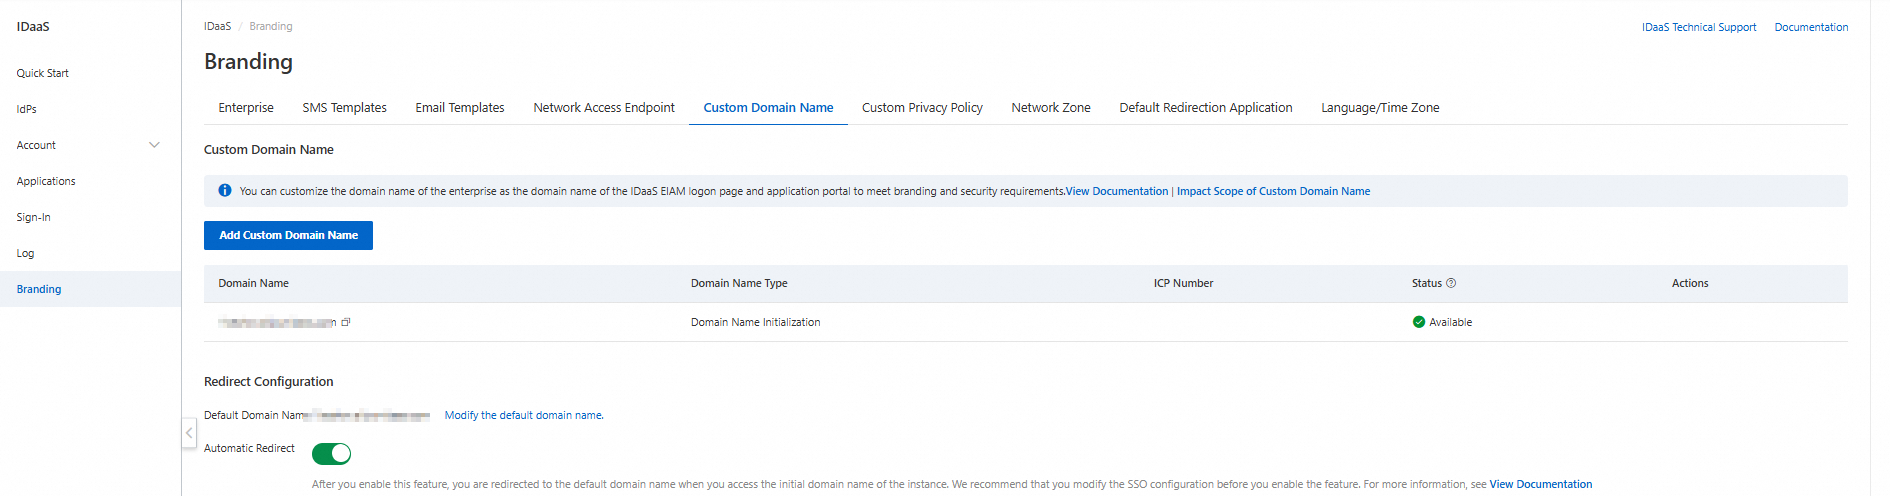
Custom domain names affect logon, single sign-on (SSO), and data synchronization. Review Potential impacts before proceeding.
Step 1: Enter the domain name
Enter your custom domain name, for example, login.example.com. The domain name:
Must be globally unique across all IDaaS EIAM instances
Can contain lowercase letters, digits, hyphens (
-), and periods (.)Must not include a path or query parameters
Has a maximum length of 128 characters
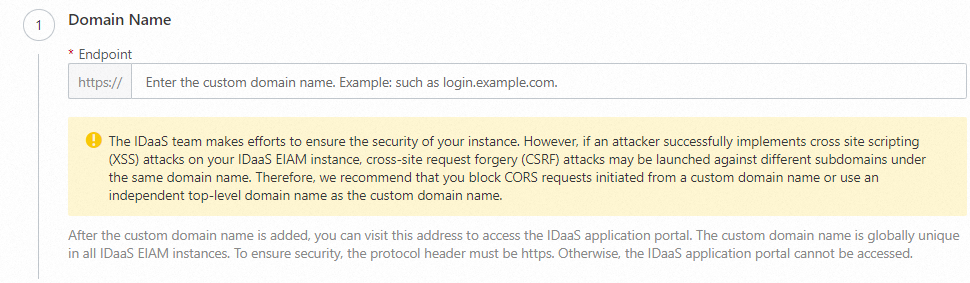
If an attacker launches a Cross-Site Scripting (XSS) attack on your IDaaS EIAM instance, it could enable a Cross-Site Request Forgery (CSRF) attack on other subdomains under the same parent domain. To reduce this risk, block Cross-Origin Resource Sharing (CORS) requests from the custom domain, or use a dedicated top-level domain.
Step 2: Add a DNS record
Add the DNS record shown on the page to your DNS provider (for example, Alibaba Cloud DNS). This verifies ownership of the domain. For the same instance and domain name, the record type, name, and value are fixed.
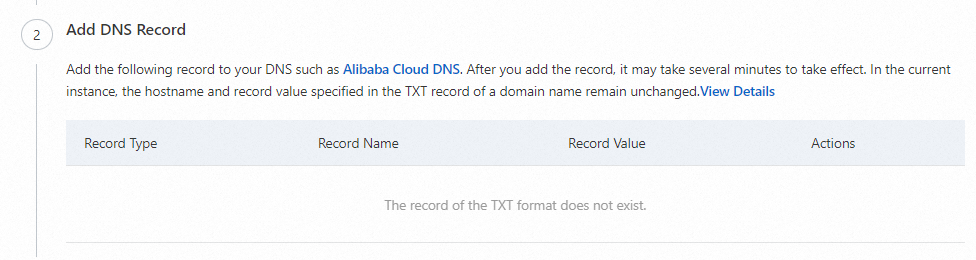
If you do not have DNS access, ask an authorized user to add the record. You can complete the remaining steps after the record is created.
For instructions on adding DNS records with specific providers:
Step 3: Enter the ICP filing number
For IDaaS EIAM instances in Alibaba Cloud regions in the Chinese mainland, provide an entity or website ICP filing number as required by the Administrative Measures on Internet Information Services. The ICP filing number appears on the instance's logon page.
Step 4: Complete the process
Review the information and click Complete. The custom domain name is saved but not yet active—you must complete the proxy configuration to enable it.
Add a custom domain name — Proxy configuration
The proxy configuration makes your custom domain name functional by forwarding user and application requests to the IDaaS EIAM initialization domain. Keeping the proxy available is your responsibility.
Option 1: Alibaba Cloud DCDN
Step 1: Add a domain name
In the Alibaba Cloud DCDN console, go to the Domain Names page and add a domain name.
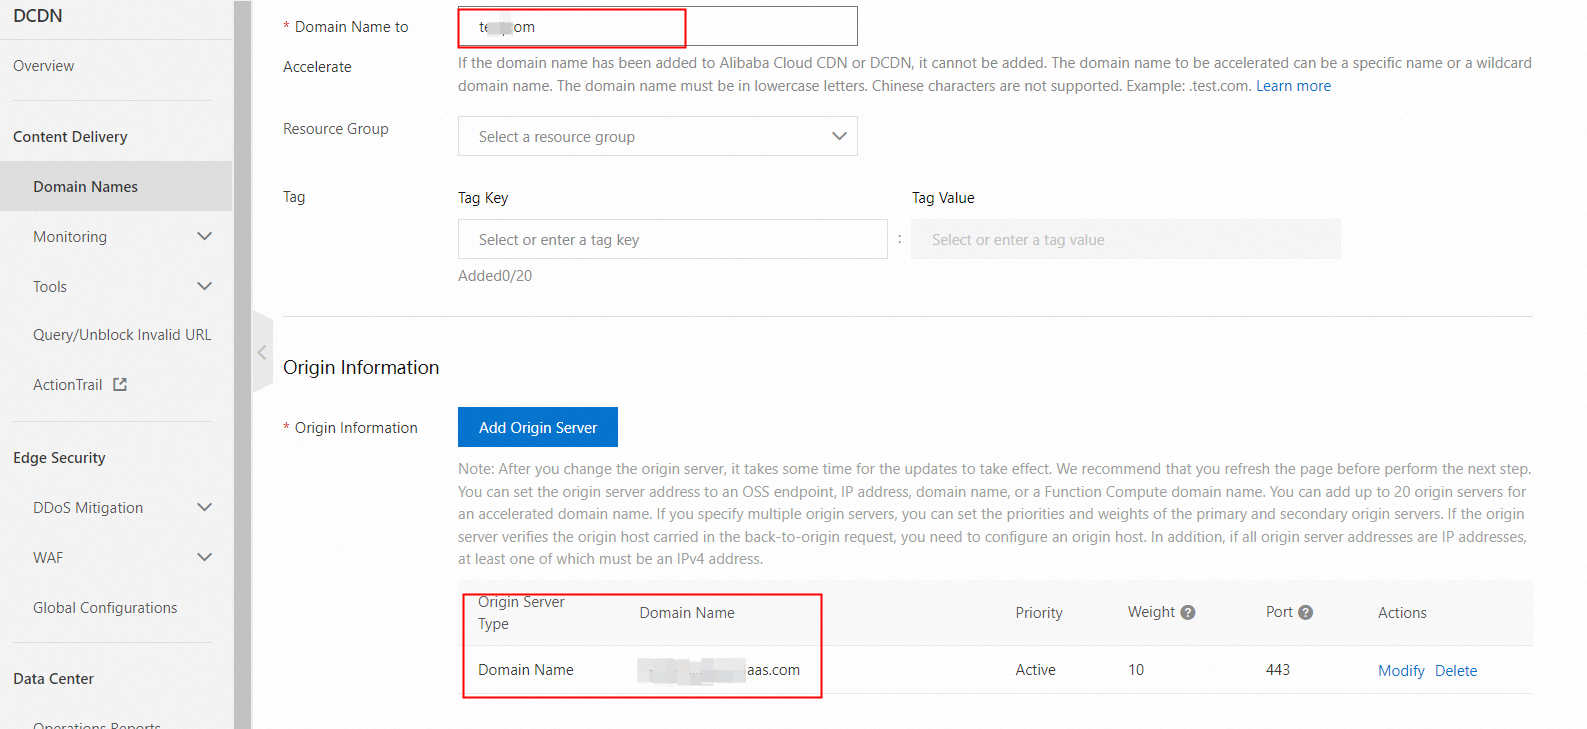
Configure the following fields:
Accelerated Domain Name: Your custom domain name.
Origin Info:
Set Origin Type to Origin Domain Name.
Enter the initialization domain name shown on the proxy configuration page (do not include
https://).Set Port to
443.
After adding the domain name, copy the CNAME record provided by DCDN and add it to your DNS settings. For instructions, see Configure a CNAME record.
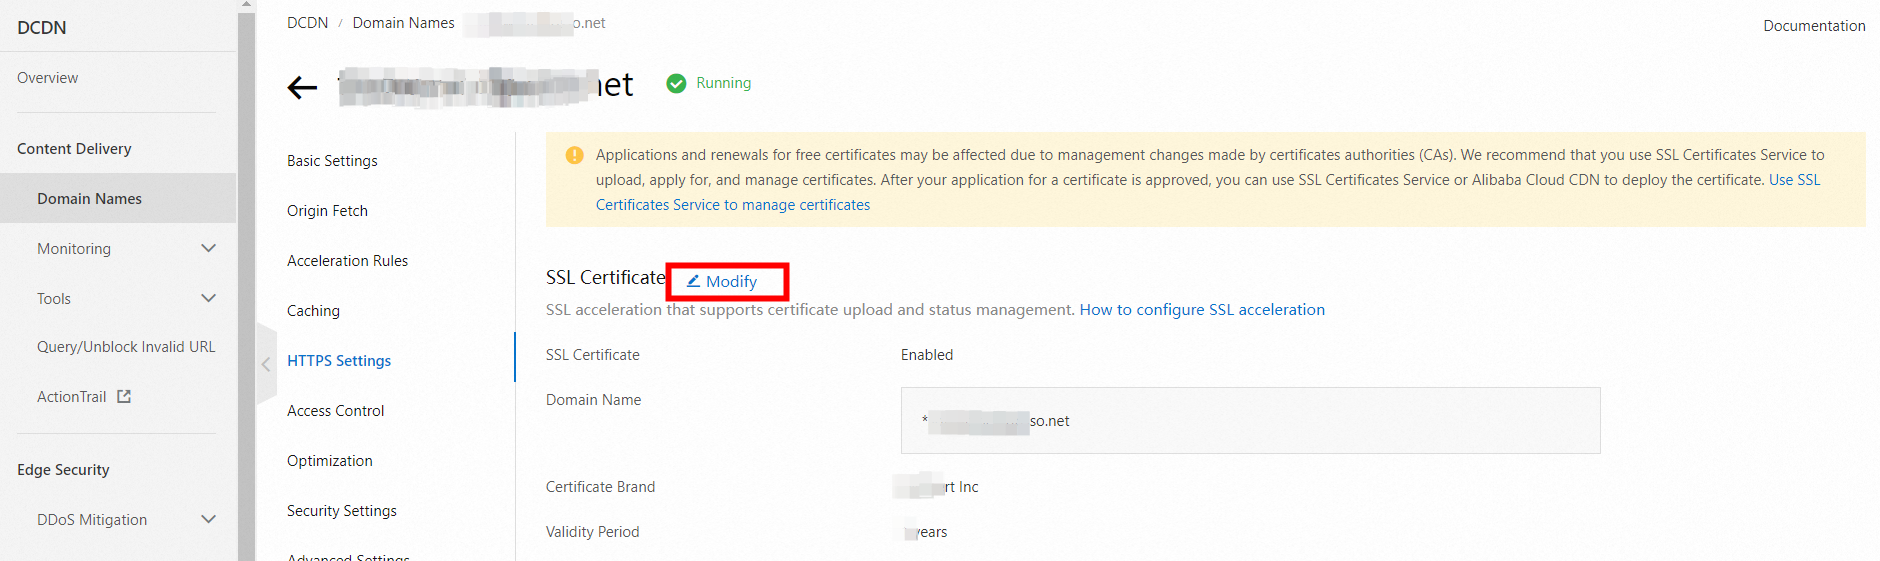
Step 2: Configure an HTTPS certificate
On the Domain Names page, open the domain's details page. On the SSL Certificate tab, configure an HTTPS certificate. For instructions, see Configure an HTTPS certificate.
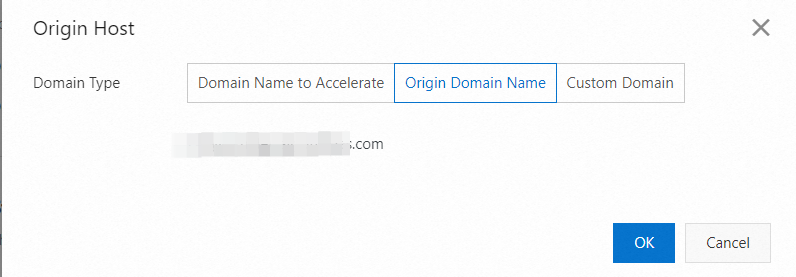
Step 3: Enable back-to-origin HOST
On the domain's details page, go to the Origin Fetch tab and enable Origin HOST.
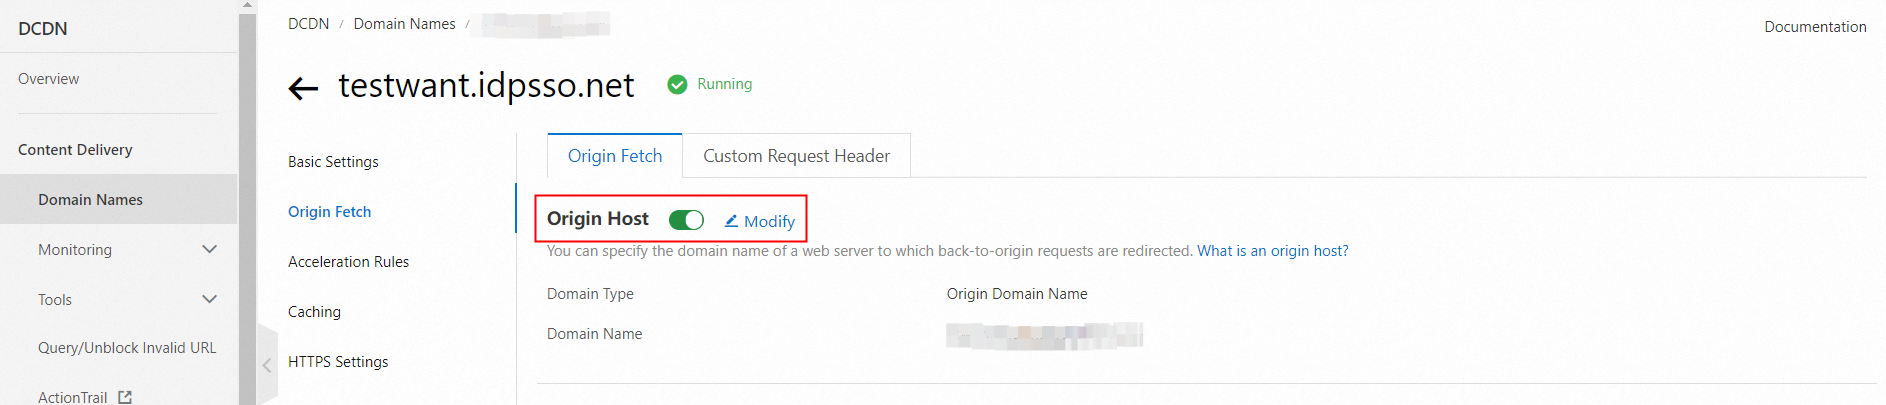
Set Domain Name Type to Origin Domain Name. The initialization domain name of the IDaaS EIAM instance is automatically selected.
Step 4: Add back-to-origin HTTP headers
On the Origin Fetch tab, click Custom Request Header and add the IP, Host, Token, and other values provided in the IDaaS EIAM console. These headers help prevent IP address spoofing and improve access security.

After completing the configuration, use Test Connectivity in the IDaaS EIAM console to run a connectivity check.

The test simulates access from the IDaaS EIAM service. If you have applied access policies to the domain (such as IP allowlists), the test result may not reflect what your users experience. Test in a simulated user environment as well.
After a successful test, review the affected features, update any related configurations, and roll out the custom domain to your users. If users should still be able to access the initialization domain name, enable automatic redirection.
Option 2: Nginx
Step 1: Install Nginx
Choose the installation method for your environment.
Install from source code
# Download the installation package
wget http://nginx.org/download/nginx-1.18.0.tar.gz

# Extract
tar -zxvf nginx-1.18.0.tar.gz
cd nginx-1.18.0

# Configure and specify the installation directory
./configure --prefix=/usr/local/nginx

# Compile and install
make && make install

# Verify the installation
cd /usr/local/nginx/sbin
./nginx -t
A successful installation outputs:
nginx: the configuration file /usr/local/nginx//conf/nginx.conf syntax is ok
nginx: configuration file /usr/local/nginx//conf/nginx.conf test is successful
Install on CentOS, AlmaLinux, or RHEL
# Install the EPEL repository (required on some systems)
sudo yum install epel-release -y

# Install Nginx
sudo yum install nginx -y

# Start and enable Nginx
sudo systemctl start nginx
sudo systemctl enable nginx

# Verify the service status
sudo systemctl status nginx
Install on Ubuntu or Debian
# Update the package list
sudo apt update

# Install Nginx
sudo apt install nginx -y

# Start and enable Nginx
sudo systemctl start nginx
sudo systemctl enable nginx

# Verify the service status
sudo systemctl status nginx
Step 2: Configure Nginx
Find the configuration file path.
nginx -tConfigure the reverse proxy to forward requests from your custom domain (for example,
www.example.com) to the IDaaS EIAM initialization domain (for example,*****.aliyunidaas.com). Edit theserverblock underhttpinnginx.conf:server { # Listen on HTTPS and enable SSL listen 443 ssl; # Your custom domain name server_name www.example.com; location / { # Forward to the IDaaS EIAM initialization domain proxy_pass https://*****.aliyunidaas.com; } }Redirect HTTP traffic to HTTPS.
server {
    listen 80;
    server_name www.example.com;

    location / {
        return 301 https://$host$request_uri;
    }
}
Configure the SSL certificate. Upload your certificate and key files to the Nginx server, then update
nginx.conf:server { listen 443 ssl; server_name www.example.com; # SSL certificate paths ssl_certificate /usr/local/nginx/ssl/www.example.com.crt; ssl_certificate_key /usr/local/nginx/ssl/www.example.com.key; # SSL settings ssl_protocols TLSv1.2 TLSv1.3; ssl_ciphers HIGH:!aNULL:!MD5; }Add the IDaaS EIAM back-to-origin request headers. Copy the IP, Host, and Token values from the IDaaS EIAM console, then add them to the
locationblock usingproxy_set_header. These headers authenticate your proxy with IDaaS EIAM and pass the client's real IP address. Misconfiguring or omitting them can allow IP spoofing.location / { proxy_pass http://***.aliyunidaas.com; # Pass the client's real IP address proxy_set_header X-IDaas-Client-IP $remote_addr; # Host value expected by IDaaS EIAM proxy_set_header X-IDaas-Host eiam-idaas.idpsso.net; # Proxy authentication token from the IDaaS EIAM console proxy_set_header X-IDaas-Proxy-Token PTC*****************************6j; # Preserve the original Host header proxy_set_header Host $host; }
Step 3: Restart Nginx
Restart Nginx after saving the configuration.
Source code installation:
sudo /usr/local/nginx/sbin/nginx -s reloadCentOS, AlmaLinux, or RHEL:
sudo service nginx restartUbuntu or Debian:
sudo systemctl restart nginxDomain status
After the proxy configuration is complete, the availability status in the IDaaS EIAM console indicates that the custom domain name feature is enabled on the instance.

The availability status in the console only confirms that the custom domain name feature is enabled on the instance. It does not verify that the domain is reachable. Because you may apply access policies to the domain (such as IP allowlists), IDaaS EIAM cannot confirm end-to-end availability. Test the domain directly from a user environment.
Set the default domain name
The default domain name serves two purposes:
When Automatic Redirection is enabled, users and applications that access the initialization domain name are redirected to the default domain name.
It appears in multiple places in the console, including the user portal address and logon address.
To change the default domain name, click Modify the default domain name in the console.

If you set a custom domain name as the default and enable automatic redirection, change the default domain name back to the initialization domain name if the custom domain becomes unavailable (for example, if the instance expires). Otherwise, users and applications cannot access the instance.
Enable automatic redirection
When automatic redirection is enabled, any access to the initialization domain name is automatically redirected to the default domain name. Accessing a custom domain name does not trigger a redirect.
If you use a single custom domain name, set it as the default and enable automatic redirection. This lets users access the initialization domain name or the custom domain name interchangeably for SSO without any additional application reconfiguration.
If you use multiple custom domain names or do not enable automatic redirection, update the SSO configuration and other affected features (see Potential impacts) for each custom domain name. Without this, users may be prompted to log on again during SSO, or may be unable to log on using WeCom QR codes.
Delete a custom domain name
Before deleting a custom domain name, check whether it is still in use—for example, in identity provider or application SSO configurations. The Last used time in the deletion confirmation dialog shows when the domain's proxy_token was last seen, which you can also check in the proxy configuration directly.

After deletion, the domain can no longer be used to access the IDaaS EIAM instance. Remove the related CNAME records and proxy configurations from your DNS provider and proxy service to prevent incorrect traffic forwarding.