This topic describes how to troubleshoot issues that occur when you back up on-premises files.
How do I change the logon port of a file backup client?
The default logon port for a file backup client is 8011. If port 8011 is used by another application, change the logon port of the file backup client to a specified port during installation.
Windows:
If the server or virtual machine (VM) that you want to back up runs Windows, follow these steps to install the client and specify a logon port:
Download the file backup client to the server or VM that you want to back up.
Decompress the client installation package.
Open Command Prompt.
In Command Prompt, navigate to the directory where the installation file is located.
Run the installation file with the
/p=<port_number>parameter. For example, runhbr-install-1.5.2-windows-amd64.exe /p=8022. Press Enter and follow the prompts to complete the installation.
After the installation is complete, open a browser and enter
http://localhost:<port_number>to activate the file client.
Linux:
If the server or VM that you want to back up runs Linux, follow these steps to install the client and specify a logon port:
Download the file backup client to the server or VM that you want to back up.
Decompress the client installation package to a directory. Then, run the
./setup -p <port_number>command to start the Cloud Backup service. For example, to set the client logon port to 8022, run./setup -p 8022.
After the installation is complete, open a browser and enter http://localhost:<port_number> to activate and log on to the client.
What do I do if a local Windows file backup fails and the error report shows "Access is denied"?
Issue
When you back up local Windows files using a file backup client, the backup job fails and an error count is displayed.
Click the download icon in the Errors column to download the error report. The report shows an "Access is denied" error.
Solution
This issue occurs because the SYSTEM account does not have the required permissions for the files that failed to be backed up. To resolve this issue, grant the necessary permissions to the SYSTEM account for these files.
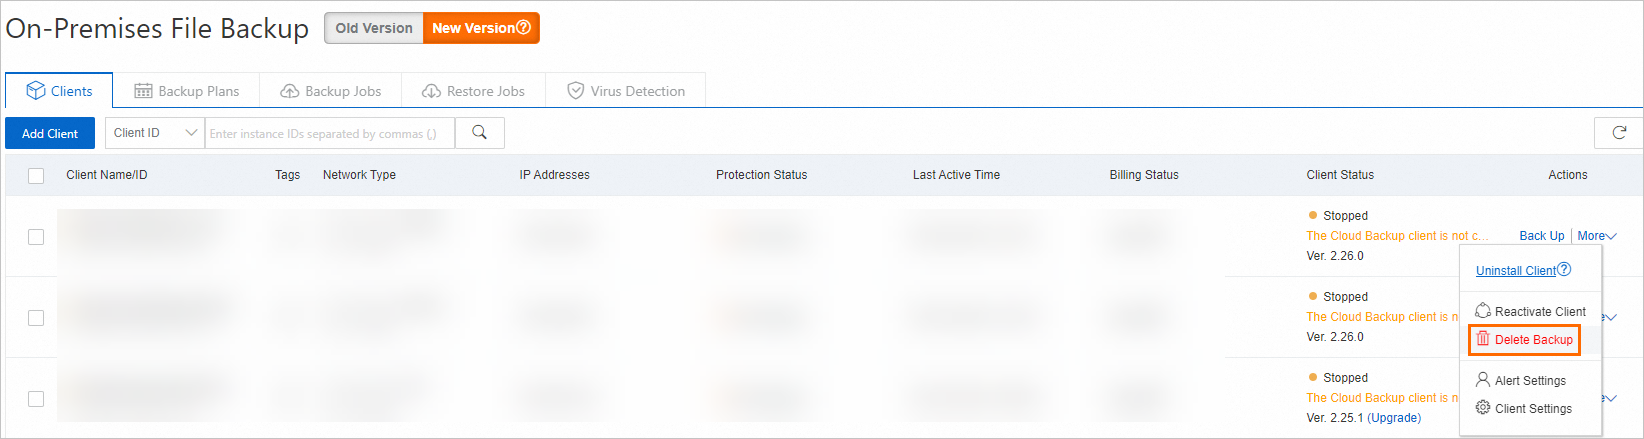
How do I reactivate a file client?
To use the on-premises file backup (old version) feature, you must install a client. If the client fails to activate, its status is Not Activated in the console. Reactivate the client using one of the following methods.
Log on to the Cloud Backup console.
In the navigation pane on the left, choose . In the top navigation bar, select a region.
In the client list, find the client that you want to activate. In the Actions column of the client, choose .
Reactivate the client as prompted.
What do I do if an on-premises file backup fails with error code "0xc0000142"?
Issue
When you use a file backup client to back up on-premises files on a Windows system, the backup job fails and returns error code "0xc0000142".
Cause
Security software, such as Windows Defender or other antivirus programs, incorrectly deletes the ids.exe file. As a result, the client program hbrclient.exe fails when it attempts to start the ids.exe backup worker process.
If other processes on the system have high CPU usage, the Cloud Backup process may not obtain sufficient computing resources due to resource competition. This can cause the backup to run slowly, pause, or exit unexpectedly.
Local security policies may prevent system users from starting the `ids.exe` program.
Solution
Check the scan logs of your security software. Add the hbrclient.exe and ids.exe client programs to the trust list or whitelist to ensure that they can run correctly.
Upgrade the server specifications to meet backup performance requirements. After the upgrade, configure the CPU settings for the Cloud Backup client to balance backup performance with the business system load. For more information, see CPU Settings for the Backup Client.
To ensure that the program runs smoothly, log on to the system using an administrator account. For more information, see Administrator Account Logon.
Is the IP address displayed on the On-Premises File Backup page a local IP address?
The IP address on the On-Premises File Backup page may not be the actual IP address that you use. Cloud Backup does not automatically detect and display the correct IP address. The displayed IP address is for reference only and does not affect your backup jobs.
What do I do if the "Failed to write data to the backup vault. Check whether the firewall blocks connections to the domain name or port, and ensure sufficient network bandwidth." error is reported?
Issue
The client log reports the following error: "Failed to write data to the backup vault. Check whether the firewall blocks connections to the domain name or port, and ensure sufficient network bandwidth. file_path: client.PutObject: Put *: net/http: timeout awaiting response headers".
Cause
A network behavior detection tool detects illicit content and blocks the corresponding request.
Solution
Exclude the specified files that contain illicit content.
Log on to the Cloud Backup console.
In the navigation pane on the left, choose and select a region. On the Backup Plans tab, find the backup plan that you want to œquit
modify and click Edit in the Actions column.
On the Configure Plan page:
Select the Advanced Rule Mode checkbox.
Set Backup Folder Rule to Specified Folders.
Source Paths: Enter the path for the backup file. For more information on backup path rules, see the console.
Backup Rule: Select Exclude Files.
Enter Paths: Enter the path of the file to exclude. This path is the file_path from the log. For more information about path rules, see the description in the console.
Click OK.
Check the scan logs of the security software and add the
hbrclient.exeandids.exeprograms to the trust list or whitelist to ensure that they can run correctly.
What do I do if the Windows file client fails to install with the message "Failed to initialize the client. Check whether the entered parameters are correct."?
First, confirm whether the client is already installed. If it is, check the system for the residual registry entries listed below. If you find any of these entries, delete them and then try to install the client again.
HKLM:\\SYSTEM\\CurrentControlSet\\services\\eventlog\\Application\\hbrclient

HKLM:\\SYSTEM\\CurrentControlSet\\services\\eventlog\\Application\\hbrclientupdater

HKLM:\\SOFTWARE\\Alibaba, Inc.\\Aliyun Hybrid Backup Service Client
How do I switch accounts for an on-premises file backup?
Assume that you are performing an on-premises file backup using Account A and the backup client is installed on your local server. To switch to Account B to perform the backup, follow these steps.
Uninstall the Cloud Backup client that is associated with Account A. For more information, see How to uninstall the Cloud Backup client.
Delete the backup data.
After the uninstallation is complete, wait for one hour. Then, use Account A to log on to the Cloud Backup console. In the navigation pane on the left, click On-Premises File Backup. On the Clients tab, find the uninstalled client and choose . Follow the prompts to delete the backup data of the client.
Log on to the Cloud Backup console using Account B. Then, install the backup client and perform backup operations as normal.
How do I handle residual backup child processes after uninstalling the backup client?
After you uninstall the client, a backup child process (ids) may remain. This issue is caused by a bug in Red Hat kernel version 4.18.0-477.10.1.el8_8.x86_64 that blocks the file system from being read. For more information, see Red Hat Customer Portal. After the client is uninstalled, the backup child process might become a zombie process. A zombie process does not consume system resources, so no special action is usually required. However, to clear these zombie processes, try the following methods:
Run
sudo kill -s SIGCHLD 1. This command sends a SIGCHLD signal to process 1, prompting the system to reclaim the status information of the backup child process. This method might not be effective in all cases.If the file system where the backup directory is located can be unmounted, run the following command to unmount it. This operation might terminate the related system calls and clear the zombie process. For example, if the backup directory is in the
/path/to/backupfile system, replace the path as needed.sudo umount /path/to/backupIf the preceding methods do not work, run the
sudo rebootcommand to restart the system. A system restart clears all zombie processes.
What do I do if an on-premises file backup fails with an "Internal error" message?
Issue
An on-premises file backup fails, and an "Internal error" message is displayed in the console.
Cause
An antivirus program incorrectly deleted some client files. This makes the client installation incomplete and unable to perform backups.
Solution
View the client logs. For more information, see How to view the default installation path and logs of the Cloud Backup client.
If the log contains the keyword "Runner returns unknown error: open NUL: The system cannot find the file specified", download and install the client again. Then, add all files in the backup client directory to the whitelist of your antivirus software to prevent them from being deleted again.
Why does an on-premises file backup job take a long time to run?
Issue
An on-premises file backup job takes a long time to run in the console.
Cause
The previous backup job failed to create a file cache. As a result, a full backup is performed instead of an incremental backup. This extends the running time of the current backup job.
Solution
View the client logs. For more information, see How to view the default installation path and logs of the Cloud Backup client.
If the log contains the keywords "failed to create local file cache" and "Access is denied", it indicates that the file cache for the previous backup job was not created because the backup process did not have permission to access the cache.
The file cache path is
C:\Program Files\Aliyun Hybrid Backup Service Client\cache. Check the following items:Confirm that the permissions for the cache directory and installation directory are correctly configured to ensure that the backup process has read and write permissions.
Check whether other software, such as security or antivirus programs, is accessing or restricting access to this directory.
If you complete the preceding checks and the running time of subsequent backup jobs returns to normal, the permission issue might have been caused by a temporary factor. Continue to monitor the system status. If the issue reoccurs, further investigate the environment to determine the specific cause.