When users directly access Object Storage Service (OSS) resources, the access speed is limited by the downstream bandwidth of OSS and the region where the bucket is located. Use Global Accelerator to allow clients to connect to the nearest access point of the Alibaba Cloud acceleration network, improving client access speed and experience. This topic describes how to use Global Accelerator to accelerate access to OSS resources.
Use case
A company has its headquarters in the US (Virginia) region, and its massive files are stored in an Alibaba Cloud OSS bucket in the same region. Due to unstable cross-border networks, the office in China (Hong Kong) often experiences issues such as latency, jitter, and packet loss when accessing these OSS resources.

You can deploy Global Accelerator and configure the endpoint to be the OSS bucket address. Global Accelerator uses Alibaba Cloud's high-quality Border Gateway Protocol (BGP) bandwidth and global transmission network to accelerate access from clients in the China (Hong Kong) office to the OSS resources in the US (Virginia) region.
Prerequisites
You have activated OSS in the US (Virginia) region and have resources stored in a created bucket.
Procedure

This topic uses a pay-as-you-go standard Global Accelerator instance as an example to describe how to configure Global Accelerator to accelerate access to OSS resources. Before you create a pay-as-you-go standard Global Accelerator instance, note the following information:
GA instances use the pay-by-data-transfer metering method. You do not need to associate a basic bandwidth plan with pay-as-you-go GA instances. The billing of data transfer over the GA network is managed by Cloud Data Transfer (CDT). For more information, see Traffic billing.
The first time you use a pay-as-you-go GA instance, you must Activate the Service.
Step 1: Configure basic information about an instance
Log on to the GA console.
On the Instances page, click Create Standard Pay-as-you-go Instance.
In the Basic Instance Configuration step, configure the parameters based on the following table and click Next.
Parameter
Description
GA Instance Name
Enter a name for the GA instance.
Instance Billing Method
Pay-As-You-Go is selected by default.
You are charged instance fees, Capacity Unit (CU) fees, and data transfer fees for pay-as-you-go standard Global Accelerator instances.
For more information about instance fees and CU fees, see Billing of pay-as-you-go GA instances.
For more information about data transfer fees, see Traffic billing.
Resource Group
Select the resource group to which the standard Global Accelerator instance belongs.
The resource group must be created by the current Alibaba Cloud account in Resource Management. For more information, see Create a resource group.
Step 2: Configure an acceleration area
Specify acceleration regions and allocate bandwidth to each acceleration region.
In the Configure Acceleration Area step, configure the parameters based on the following table and click Next.
Parameter | Description |
Acceleration Area | Select one or more regions from the drop-down list and click Add. In this example, the China (Hong Kong) region in the Asia Pacific section is selected. |
Assign Bandwidth | |
Maximum Bandwidth | Specify the maximum bandwidth for the acceleration region. Each acceleration region supports a bandwidth range of 2 to 10,000 Mbit/s. The maximum bandwidth is used for bandwidth throttling. The data transfer fees are managed by CDT. In this example, the default value 200 Mbit/s is used. Important If you specify a small value for the maximum bandwidth, throttling may occur and packets may be dropped. Specify a maximum bandwidth based on your business requirements. |
IP Protocol | Select the IP version that is used to connect to Global Accelerator. In this example, the default value IPv4 is selected. |
ISP Line Type | Select an ISP line type for the Global Accelerator instance. BGP (Multi-ISP) is selected in this example. |
Step 3: Configure a listener
A listener listens for connection requests and distributes the requests to endpoints based on the port and the protocol that you specify. Each listener is associated with an endpoint group. You can associate an endpoint group with a listener by specifying the region to which you want to distribute network traffic. After you associate an endpoint group with a listener, network traffic is distributed to the optimal endpoint in the endpoint group.
On the Configure Listeners wizard page, configure the listener, and then click Next.
This section only introduces the configuration items relevant to this topic. Keep the default configuration for other items. For more information, see Add and manage intelligent routing listeners.
Parameter | Description |
Listener Name | Enter a name for the listener. |
Routing Type | Select a routing type. In this example, select Intelligent Routing. |
Protocol | Select the protocol type for the listener. In this example, select TCP. Note OSS supports access via HTTP and HTTPS. Note the following recommendations for listener protocols:
|
Port | Specify the listener port that is used to receive and forward requests to endpoints. The port number must be in the range of 1 to 65499. You can specify up to 30 ports for each listener. Separate multiple ports with commas (,), for example, 80,90,8080. If you have multiple consecutive ports, you can use a hyphen (-) to specify a port range, for example, 80-85. In this example, enter 80,443. |
Client Affinity | Select whether to maintain client affinity. Maintaining client affinity means that when a client accesses a stateful application, all requests from the same client can be directed to the same endpoint. In this example, select Source IP. |
Step 4: Configure endpoint groups and endpoints
On the Configure an Endpoint Group wizard page, configure the endpoint group and endpoints according to the following information, and then click Next.
This section only introduces the configuration items relevant to this scenario. For more information about endpoint configuration items, see Add and manage endpoint groups for intelligent routing listeners.
Parameter
Description
Region
Select the region to which the endpoint group belongs.
In this example, select US (Virginia).
Endpoint Configuration
An endpoint is the target host that client requests access. Configure endpoints according to the following information:
Backend Service Type: Select OSS.
Backend Service: Select the OSS bucket that needs accelerated access.
Weight: Enter the endpoint weight, with a value range of 0 to 255. Global Accelerator routes traffic to endpoints proportionally based on the weights you configure. In this example, keep the default value of 255.
WarningIf the weight of an endpoint is set to 0, Global Accelerator stops distributing traffic to that endpoint. Proceed with caution.
Preserve Client IP
Select whether to preserve the client source IP.
If you select to preserve the client source IP, the backend server can obtain the client source IP through this feature. For more information, see Preserve client IP addresses.
In this example, keep the default configuration Do Not Preserve.
In the Configuration Review step, check the configurations and click Submit.
NoteIt takes 3 to 5 minutes to create a GA instance.
Optional: After the creation task is completed, click Go to Instance Details at the bottom of the creation task details list. On the instance details page, you can select tabs such as Instance Information, Listeners, Acceleration Areas, and others to view the instance configuration information.
Step 5: Configure Hosts or DNS resolution
If you use the OSS domain name provided by Alibaba Cloud to access backend OSS resources, configure Hosts resolution locally. If you use a custom domain name (self-owned domain name) to access backend OSS resources, configure DNS resolution. After configuration, requests to access backend OSS resources will be forwarded to GA, achieving acceleration effects.
Hosts resolution
Configure the local Hosts resolution file to add the accelerated IP as the resolution address for the OSS domain name. For OSS domain name composition rules, see Access OSS through IPv6 protocol.
This example uses the Alibaba Cloud Linux 3 operating system for testing. Different types of operating systems have different test commands. For specific test commands, refer to your operating system's user guide.
Open a command line window on a computer in the China (Hong Kong) office.
Configure the Hosts resolution file.
Run the following command to open the /etc/hosts file:
vim /etc/hostsPress the i key to enter edit mode, and add the following information at the end of the file:
<Accelerated IP> <Source BucketName>.<Endpoint of the source Bucket>After making the changes, press the Esc key, enter
:wq!, and press the Enter key to save the modified configuration file and exit edit mode.
Run the following command to restart the network service:
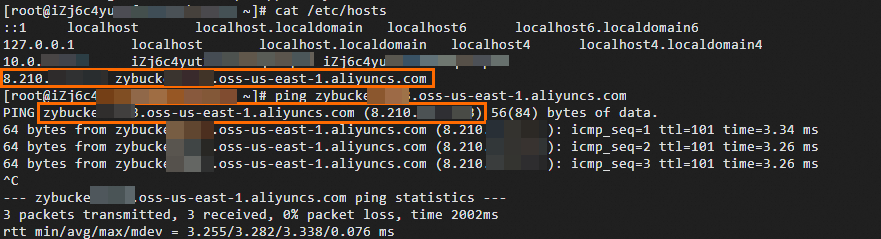
systemctl restart NetworkManagerAfter configuration, run the following commands to check the configured /etc/hosts file and whether the Hosts resolution configuration is effective:
cat /etc/hosts
ping <OSS domain name>
Upon verification, the /etc/hosts file has been written with the mapping relationship between the OSS domain name and the accelerated IP, and the Hosts resolution configuration is effective.
DNS resolution
Configure DNS resolution to forward requests accessing backend OSS resources to Global Accelerator, achieving acceleration effects. Choose one of the following options:
Add an A record to point the backend OSS bucket domain name to an IPv4 address, which is the accelerated IP allocated by the Global Accelerator instance.
Add a CNAME record to point the backend OSS bucket domain name to another domain name, which is the CNAME address allocated by the Global Accelerator instance.
Before configuring DNS resolution, make sure you have bound the custom domain name to the bucket where the resources are located. Otherwise, you cannot pass OSS domain name verification. The custom domain name format here is <Source BucketName>.<Self-owned domain name>. For specific operations, see Map a custom domain name to the default domain name of a bucket.
- Log on to the Alibaba Cloud DNS console.
If your domain name is not registered with Alibaba Cloud Domain Names, you must add your domain name to the Alibaba Cloud DNS console.
NoteIf your domain name is not registered using Alibaba Cloud Domains, you must add your domain name to Alibaba Cloud DNS before you can configure a DNS record. For more information, see Add a domain name. If your domain name is registered using Alibaba Cloud Domains, skip this step.
On the Public Zone page, find the target domain name, and click Settings in the Actions column.
Create or modify the DNS record that points your custom domain to the GA instance.
If a CNAME record for your custom domain already exists (for example, if you previously enabled Add CNAME Record Automatically ), find the record and click Edit in the Actions column.
If no record for your custom domain exists, click Add Record.
In the Add Record or Edit Record panel, complete the following configuration, and then click OK.
A record
Parameter
Description
Record Type
Select A.
An A record is used to point a domain name to an IPv4 address.
Hostname
Enter the prefix of the accelerated domain name.
If you did not enable Add CNAME Record Automatically when binding the custom domain name to the bucket where resources are located, enter the source bucket name as the host record.
If you enabled Add CNAME Record Automatically when binding the custom domain name to the bucket where resources are located, make sure the host record is the source bucket name, no modification is needed.
DNS Request Source
Keep the default.
TTL
Indicates the cache time of DNS records on DNS servers. The smaller the value, the faster the modified records take effect across different locations.
In this example, use the default value of 10 minutes.
Record Value
Enter the accelerated IP allocated by the Global Accelerator instance.
CNAME record
Parameter
Description
Record Type
Select CNAME.
A CNAME record is used to point a domain name to another domain name.
Hostname
Enter the prefix of the accelerated domain name.
If you did not enable Add CNAME Record Automatically when binding the custom domain name to the bucket where resources are located, enter the source bucket name as the host record.
If you enabled Add CNAME Record Automatically when binding the custom domain name to the bucket where resources are located, make sure the host record is the source bucket name, no modification is needed.
Query Source
Keep the default.
TTL
Indicates the cache time of DNS records on DNS servers. The smaller the value, the faster the modified records take effect across different locations.
In this example, use the default value of 10 minutes.
Record Value
Enter the CNAME allocated by the Global Accelerator instance.
You can view the CNAME allocated by the Global Accelerator instance on the Instances page.
After configuration, you can run the following command to check whether the DNS resolution configuration is effective:
ping <Custom domain name>The following verification process uses configuring a CNAME resolution record as an example. Upon verification, if
pingto the custom domain name is redirected to the Global Accelerator's CNAME, it indicates that the DNS resolution configuration has taken effect.
Step 6: Access testing
Complete the following operations to test whether clients in China (Hong Kong) can access OSS resources in the US (Virginia) headquarters through OSS domain names or custom domain names, and achieve accelerated access.
This example uses the ossutil tool provided by Alibaba Cloud OSS service to copy files from the source bucket in US (Virginia) to a client in China (Hong Kong). For specific installation methods, see Download and install ossutil.
Open a command line window on a computer in the China (Hong Kong) client.
Run the following command to copy files from the source bucket in US (Virginia) to the client in China (Hong Kong):
Before GA is used:
ossutil64 --retry-times 10 -e <Endpoint of the source Bucket> -k <AccessKey Secret of the source account> -i <AccessKey ID of the source account> -f cp oss://<Source BucketName>/<Source file> ./NoteWhen not using Global Accelerator for copying, the domain name you actually access is
<Source BucketName>.<Endpoint of the source Bucket>. For example:testBucketName.oss-us-west-1.aliyuncs.com.Figure 1. Access response before acceleration

After using Global Accelerator, the commands executed differ depending on whether a custom domain name is used.
Accelerated access without custom domain name:
ossutil64 --retry-times 10 -e <Endpoint of the source Bucket> -k <AccessKey Secret of the source account> -i <AccessKey ID of the source account> -f cp oss://<Source BucketName>/<Source file> ./NoteThe actual domain name and command executed here are the same as before using Global Accelerator, but you need to ensure that you have configured the Hosts resolution file to direct access requests to the accelerated IP of Global Accelerator. For specific operations, see Step 5: Configure Hosts or DNS resolution.
When not using a custom domain name for copying, the domain name you actually access is
<Source BucketName>.<Endpoint of the source Bucket>. For example:testBucketName.oss-us-west-1.aliyuncs.com.
Figure 2. Access response with acceleration without custom domain name

Accelerated access with a custom domain name:
ossutil64 --retry-times 10 -e <Self-owned domain name> -k <AccessKey Secret of the source account> -i <AccessKey ID of the source account> -f cp oss://<Source BucketName>/<Source file> ./NoteMake sure you have configured DNS resolution files to direct access requests to Global Accelerator. For specific operations, see Step 5: Configure Hosts or DNS resolution.
When using a custom domain name for copying, the domain name you actually access is
<Source BucketName>.<Self-owned domain name>. For example:testBucketName.example.com
Figure 3. Access response with custom domain name acceleration

Testing shows that using Global Accelerator reduces the response time for clients in China (Hong Kong) accessing OSS resources in US (Virginia).
NoteThe actual performance improvement from using GA will depend on your specific network conditions and test environment.