ApsaraMQ for Kafka triggers invoke Function Compute functions when messages are published to a Kafka topic, enabling event-driven processing without polling.
How it works
ApsaraMQ for Kafka integrates with Function Compute through EventBridge. When you create a trigger in the Function Compute console, FC automatically creates event streams in EventBridge based on the trigger configuration.
Once active, the trigger monitors the specified topic. When a message is published to ApsaraMQ for Kafka, EventBridge delivers one or more messages in a batch to the associated function, based on your batch settings.
Limits
The ApsaraMQ for Kafka instance must reside in the same region as the function.
If the number of event streams reaches the upper limit, no additional Kafka triggers can be created. For the limit, see Limits.
Prerequisites
Before you begin, ensure that you have:
EventBridge: Activated EventBridge and granted permissions to a RAM user
Function Compute: An event function
ApsaraMQ for Kafka: A deployed instance and a topic and consumer group
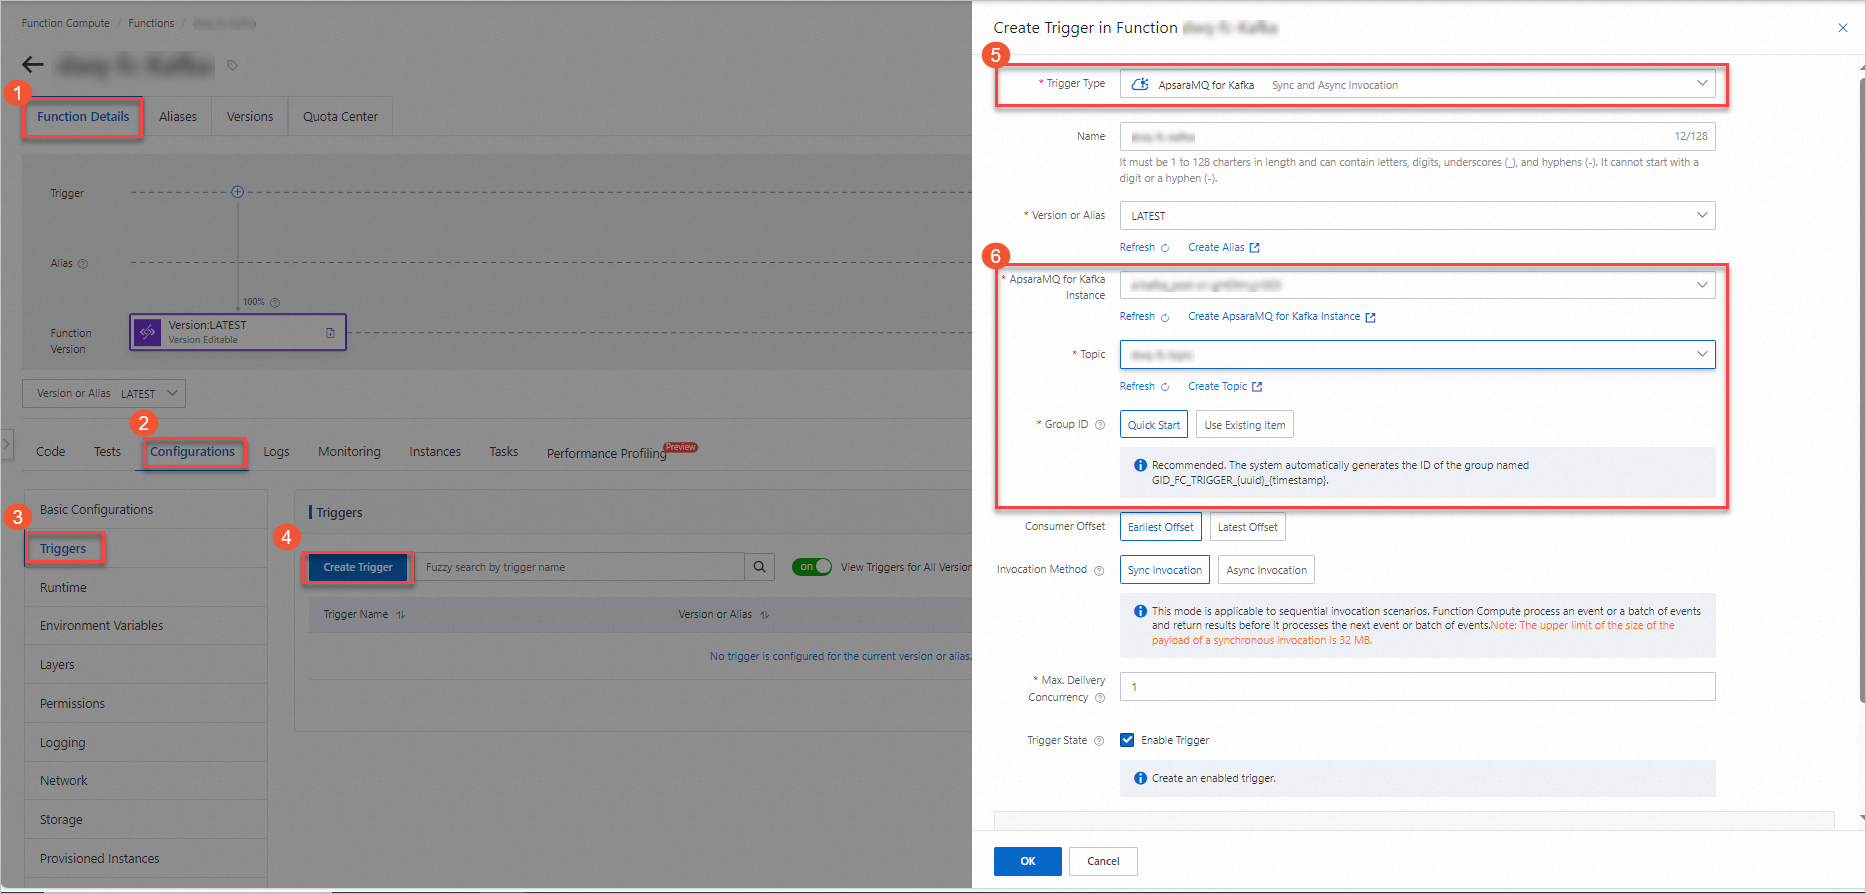
Step 1: Create a trigger
Log on to the Function Compute console and open the target function.
On the Configurations tab, go to the Triggers page and click Create Trigger.
Configure the trigger parameters described in the following table, then click OK.
| Parameter | Required | Description | Example |
|---|---|---|---|
| Consumer offset | Yes | The point from which EventBridge starts pulling messages. Earliest Offset: start from the oldest available message. Latest Offset: start from new messages only. | Earliest Offset |
| Invocation method | Yes | How the function is invoked when an event or batch of events is delivered. Sync Invocation: waits for a response before processing the next batch; payload limit is 32 MB. See Synchronous invocation. Async Invocation: returns immediately and continues to the next batch; payload limit is 128 KB. See Asynchronous invocation. | Sync Invocation |
| Max. Delivery Concurrency | No | The maximum number of Kafka messages delivered to Function Compute concurrently. Valid values: 1–300. Available only for Sync Invocation. To increase the limit, go to Quota Center of EventBridge, find EventStreaming FC Sink Maximum Concurrent Number of Synchronous Posting, and click Apply. | 1 |
For advanced settings such as push settings, retry policies, and dead-letter queues, see Advanced features of triggers.
Step 2: (Optional) Configure test parameters
The trigger passes Kafka messages to the function as the event parameter. To test the function without publishing a real message, manually configure a test event that simulates the trigger payload.
Note: The simulated test is useful for validating your parsing logic, but it does not test the full trigger pipeline. To verify end-to-end behavior, use an actual Kafka message as described in Step 3.
On the Code tab, click the
 icon next to Test Function and select Configure Test Parameters.
In the Configure Test Parameters panel, click Create New Test Event or Modify Existing Test Event, enter a name and event content, and click OK.
The following example shows the event structure for two batched messages:
[
    {
        "specversion": "1.0",
        "id": "8e215af8-ca18-4249-8645-f96c1026****",
        "source": "acs:alikafka",
        "type": "alikafka:Topic:Message",
        "subject": "acs:alikafka_pre-cn-i7m2t7t1****:topic:mytopic",
        "datacontenttype": "application/json; charset=utf-8",
        "time": "2022-06-23T02:49:51.589Z",
        "aliyunaccountid": "164901546557****",
        "data": {
            "topic": "****",
            "partition": 7,
            "offset": 25,
            "timestamp": 1655952591589,
            "headers": {
                "headers": [],
                "isReadOnly": false
            },
            "key": "keytest",
            "value": "hello kafka msg"
        }
    },
    {
        "specversion": "1.0",
        "id": "8e215af8-ca18-4249-8645-f96c1026****",
        "source": "acs:alikafka",
        "type": "alikafka:Topic:Message",
        "subject": "acs:alikafka_pre-cn-i7m2t7t1****:topic:mytopic",
        "datacontenttype": "application/json; charset=utf-8",
        "time": "2022-06-23T02:49:51.589Z",
        "aliyunaccountid": "164901546557****",
        "data": {
            "topic": "****",
            "partition": 7,
            "offset": 25,
            "timestamp": 1655952591589,
            "headers": {
                "headers": [],
                "isReadOnly": false
            },
            "key": "keytest",
            "value": "hello kafka msg"
        }
    }
]
The data object contains the Kafka-specific fields:
| Field | Type | Example | Description |
|---|---|---|---|
topic | String | TopicName | The topic name. |
partition | Int | 1 | The partition number from which the message was consumed. |
offset | Int | 0 | The message offset within the partition. |
timestamp | String | 1655952591589 | The Unix timestamp (ms) indicating when message consumption started. |
For the CloudEvents envelope fields (specversion, id, source, type, etc.), see Event overview.
Step 3: Write and test function code
On the Code tab, write your function code in the editor and click Deploy. The following Node.js example shows the function handler:
'use strict';
/*
To enable the initializer feature
please implement the initializer function as below:
exports.initializer = (context, callback) => {
  console.log('initializing');
  callback(null, '');
};
*/
exports.handler = (event, context, callback) => {
  console.log("event: %s", event);
  // Parse the event parameters and process the event.
  callback(null, 'return result');
}
Test the function using one of the following methods:
Simulated test: Click Test Function to use the test event configured in Step 2. This is useful for validating your parsing logic without a live Kafka connection.
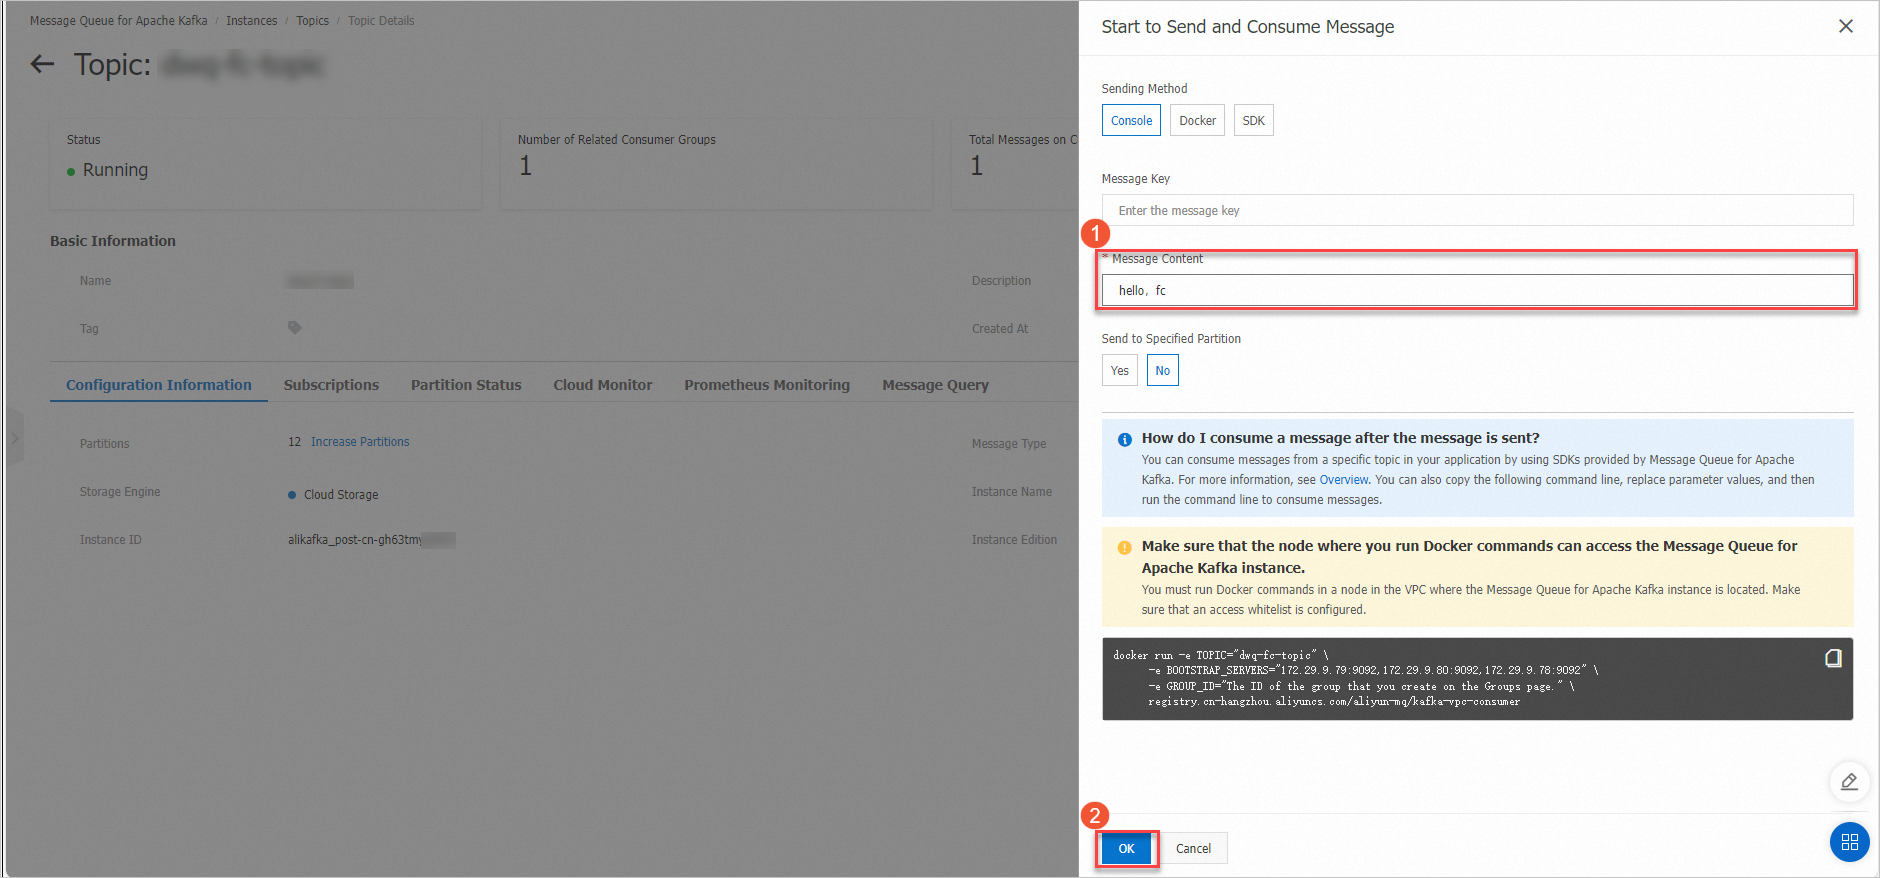
End-to-end test: Log on to the ApsaraMQ for Kafka console, select the topic, and click Send Message to publish a real message. The trigger detects the message and invokes the function automatically.
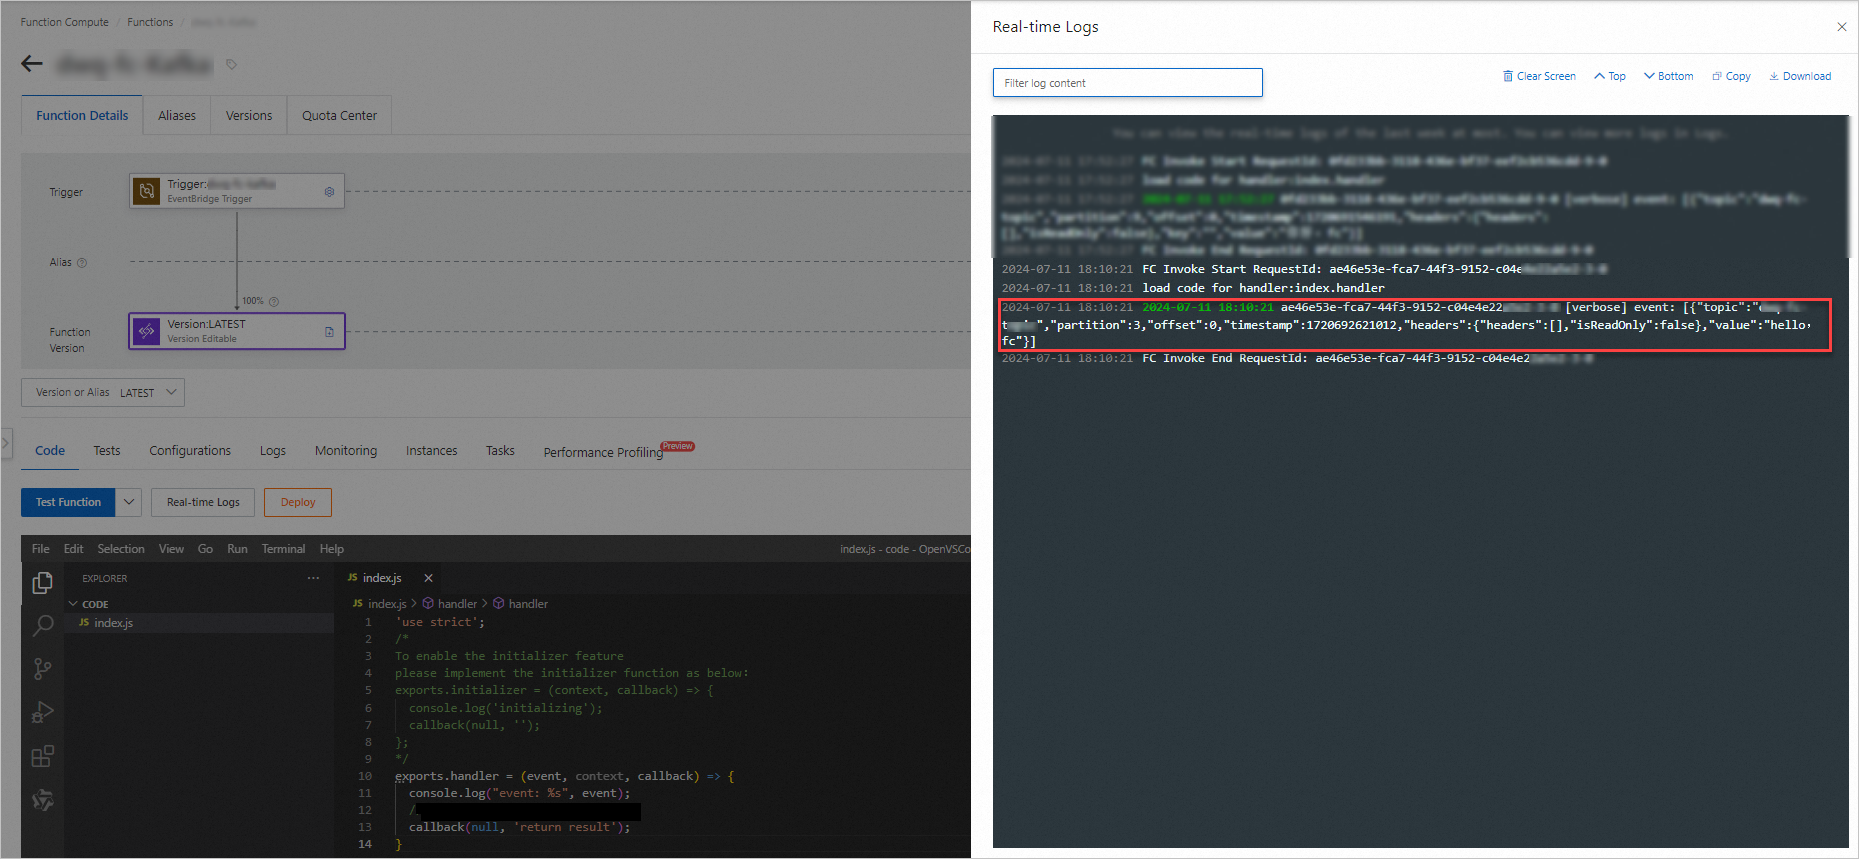
After execution, view the output in Real-time Logs.
What's next
To modify or delete an existing trigger, see Manage triggers.