StarRocks catalogs let you access StarRocks metadata—databases, tables, and partitions—directly in the Realtime Compute for Apache Flink development console, without manually writing DDL statements for each table. Flink maps StarRocks tables automatically so you can query or write data right away.
This topic covers how to create, view, use, and drop a StarRocks catalog.
Limitations
-
StarRocks catalogs require engine version vvr-6.0.6-flink-1.15 or later.
-
StarRocks catalogs are read-only with respect to schema: you cannot create or modify StarRocks tables through a catalog.
Create a StarRocks catalog
Two methods are available: the console UI and Flink SQL. The UI is the recommended method.
Create a StarRocks catalog on the console
-
Log on to the Realtime Compute for Apache Flink console. Find the workspace you want to manage and click Console in the Actions column.
-
In the left-side navigation pane, click Catalogs.
-
On the Catalog List page, click Create Catalog. In the Create Catalog wizard, select StarRocks on the Built-in Catalog tab and click Next.
-
Configure the catalog parameters.
ImportantStarRocks catalog configurations cannot be modified after creation. To change any setting, drop the existing catalog and create a new one.
Parameter Description Required Notes catalog nameName of the StarRocks catalog. Yes Lowercase letters and digits only. Hyphens (-), underscores (_), and uppercase letters are not allowed. endpointEndpoint of a FrontEnd (FE) node. Yes Format: jdbc:mysql://ip:port. The default JDBC port is 9030.dbnameDefault StarRocks database to connect to. Yes — usernameUsername for accessing StarRocks. Yes — passwordPassword for accessing StarRocks. Yes Use a variable instead of a plaintext password to avoid credential exposure. See Manage variables. 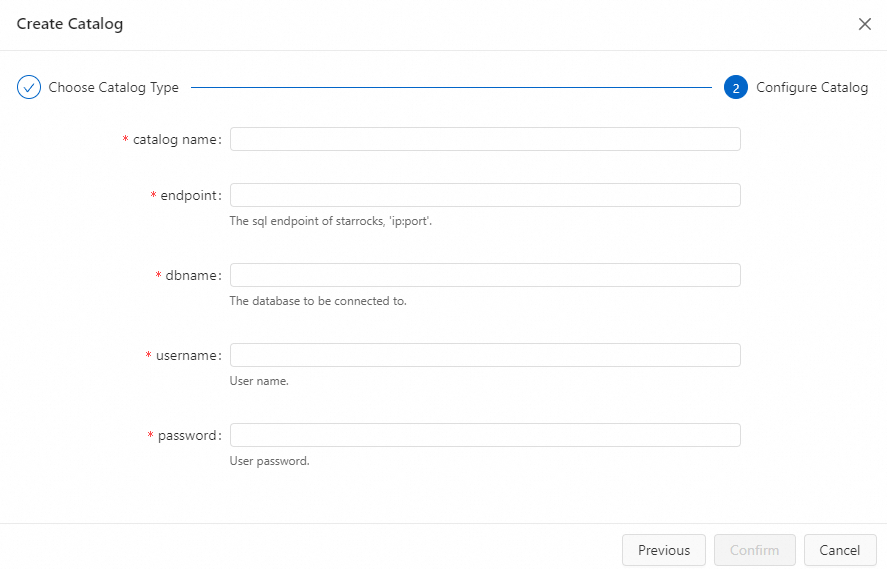
-
Click Confirm.
The catalog appears on the Catalog List page.
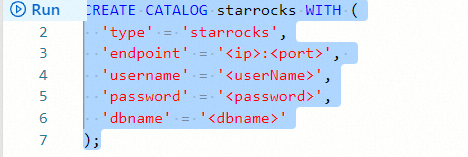
Create a StarRocks catalog using Flink SQL
In the SQL editor on the Scripts page, enter a CREATE CATALOG statement, select the statement, and click Run on the left side.
CREATE CATALOG <catalogname> WITH (
  'type' = 'starrocks',
  'endpoint' = '<ip>:<port>',
  'username' = '<userName>',
  'password' = '<password>',
  'dbname' = '<dbname>'
);
The configuration options differ depending on your VVR version.
VVR 11+
| Option | Description | Required | Notes |
|---|---|---|---|
catalogname |
Name of the StarRocks catalog. | Yes | Lowercase letters (a–z) and digits (0–9) only. |
type |
Connector type. | Yes | Set to starrocks. |
endpoint |
FrontEnd (FE) endpoint. | No | Format: jdbc:mysql://ip:port. Default port: 9030. Use this option to avoid configuring jdbc-url and http-url separately. |
jdbc-url |
JDBC URL for the FE MySQL server. | No | Separate multiple addresses with commas. Format: jdbc:mysql://<fe_host1>:<fe_query_port1>,<fe_host2>:<fe_query_port2>. Must be used together with http-url. |
http-url |
HTTP URL for the FE HTTP server. | No | Separate multiple addresses with semicolons. Format: <fe_host1>:<fe_http_port1>;<fe_host2>:<fe_http_port2>. Must be used together with jdbc-url. |
username |
Username for accessing StarRocks. | Yes | — |
password |
Password for accessing StarRocks. | Yes | Use a variable instead of a plaintext value. See Namespace variables. |
dbname |
Default database to connect to. | No | Equivalent to default-database. Use either one. |
default-database |
Default database to connect to. | No | Compatibility alias for dbname. Use either one. |
table.num-buckets |
Default number of buckets per partition for tables created through the catalog. | No | — |
table.char-expand-multiple |
Multiplier applied to VARCHAR and CHAR column lengths when creating tables through the catalog. |
No | Default: 4. |
table.binary-padding |
Number of characters added to VARBINARY and BINARY column lengths when creating tables through the catalog. |
No | Default: 2. |
table.key-type |
Table type for tables created through the catalog. | No | Valid values: PRI (default, primary key table), UNI (unique key table), AGG (aggregate table), DUP (duplicate key table). |
table.keys |
Key fields for tables created through the catalog. | No | — |
table.distribution-keys |
Distribution columns (bucket keys) for tables created through the catalog. | No | If not specified, primary key tables use the primary key as the bucket key by default. Important Do not set this parameter to an empty string ( |
table.enable-null-primary-key |
Whether Flink treats nullable primary key columns in StarRocks as non-nullable. | No | Valid values: false (default), true. When set to true, make sure upstream data has no NULL values in primary key columns to avoid unexpected behavior. |
VVR 8 and earlier
| Option | Description | Required | Notes |
|---|---|---|---|
catalogname |
Name of the StarRocks catalog. | Yes | Lowercase letters (a–z) and digits (0–9) only. |
type |
Connector type. | Yes | Set to starrocks. |
endpoint |
FrontEnd (FE) endpoint. | Yes | Format: jdbc:mysql://ip:port. Default port: 9030. |
username |
Username for accessing StarRocks. | Yes | — |
password |
Password for accessing StarRocks. | Yes | Use a variable instead of a plaintext value. See Namespace variables. |
dbname |
Default database to connect to. | Yes | — |
View a StarRocks catalog
-
Log on to the Realtime Compute for Apache Flink console. Find the workspace you want and click Console in the Actions column.
-
In the left-side navigation pane, click Catalogs.
-
On the Catalog List page, find the catalog. The Name and Type columns show its basic details.
NoteTo browse the databases and tables inside the catalog, click View in the Actions column.
Use a StarRocks catalog
A catalog exposes StarRocks data as a three-level namespace: catalog_name.db_name.table_name. Reference tables in Flink SQL using backtick-quoted identifiers at each level.
| Flink namespace level | StarRocks equivalent |
|---|---|
| Catalog name | Defined in Flink only |
| Database name | StarRocks database name |
| Table name | StarRocks table name |
Read data from a StarRocks table
VVR 11+
INSERT INTO ${other_sink_table}
SELECT ...
FROM `${catalog_name}`.`${db_name}`.`${table_name}`
VVR 8 and earlier
The OPTIONS hint is required to specify the connector parameters for the source table.
INSERT INTO ${other_sink_table}
SELECT ...
FROM `${catalog_name}`.`${db_name}`.`${table_name}`
    /*+
        OPTIONS('connector' = 'starrocks', 'jdbc-url' = 'jdbc:mysql://ip:port', 'scan-url' = 'ip:port')
    */
Write data to a StarRocks table
VVR 11+
INSERT INTO `${catalog_name}`.`${db_name}`.`${table_name}`
SELECT ...
FROM ${other_source_table}
VVR 8 and earlier
The OPTIONS hint is required to specify the connector parameters for the result table.
INSERT INTO `${catalog_name}`.`${db_name}`.`${table_name}`
    /*+
        OPTIONS('connector' = 'starrocks', 'jdbc-url' = 'jdbc:mysql://ip:port', 'load-url' = 'ip:port', 'sink.buffer-flush.interval-ms' = '5000', 'sink.properties.row_delimiter' = '\x02', 'sink.properties.column_separator' = '\x01')
    */
SELECT ...
FROM ${other_source_table}
Use CTAS or CDAS to write to StarRocks
CTAS (CREATE TABLE AS SELECT) and CDAS (CREATE DATABASE AS DATABASE) let you create StarRocks tables or databases from existing sources in a single statement.
USE CATALOG sr_catalog;

CREATE TABLE IF NOT EXISTS `${table_name}`
WITH (
  ...
) AS TABLE ${other_source_table};


CREATE DATABASE IF NOT EXISTS `${db_name}`
WITH (
  ...
) AS DATABASE ${other_source_database};
For a complete walkthrough, see Ingest data from MySQL to StarRocks with Flink.
Drop a StarRocks catalog
Dropping a catalog does not affect running deployments. However, deployments that are not yet published or that need to be suspended will be affected. Proceed with caution.
Two methods are available: the console UI and Flink SQL. The UI is the recommended method.
Drop a StarRocks catalog on the console
-
Log on to the Realtime Compute for Apache Flink console. Find the workspace you want and click Console in the Actions column.
-
In the left-side navigation pane, click Catalogs.
-
On the Catalog List page, find the catalog and click Delete in the Actions column.
-
In the confirmation dialog, click Delete.
The catalog is removed from the Catalogs pane in the left-side navigation.
Drop a StarRocks catalog using Flink SQL
In the SQL editor on the Scripts page, enter the following statement, right-click it, and select Run.
DROP CATALOG `<catalog name>`;Replace <catalog name> with the name of the catalog you want to drop.
After the statement runs, verify the catalog is removed by checking the Catalogs pane in the left-side navigation.