A MaxCompute catalog lets you read and write MaxCompute tables in Flink SQL without declaring schemas manually. When you create a catalog, Realtime Compute for Apache Flink queries MaxCompute to fetch the schema of each physical table automatically, so you can use MaxCompute tables as source, dimension, or result tables directly in your deployments.
How it works
The following table shows how MaxCompute concepts map to Flink catalog concepts:
| Flink catalog concept | MaxCompute concept | Notes |
|---|---|---|
| Catalog | — | Defined in Flink only; represents the connection to MaxCompute |
| Database | MaxCompute project | One database per project. When catalog.schema.enabled is true, a database maps to a MaxCompute schema instead |
| Table | MaxCompute physical table | Data type mappings between both systems are created automatically. No DDL registration needed for existing tables |
Limitations
| Constraint | Details |
|---|---|
| Runtime version | Requires Ververica Runtime (VVR) 6.0.7 or later |
| Create databases | Not supported. Databases in a MaxCompute catalog refer to MaxCompute projects, which must already exist |
| Modify table schemas | Not supported |
| CREATE TABLE AS (CTAS) | Not supported. See CTAS |
| Catalog parameters | Cannot be changed after creation. To update a parameter, delete the catalog and create it again |
Prerequisites
Before you begin, make sure you have:
A Realtime Compute for Apache Flink workspace
A MaxCompute project and its endpoint
An Alibaba Cloud account with admin permission on the MaxCompute projects the catalog will access
The AccessKey ID and AccessKey secret for that account
Create a MaxCompute catalog
Two methods are available: the console UI and Flink SQL. Use the console UI unless you need to automate catalog creation through code.
Console UI (recommended)
Log on to the Realtime Compute for Apache Flink console. Find your workspace and click Console in the Actions column.
In the left navigation pane, click Catalogs.
On the Catalog List page, click Create Catalog. In the dialog box, select ODPS and click Next.
Configure the catalog parameters.
Parameter Description Required catalog nameA custom name for the catalog Yes endpointThe MaxCompute endpoint. See Endpoints Yes accessIdThe AccessKey ID of the account used to access MaxCompute. The account must have admin permission on the projects the catalog accesses Yes accessKeyThe AccessKey secret of the account Yes projectThe MaxCompute project to use as the default database. If left blank, the account's default project is used. After creation, all projects in your account appear in the catalog metadata No catalog.schema.enabledWhether to enable schema support. false(default): a Flink database maps to a MaxCompute project.true: a Flink database maps to a MaxCompute schema. Enable this for projects that use the schema featureNo 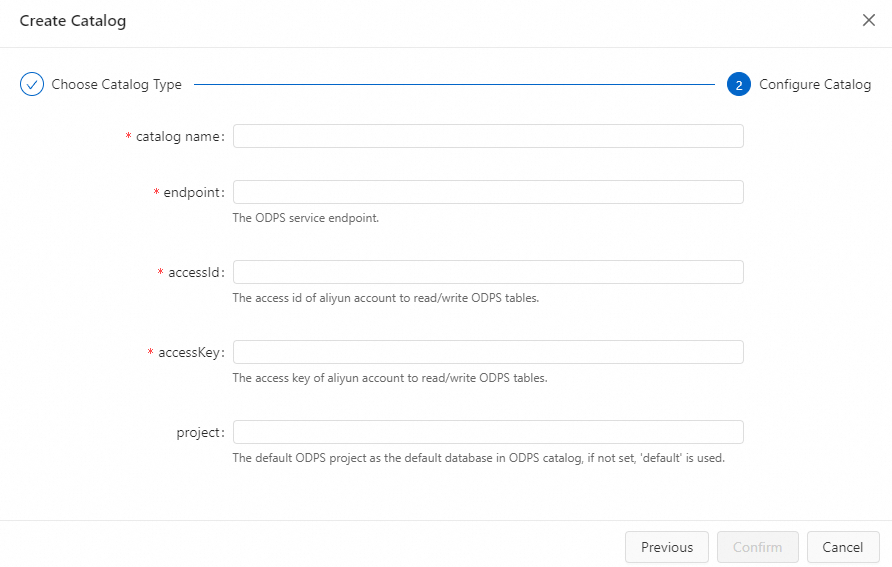
Click Confirm. The new catalog appears in the Catalogs pane on the left side of the page.
If the AccessKey pair lacks permissions for specific tables or databases in MaxCompute, an error is reported. This does not prevent you from reading or writing tables that are accessible.
Flink SQL
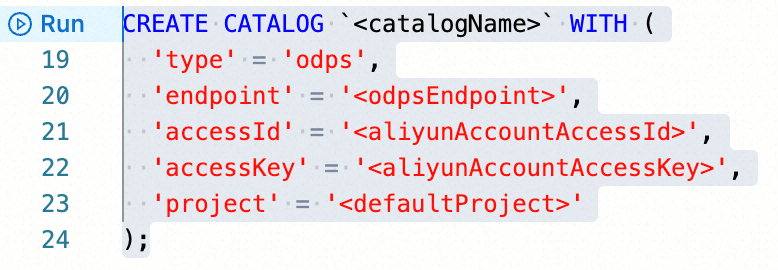
In the SQL Editor, run the following statement:
CREATE CATALOG `<catalogName>` WITH (
  'type' = 'odps',
  'endpoint' = '<odpsEndpoint>',
  'accessId' = '<aliyunAccountAccessId>',
  'accessKey' = '<aliyunAccountAccessKey>',
  'project' = '<defaultProject>',
  'userAccount' = '<RAMUserAccount>'
);| Parameter | Description | Required |
|---|---|---|
catalogName | A custom name for the catalog | Yes |
type | Set to odps | Yes |
endpoint | The MaxCompute endpoint. See Endpoints | Yes |
accessId | The AccessKey ID. The account must have admin permission on the projects the catalog accesses | Yes |
accessKey | The AccessKey secret | Yes |
project | The MaxCompute project to use as the default database | No |
userAccount | The Alibaba Cloud account name or RAM user name. Set this when the AccessKey secret belongs to a RAM user that has admin permission only on specific projects. Format: RAM$[<account_name>:]<RAM_name>. The catalog then lists only the projects that the account can access. See User planning and management | No |
Select the statement and click Run on the left side of the editor.
View a MaxCompute catalog
Console UI
Log on to the Realtime Compute for Apache Flink console. Find your workspace and click Console in the Actions column.
In the left navigation pane, click Catalogs.
On the Catalog List page, find the catalog and check the Catalog Name and Type columns. To browse databases and tables, click View in the Actions column.
Flink SQL
In the SQL Editor, run:
DESCRIBE `<catalogName>`.`<projectName>`.`<tableName>`;| Parameter | Description |
|---|---|
catalogName | The catalog name |
projectName | The MaxCompute project name |
tableName | The MaxCompute physical table name |
Select the statement, click Run, and view the table schema on the Results tab below the editor.
Use a MaxCompute catalog
Create a MaxCompute physical table
Running a Flink DDL CREATE TABLE statement against a MaxCompute catalog automatically creates the corresponding physical table in MaxCompute and maps data types between both systems.
MaxCompute column names are all lowercase. Flink DDL column names are case-sensitive — uppercase letters are converted to lowercase automatically. If two column names become identical after conversion, the statement fails.
Non-partitioned table
CREATE TABLE `<catalogName>`.`<projectName>`.`<tableName>` (
  f0 INT,
  f1 BIGINT,
  f2 DOUBLE,
  f3 STRING
);
Partitioned table
Place the partition key column at the end of the schema and declare it in PARTITIONED BY:
CREATE TABLE `<catalogName>`.`<projectName>`.`<tableName>` (
  f0 INT,
  f1 BIGINT,
  f2 DOUBLE,
  f3 STRING,
  ds STRING
) PARTITIONED BY (ds);
In this example, f0, f1, f2, and f3 are regular columns and ds is the partition key.
Read data from a MaxCompute catalog table
Because the catalog fetches schemas from MaxCompute automatically, no DDL declaration is required before reading.
Read all data (default)
SELECT * FROM `<catalogName>`.`<projectName>`.`<tableName>`;By default, this reads all partitions of a partitioned table.
Read a specific partition
SELECT * FROM `<catalogName>`.`<projectName>`.`<tableName>`
/*+ OPTIONS('partition' = 'ds=230613') */;
Read incrementally (incremental source table)
SELECT * FROM `<catalogName>`.`<projectName>`.`<tableName>`
/*+ OPTIONS('startPartition' = 'ds=230613') */;
Use as a dimension table
SELECT * FROM `<anotherTable>` AS l LEFT JOIN
`<catalogName>`.`<projectName>`.`<tableName>`
/*+ OPTIONS('partition' = 'max_pt()', 'cache' = 'ALL') */
FOR SYSTEM_TIME AS OF l.proc_time AS r
ON l.id = r.id;
For all available options, see MaxCompute connector.
Add a watermark
MaxCompute catalogs do not carry watermark information. To specify event time when using a catalog table as a source, use CREATE TABLE ... LIKE ...:
CREATE TABLE `<newTable>` ( WATERMARK FOR ts AS ts )
LIKE `<catalogName>`.`<projectName>`.`<tableName>`;
Here ts is a column of the DATETIME type in the MaxCompute physical table. After this statement runs, reads from <newTable> include watermark information.
Write data to a MaxCompute catalog table
MaxCompute catalogs support writing to both static and dynamic partitions. For the full list of result table options, see MaxCompute connector.
In the SELECT list, partition key columns must appear after regular columns, ordered by partition level.
Write to a static partition
-- Example: two-level partition (ds, hh), writing to a fixed partition
INSERT INTO `<catalogName>`.`<projectName>`.`<tableName>`
/*+ OPTIONS('partition' = 'ds=20231024,hh=09') */
SELECT <otherColumns>, '20231024', '09' FROM `<anotherTable>`;
Write to a dynamic partition
INSERT INTO `<catalogName>`.`<projectName>`.`<tableName>`
/*+ OPTIONS('partition' = 'ds,hh') */
SELECT <otherColumns>, ds, hh FROM `<anotherTable>`;
Delete a MaxCompute catalog
Deleting a catalog does not affect running deployments immediately. However, any deployment that references a table in the deleted catalog will fail when you publish or restart it. Delete with caution.
Console UI
Log on to the Realtime Compute for Apache Flink console. Find your workspace and click Console in the Actions column.
In the left navigation pane, click Catalogs.
On the Catalog List page, find the catalog and click Delete in the Actions column.
In the confirmation dialog, click Delete. Confirm that the catalog no longer appears in the Catalogs pane.
Flink SQL
In the SQL Editor, run:
DROP CATALOG `<catalogName>`;Running deployments are not affected immediately, but unpublished drafts and deployments that require a suspend-resume cycle will be affected.
Right-click the statement and choose Run. Verify that the catalog no longer appears in the Catalogs pane.
Data type mappings
For the complete MaxCompute data type reference, see MaxCompute data type system version 2.0.
MaxCompute to Flink
| MaxCompute | Flink |
|---|---|
| BOOLEAN | BOOLEAN |
| TINYINT | TINYINT |
| SMALLINT | SMALLINT |
| INT | INTEGER |
| BIGINT | BIGINT |
| FLOAT | FLOAT |
| DOUBLE | DOUBLE |
| DECIMAL(precision, scale) | DECIMAL(precision, scale) |
| CHAR(n) | CHAR(n) |
| VARCHAR(n) | VARCHAR(n) |
| STRING | STRING |
| BINARY | BYTES |
| DATE | DATE |
| DATETIME | TIMESTAMP(3) |
| TIMESTAMP | TIMESTAMP(9) |
| ARRAY | ARRAY |
| MAP | MAP |
| STRUCT | ROW |
| JSON | STRING |
Flink to MaxCompute
| Flink | MaxCompute |
|---|---|
| BOOLEAN | BOOLEAN |
| TINYINT | TINYINT |
| SMALLINT | SMALLINT |
| INTEGER | INT |
| BIGINT | BIGINT |
| FLOAT | FLOAT |
| DOUBLE | DOUBLE |
| DECIMAL(precision, scale) | DECIMAL(precision, scale) |
| CHAR(n) | CHAR(n) |
| VARCHAR / STRING | STRING |
| BINARY | BINARY |
| VARBINARY / BYTES | BINARY |
| DATE | DATE |
| TIMESTAMP(n<=3) | DATETIME |
| TIMESTAMP(3<n<=9) | TIMESTAMP |
| ARRAY | ARRAY |
| MAP | MAP |
| ROW | STRUCT |