Checkpoints and savepoints let you capture Flink job state so you can recover from failures, upgrade jobs, or roll back to a known-good point. This topic covers how to create, view, restore from, and delete checkpoints and savepoints.
Checkpoint vs. savepoint
| Concept | Who manages the lifecycle | Key behaviors | When to use |
|---|---|---|---|
| System checkpoint (Checkpoint in Apache Flink) | Flink system | Created and deleted automatically. Configure Checkpointing Interval, Checkpointing Timeout, and Min Interval Between Checkpoints. By default, one checkpoint is retained for recovery. Cannot be created or deleted manually. | Routine failure recovery during normal job operation. |
| Savepoint (Savepoint in Apache Flink) | User | Created manually or on a schedule. Deleted manually or by cleanup rules. Portable: can be shared between jobs with compatible state schemas. | Before upgrading job code, migrating to a new job, performing A/B testing, or any scenario requiring an explicit, user-controlled snapshot. |
Operations in this topic
The following table lists the operations covered in this topic. Find the scenario that matches your goal to jump directly to the relevant section.
| Operation | If you want to... |
|---|---|
| Manually create a savepoint | Capture job state at a specific point while the job is running, so you can restore from it later. Important
A manually created savepoint can only be deleted manually—automatic cleanup rules do not apply to it. |
| Configure scheduled automatic creation of savepoints | Have the system create savepoints at regular intervals while the job runs, without manual intervention. |
| View the state generation overview | Review checkpoint and savepoint history, including status, completion time, and size. |
| Restore a job from a specified savepoint | Start a stopped job from a specific savepoint, including a savepoint from another job. |
| Configure automatic cleanup rules for savepoints | Limit OSS storage costs by automatically deleting old savepoints based on count or age. |
| Manually delete a specific savepoint | Delete a savepoint that automatic cleanup rules do not cover (for example, a manually created savepoint). |
| Set state-related parameters | Configure the state backend, state TTL for SQL jobs, or local disk storage for temporary savepoint data. |
Manually create a savepoint
You can only create a savepoint while the job is in the RUNNING state.
If you select Stop With Savepoint when canceling a deployment, less data needs to be reprocessed on restart, but cancellation takes longer.
-
Go to the savepoint creation page.
-
Log on to the Realtime Compute for Apache Flink console.
-
In the Actions column of the target workspace, click Console.
-
On the O&M > Deployments page, click the name of the target job.
-
-
In the upper-right corner of the page, click Create Savepoint.
-
Select a savepoint format and enter a description.
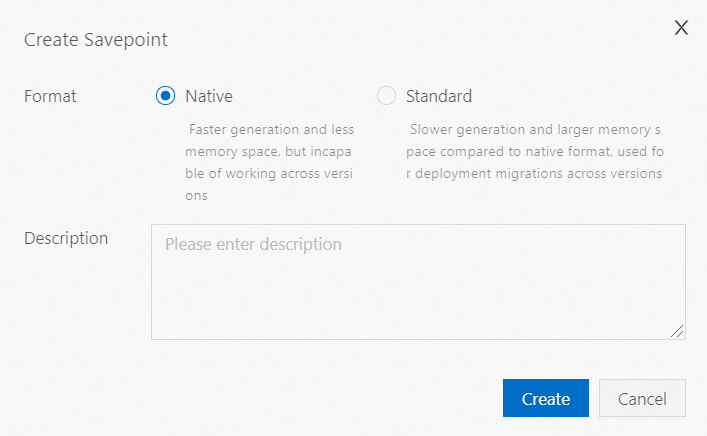
-
Click Create.
Configure scheduled automatic creation of savepoints
-
Go to the State page.
-
Log on to the Realtime Compute for Apache Flink console.
-
In the Actions column of the target workspace, click Console.
-
On the O&M > Deployments page, click the name of the target job.
-
Click State.
-
-
On the Configure tab, enable Savepoint automatically generated at regular intervals and set the schedule. Click Quick Setting to choose a preset interval, or enter a cron expression manually. To enter an expression manually, click each field and modify its value.
The minimum interval is 10 minutes. If you specify a shorter interval, the system uses 10 minutes.
Cron expression reference
The cron expression has five fields: minute hour day-of-month month day-of-week.
| Field | Required | Value range | Supported special characters |
|---|---|---|---|
| Minute | Yes | [0, 59] | * , - / |
| Hour | Yes | [0, 23] | * , - / |
| Day | Yes | [1, 31] | * , - / |
| Month | Yes | [1, 12] or [JAN, DEC] | * , - / |
| Week | Yes | [1, 7] or [MON, SUN] | * , - / |
In the [1, 7] format, 1 represents Monday and 7 represents Sunday.
Special characters:
| Character | Meaning | Example |
|---|---|---|
* |
All possible values | * in Month means every month |
, |
Specific values | 5,20 in Minute triggers at minutes 5 and 20 |
- |
Range | 5-20 in Minute triggers every minute from minute 5 to minute 20 |
/ |
Increment | 0/15 in Minute triggers every 15 minutes starting at minute 0; 3/20 triggers every 20 minutes starting at minute 3 |
Examples:
| Expression | Schedule |
|---|---|
15 10 * * * |
10:15 AM every day |
0 12 * * * |
12:00 PM every day |
0 10,14,16 * * * |
10:00 AM, 2:00 PM, and 4:00 PM every day |
0/30 9-17 * * * |
Every 30 minutes from 9:00 AM to 5:00 PM every day |
* 14 * * * |
Every minute from 2:00 PM to 2:59 PM every day |
0-5 14 * * * |
Every minute from 2:00 PM to 2:05 PM every day |
0/5 14 * * * |
Every 5 minutes from 2:00 PM to 2:55 PM every day |
0/5 14,18 * * * |
Every 5 minutes from 2:00–2:55 PM and 6:00–6:55 PM every day |
0 12 * * WED |
12:00 PM every Wednesday |
15 10 15 * * |
10:15 AM on the 15th of every month |
10,44 14 * 3 WED |
2:10 PM and 2:44 PM every Wednesday in March |
-
Field order:
minute hour day-of-month month day-of-week -
day-of-month and day-of-week use OR logic:
0 12 1 * 5triggers at 12:00 PM on the first day of each month or on every Friday—not only when the first day of the month falls on a Friday. -
The `?` character is not supported. Use
*to ignore a field.
View the state generation overview
-
Go to the State page.
-
Log on to the Realtime Compute for Apache Flink console.
-
In the Actions column of the target workspace, click Console.
-
On the O&M > Deployments page, click the name of the target job.
-
Click State.
-
-
On the Overview tab, review the following information.
| Category | Information shown |
|---|---|
| System checkpoint | Last successful and failed checkpoint: ID, completion time, duration, and checkpoint size |
| Savepoint | Last successful and failed savepoint: ID, completion time, duration, and failure time |
Restore a job from a specified savepoint
You can restore a job from any savepoint, including a savepoint created by a different job. To share a savepoint across jobs, the state schemas of both jobs must be compatible—for example, during A/B testing.
The job must be in the CANCELLED state before you can restore it from a savepoint. If the job is RUNNING, stop it first.
If you want to restart the job without restoring historical state, see Start a job for a stateless restart.
-
Go to the State page.
-
Log on to the Realtime Compute for Apache Flink console.
-
In the Actions column of the target workspace, click Console.
-
On the O&M > Deployments page, click the name of the target job.
-
Click State.
-
-
On the History tab, find the target savepoint in the Savepoints list.
-
In the Actions column for the target savepoint, select More > Start job from this savepoint.
-
In the Start Job dialog box, configure the startup settings. For details, see Start a job.
Configure automatic cleanup rules for savepoints
Automatic cleanup rules apply only to savepoints created by scheduled or automatic triggers. Manually created savepoints are never deleted by cleanup rules—delete them manually when no longer needed.
If a deployment is suspended for an extended period, savepoints are deleted based on the cleanup rules when the deployment next starts.
-
Go to the State page.
-
Log on to the Realtime Compute for Apache Flink console.
-
In the Actions column of the target workspace, click Console.
-
On the O&M > Deployments page, click the name of the target job.
-
Click State.
-
-
On the Configure tab, enable Scheduled automatic cleaning of savepoint and set the cleanup rules. Configure Number of historical savepoints saved and The maximum time to save historical savepoints. A savepoint is deleted when either condition is met.
-
Click Save Changes.
Manually delete a specific savepoint
Delete outdated savepoints periodically to avoid unnecessary Object Storage Service (OSS) charges. Manually created savepoints are not covered by automatic cleanup rules, so they must be deleted manually.
-
Go to the State page.
-
Log on to the Realtime Compute for Apache Flink console.
-
In the Actions column of the target workspace, click Console.
-
On the O&M > Deployments page, click the name of the target job.
-
Click State.
-
-
On the History tab, find the target savepoint in the Savepoints list.
-
In the Actions column for the target savepoint, select More > Delete this savepoint.
-
Click OK.
Set state-related parameters
-
Go to the O&M page of the target job.
-
Log on to the Realtime Compute for Apache Flink console.
-
In the Actions column of the target workspace, click Console.
-
On the O&M > Deployments page, click the target job.
-
-
On the Configuration tab, in the Parameters section, click Edit.
-
In Other Configuration, add the following parameters and click Save.
state.backend.incremental: true
table.exec.state.ttl: 129600000
For the full list of state-related parameters, see GeminiStateBackend configurations.
What's next
-
For common questions about checkpoints and savepoints, see Checkpoint FAQ.
-
For the impact of SQL changes on state compatibility, see SQL modifications and compatibility.