This tutorial shows how to use Realtime Compute for Apache Flink (Flink) with Apache Paimon to build a real-time data lake pipeline. You'll ingest order data from ApsaraDB RDS for MySQL into a Paimon table stored in Object Storage Service (OSS), synchronize table schema changes automatically, and run analytical queries on the ingested data.
How it works
-
Flink reads change data capture (CDC) events from MySQL using the MySQL connector. The source tables match a regex pattern, so multiple tables merge into one Paimon table.
-
Flink routes the changes to the target Paimon table through a data ingestion job.
-
Queries run against the Paimon table directly from the Flink console.
When you add a column to the MySQL source tables, Flink CDC propagates the schema change to Paimon automatically — no manual migration required.
Prerequisites
Before you begin, make sure you have:
-
A Realtime Compute for Apache Flink workspace. See Activate Realtime Compute for Apache Flink.
-
(If using a RAM user or RAM role) The required permissions to access the Flink console. See Permission management.
Step 1: Prepare the data source
-
Create an ApsaraDB RDS for MySQL instance and configure a database. Create a database named orders and a privileged account (or a standard account with read and write permissions for the orders database).
The RDS instance must be in the same virtual private cloud (VPC) as the Flink workspace. If they're in different VPCs, see Network connectivity.
-
Connect to the ApsaraDB RDS for MySQL instance and create the
orders_1andorders_2tables in the orders database.CREATE TABLE `orders_1` ( orderkey BIGINT NOT NULL, custkey BIGINT, order_status VARCHAR(100), total_price DOUBLE, order_date DATE, order_priority VARCHAR(100), clerk VARCHAR(100), ship_priority INT, comment VARCHAR(100), PRIMARY KEY (orderkey) ); CREATE TABLE `orders_2` ( orderkey BIGINT NOT NULL, custkey BIGINT, order_status VARCHAR(100), total_price DOUBLE, order_date DATE, order_priority VARCHAR(100), clerk VARCHAR(100), ship_priority INT, comment VARCHAR(100), PRIMARY KEY (orderkey) ); -
Insert test data into both tables.
INSERT INTO `orders_1` VALUES (1, 1, 'O', 131251.81, '1996-01-02', '5-LOW', 'Clerk#000000951', 0, 'nstructions sleep furiously among ');
INSERT INTO `orders_1` VALUES (2, 3, 'O', 40183.29, '1996-12-01', '1-URGENT', 'Clerk#000000880', 0, ' foxes. pending accounts at the pending, silent asymptot');
INSERT INTO `orders_1` VALUES (3, 6, 'F', 160882.76, '1993-10-14', '5-LOW', 'Clerk#000000955', 0, 'sly final accounts boost. carefully regular ideas cajole carefully. depos');
INSERT INTO `orders_1` VALUES (4, 6, 'O', 31084.79, '1995-10-11', '5-LOW', 'Clerk#000000124', 0, 'sits. slyly regular warthogs cajole. regular, regular theodolites acro');
INSERT INTO `orders_1` VALUES (5, 2, 'F', 86615.25, '1994-07-30', '5-LOW', 'Clerk#000000925', 0, 'quickly. bold deposits sleep slyly. packages use slyly');
INSERT INTO `orders_1` VALUES (6, 2, 'F', 36468.55, '1992-02-21', '4-NOT SPECIFIED', 'Clerk#000000058', 0, 'ggle. special, final requests are against the furiously specia');
INSERT INTO `orders_1` VALUES (7, 2, 'O', 171488.73, '1996-01-10', '2-HIGH', 'Clerk#000000470', 0, 'ly special requests ');
INSERT INTO `orders_1` VALUES (8, 6, 'O', 116923.00, '1995-07-16', '2-HIGH', 'Clerk#000000616', 0, 'ise blithely bold, regular requests. quickly unusual dep');
INSERT INTO `orders_1` VALUES (9, 3, 'F', 99798.76, '1993-10-27', '3-MEDIUM', 'Clerk#000000409', 0, 'uriously. furiously final request');
INSERT INTO `orders_1` VALUES (10, 3, 'O', 41670.02, '1998-07-21', '3-MEDIUM', 'Clerk#000000223', 0, 'ly final packages. fluffily final deposits wake blithely ideas. spe');
INSERT INTO `orders_2` VALUES (11, 6, 'O', 148789.52, '1995-10-23', '4-NOT SPECIFIED', 'Clerk#000000259', 0, 'zzle. carefully enticing deposits nag furio');
INSERT INTO `orders_2` VALUES (12, 5, 'O', 38988.98, '1995-11-03', '1-URGENT', 'Clerk#000000358', 0, ' quick packages are blithely. slyly silent accounts wake qu');
INSERT INTO `orders_2` VALUES (13, 4, 'F', 113701.89, '1992-06-03', '3-MEDIUM', 'Clerk#000000456', 0, 'kly regular pinto beans. carefully unusual waters cajole never');
INSERT INTO `orders_2` VALUES (14, 6, 'O', 46366.56, '1996-08-21', '4-NOT SPECIFIED', 'Clerk#000000604', 0, 'haggle blithely. furiously express ideas haggle blithely furiously regular re');
INSERT INTO `orders_2` VALUES (15, 4, 'O', 219707.84, '1996-09-20', '3-MEDIUM', 'Clerk#000000659', 0, 'ole express, ironic requests: ir');
INSERT INTO `orders_2` VALUES (16, 1, 'F', 20065.73, '1994-07-16', '3-MEDIUM', 'Clerk#000000661', 0, 'wake fluffily. sometimes ironic pinto beans about the dolphin');
INSERT INTO `orders_2` VALUES (17, 0, 'P', 65883.92, '1995-03-18', '1-URGENT', 'Clerk#000000632', 0, 'ular requests are blithely pending orbits-- even requests against the deposit');
INSERT INTO `orders_2` VALUES (18, 6, 'F', 79258.24, '1994-01-20', '5-LOW', 'Clerk#000000743', 0, 'y pending requests integrate');
INSERT INTO `orders_2` VALUES (19, 2, 'O', 116227.05, '1996-12-19', '4-NOT SPECIFIED', 'Clerk#000000547', 0, 'symptotes haggle slyly around the furiously iron');
INSERT INTO `orders_2` VALUES (20, 1, 'O', 215135.72, '1998-04-18', '3-MEDIUM', 'Clerk#000000440', 0, ' pinto beans sleep carefully. blithely ironic deposits haggle furiously acro');
Step 2: Create catalogs
-
Go to the Data Management page.
-
Log on to the Realtime Compute for Apache Flink console.
-
In the Actions column of the target workspace, click Console.
-
Click Data Management.
-
-
Create a Paimon catalog.
-
Click Create Catalog. On the Built-in Catalog tab, select Apache Paimon and click Next.
-
Enter the configuration information.
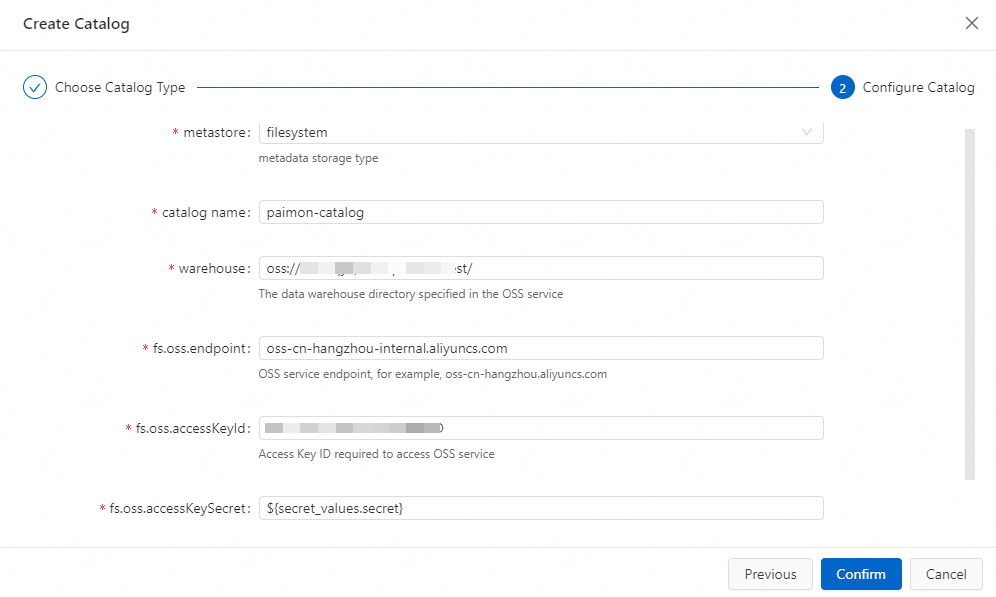
Parameter
Description
Example
catalog nameA name for the Paimon catalog.
paimon-catalogmetastoreWhere Paimon stores table metadata.
filesystemstores metadata in OSS only.dlfstores metadata in OSS and synchronizes it to Data Lake Formation (DLF).filesystemwarehouseThe root directory of the Paimon catalog. Must be an OSS path. Use the OSS bucket created when you activated Flink, or another OSS bucket in the same region under your Alibaba Cloud account. Format:
oss://<bucket>/<object>. To find your bucket and object names, go to the OSS console.oss://my-bucket/paimon-datafs.oss.endpointThe OSS service endpoint. If Flink and DLF are in the same region, use the VPC endpoint to avoid public network charges. For endpoint values, see Regions and endpoints.
oss-cn-beijing-internal.aliyuncs.comfs.oss.accessKeyIdThe AccessKey ID of an Alibaba Cloud account or RAM user with read and write permissions for OSS. If you don't have one, see Create an AccessKey pair.
—
fs.oss.accessKeySecretThe AccessKey secret for the account above. Store it as a project variable to avoid exposing plaintext credentials. See Project variables.
—
-
Click OK.
-
-
Create a MySQL catalog.
-
Click Create Catalog. On the Built-in Catalog tab, select MySQL and click Next.
-
Enter the configuration information.

Parameter
Description
Example
catalognameA name for the MySQL catalog.
mysql-cataloghostnameThe IP address or hostname of the MySQL database. Use the private endpoint of the RDS instance.
—
portThe port of the MySQL database.
3306default-databaseThe default database name. Enter the orders database created in Step 1.
ordersusernameThe username for connecting to MySQL.
—
passwordThe password for the MySQL user. Store it as a project variable to avoid exposing plaintext credentials. See Project variables.
—
-
Click OK.
-
Step 3: Create and run the Flink job
-
Create a data ingestion job.
-
In the Actions column of the target workspace, click Console.
-
In the left navigation pane, click Data Studio > Data Ingestion.
-
Click
 , then click Create Data Ingestion Draft. Enter a File Name and select an Engine Version.
Parameter
Description
Example
File Name
The job name. Must be unique within the current project.
flink-testEngine Version
The Flink engine version. Use a version tagged Recommended or Stable for higher reliability. See Feature release notes and Introduction to engine versions.
vvr-11.5-jdk11-flink-1.20 -
Click Create.
-
-
Enter the following YAML configuration to capture real-time changes from all tables matching
orders_\d+in the orders database and merge them into a single Paimon table nameddefault.orders.source: type: mysql name: MySQL Source hostname: ${secret_values.mysql.hostname} port: 3306 username: ${secret_values.mysql.username} password: ${secret_values.mysql.password} tables: orders.orders_\d+ server-id: 8601-8604 # Optional. Sync data from tables created after the job starts (incremental phase only). scan.binlog.newly-added-table.enabled: true # Optional. Sync table and column comments. include-comments.enabled: true # Optional. Process unbounded shards first to reduce TaskManager memory pressure. scan.incremental.snapshot.unbounded-chunk-first.enabled: true # Optional. Deserialize only captured tables to speed up reads. scan.only.deserialize.captured.tables.changelog.enabled: true sink: type: paimon name: Paimon Sink catalog.properties.metastore: filesystem catalog.properties.warehouse: oss://default/test catalog.properties.fs.oss.endpoint: oss-cn-beijing-internal.aliyuncs.com catalog.properties.fs.oss.accessKeyId: xxxxxxxx catalog.properties.fs.oss.accessKeySecret: xxxxxxxx # Optional. Enable deletion vectors to improve query performance. table.properties.deletion-vectors.enabled: true # If you use a DLF catalog instead of filesystem, use this sink configuration: # sink: # type: paimon # catalog.properties.metastore: rest # catalog.properties.token.provider: dlf # catalog.properties.uri: dlf_uri # catalog.properties.warehouse: your_warehouse # table.properties.deletion-vectors.enabled: true # Route all tables matching orders_\d+ to a single Paimon table: default.orders route: - source-table: orders.orders_\d+ sink-table: default.ordersFor the full list of configuration options, see Flink CDC data ingestion job development reference.
-
In the upper-right corner, click Deploy, then click OK.
-
In the left navigation pane, click Operation Center > Deployments. On the Deployments page, click the job name to open its deployment details page.
-
In the Parameters section, click Edit in the upper-right corner. Change Checkpointing Interval and Min Interval Between Checkpoints to
10 s, then click Save.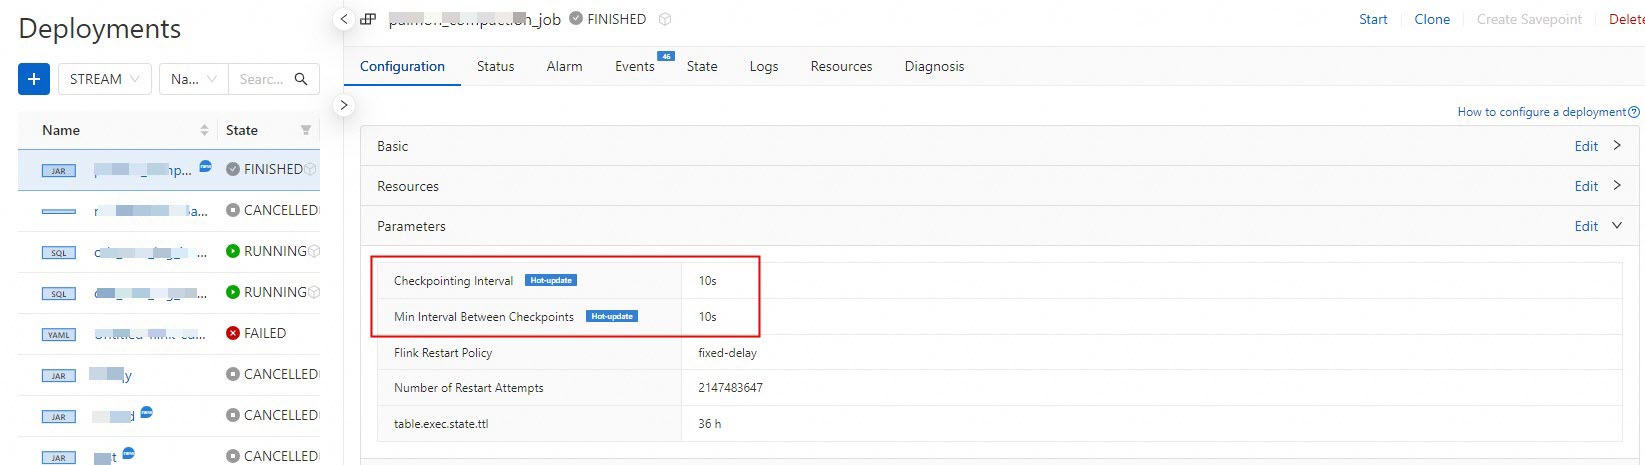
-
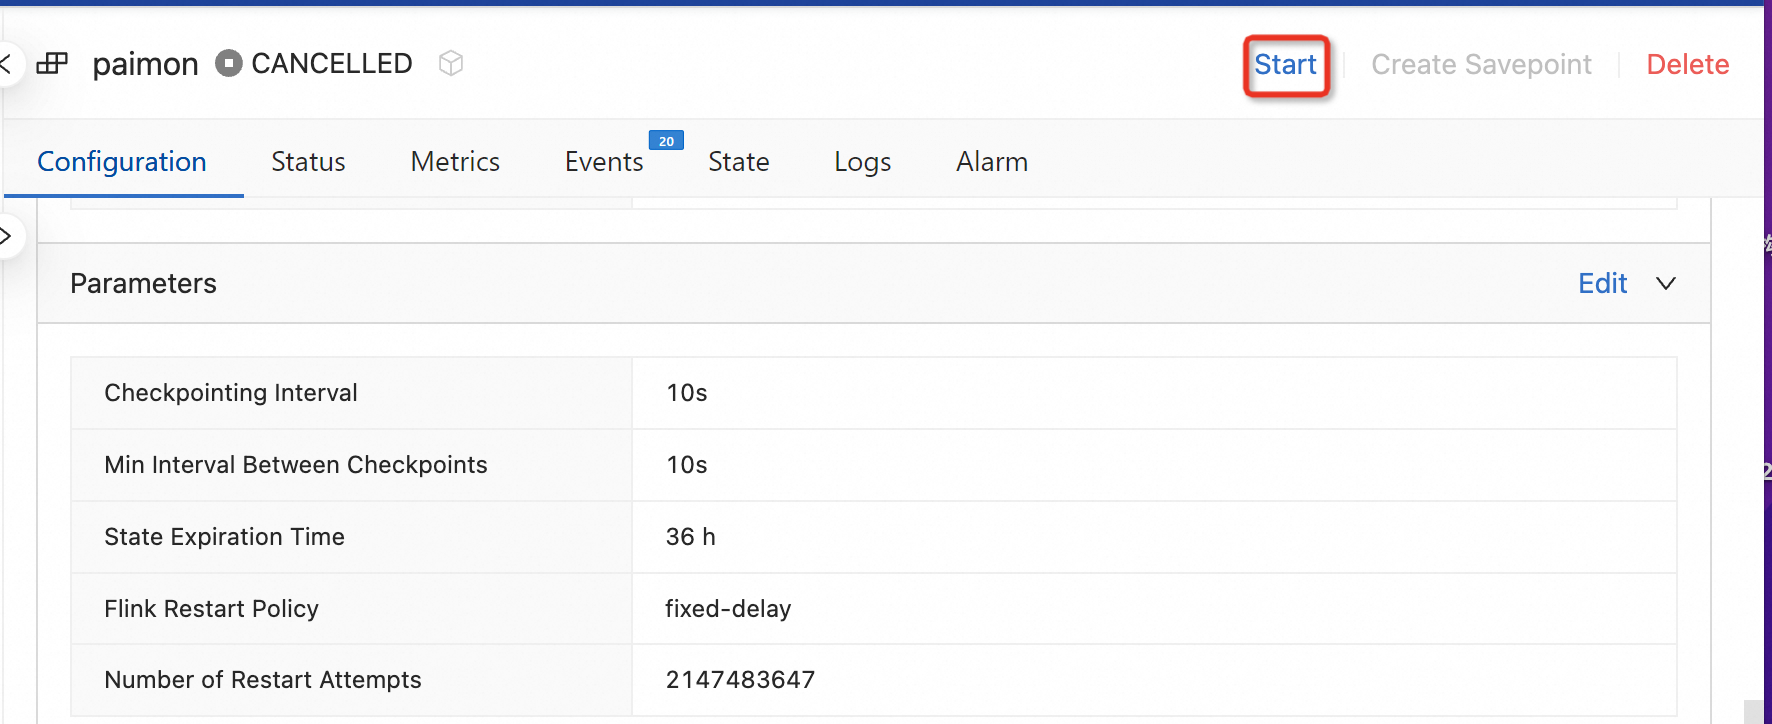
At the top of the deployment details page, click Start, select Stateless Start, then click Start.
-
Query the ingested data.
-
Go to Data Studio > Data Query. On the Query Script tab, paste the following query into the editor.
select custkey, sum(total_price) from `paimon-catalog`.`default`.`orders` group by custkey; -
Select the query text and click Run to the left of the code line.
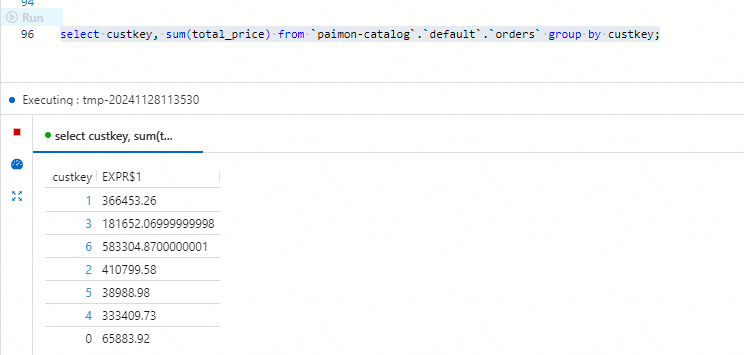 The results show each customer's total order value aggregated across both
 orders_1andorders_2. Each row contains acustkeyand the corresponding sum oftotal_pricefor that customer.
-
Step 4: Synchronize a MySQL schema change to Paimon
This step demonstrates automatic schema change propagation. You'll add a quantity column to the MySQL source tables and verify that Paimon reflects the change without any manual intervention.
-
Log on to the ApsaraDB RDS console.
-
In the orders database, run the following SQL to add the
quantitycolumn to both tables and populate it with test data.ALTER TABLE `orders_1` ADD COLUMN quantity BIGINT; ALTER TABLE `orders_2` ADD COLUMN quantity BIGINT; UPDATE `orders_1` SET `quantity` = 100 WHERE `orderkey` < 5; UPDATE `orders_2` SET `quantity` = 100 WHERE `orderkey` > 15;Click Execute.
-
In the Realtime Compute for Apache Flink console, go to Development > Scripts. On the Scripts tab, paste the following query into the script editor.
select * from `paimon-catalog`.`default`.`orders` where `quantity` is not null;Select the query text and click Run to the left of the code line. The results show rows where
quantityis100: rows fromorders_1withorderkey < 5(rows 1–4) and rows fromorders_2withorderkey > 15(rows 16–20). Thequantitycolumn is now present in the Paimon table — Flink CDC propagated theALTER TABLEschema change automatically.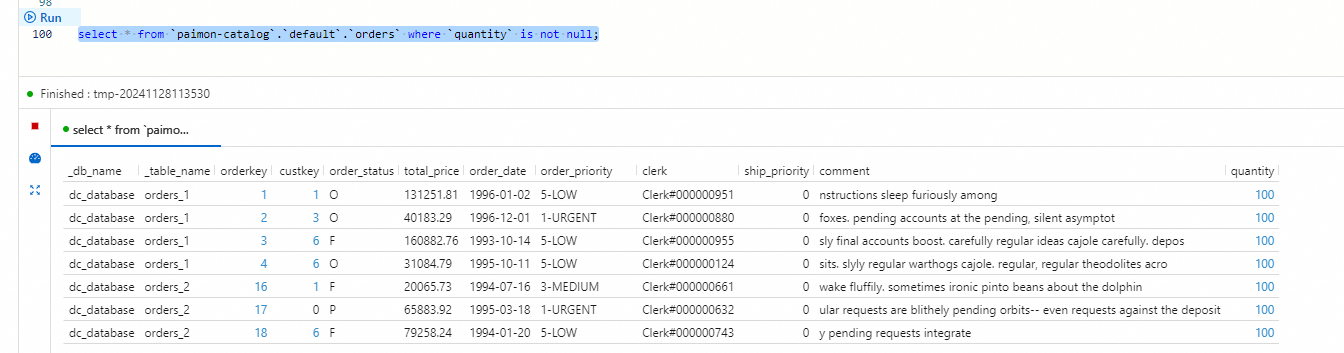
What's next
-
Paimon connector for streaming data lakehouses — connector features and configuration options
-
Manage Paimon catalogs — catalog management operations
-
Best practices for Flink CDC data ingestion — advanced configuration for production scenarios