You can use event rules to filter events and route the events to Knative. This topic describes the prerequisites and procedure for routing custom events to Knative. This topic also describes how to verify the result.
Before you start
Step 1: Create a custom event source
Log on to the EventBridge console. In the left-side navigation pane, click Event Buses.
In the top navigation bar, select a region. On the Event Buses page, click the name of the custom event bus that you want to manage.
In the left-side navigation pane, click Event Sources and then click Add Event Source.
In the Add Custom Event Source panel, configure the Name and Description parameters, select Custom Application from the Event Provider drop-down list, and then click OK.
Step 2: Create an event rule
The event targets that you want to configure for an event rule must reside in the same region as the event rule.
Log on to the EventBridge console. In the left-side navigation pane, click Event Buses.
In the top navigation bar, select a region. On the Event Buses page, click the name of the event bus that you want to manage.
In the left-side navigation pane, click Event Rules. On the page that appears, click Create Rule.
In the Create Rule wizard, perform the following steps and click Create.
In the Configure Basic Info step, configure the Name and Description parameters and click Next Step.
In the Configure Event Pattern step, set the Event Source Type parameter to Custom Event Source, select the created event source from the Event Source drop-down list, and then click Next Step.
In the Configure Targets step, configure the parameters and click Create.

Item
Example
Description
Service Type
Knative
Select Knative from the drop-down list.
Gateway
alb-******Enter the gateway that you selected when you deployed the Knative Service.
Host
******.example.comEnter the domain name that is associated when you deployed the Knative Service. The value can be the default domain name or a custom domain name.
Body
Complete Event
Specify the method that you want to use to route events. The following routing methods are supported. For more information, see Event transformation.
Complete Event
Partial Event
Fixed Value
Template
Maximum Concurrency
22
Specify the maximum number of concurrent requests.
Network Type
Internet
Specify the network type. The following network types are supported:
VPC: If you select this value, you must create a virtual private cloud (VPC), a vSwitch, and a security group in advance. For more information, see Create a VPC and a vSwitch, Create a vSwitch, and Create a security group.
Internet
Step 3: Publish an event
Log on to the EventBridge console. In the left-side navigation pane, click Event Buses.
- In the top navigation bar, select a region.
On the Event Buses page, find the custom event bus that you want to manage and click Publish Event in the Operations column.
NoteYou can publish events only to custom event buses in the EventBridge console.
In the Publish Event to Custom Event Bus panel, select a custom event source from the Custom Event Source drop-down list, enter the event content in the Event Body code editor, and then click OK.
NoteFor information about the event parameters, see Overview.
After you click OK, the event ID is automatically copied.
Verify the result
Go to the Overview page of the event bus that you want to manage.
In the left-side navigation pane, click Event Tracking. Then, click the Query By Event ID tab.
In the Event ID field, paste the event ID that is automatically copied and click Query.
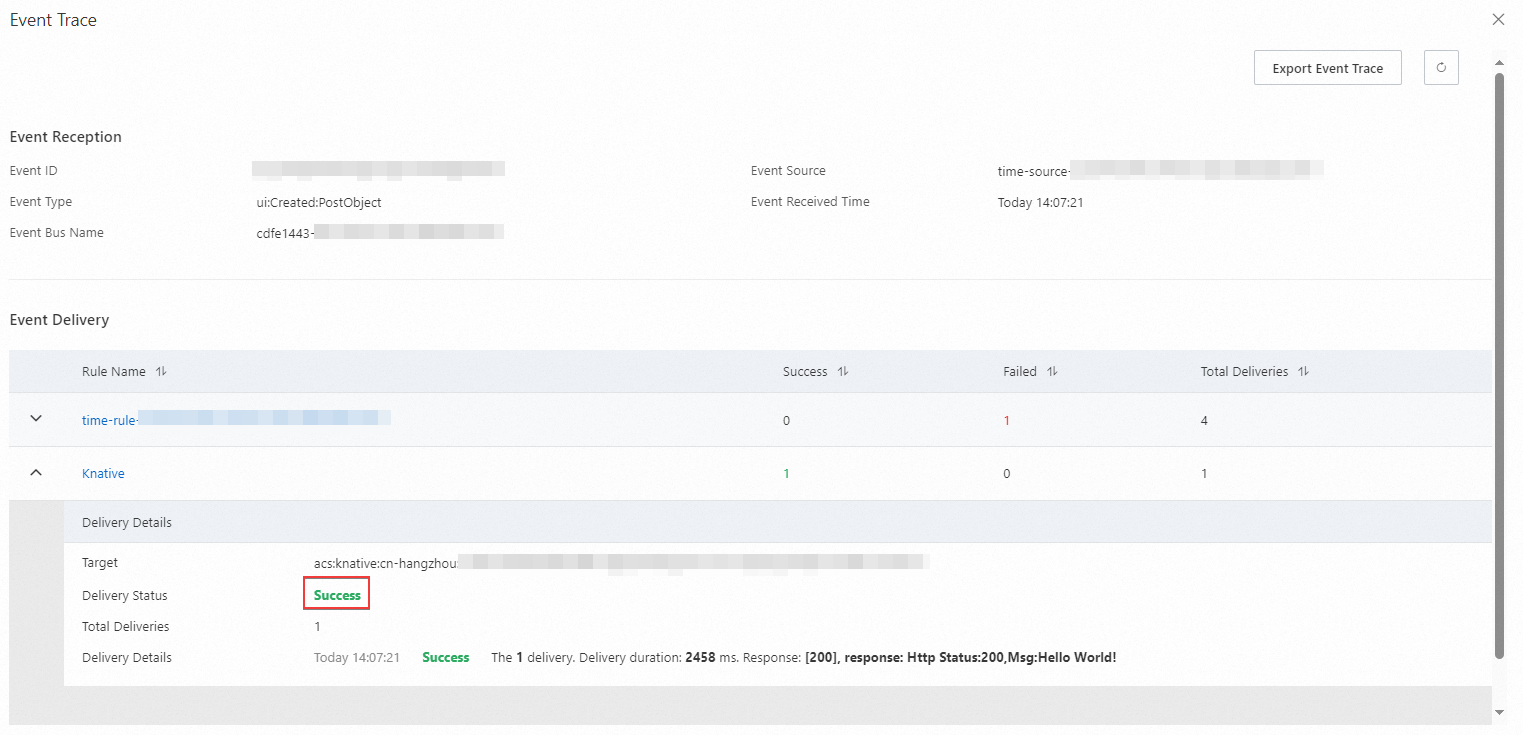
Click Event Trace in the Operations column of the queried event to view whether the event is delivered.