This topic describes how to create, view, modify, and delete a custom ApsaraMQ for Kafka connector task.
Supported regions
You can create custom ApsaraMQ for Kafka connector tasks in the following regions: China (Hangzhou), China (Shanghai), China (Beijing), China (Zhangjiakou), China (Shenzhen), China (Hong Kong), US (Silicon Valley), and Singapore.
Billing
Custom ApsaraMQ for Kafka connectors are independent of ApsaraMQ for Kafka instances. ApsaraMQ for Kafka does not charge you for custom ApsaraMQ for Kafka connectors. Alibaba Cloud does not provide a service level agreement (SLA) for custom ApsaraMQ for Kafka connectors. For information about the billing of Serverless App Engine (SAE) on which custom ApsaraMQ for Kafka connectors depend, see Pay-as-you-go.
Prerequisites
-
Services are activated
-
EventBridge is activated and the required permissions are granted to a Resource Access Management (RAM) user. For more information, see Activate EventBridge and grant permissions to a RAM user.
-
Object Storage Service (OSS) is activated and a bucket is created. For more information, see Create buckets.
-
SAE is activated. For more information, see Preparations.
-
A virtual private cloud (VPC) and a vSwitch are created. For more information, see Resource Orchestration Service (ROS) console.
-
An ApsaraMQ for Kafka instance is purchased and deployed. For more information, see Step 2: Purchase and deploy an instance.
-
-
The environment is prepared
-
Kafka Connect 3.2.3 is installed.
-
Scala 2.13 is installed.
-
Java 8 is installed.
-
Process for creating a custom ApsaraMQ for Kafka connector task
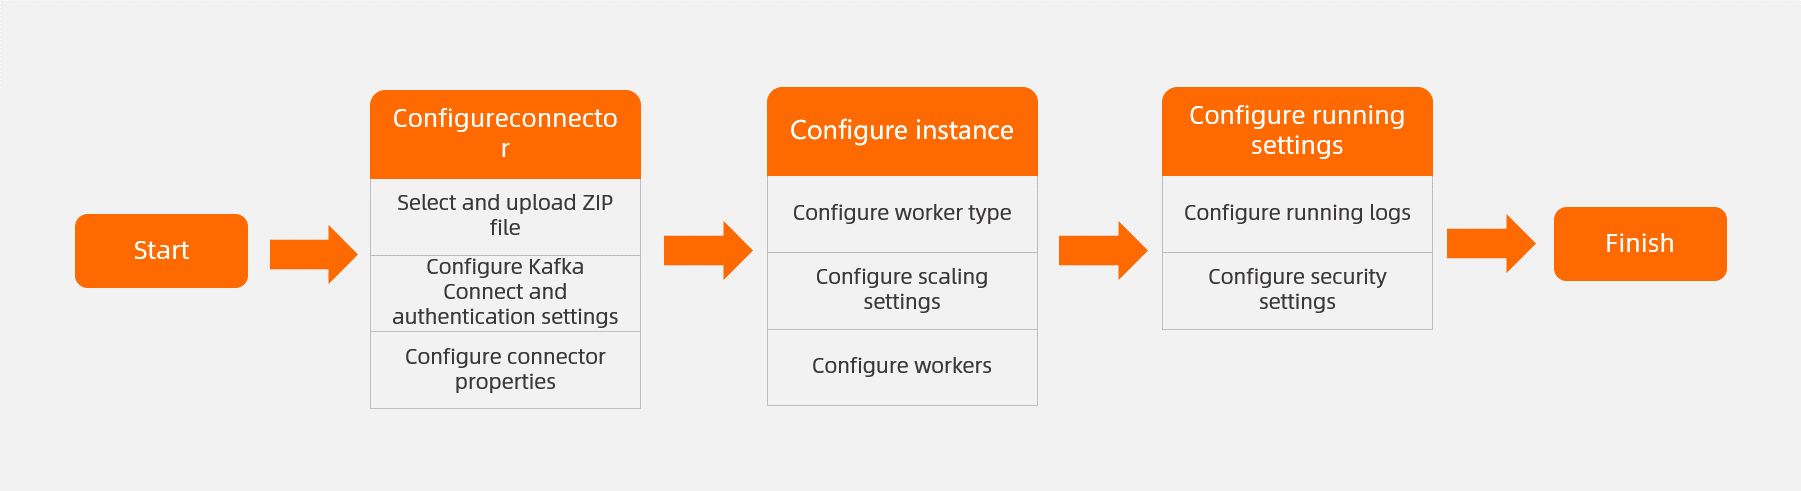
Create a custom ApsaraMQ for Kafka connector task
Log on to the EventBridge console. In the left-side navigation pane, click Event Streams.
In the top navigation bar, select a region and click Create Event Stream.
-
In the Create Event Stream panel, follow the on-screen instructions to configure the parameters and click Create.
-
In the Basic Information step, configure the Event Stream Name and Description parameters and click Next Step.
-
In the Connector step, select Apache Kafka Connect from the Event Provider drop-down list.
-
In the Kafka Connect Plug-in section, configure the parameters that are described in the following table.
Parameter
Description
Example
Kafka Connect Plug-in
EventBridge allows you to import the ZIP file that contains the configurations of Kafka Connect to the console by using the Local Upload or OSS Reference method. Default value: OSS Reference.
OSS Reference
Bucket
Select the bucket that contains the ZIP file. For more information, see Create buckets.
testbucket
File
Select the ZIP file that contains the configurations of Kafka Connect from the bucket. You can also follow the on-screen instructions in the EventBridge console to upload the ZIP file.
test-connect.zip
-
In the Message Queue for Apache Kafka Resources section, configure the parameters that are described in the following table.
Parameter
Description
Example
Message Queue for Apache Kafka Parameters
-
Source Connect: Import data from other services to ApsaraMQ for Kafka by using Kafka Connect.
-
Sink Connect: Export data from ApsaraMQ for Kafka to other services by using Kafka Connect.
Source Connect
Message Queue for Apache Kafka Instance
Select an ApsaraMQ for Kafka instance to or from which you want to deliver data.
alikafka-cn-zpr37892366****
VPC
Select the ID of the VPC in which the ApsaraMQ for Kafka instance is deployed.
vpc-bq1huohcvuo****
vSwitch
Select the ID of the vSwitch that the ApsaraMQ for Kafka instance uses.
vsw-bqu1hdguoo****
Security Group
Select the security group to which the ApsaraMQ for Kafka instance belongs.
sg-dguigreuohpnv****
-
-
In the Kafka Connect section, configure the parameters of Kafka Connect by using one of the following methods:
-
Method 1: Select the .properties file from the file list of the uploaded ZIP file that contains the configurations of the connector.
-
Method 2: Configure the following connection parameters in the EventBridge console.
ImportantIf you uploaded a ZIP file that contains the configurations of the connector, the configurations in the ZIP file are overwritten by the configurations in the EventBridge console.
Parameter (required)
Description
Example
name
The connector name. In most cases, the name is a string that does not contain ISO control characters.
mongo-sink
connector.class
The class name or alias of the connector. The class must be a subclass of
org.apache.kafka.connect.connector.Connector.com.mongodb.kafka.connect.MongoSinkConnector
task.max
The maximum number of concurrent threads. Valid values: 1 to the maximum number of partitions in the ApsaraMQ for Kafka topic.
1
topics
Specify the source topics if Message Queue for Apache Kafka Parameters is set to Sink Connect. Separate multiple topics with commas (,).
sourceA,sourceB
For more information, see 3.5 Kafka Connect Configs.
-
-
-
In the Instance step, follow the on-screen instructions to configure the parameters.
-
In the Worker Type section, configure the parameters that are described in the following table.
Parameter
Description
Example
Worker Type
The worker type. Auto scaling is supported by workers. You can scale workers based on CPU utilization. We recommend that you use workers that have 2 CPU cores and 4 GiB of memory.
2 Core 4 GIB
Min. Number of Workers
The minimum number of workers that you want to scale out. The value cannot be less than 1.
2
Max. Number of Workers
The maximum number of workers that you want to scale out. The value cannot be greater than 50.
2
NoteThe maximum number of workers must be equal to or greater than the minimum number of workers.
Horizontal Scaling Threshold (%)
If the CPU utilization is equal to or greater than the specified threshold, auto scaling is triggered. Unit: percentage (%).
50
-
In the Configure Worker section, select Automatically Create Dependencies for Apache Kafka Connector Worker.
The values of the parameters in the Configure Worker section are preset in the EventBridge console. We recommend that you do not change the values.
-
-
In the Running Configurations step, select Deliver Data to Log Service or Deliver Data to Message Queue for Apache Kafka in the Log Delivery section. In the Role Authorization section, specify the role on which the connector depends. Then, click Confirm.
ImportantWe recommend that you select a role to which the AliyunSAEFullAccess permission policy is attached. Otherwise, the task may fail to run.
-
What to do next

After you create a custom ApsaraMQ for Kafka connector task, you can find the task on the Event Streams page. In the Actions column of the task, you can perform the following operations:
-
View task details: Click Details in the Actions column to view the details of the task.
-
Modify the task: Click Edit in the Actions column and modify the connector, instance, and running configurations of the task in the Edit Event Stream panel. Then, click OK.
-
Stop and start the task: Click Pause or Enable in the Actions column. In the Note message that appears, click OK.
-
Delete the task: Click Delete in the Actions column. In the Note message that appears, click OK.