This topic describes how to use the event stream feature provided by EventBridge to route messages between ApsaraMQ for RabbitMQ instances.
Prerequisites
EventBridge is activated and the required permissions are granted to a Resource Access Management (RAM) user. For more information, see Activate EventBridge and grant permissions to a RAM user.
ApsaraMQ for RabbitMQ instances are purchased and deployed. Make sure that the instances are in the Running state. For more information, see Step 2: Create resources.
Background information
As a type of lightweight channel for processing end-to-end streaming data in real time, event streams allow you to filter and transform lightweight streaming data and synchronize data between data warehouses, between data processing programs, and between data analysis and data processing systems. You can use an event stream to route messages that are produced on a source ApsaraMQ for RabbitMQ instance to a destination ApsaraMQ for RabbitMQ instance without the need to define an event bus. For more information, see Overview.
Step 1: Create an event stream for the destination instance
EventBridge allows you to create an event stream to route messages only between ApsaraMQ for RabbitMQ instances that are deployed in the same region.
Log on to the EventBridge console.
In the top navigation bar, select a region.
In the left-side navigation pane, click Event Streams.
On the Event Streams page, click Create Event Stream.
On the Create Event Stream page, configure the Task Name and Description parameters and follow the on-screen instructions to configure other parameters. Then, click Save. The following section describes the parameters:
Task Creation
In the Source step, set the Data Provider parameter to ApsaraMQ for RabbitMQ and follow the on-screen instructions to configure other parameters. Then, click Next Step. The following table describes the parameters.
Parameter
Description
Example
Region
The region where the source ApsaraMQ for RabbitMQ instance resides.
China (Hangzhou)
ApsaraMQ for RabbitMQ Instance
The source ApsaraMQ for RabbitMQ instance.
amqp-cn-7pp2mwbc****
Vhost
The vhost of the source ApsaraMQ for RabbitMQ instance.
test
Queue
The queue in which the messages that you want to route are stored.
test
Messages
The maximum number of messages that can be sent in each function invocation. Requests are sent only when the number of messages in the backlog reaches the specified value. Valid values: 1 to 10000.
100
Interval (Unit: Seconds)
The time interval at which the function is invoked. The system sends the aggregated messages to Function Compute at the specified time interval. Valid values: 0 to 15. Unit: seconds. The value 0 specifies that messages are sent immediately after aggregation.
3
In the Filtering step, specify the rule used to filter events and click Next Step. You do not need to configure the Transformation step in message routing scenarios.
In the Sink step, set the Service Type parameter to ApsaraMQ for RabbitMQ and follow the on-screen instructions to configure other parameters. Then, click Save. The following table describes the parameters.
Exchange: A producer sends a message to an exchange, and then the exchange routes the message to one or more queues.
Queue: Each message is sent to one or more queues.
Parameter
Description
Example
Instance ID
The destination ApsaraMQ for RabbitMQ instance that you created.
amqp-cn-zvp2pny6****
vhost
The vhost that you created.
test
Destination Type
Queue
Exchange
The exchange to which messages are routed on the ApsaraMQ for RabbitMQ instance. This parameter is required only if you set the Destination Type parameter to Exchange.
exchange
Queue
The queue to which messages are routed on the ApsaraMQ for RabbitMQ instance. This parameter is required only if you set the Destination Type parameter to Queue.
queue
Message Routing Key
EventBridge extracts data from an event by using JSONPath and routes the specified content of the event to the event target. This parameter is required only if you set the Destination Type parameter to Exchange.
Partial Event
$.data.keyMessage Body
EventBridge extracts data from an event by using JSONPath and routes the specified event content to the event target.
Partial Event
$.data.bodyMessageId
EventBridge extracts data from an event by using JSONPath and routes the specified event content to the event target.
Partial Event
$.data.props.messageIdCustom Property
EventBridge extracts data from an event by using JSONPath and routes the specified event content to the event target.
Partial Event
$.data.propsTask Property
Configure the retry policy and dead-letter queue for the event stream. For more information, see Retry policies and dead-letter queues.
Go back to the Event Streams page, find the event stream that you created, and then click Enable in the Actions column.
In the Note message that appears, click OK.
Enabling an event stream requires 30 to 60 seconds to complete. You can view the progress in the Status column of the event stream on the Event Streams page.
Step 2: Use an SDK to send a message
Obtain the endpoint. Before you send and receive messages, you must obtain the endpoint that is used to access the ApsaraMQ for RabbitMQ instance in the ApsaraMQ for RabbitMQ console and specify the endpoint for a publisher. This way, the publisher can use the endpoint to access the ApsaraMQ for RabbitMQ instance.
Log on to the ApsaraMQ for RabbitMQ console.
In the Resource Distribution section of the Overview page, select the region where the ApsaraMQ for RabbitMQ instance that you want to manage resides.
On the Instances page, click the name of the instance that you want to manage.
On the Endpoint Information tab of the Instance Details page, move the pointer over the type of endpoint that you want to use. Then, click the
 icon next to the endpoint to copy the endpoint.
 Type
Description
Example
Public endpoint
You can access an instance over the Internet to read and write data. By default, pay-as-you-go instances support public endpoints. To use the public endpoint of a subscription instance, you must select a public endpoint when you create the subscription instance.
XXX.mq-amqp.cn-hangzhou-a.aliyuncs.com
VPC endpoint
You can access an instance over a VPC to read and write data. By default, pay-as-you-go and subscription instances support VPC endpoints.
XXX.mq-amqp.cn-hangzhou-a-internal.aliyuncs.com
Install Java dependencies. Add the following dependency to the pom.xml file:
<dependency>
    <groupId>com.rabbitmq</groupId>
    <artifactId>amqp-client</artifactId>
    <version>5.5.0</version> <!-- All versions of open source RabbitMQ are supported. -->
</dependency>
Generate a pair of username and password.
Log on to the ApsaraMQ for RabbitMQ console.
In the Resource Distribution section of the Overview page, select the region where the ApsaraMQ for RabbitMQ instance that you want to manage resides.
On the Instances page, click the name of the instance that you want to manage.
In the left-side navigation pane, click Static Accounts.
On the Static Accounts page, click Create Username/Password.
In the Create Username/Password panel, enter an AccessKey ID in the AccessKey ID field and an AccessKey secret in the AccessKey Secret field. Then, click OK.
On the Static Accounts page, the created pair of static username and password appears. The password is masked.

In the Password column of the created pair of static username and password, click Display to view the password.
Produce messages. Create, compile, and run Qava to produce messages.
ImportantBefore you compile and run ProducerTest.java to produce messages, you must configure the parameters that are described in the Parameters table.
Table 3. Parameters Parameter
Example
Description
hostName
1880770****.mq-amqp.cn-hangzhou-a.aliyuncs.com
The endpoint that is used to access the ApsaraMQ for RabbitMQ instance.
Port
5672
The default port. Use port 5672 for non-encrypted connections and port 5671 for encrypted connections.
userName
MjoxODgwNzcwODY5MD****
The static username that is generated in the ApsaraMQ for RabbitMQ console. ApsaraMQ for RabbitMQ encodes the AccessKey pair of your Alibaba Cloud account or a RAM user within the account and the ID of the ApsaraMQ for RabbitMQ instance in the Base64 format to generate the static username. You can obtain the static username on the Static Accounts page in the ApsaraMQ for RabbitMQ console.
passWord
NDAxREVDQzI2MjA0OT****
The static password that is generated in the ApsaraMQ for RabbitMQ console. ApsaraMQ for RabbitMQ uses the HMAC-SHA1 algorithm to generate a signature based on the AccessKey secret of your Alibaba Cloud account or a RAM user within the account and the timestamp parameter that indicates the current system time. Then, ApsaraMQ for RabbitMQ encodes the signature and the timestamp parameter in the Base64 format to generate the static password. You can obtain the static password on the Static Accounts page in the ApsaraMQ for RabbitMQ console.
virtualHost
Test
The vhost that you created in the ApsaraMQ for RabbitMQ instance. You can view the information about the vhost on the vhost Details page in the ApsaraMQ for RabbitMQ console. For more information, see View the statistics of a vhost.
ExchangeName
ExchangeTest
The exchange that you created in the ApsaraMQ for RabbitMQ instance. You can use the instance ID and vhost name to fuzzy search the created exchange on the Exchanges page in the ApsaraMQ for RabbitMQ console.
BindingKey
BindingKeyTest
The binding key that is used to bind the exchange to a queue in ApsaraMQ for RabbitMQ. You can view the binding of the exchange and obtain the binding key on the Exchanges page in the ApsaraMQ for RabbitMQ console.
QueueName
QueueTest
The queue that you created in the ApsaraMQ for RabbitMQ instance. This parameter is required only when you subscribe to messages. You can view the binding of the exchange and obtain the queue to which the exchange is bound on the Exchanges page in the ApsaraMQ for RabbitMQ console.
import com.rabbitmq.client.AMQP;
import com.rabbitmq.client.AlreadyClosedException;
import com.rabbitmq.client.Channel;
import com.rabbitmq.client.ConfirmCallback;
import java.io.IOException;
import java.nio.charset.StandardCharsets;
import java.security.KeyManagementException;
import java.security.KeyStoreException;
import java.security.NoSuchAlgorithmException;
import java.util.UUID;
import java.util.concurrent.ConcurrentNavigableMap;
import java.util.concurrent.ConcurrentSkipListMap;
import java.util.concurrent.TimeoutException;

public class Producer {
    // The endpoint of the ApsaraMQ for RabbitMQ instance.
    public static final String hostName = "1880770****.mq-amqp.cn-hangzhou-a.aliyuncs.com";
    // The static username of the ApsaraMQ for RabbitMQ instance.
    public static final String userName = "MjoxODgwNzcwODY5MD****";
    // The static password of the ApsaraMQ for RabbitMQ instance.
    public static final String password = "NDAxREVDQzI2MjA0OT****";
    // The name of the vhost of the ApsaraMQ for RabbitMQ instance.
    public static final String virtualHost = "vhost_test";

    // If you want to use port 5671, you must set the enableSSL parameter to true.
    public static final int port = 5672;
    public static final boolean enableSSL = false;

    private Channel channel;
    private final ConcurrentNavigableMap<Long/*deliveryTag*/, String/*msgId*/> outstandingConfirms;
    private final ConnectionFactory factory;
    private final String exchangeName;
    private final String queueName;
    private final String bindingKey;

    public Producer(ConnectionFactory factory, String exchangeName, String queueName, String bindingKey) throws IOException, TimeoutException, NoSuchAlgorithmException, KeyStoreException, KeyManagementException {
        this.factory = factory;
        this.outstandingConfirms = new ConcurrentSkipListMap<>();
        this.channel = factory.createChannel();
        this.exchangeName = exchangeName;
        this.queueName = queueName;
        this.bindingKey = bindingKey;
    }

    public static void main(String[] args) throws IOException, TimeoutException, NoSuchAlgorithmException, KeyStoreException, KeyManagementException {
        // Create a connection factory.
        ConnectionFactory factory = new ConnectionFactory(hostName, port, userName, password, virtualHost, enableSSL);

        // Initialize the producer.
        Producer producer = new Producer(factory, "ExchangeTest", "QueueTest", "BindingKeyTest");

        // Declare the producer.
        producer.declare();

        producer.initChannel();

        // Send messages.
        producer.doSend("hello,amqp");
    }

    private void initChannel() throws IOException {
        channel.confirmSelect();

        ConfirmCallback cleanOutstandingConfirms = (deliveryTag, multiple) -> {
            if (multiple) {
                ConcurrentNavigableMap<Long, String> confirmed = outstandingConfirms.headMap(deliveryTag, true);

                for (Long tag : confirmed.keySet()) {
                    String msgId = confirmed.get(tag);
                    System.out.format("Message with msgId %s has been ack-ed. deliveryTag: %d, multiple: %b%n", msgId, tag, true);
                }

                confirmed.clear();
            } else {
                String msgId = outstandingConfirms.remove(deliveryTag);
                System.out.format("Message with msgId %s has been ack-ed. deliveryTag: %d, multiple: %b%n", msgId, deliveryTag, false);
            }
        };
        channel.addConfirmListener(cleanOutstandingConfirms, (deliveryTag, multiple) -> {
            String msgId = outstandingConfirms.get(deliveryTag);
            System.err.format("Message with msgId %s has been nack-ed. deliveryTag: %d, multiple: %b%n", msgId, deliveryTag, multiple);
            // send msg failed, re-publish
        });


        channel.addReturnListener(returnMessage -> System.out.println("return msgId=" + returnMessage.getProperties().getMessageId()));
    }

    private void declare() throws IOException {
        channel.exchangeDeclare(exchangeName, "direct", true);
        channel.queueDeclare(queueName, true, false, false, null);
        channel.queueBind(queueName, exchangeName, bindingKey);
    }


    private void doSend(String content) throws IOException, TimeoutException, NoSuchAlgorithmException, KeyStoreException, KeyManagementException {
        try {
            String msgId = UUID.randomUUID().toString();
            AMQP.BasicProperties props = new AMQP.BasicProperties.Builder().messageId(msgId).build();

            channel.basicPublish(exchangeName, bindingKey, true, props, content.getBytes(StandardCharsets.UTF_8));

            outstandingConfirms.put(channel.getNextPublishSeqNo(), msgId);
        } catch (AlreadyClosedException e) {
            //need reconnect if channel is closed.
            String message = e.getMessage();

            System.out.println(message);

            if (channelClosedByServer(message)) {
                factory.closeCon(channel);
                channel = factory.createChannel();
                this.initChannel();
                doSend(content);
            } else {
                throw e;
            }
        }
    }

    private boolean channelClosedByServer(String errorMsg) {
        if (errorMsg != null
            && errorMsg.contains("channel.close")
            && errorMsg.contains("reply-code=541")
            && errorMsg.contains("reply-text=InternalError")) {
            return true;
        } else {
            return false;
        }
    }
}
Step 3: Test the event stream
Log on to the ApsaraMQ for RabbitMQ console. In the left-side navigation pane, click Instances.
In the top navigation bar of the Instances page, select the region where the instance that you want to manage resides. Then, in the instance list, click the name of the instance that you want to manage.
On the Instances page, click the name of the instance that you created in Step 1: Create an event stream for the destination instance.
In the Basic Information section of the Instance Details page, click the Message Query tab.
Select Query by Message ID or Query by Queue and configure the Time Range parameter and other related parameters. Then, click Query.
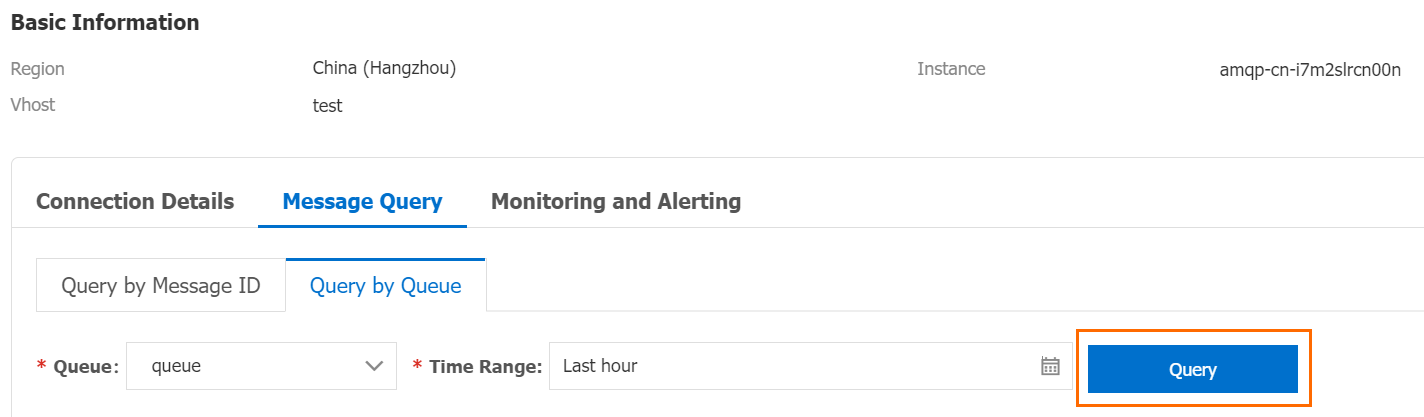
Check whether the queried message content is the same as the content of the message that was sent in Step 2: Use an SDK to send a message.