Use ES-Hadoop to enable Apache Spark to write data to and read data from Alibaba Cloud Elasticsearch
Elasticsearch-Hadoop (ES-Hadoop) bridges Apache Spark and Alibaba Cloud Elasticsearch, letting Spark jobs read from and write to an Elasticsearch cluster without custom connectors. This tutorial walks through a full end-to-end example: preparing the environment, writing JSON records into an Elasticsearch index, reading them back, and verifying the results in Kibana.
Prerequisites
Before you begin, make sure you have:
-
An Alibaba Cloud Elasticsearch cluster (this tutorial uses V6.7.0) with the Auto Indexing feature enabled
ImportantDisable the Auto Indexing feature in production. Create the index and configure mappings in advance. This tutorial enables Auto Indexing for test purposes only.
-
An E-MapReduce (EMR) cluster running in the same virtual private cloud (VPC) as the Elasticsearch cluster, with the following configuration:
-
EMR Version: EMR-3.29.0
-
Required Services: Spark 2.4.5 (keep default settings for other services)
-
-
The private IP address of the EMR cluster added to the Elasticsearch cluster's private IP address whitelist, if you changed the default whitelist (the default is
0.0.0.0/0) To get the EMR cluster's private IP address, see View the cluster list and cluster details. To update the whitelist, see Configure a public or private IP address whitelist for an Elasticsearch cluster. -
JDK 1.8.0 or later
For instructions on creating an Elasticsearch cluster, see Create an Alibaba Cloud Elasticsearch cluster and Access and configure an Elasticsearch cluster. For instructions on creating an EMR cluster, see Create a cluster.
How it works
-
Upload JSON test data to the Hadoop Distributed File System (HDFS) on the EMR master node.
-
Build a Java Maven project with ES-Hadoop and Spark dependencies, then compile the write and read classes.
-
Package the compiled code into a JAR and submit it as a Spark job using
spark-submit. -
ES-Hadoop serializes each Resilient Distributed Dataset (RDD) record and writes it to the specified Elasticsearch index using the REST API.
-
Verify the written data by running a query in the Kibana Dev Tools console.
Prepare test data
-
Log on to the E-MapReduce console, get the IP address of the EMR master node, and SSH into the corresponding ECS instance. For details, see Log on to a cluster.
-
Create a file named
http_log.txtwith the following JSON records:{"id": 1, "name": "zhangsan", "birth": "1990-01-01", "addr": "No.969, wenyixi Rd, yuhang, hangzhou"} {"id": 2, "name": "lisi", "birth": "1991-01-01", "addr": "No.556, xixi Rd, xihu, hangzhou"} {"id": 3, "name": "wangwu", "birth": "1992-01-01", "addr": "No.699 wangshang Rd, binjiang, hangzhou"} -
Upload the file to HDFS:
hadoop fs -put http_log.txt /tmp/hadoop-es
Add POM dependencies
Create a Java Maven project and add the following dependencies to pom.xml. Make sure each version matches the version of the corresponding Alibaba Cloud service — for example, elasticsearch-spark-20_2.11 must match your Elasticsearch cluster version, and spark-core_2.12 must match your HDFS version.
<dependencies>
    <dependency>
        <groupId>org.apache.spark</groupId>
        <artifactId>spark-core_2.12</artifactId>
        <version>2.4.5</version>
    </dependency>
    <dependency>
        <groupId>org.apache.spark</groupId>
        <artifactId>spark-sql_2.11</artifactId>
        <version>2.4.5</version>
    </dependency>
    <dependency>
        <groupId>org.elasticsearch</groupId>
        <artifactId>elasticsearch-spark-20_2.11</artifactId>
        <version>6.7.0</version>
    </dependency>
</dependencies>
Write data to Elasticsearch
The following Java code reads http_log.txt from HDFS and writes each line as a document to the company/_doc index. Replace the placeholder values with your actual cluster endpoint and credentials.
import java.util.Map;
import java.util.concurrent.atomic.AtomicInteger;
import org.apache.spark.SparkConf;
import org.apache.spark.SparkContext;
import org.apache.spark.api.java.JavaRDD;
import org.apache.spark.api.java.function.Function;
import org.apache.spark.sql.Row;
import org.apache.spark.sql.SparkSession;
import org.elasticsearch.spark.rdd.api.java.JavaEsSpark;
import org.spark_project.guava.collect.ImmutableMap;

public class SparkWriteEs {
    public static void main(String[] args) {
        SparkConf conf = new SparkConf();
        conf.setAppName("Es-write");
        conf.set("es.nodes", "es-cn-n6w1o1x0w001c****.elasticsearch.aliyuncs.com"); // (1)
        conf.set("es.net.http.auth.user", "elastic");
        conf.set("es.net.http.auth.pass", "xxxxxx");                                 // (2)
        conf.set("es.nodes.wan.only", "true");                                       // (3)
        conf.set("es.nodes.discovery", "false");                                     // (4)
        conf.set("es.input.use.sliced.partitions", "false");                         // (5)

        SparkSession ss = new SparkSession(new SparkContext(conf));
        final AtomicInteger employeesNo = new AtomicInteger(0);

        JavaRDD<Map<Object, ?>> javaRDD = ss.read().text("/tmp/hadoop-es/http_log.txt") // (6)
                .javaRDD().map((Function<Row, Map<Object, ?>>) row ->
                        ImmutableMap.of("employees", employeesNo.getAndAdd(1), row.mkString()));

        JavaEsSpark.saveToEs(javaRDD, "company/_doc");
    }
}-
es.nodes— the internal endpoint of your Elasticsearch cluster. Get it from the Basic Information page of the cluster. See View the basic information of a cluster. -
es.net.http.auth.pass— the password you set when creating the cluster. Replacexxxxxxwith your actual password. -
es.nodes.wan.only— set totruebecause Alibaba Cloud Elasticsearch uses a virtual IP. This disables node discovery and routes all traffic through the endpoint ines.nodes. -
es.nodes.discovery— must befalsefor Alibaba Cloud Elasticsearch. The cluster's internal node addresses are not reachable from outside, so the native node discovery mechanism does not work. -
es.input.use.sliced.partitions— set tofalseto skip the index read-ahead phase, which improves query efficiency. The read-ahead phase can take longer than the actual data query. -
Replace
/tmp/hadoop-es/http_log.txtwith the actual HDFS path of your test data.
Avoid using the elastic account in production. Resetting its password can temporarily block cluster access. Create a dedicated user with the required role in Kibana instead. See Use the RBAC mechanism provided by Elasticsearch X-Pack to implement access control.
Read data from Elasticsearch
The following code reads all documents from the company/_doc index and prints them to stdout:
import org.apache.spark.SparkConf;
import org.apache.spark.api.java.JavaPairRDD;
import org.apache.spark.api.java.JavaSparkContext;
import org.elasticsearch.spark.rdd.api.java.JavaEsSpark;
import java.util.Map;

public class ReadES {
    public static void main(String[] args) {
        SparkConf conf = new SparkConf()
                .setAppName("readEs")
                .setMaster("local[*]")
                .set("es.nodes", "es-cn-n6w1o1x0w001c****.elasticsearch.aliyuncs.com")
                .set("es.port", "9200")
                .set("es.net.http.auth.user", "elastic")
                .set("es.net.http.auth.pass", "xxxxxx")
                .set("es.nodes.wan.only", "true")
                .set("es.nodes.discovery", "false")
                .set("es.input.use.sliced.partitions", "false")
                .set("es.resource", "company/_doc")
                .set("es.scroll.size", "500");

        JavaSparkContext sc = new JavaSparkContext(conf);
        JavaPairRDD<String, Map<String, Object>> rdd = JavaEsSpark.esRDD(sc);

        for (Map<String, Object> item : rdd.values().collect()) {
            System.out.println(item);
        }

        sc.stop();
    }
}
Configuration reference
| Parameter | Default | Description |
|---|---|---|
es.nodes |
localhost |
Endpoint for accessing the Elasticsearch cluster. Use the internal endpoint for best performance. |
es.port |
9200 |
Port for accessing the Elasticsearch cluster. |
es.net.http.auth.user |
elastic |
Username for Elasticsearch authentication. |
es.net.http.auth.pass |
/ |
Password for the specified username. If you forget it, reset it — see Reset the access password for an Elasticsearch cluster. |
es.nodes.wan.only |
false |
When true, disables node discovery and routes all traffic through es.nodes. Required when Elasticsearch uses a virtual IP. |
es.nodes.discovery |
true |
When false, prevents ES-Hadoop from discovering additional cluster nodes. Must be false for Alibaba Cloud Elasticsearch, because the cluster's internal node addresses are not reachable from outside. |
es.input.use.sliced.partitions |
true |
When false, skips the index read-ahead phase. Set to false to improve query efficiency — the read-ahead phase can take longer than the actual data query. |
es.index.auto.create |
true |
When true, ES-Hadoop automatically creates the index if it does not exist. Disable this in production and create indexes with explicit mappings instead. |
es.resource |
/ |
The index and type to read from or write to, in index/type format. |
es.mapping.names |
/ |
Field name mappings between the source data and the Elasticsearch index. |
es.scroll.size |
(none) | Number of documents fetched per scroll request when reading. |
For the full list of ES-Hadoop configuration options, see ES-Hadoop configuration reference.
Submit the Spark jobs
-
Package the compiled code into a JAR and upload it to the EMR master node or an associated gateway cluster.
-
On the EMR client, run the following commands to submit the jobs.
Write data:
cd /usr/lib/spark-current
./bin/spark-submit --master yarn --executor-cores 1 --class "SparkWriteEs" /usr/local/spark_es.jar
Read data:
cd /usr/lib/spark-current ./bin/spark-submit --master yarn --executor-cores 1 --class "ReadES" /usr/local/spark_es.jarImportantReplace
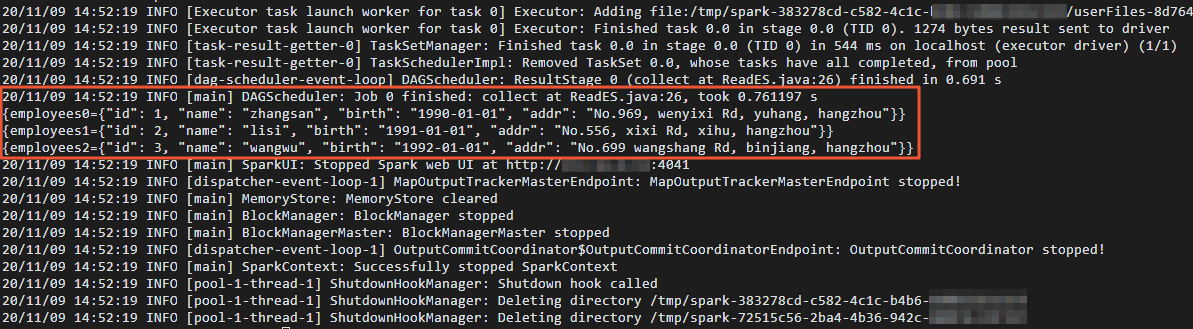
/usr/local/spark_es.jarwith the actual path where you uploaded the JAR.After the read job completes, the output shows each document retrieved from the Elasticsearch index:
Verify results
-
Log on to the Kibana console of your Elasticsearch cluster. See Log on to the Kibana console.
-
In the left-side navigation pane, click Dev Tools.
-
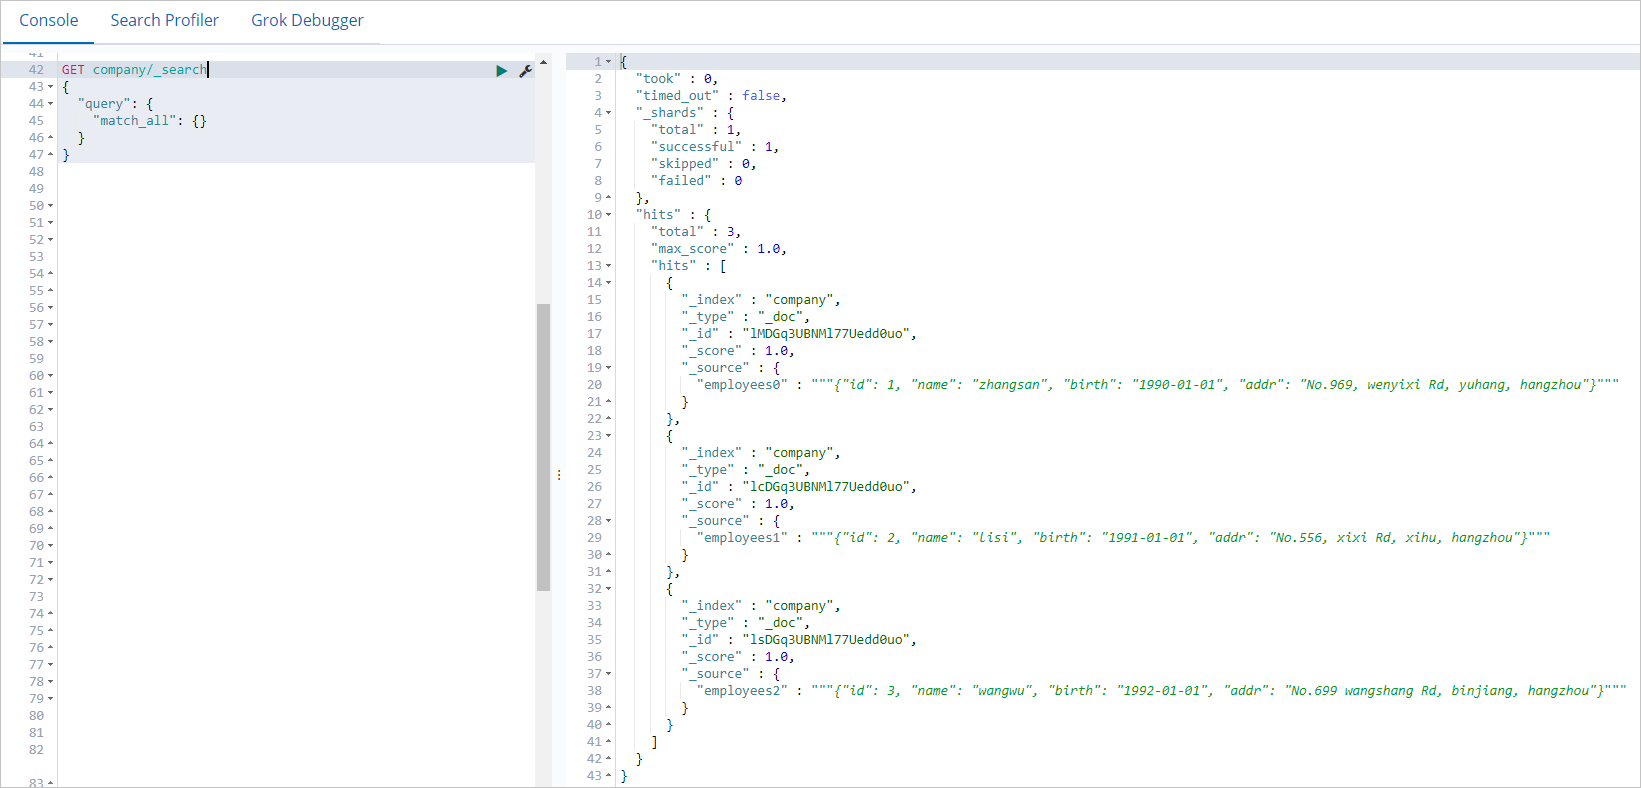
On the Console tab, run the following query to confirm the data was written successfully:
GET company/_search
{
  "query": {
    "match_all": {}
  }
}
A successful response returns all three documents written by the Spark job:
What's next
ES-Hadoop supports more than just Java RDD writes. Once integrated with Spark, you can also use Spark Datasets, Spark Streaming, Scala, and Spark SQL. For details, see Apache Spark support.