This topic describes how to migrate index data from Amazon Web Services (AWS) ES to Alibaba Cloud Elasticsearch. The solution uses snapshot-based migration: create a snapshot of the AWS ES data in AWS S3, transfer the snapshot data to Alibaba Cloud OSS, and then restore the indexes in Alibaba Cloud Elasticsearch.
How it works
The migration is based on the Elasticsearch snapshot mechanism and is not tied to a specific cloud vendor: create a snapshot on the source AWS ES cluster and store it in an AWS S3 bucket, transfer the snapshot data to Alibaba Cloud OSS, and then restore the indexes from OSS on the destination Alibaba Cloud Elasticsearch cluster. The cross-cloud transfer of the snapshot data can also be performed by using the Migration Implementation tool, which also applies to ES snapshot data stored in Tencent Cloud COS. The restore operation uses the Manual Backup and Restoration feature of ES.
An ES snapshot can be restored only to a cluster that runs the same or a later version, and the constraint applies down to the patch version. For more information, see Snapshot compatibility. For example, if the source AWS ES cluster runs 7.10.2 and you select 7.10.0 for the destination Alibaba Cloud Elasticsearch cluster, the restore operation fails and returns the snapshot was created with Elasticsearch version [7.10.2] which is higher than the version of this node [7.10.0]. In this case, select a later version, such as 7.16.2.
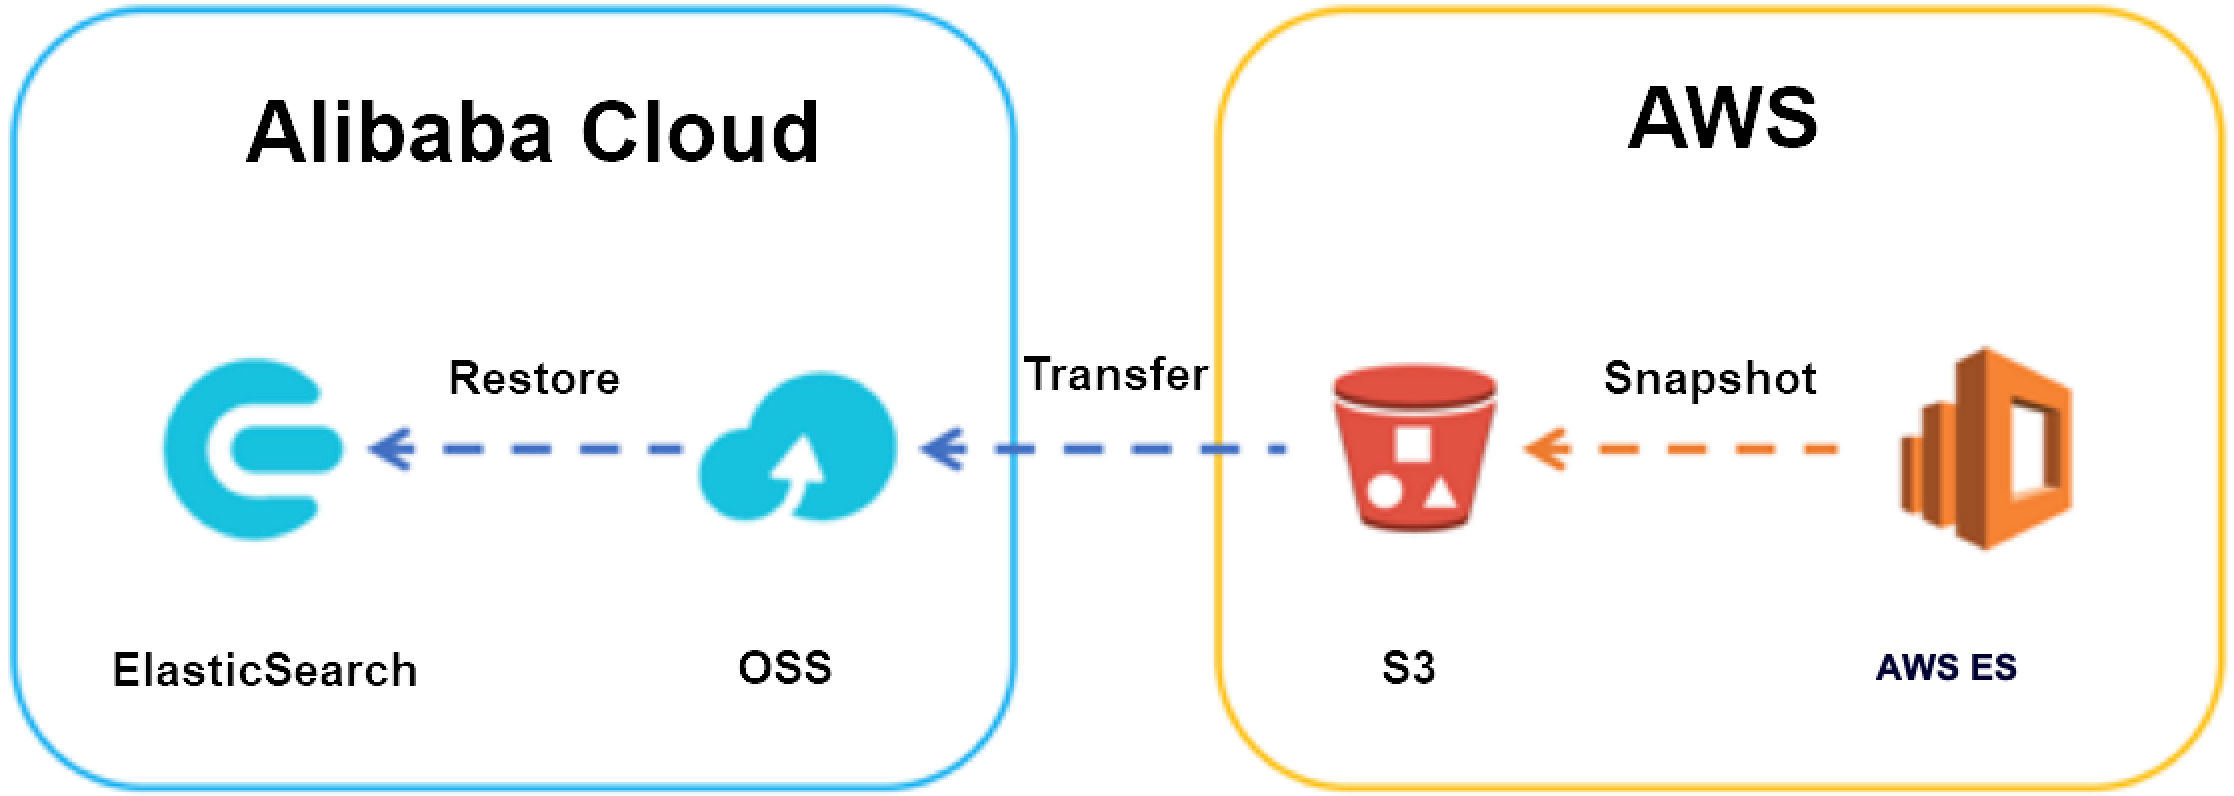
The migration consists of four phases that map one-to-one to the four steps in this topic:
-
Prepare the resources: the AWS domain, the AWS S3 bucket, and the IAM role and policy on the source side, and the Alibaba Cloud Elasticsearch cluster and the OSS bucket on the destination side.
-
Register a snapshot repository that points to the S3 bucket in AWS ES.
-
Migrate the first full snapshot: create the snapshot, transfer it to OSS, register the OSS repository in Alibaba Cloud Elasticsearch, and restore the indexes.
-
Migrate incremental snapshots and switch over: stop writes on the source cluster, create the incremental snapshot, transfer it to OSS, restore the snapshot and verify the document count, and then switch service traffic.
Step 1: Prepare the resources required for the migration
Only manual snapshots that are stored in your own AWS S3 bucket can be migrated. The snapshots that AWS automatically creates every day are retained for 14 days, cannot be migrated to another domain, and can be used only to restore the current domain. Manual snapshots are billed at AWS S3 standard rates. Complete the following preparations before you start the migration.
Prepare the source AWS resources
-
Create an AWS domain. Amazon OpenSearch Service has retired early Elasticsearch versions such as 7.1.0.0. Use one of the versions that are currently available in the console. This topic uses Elasticsearch 7.10.2 as an example. You can use any region; this topic uses us-east-1. For more information, see Creating and managing Amazon OpenSearch Service domains.
NoteIf fine-grained access control is enabled for the domain and the master user type is IAM, or if the access policy of the domain allows only IAM principals (for example,
es:ESHttp*is granted only to the account root user), you cannot log on to the Kibana console of the domain from a browser. The request returns the 403 errorUser: anonymous is not authorized to perform: es:ESHttpGet. In this case, run all AWS-side commands in this topic as requests that are signed with AWS Signature Version 4 (SigV4). For example, reuse the Python client described in Step 2. -
Create an AWS S3 bucket to store the manual snapshots, and record the Amazon Resource Name (ARN) of the bucket. The ARN is used in two places: the Resource statement of the IAM policy, and the Python client that registers the snapshot repository.
The following example shows an ARN.
arn:aws:s3:::eric-es-index-backups -
Prepare the index that you want to migrate in AWS ES. This topic uses an index named
movies.
Create an IAM role and an IAM policy
The IAM role authorizes AWS ES to access the S3 bucket, and the IAM policy limits the actions that the role can perform. You must create both and attach the policy to the role.
-
Create an IAM role to authorize AWS ES. The role is required when you register the snapshot repository, and only an IAM user that has permissions to assume this role can register the repository.
The
Servicestatement in the trust relationship of the role must be set toes.amazonaws.com, as shown in the following example.{ "Version": "2012-10-17", "Statement": [ { "Sid": "", "Effect": "Allow", "Principal": { "Service": "es.amazonaws.com" }, "Action": "sts:AssumeRole" } ] }In the IAM console, choose Roles in the left-side navigation pane, find the target role, click the Trust relationships tab, and then click Edit trust relationship to view and edit the trust policy.
NoteAWS ES is not available in the Select role type drop-down list when you create a role for an AWS service in the IAM console. Select AWS EC2, create the role, and then change
ec2.amazonaws.comtoes.amazonaws.com. -
Create an IAM policy and attach it to the preceding IAM role to limit the actions that the role can perform on the S3 bucket.
The Resource statement of the policy must specify the ARN of the S3 bucket that stores the snapshots. The following example specifies the
eric-es-index-backupsbucket.{ "Version": "2012-10-17", "Statement": [ { "Action": [ "s3:ListBucket" ], "Effect": "Allow", "Resource": [ "arn:aws:s3:::eric-es-index-backups" ] }, { "Action": [ "s3:GetObject", "s3:PutObject", "s3:DeleteObject" ], "Effect": "Allow", "Resource": [ "arn:aws:s3:::eric-es-index-backups/*" ] } ] }After the policy is created, you can verify it in the IAM console: choose Policies in the left-side navigation pane, click the policy name to open the details page, and confirm on the JSON view of the Permissions tab that the policy content matches the preceding example. Policy summary shows that the policy grants Limited: List, Read, Write access to S3.
Then, click Roles in the left-side navigation pane, select the target role, and confirm on the Permissions tab that the policy is attached.
Prepare the destination Alibaba Cloud resources
-
Create an Alibaba Cloud Elasticsearch cluster in the China (Hangzhou) region. The version of the cluster must be no earlier than the exact patch version of the source AWS ES cluster. If the source cluster runs 7.10.2, select 7.16.2. For more information, see Create an Alibaba Cloud Elasticsearch cluster.
-
Create an OSS bucket to receive the snapshot data that is transferred from AWS S3. The bucket used in this topic resides in the China (Hangzhou) region, uses the Standard storage class and the private ACL, and keeps the default values for all other parameters. For more information, see Create buckets.
Step 2: Register a snapshot repository in AWS ES
You can create manual snapshots only after you register a snapshot repository that points to the S3 bucket in AWS ES. The registration request must be signed with AWS Signature Version 4 (SigV4) by the user or role that is specified in the trust relationship of the IAM role created in Step 1: Prepare the resources required for the migration. The curl command does not support AWS request signing, so use the following Python client to register the repository.
Prepare the registration script
-
Download the register_snapshot_repository.py file.
-
Modify the parameter values that are marked by the comments in the script, and save the script as snapshot.py.
The following table describes the parameters.
Parameter
Description
region
The AWS region in which the snapshot repository is created.
host
The endpoint of the AWS ES domain.
aws_access_key_id
The ID of the IAM credential.
aws_secret_access_key
The key of the IAM credential.
service
The AWS service identifier that is used for signing. For Amazon OpenSearch Service, including its Elasticsearch versions, the value is always
es.url
The request URL that registers the snapshot repository, in the
https://{host}/_snapshot/{repository-name}format. The repository name must be the same as the name that you use when you create and restore snapshots.payload
Must include the name and ARN of the S3 bucket that you created for the IAM role in Step 1: Prepare the resources required for the migration.
Important-
We recommend that you add
"base_path": "<custom-prefix>"to settings so that the snapshot files of this cluster are stored under the specified prefix and do not share a path with the snapshots of other clusters in the same S3 bucket. For more information, see the description of repository uniqueness in the FAQ section. Record the prefix: thebase_pathvalue that you specify when you register the OSS repository in Alibaba Cloud Elasticsearch must be the same as the actual prefix of the snapshot data in OSS. -
To enable server-side encryption with S3-managed keys for the snapshot repository, add
"server_side_encryption": trueto the settings JSON. -
If the S3 bucket resides in the ap-southeast-1 region, use
"endpoint": "s3.amazonaws.com"instead of"region": "ap-southeast-1".
-
Install the dependencies and run the registration
-
Install the dependencies that the sample Python client requires.
The sample Python client sends requests by using requests and signs the requests by using requests-aws4auth. Install both dependencies on the machine that runs the registration, in a Python 3 environment.
pip install requests requests_aws4auth -
Run the Python client to register the snapshot repository. If the registration succeeds, HTTP status code 200 and
{"acknowledged" : true}are returned.python snapshot.py
Verify the registration result
-
Log on to the Kibana console of the AWS ES domain and run the following command on the Dev Tools > Console page to view the result. If fine-grained access control is enabled for the domain, or if the access policy allows only IAM principals and you cannot log on to Kibana, run the same command as a signed request. For example, reuse the preceding Python client and change the request method to GET.
GET _snapshotThe response returns the configuration of the registered snapshot repositories. The repository that the system automatically creates is named
cs-automated. If encryption at rest is enabled for the domain, the repository is namedcs-automated-enc.{ "eric-snapshot-repository": { "type": "s3", "settings": { "bucket": "eric-es-index-backups", "base_path": "eric-aws", "region": "us-east-1", "role_arn": "arn:aws:iam::xxx:role/eric-iam-role-es" } }, "cs-automated-enc": { "type": "s3" } }
Step 3: Migrate the first full snapshot
This step migrates all existing data on the source cluster to the destination cluster: create a full snapshot in AWS ES, transfer the snapshot data to Alibaba Cloud OSS, and then register the OSS repository in Alibaba Cloud Elasticsearch and restore the indexes.
Create a full snapshot in AWS ES
Run the following AWS-side commands on the Dev Tools page of the Kibana console of the AWS ES domain. If you cannot log on to the Kibana console of the domain from a browser, run the same commands as requests that are signed with SigV4.
-
Create a snapshot named
snapshot_movies_1for themoviesindex in theeric-snapshot-repositoryrepository.PUT _snapshot/eric-snapshot-repository/snapshot_movies_1 { "indices": "movies" } -
Check the snapshot status. If
stateisSUCCESS, the snapshot is created.GET _snapshot/eric-snapshot-repository/snapshot_movies_1{ "snapshots": [ { "snapshot": "snapshot_movies_1", "uuid": "BlgKLvgoSpSgwBnbD4hIWg", "version_id": 7100299, "version": "7.10.2", "indices": [ "movies" ], "data_streams": [], "include_global_state": true, "state": "SUCCESS", "start_time": "2018-02-28T03:00:44.591Z", "start_time_in_millis": 1519786844591, "end_time": "2018-02-28T03:00:46.236Z", "end_time_in_millis": 1519786846236, "duration_in_millis": 1645, "failures": [], "shards": { "total": 5, "failed": 0, "successful": 5 } } ] } -
Confirm in the AWS S3 console that the snapshot files are generated.
After the snapshot is created, the S3 bucket eric-es-index-backups contains the generated snapshot files, including the
indicesfolder,index-0,index.latest,meta-BlgKLvgoSpSgwBhbD4hTWg.dat, andsnap-BlgKLvgoSpSgwBhbD4hTWg.dat.
Transfer the snapshot data to Alibaba Cloud OSS
Transfer the snapshot data from AWS S3 to Alibaba Cloud OSS. For more information, see Migrate applications from Amazon S3 to OSS.
After the transfer is complete, confirm in the OSS console that the snapshot data is in place.
The OSS bucket contains the following snapshot files: indices/ (folder), index-0, index.latest, meta-BlgKLvgoSpSgwBhbD4hTWg.dat, and snap-BlgKLvgoSpSgwBhbD4hTWg.dat.
Register an OSS snapshot repository in Alibaba Cloud Elasticsearch
-
Create a snapshot repository.
During an Elasticsearch snapshot migration, you must ensure that each Elasticsearch cluster uses a dedicated snapshot repository or path. If multiple clusters share the same repository, data restoration may fail and data may be lost.
Log on to the Kibana console of the destination Alibaba Cloud Elasticsearch cluster (Log on to the Kibana console) and run the following command on the Dev Tools > Console page to create a snapshot repository that has the same name. The
base_pathvalue must be the same as the actual prefix of the snapshot data after the data is transferred to OSS. If nobase_pathis configured for the repository on the AWS side and the snapshot files reside in the root directory of the bucket, do not configurebase_pathhere either.PUT _snapshot/eric-snapshot-repository { "type": "oss", "settings": { "base_path": "my/snapshot/directory", "endpoint": "http://oss-cn-hangzhou-internal.aliyuncs.com", "access_key_id": "your AccessKeyID", "secret_access_key": "your AccessKeySecret", "bucket": "eric-oss-aws-es-snapshot-s3", "compress": true } } -
Check the status of the snapshot named
snapshot_movies_1.GET _snapshot/eric-snapshot-repository/snapshot_movies_1If
statein the response isSUCCESS, Alibaba Cloud Elasticsearch can read the snapshot from the OSS repository. Ifsnapshot_missing_exceptionis returned, check whetherbase_pathis the same as the actual prefix of the snapshot data in OSS.NoteRecord the start time and the end time of this snapshot. The values are required when you migrate the incremental snapshot data. Example:
-
"start_time_in_millis": 1519786844591
-
"end_time_in_millis": 1519786846236
-
Restore the indexes and verify the data
Run the following command in the Kibana console of the Alibaba Cloud Elasticsearch cluster to restore the snapshot.
POST _snapshot/eric-snapshot-repository/snapshot_movies_1/_restore
{
    "indices": "movies"
}
Run the following command to check the availability of the movies index.
GET movies/_recoveryAfter the restoration is complete, the number of documents in the movies index is the same as the number in the AWS ES domain.
You can also verify the data in the Kibana console of the Alibaba Cloud Elasticsearch cluster: on the Discover page, select the movies index. In this example, three documents are returned after the restoration (The Manchurian Candidate, Mars Attacks!, and U.S. Marshals), which is the same as the source cluster.
Step 4: Migrate incremental snapshots and switch over
After the first full snapshot is migrated, the data that is written to the source cluster in the meantime must be caught up by using incremental snapshots. Before the formal switchover, stop all services that can modify the indexes on the source cluster, and then perform this step to ensure that the last incremental snapshot contains all data. The following example writes 2 more documents to the source cluster.
Create an incremental snapshot in AWS ES
-
Write incremental data to the
moviesindex in AWS ES.In this example, 2 documents are written. After the write operation, the
moviesindex contains 5 documents whose_idvalues are 1 to 5. RunGET movies/_countto check the current number of documents, which is used for comparison with the destination cluster. -
Create the incremental snapshot.
Run the following command to manually create a snapshot. For more information, see Create a full snapshot in AWS ES.
PUT _snapshot/eric-snapshot-repository/snapshot_movies_2
{
"indices": "movies"
}
After the snapshot is created, run the following command to check the snapshot status.
GET _snapshot/eric-snapshot-repository/snapshot_movies_2View the new snapshot files in the AWS S3 console.
The S3 bucket lists all files of the snapshot repository. The new files that correspond to
snapshot_movies_2aresnap-CWhlF7ShQZaKQlJasPE70A.dat,index.latest,index-1, andmeta-CWhlF7ShQZaKQlJasPE70A.dat.
Transfer the incremental snapshot data to Alibaba Cloud OSS
Transfer the incremental snapshot data from AWS S3 to Alibaba Cloud OSS by using ossimport. The S3 bucket already contains the files of the first snapshot. We recommend that you set isSkipExistFile to true in the local_job.cfg configuration file to transfer only the new snapshot files.
isSkipExistFile is a boolean parameter. The default value false indicates that existing objects are overwritten. If the value is true, the objects that are already migrated are skipped based on the size and LastModifiedTime values of the objects. This parameter does not take effect when jobType is audit.
After the transfer is complete, the new snapshot files appear in OSS.
After the incremental files are transferred to OSS, Alibaba Cloud Elasticsearch continues to use the cached repository content. As a result, GET _snapshot/eric-snapshot-repository/_all may still return only the first snapshot. In the Kibana console of the Alibaba Cloud Elasticsearch cluster, register the OSS repository that has the same name again: run DELETE _snapshot/eric-snapshot-repository first, and then re-create the repository by using the PUT command described in Step 3. Confirm that the new snapshot is visible, and then restore the incremental snapshot.
The new files are index-1, index.latest, meta-CWhIF7ShQZaKQUasPE70A.dat, and snap-CWhIF7ShQZaKQUasPE70A.dat.
Restore the incremental snapshot and switch service traffic
The commands that restore the incremental snapshot are the same as the commands in Step 3: Migrate the first full snapshot. However, you must close the movies index before the restoration and reopen the movies index after the restoration.
-
Close the
moviesindex.POST /movies/_close -
Check the status of the
moviesindex and confirm that the state has changed toclose. You cannot useGET movies/_statsto query a closed index because the request returnsindex_closed_exception. Run the following command instead.GET _cat/indices/movies?v -
Restore the incremental snapshot.
POST _snapshot/eric-snapshot-repository/snapshot_movies_2/_restore { "indices": "movies" } -
Open the
moviesindex.POST /movies/_open
After the restoration is complete, run GET movies/_count to verify the number of documents. In this example, the destination cluster returns 5, which is the same as the source AWS ES cluster. You can then switch service traffic to the Alibaba Cloud Elasticsearch cluster.
FAQ
Why is repository uniqueness required?
If multiple Elasticsearch clusters, including the source cluster and the destination cluster, use the same snapshot repository at the same time, the following issues occur:
-
Metadata conflicts: Multiple clusters operating on the same repository can overwrite or corrupt metadata files, preventing snapshots from being correctly identified.
-
Data overwrites: Snapshots from different clusters may overwrite each other's data files, causing data loss or corruption.
-
Restoration failures: Elasticsearch cannot determine which data belongs to which cluster, causing restore operations to fail or restore incorrect data.
Therefore, use a dedicated snapshot repository for each Elasticsearch cluster, or use base_path to separate paths within the same bucket. If multiple clusters must access the same repository, grant write permissions to only one cluster and register the repository with "readonly": true on the other clusters so that they attach to the repository in read-only mode.
Why does an error occur when Alibaba Cloud Elasticsearch restores index data from a snapshot in OSS?
The cause may be that the OSS path of the snapshot data contains an empty directory name that ends with a forward slash (/) or contains other special characters. For example, an abnormal level named "/" is displayed in the OSS console.
Alibaba Cloud Elasticsearch does not support such characters in the paths of snapshot files. To resolve the issue, use ossbrowser to move the OSS snapshot data to a folder that has a normal name.