Migrate Elasticsearch index data from an Amazon OpenSearch Service domain to an Alibaba Cloud Elasticsearch cluster by using the snapshot and restore mechanism.
Migration overview
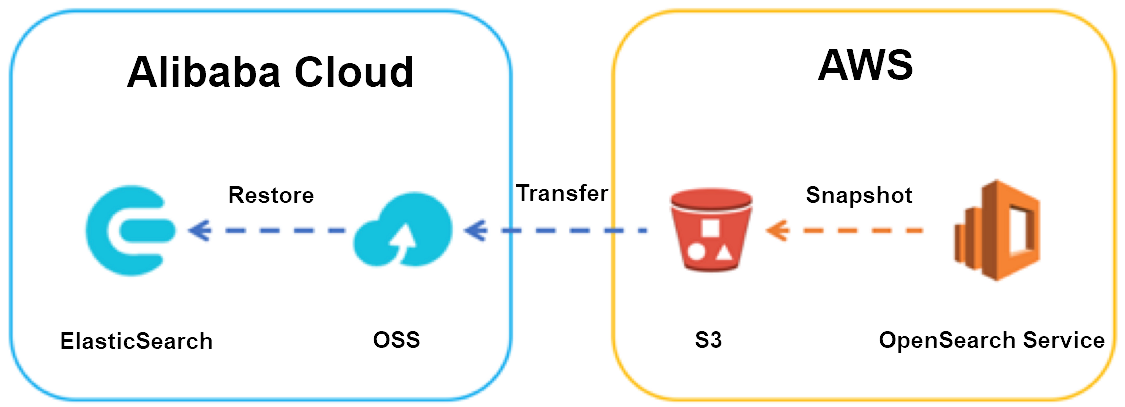
This migration transfers index data through Elasticsearch snapshots by using Amazon Simple Storage Service (Amazon S3) and Object Storage Service (OSS) as intermediary storage. The high-level steps are:
Create a snapshot repository on the Amazon OpenSearch Service domain and take a full snapshot of your indexes.
Transfer the snapshot from the S3 bucket to an OSS bucket by using ossimport or Data Online Migration.
Register a snapshot repository on the Alibaba Cloud Elasticsearch cluster that points to the OSS bucket.
Restore the snapshot to the Alibaba Cloud Elasticsearch cluster.
Sync incremental changes by repeating the snapshot-transfer-restore cycle until cutover.
Perform the final cutover by stopping writes, taking a final snapshot, and switching traffic to Alibaba Cloud Elasticsearch.
Version compatibility
The destination Elasticsearch cluster version must be the same as or later than the source cluster version. Snapshots are forward-compatible by one major version only:
| Source snapshot version | Supported restore target |
|---|---|
| Elasticsearch 1.x | Elasticsearch 2.x |
| Elasticsearch 2.x | Elasticsearch 5.x |
| Elasticsearch 5.x | Elasticsearch 6.x |
For full details, see Snapshot restore version compatibility.
This mechanism is not limited to AWS. Any Elasticsearch snapshot stored in Amazon S3, Tencent Cloud Object Storage (COS), or another object storage service can be transferred to OSS and restored. For more information, see Migrate data and Create manual snapshots and restore data from manual snapshots.
Prerequisites
AWS side
| Prerequisite | Description |
|---|---|
| Amazon OpenSearch Service domain | A running domain with the indexes to migrate. This guide uses Elasticsearch 5.5.2 in the Singapore region as an example. See Create an Amazon OpenSearch Service domain. |
| S3 bucket | Stores manual snapshots. Note the Amazon Resource Name (ARN), for example arn:aws:s3:::eric-es-index-backups. Standard S3 charges apply. |
| IAM role | Grants Amazon OpenSearch Service access to the S3 bucket. The trust relationship must specify es.amazonaws.com in the Service element. |
| IAM policy | Defines the S3 actions (s3:ListBucket, s3:GetObject, s3:PutObject, s3:DeleteObject) that the IAM role can perform on the bucket. |
| Python environment | Required to run the snapshot repository registration script. Install the requests and requests-aws4auth libraries. |
Alibaba Cloud side
| Prerequisite | Description |
|---|---|
| Alibaba Cloud Elasticsearch cluster | A running cluster with the same or later version than the source. This guide uses V5.5.3 in the China (Hangzhou) region. See Create an Alibaba Cloud Elasticsearch cluster. |
| OSS bucket | Receives the snapshot data. This guide uses a Standard storage class bucket with Private access control list (ACL) in the China (Hangzhou) region. See Create buckets. |
| AccessKey ID and AccessKey secret | Used to authenticate the Elasticsearch cluster with OSS. |
Amazon OpenSearch Service automatically creates daily snapshots of primary shards and retains them for up to 14 days at no charge. However, these automatic snapshots can only restore data to the same domain. To migrate data to another cluster, take manual snapshots.
Step 1: Set up AWS IAM permissions
Before registering a snapshot repository, configure IAM to grant Amazon OpenSearch Service access to your S3 bucket.
Create an IAM role
Open the IAM console and create a role.
Amazon OpenSearch Service is not listed in the Select role type dropdown. Select Amazon EC2 instead, then update the trust relationship to replace
ec2.amazonaws.comwithes.amazonaws.com.Set the trust relationship to the following:
   {
     "Version": "2012-10-17",
     "Statement": [
       {
         "Sid": "",
         "Effect": "Allow",
         "Principal": {
           "Service": "es.amazonaws.com"
         },
         "Action": "sts:AssumeRole"
       }
     ]
   }
Create and attach an IAM policy
Create a policy that grants the IAM role access to the S3 bucket. Replace
<your-s3-bucket>with your bucket name:{ "Version": "2012-10-17", "Statement": [ { "Action": [ "s3:ListBucket" ], "Effect": "Allow", "Resource": [ "arn:aws:s3:::<your-s3-bucket>" ] }, { "Action": [ "s3:GetObject", "s3:PutObject", "s3:DeleteObject" ], "Effect": "Allow", "Resource": [ "arn:aws:s3:::<your-s3-bucket>/*" ] } ] }Attach the policy to the IAM role.
Step 2: Register a snapshot repository on Amazon OpenSearch Service
Amazon OpenSearch Service requires AWS request signing for snapshot repository registration, so you cannot use a cURL command. Use the provided Python client instead.
Download the register_snapshot_repository.py script.
Update the script parameters:
To enable server-side encryption with S3-managed keys, add
"server_side_encryption": trueto thesettingsJSON. If the S3 bucket is in theap-southeast-1region, replace"region": "ap-southeast-1"with"endpoint": "s3.amazonaws.com".Parameter Description regionThe AWS region of the Amazon OpenSearch Service domain hostThe endpoint of the Amazon OpenSearch Service domain aws_access_key_idYour IAM credential ID aws_secret_access_keyYour IAM credential key pathThe snapshot repository path dataThe S3 bucket name and IAM role ARN Install the required Python libraries:
pip install requests requests-aws4authRun the script to register the snapshot repository:
python register_snapshot_repository.pyVerify the registration. Log in to the Kibana console of the Amazon OpenSearch Service domain, click Dev Tools in the left navigation pane, and run the following command on the Console tab: The response lists the registered snapshot repository.
GET _snapshot
Step 3: Create a full snapshot
Run the following commands in the Kibana Dev Tools console or by using cURL from the command line.
Create a snapshot. Replace
<repository>with your snapshot repository name and<index>with the index to migrate: Example with themoviesindex:PUT _snapshot/<repository>/snapshot_1 { "indices": "<index>" }PUT _snapshot/eric-snapshot-repository/snapshot_movies_1 { "indices": "movies" }Check the snapshot status: Wait until the
statefield showsSUCCESS. Note thestart_time_in_millisandend_time_in_millisvalues for incremental snapshot transfers later.GET _snapshot/<repository>/snapshot_1Verify that the snapshot objects appear in the S3 console.
Step 4: Transfer the snapshot from S3 to OSS
Transfer the snapshot objects from the S3 bucket to the OSS bucket. For detailed instructions, see Migrate data from Amazon S3 to Alibaba Cloud OSS.
After the transfer completes, verify that the snapshot objects appear in the OSS console.
Step 5: Restore the snapshot on Alibaba Cloud Elasticsearch
Log in to the Kibana console of your Alibaba Cloud Elasticsearch cluster. For more information, see Log on to the Kibana console.
Click Dev Tools in the left navigation pane and open the Console tab.
Register a snapshot repository that points to the OSS bucket. The repository name must match the one registered on Amazon OpenSearch Service. Replace the placeholder values: Example:
   PUT _snapshot/<repository>
   {
     "type": "oss",
     "settings": {
       "endpoint": "http://oss-cn-hangzhou-internal.aliyuncs.com",
       "access_key_id": "<your-AccessKey-ID>",
       "secret_access_key": "<your-AccessKey-secret>",
       "bucket": "<your-oss-bucket>",
       "base_path": "<snapshot-directory-path>",
       "compress": true
     }
   }
PUT _snapshot/eric-snapshot-repository { "type": "oss", "settings": { "endpoint": "http://oss-cn-hangzhou-internal.aliyuncs.com", "access_key_id": "your AccessKeyID", "secret_access_key": "your AccessKeySecret", "bucket": "eric-oss-aws-es-snapshot-s3", "base_path": "my/snapshot/directory", "compress": true } }Verify the snapshot is accessible:
GET _snapshot/<repository>/snapshot_1Restore the snapshot:
   POST _snapshot/<repository>/snapshot_1/_restore
   {
     "indices": "<index>"
   }
Verify the restore completed successfully:
GET <index>/_recovery
Step 6: Migrate incremental changes
After restoring the baseline snapshot, repeat the snapshot-transfer-restore cycle to sync incremental changes. In this example, the movies index initially contains 3 documents. After inserting 2 more documents on the source domain, the incremental snapshot captures the changes.
Create an incremental snapshot
On the Amazon OpenSearch Service domain, create a new snapshot:
   PUT _snapshot/<repository>/snapshot_2
   {
     "indices": "<index>"
   }
Check the snapshot status:
GET _snapshot/<repository>/snapshot_2
Transfer the incremental snapshot
Use ossimport to transfer only the new snapshot objects. In the local_job.cfg file, set isSkipExistFile to true to skip objects that already exist in the OSS bucket based on size and LastModifiedTime.
isSkipExistFile value | Behavior |
|---|---|
false (default) | Overwrites existing objects |
true | Skips objects that match by size and last modified time |
IfjobTypeis set toaudit, theisSkipExistFilesetting has no effect.
For more information, see ossimport description and configuration.
Restore the incremental snapshot
Close the index before restoring:
POST /<index>/_closeVerify the index is closed:
GET <index>/_statsRestore the incremental snapshot:
   POST _snapshot/<repository>/snapshot_2/_restore
   {
     "indices": "<index>"
   }
Reopen the index:
POST /<index>/_openVerify the document count matches the source. In this example, the
moviesindex should contain 5 documents (3 original + 2 added):GET <index>/_count
Close the target index before restoring an incremental snapshot. Restoring to an open index fails.
Step 7: Perform the final cutover
Stop all services that write to the source indexes on the Amazon OpenSearch Service domain.
Create a final snapshot on the Amazon OpenSearch Service domain:
   PUT _snapshot/<repository>/snapshot_final
   {
     "indices": "<index>"
   }
Transfer the final snapshot to OSS and restore it to the Alibaba Cloud Elasticsearch cluster. Follow the same steps described in Step 6: Migrate incremental changes.
Switch application traffic to the Alibaba Cloud Elasticsearch cluster endpoint.
Verify migration results
After restoring, confirm that the data is complete and correct:
Check document count. Compare the document count on both clusters:
GET <index>/_countCheck index health. Verify the index status is
green:GET _cluster/health/<index>Check recovery status. Confirm all shards are fully recovered:
GET <index>/_recoverySpot-check data. Query a few documents to confirm data integrity:
   GET <index>/_search
   {
     "size": 5
   }
FAQ
Why does the restore fail with an error about snapshot objects in OSS?
This usually happens when snapshot object names in OSS contain special characters such as a forward slash (/). Use ossbrowser to move the affected snapshot objects into a regular folder, then retry the restore.
Can I use cURL to register a snapshot repository on Amazon OpenSearch Service?
No. Amazon OpenSearch Service requires AWS request signing, which cURL does not support. Use the Python client with the requests and requests-aws4auth libraries instead.
Do I need to close the index before every restore?
Only for incremental restores. When restoring to an index that already exists and is open, close it first with POST /<index>/_close, then reopen it with POST /<index>/_open after the restore completes.