This topic describes how to migrate data from a self-managed Elasticsearch cluster on an ECS instance to an Alibaba Cloud Elasticsearch cluster. You will create an OSS snapshot repository to back up your data and then restore the snapshot to your Alibaba Cloud Elasticsearch cluster.
Limitations
Your OSS bucket must meet the following requirements:
The storage class must be Standard.
The bucket must be in the same region as your Alibaba Cloud Elasticsearch cluster.
Cluster version: You can migrate data from an earlier version to a later version within the same Elasticsearch major version, such as from 8.15.1 to 8.17.1. Avoid migrating data across major versions, such as from 7.7.1 to 8.17.1.
NoteAlibaba Cloud Elasticsearch is fully compatible with open source Elasticsearch. However, because data types can change between major versions (for example, the
stringtype in version 5.x was split intotextandkeywordin version 6.x), migrating across major versions can cause field type recognition errors.
Prerequisites
Create an Alibaba Cloud Elasticsearch cluster of the same major version as your self-managed Elasticsearch cluster and an OSS bucket.
The RAM User must have the
AliyunOSSFullAccesspermission policy. For more information, see Grant permissions to a RAM User.
Background
This topic uses an index named products_info to demonstrate data migration from a self-managed Elasticsearch cluster.
Run curl -X GET "http://localhost:9200/products_info/_search?pretty". If the following data is returned, the index data is ready:
Solution overview
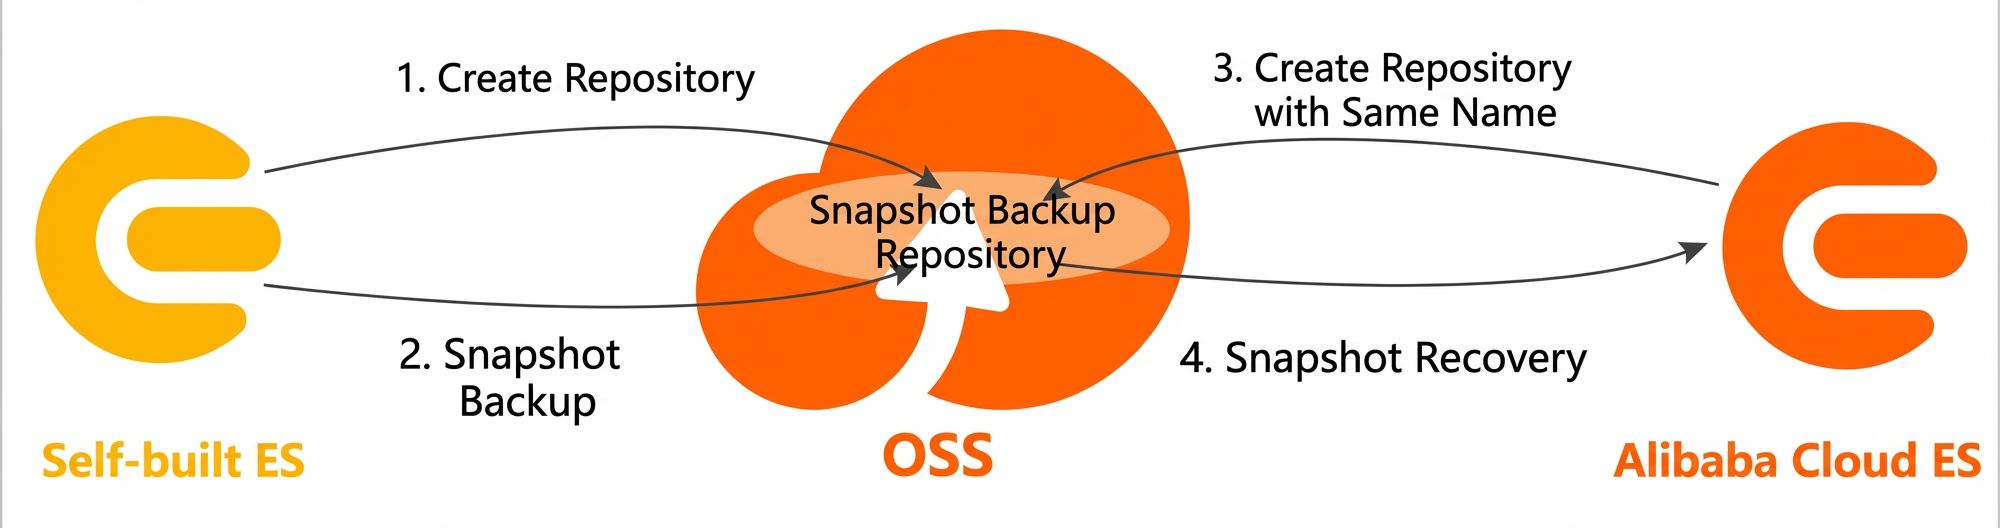
This solution is suitable for use cases that involve large data volumes (over 500 GB) and require high migration efficiency. After the initial full backup, synchronizing only incremental data reduces migration time. This approach is ideal for migrating self-managed Elasticsearch clusters to the cloud, performing cross-version upgrades, and setting up disaster recovery for production environments.
Data migration
1. Install the elasticsearch-repository-oss plugin
Connect to the ECS instance that hosts your self-managed Elasticsearch cluster and download the elasticsearch-repository-oss plug-in. This example uses version 8.17.0 of the plug-in.
wget https://github.com/aliyun/elasticsearch-repository-oss/releases/download/v8.17.0/elasticsearch-repository-oss-8.17.0.zipFor other versions of the elasticsearch-repository-oss plug-in, see How do I obtain other versions of the elasticsearch-repository-oss plug-in?
Install the plug-in on your Elasticsearch cluster.
# Install the plug-in by unzipping it to the plugins directory in the Elasticsearch installation path on each node.
sudo unzip -d /usr/local/elasticsearch-8.17.0/plugins/elasticsearch-repository-oss elasticsearch-repository-oss-8.17.0.zip
Start the nodes of your self-managed Elasticsearch cluster.
cd /usr/local/elasticsearch-8.17.0
./bin/elasticsearch -d
2. Create snapshot repository on the self-managed cluster
On the server that hosts your self-managed Elasticsearch cluster, run the following command to create a repository.
This command applies to Elasticsearch 8.x. For information about how to create a snapshot repository for other Elasticsearch versions, see Create manual snapshots and restore data from manual snapshots.
curl -X PUT "http://localhost:9200/_snapshot/<yourBackupName>" -H 'Content-Type: application/json' -d'
{
    "type": "oss",
    "settings": {
        "oss.client.endpoint": "oss-cn-shanghai.aliyuncs.com",
        "oss.client.access_key_id": "xxxx",
        "oss.client.secret_access_key": "xxxx",
        "oss.client.bucket": "<yourBucketName>",
        "oss.client.base_path":"snapshot/",
        "oss.client.compress": true
    }
}
'
Parameter | Description |
<yourBackupName> | The name of the repository. You can customize this name. |
type | The repository type. This must be set tooss. |
oss.client.endpoint | The endpoint of the OSS bucket. For more information, see Regions and endpoints. Note If your self-managed Elasticsearch cluster on an ECS instance is in the same region as the OSS bucket, use the internal endpoint to access OSS. Otherwise, use the public endpoint. |
oss.client.access_key_id | The AccessKey ID of the Alibaba Cloud account used to create the OSS bucket. For more information, see How do I obtain an AccessKey pair? |
oss.client.secret_access_key | The AccessKey secret of the Alibaba Cloud account used to create the OSS bucket. For more information, see How do I obtain an AccessKey pair? |
oss.client.bucket | The name of the OSS bucket. |
oss.client.base_path | The path where snapshots are stored. |
oss.client.compress | Specifies whether to enable compression.
|
If the repository is created successfully, the command returns an"acknowledge":true response.
3. Create an index snapshot
Create a snapshot named snapshot_1 in your self-managed Elasticsearch cluster to back up the products_info index.
curl -X PUT localhost:9200/_snapshot/<yourBackupName>/snapshot_1?pretty -H "Content-Type: application/json" -d'
{
"indices": "products_info"
}'
<yourBackupName> is the repository name that you specified when you created the snapshot repository on the self-managed Elasticsearch cluster.
If the snapshot is created successfully, the command returns an"accepted" : true response.
During snapshot creation, you can run thecurl -X GET localhost:9200/_snapshot/<yourBackupName>/snapshot_1/_status command to view the snapshot's status. When thestate in the response isSUCCESS, snapshot creation is complete.
4. Create the repository on the Alibaba Cloud cluster
In your Alibaba Cloud Elasticsearch cluster, log on to the Kibana console. In the left-side navigation pane, click the  icon and select.
In theconsole, run the following command to create a repository with the same name as the one on your self-managed Elasticsearch cluster.
PUT _snapshot/<yourBackupName>/
{
    "type": "oss",
    "settings": {
        "endpoint": "oss-cn-shanghai.aliyuncs.com",
        "access_key_id": "xxxx",
        "secret_access_key": "xxxxxx",
        "bucket": "<yourBucketName>",
        "compress": true,
        "chunk_size": "500mb",
        "base_path": "snapshot/"
    }
}<yourBackupName>, <yourBucketName>, and <base_path> must match the repository name, bucket name, and base path specified for the snapshot repository on the self-managed Elasticsearch cluster.
5. Restore the snapshot on the Alibaba Cloud cluster
In the Kibana console, run the following command to restore the snapshot_1 snapshot from the backup repository to the cluster. This command restores all indexes except for monitoring and security audit indexes, and it automatically skips any non-existent indexes.
POST _snapshot/<yourBackupName>/snapshot_1/_restore
{"indices":"*,-.monitoring*,-.security_audit*","ignore_unavailable":"true"}
If the command is successful, it returns an"accepted" : true response.
During index restoration, you can run GET products_info/_recovery to check the recovery status of the products_info index. When the "stage" value is "DONE", the index is fully restored.
In Elasticsearch 7.10.x and 7.17.x, you can set cluster.restore.ignore_revision.enable to true to allow restoring data from a snapshot with a higher revision number. The revision number is the third digit of a version number. For example, in version 7.10.1, 7 is the major version, 10 is the minor version, and 1 is the revision number.
For example, if you set cluster.restore.ignore_revision.enable to true on a running Elasticsearch 7.10.0 cluster, you can restore data from a snapshot created in version 7.10.2. Use the following code to configure the setting.
PUT _cluster/settings
{
  "persistent": {
    "cluster.restore.ignore_revision.enable": true
  }
}
6. Verify the results
In the Kibana console, run the following commands to check the restoration results.
View the restored indexes
GET /_cat/indices?vView the restored index data
GET /products_info/_searchIf the command is successful, the expected result is as follows:
{
  "took": 3,
  "timed_out": false,
  "_shards": {
    "total": 1,
    "successful": 1,
    "skipped": 0,
    "failed": 0
  },
  "hits": {
    "total": {
      "value": 6,
      "relation": "eq"
    },
    "max_score": 1,
    "hits": [
      {
        "_index": "products_info",
        "_id": "1",
        "_score": 1,
        "_source": {
          "productName": "Financial Product A",
          "annual_rate": "3.2200%",
          "describe": "180-day fixed-term investment, minimum 20,000 to invest, stable returns, optional message notifications"
        }
      },
      {
        "_index": "products_info",
        "_id": "2",
        "_score": 1,
        "_source": {
          "productName": "Financial Product B",
          "annual_rate": "3.1100%",
          "describe": "90-day fixed-term investment, minimum 10,000 to invest, daily profit notifications"
        }
      },
      {
        "_index": "products_info",
        "_id": "3",
        "_score": 1,
        "_source": {
          "productName": "Financial Product C",
          "annual_rate": "3.3500%",
          "describe": "270-day fixed-term investment, minimum 40,000 to invest, instant daily profit notifications"
        }
      },
      {
        "_index": "products_info",
        "_id": "4",
        "_score": 1,
        "_source": {
          "productName": "Financial Product D",
          "annual_rate": "3.1200%",
          "describe": "90-day fixed-term investment, minimum 12,000 to invest, daily profit notifications"
        }
      },
      {
        "_index": "products_info",
        "_id": "5",
        "_score": 1,
        "_source": {
          "productName": "Financial Product E",
          "annual_rate": "3.0100%",
          "describe": "Recommended 30-day fixed-term investment, minimum 8,000 to invest, daily profit notifications"
        }
      },
      {
        "_index": "products_info",
        "_id": "6",
        "_score": 1,
        "_source": {
          "productName": "Financial Product F",
          "annual_rate": "2.7500%",
          "describe": "Popular short-term product, 3-day term, no fees, minimum 500 to invest, profit notifications via SMS"
        }
      }
    ]
  }
}
FAQ
How to obtain other versions of the elasticsearch-repository-oss plugin?
You can download the plug-in from GitHub. If a package for your specific version is not available on GitHub, we recommend that you download a package for a nearby minor version within the same major version. Then, modify the parameter values in theplugin-descriptor.properties file, repackage the plug-in, and then install it.
Set version to the required plug-in version.
Set elasticsearch.version to the version of your self-managed Elasticsearch cluster.
NoteThe plug-in version must match the version of your self-managed Elasticsearch cluster.
Set java.version to 1.8.
NoteDifferent Elasticsearch versions depend on different JDK versions. Refer to the official Elasticsearch documentation and the plug-in requirements for specific requirements.
Open source Elasticsearch has many versions, and their compilation processes differ. Therefore, you may need to compile and debug the elasticsearch-repository-oss plug-in for your specific Elasticsearch version. For example, a self-managed Elasticsearch 7.6.2 cluster requires JDK 1.8 or later. After compiling and debugging, the corresponding plug-in is elasticsearch-repository-oss-7.6.2.