This topic describes how to connect to an Alibaba Cloud Elasticsearch cluster using curl commands.
Before you begin
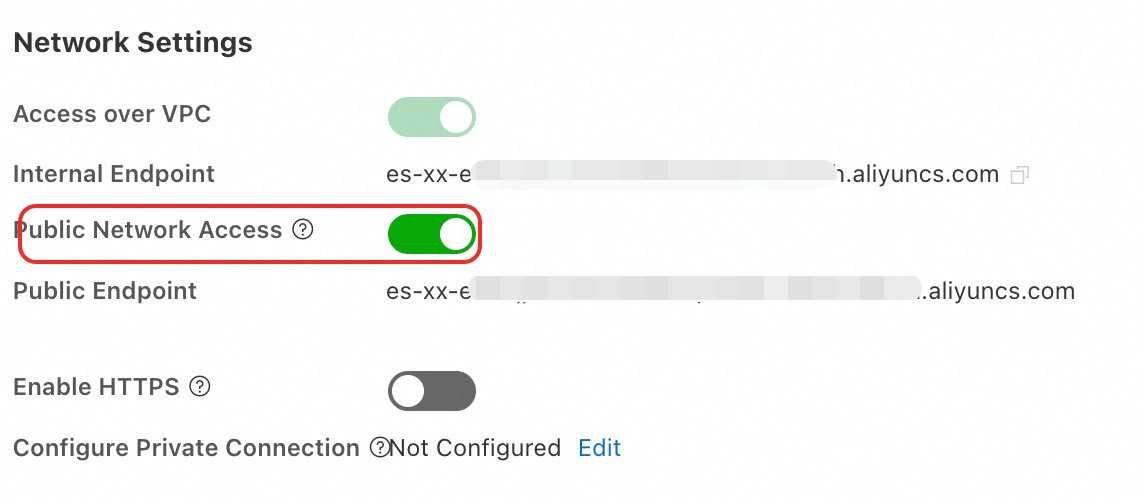
Obtain the cluster endpoint
You can connect to your Elasticsearch cluster using its internal endpoint or public endpoint.
Internal endpoint (VPC): Access the cluster over a VPC for low latency and high stability. This endpoint is enabled by default after you create the cluster.
Public endpoint: Access the cluster over the internet. You must enable this endpoint manually.
How to enable public access:
Log on to the Alibaba Cloud Elasticsearch console and go to the Basic Information page of your instance.
In the left-side navigation pane, choose Configuration and Management > Security Settings, and enable public access. When the cluster status changes from Initializing to Valid, public access is enabled.
 Important
Using a public endpoint reduces the security of your Elasticsearch cluster. If you use a public endpoint, you must configure an IP whitelist and disable public access when it is no longer needed.
Configure an IP whitelist
To secure your cluster, you must add the IP address of the client device to the cluster's VPC or public IP whitelist. Only whitelisted IP addresses can access the cluster.
Obtain the IP address of your client device.
You can obtain the IP address based on your connection scenario.
Scenario
IP address
Method
Connect from a local device
Public IP address of the local device.
If your device is on a local area network (LAN), such as a home or office network, add the public egress IP address of the LAN to the cluster's public IP whitelist.
Run the
curl ipinfo.io/ipcommand to get the public IP address of your local device.Connect from an ECS instance in a different VPC
Public IP address of the ECS instance
Log on to the ECS console and view the IP address in the instance list.
Connect from an ECS instance in the same VPC
Private IP address of the ECS instance
Log on to the ECS console and view the IP address in the instance list.
Add the IP address to a whitelist group.
Log on to the Alibaba Cloud Elasticsearch console. On the Basic Information page of the instance, choose Configuration and Management > Security Settings in the left-side navigation pane. Click Modify to configure the VPC or public IP whitelist.
Click Configure to the right of the default group. In the dialog box, add IP addresses to the VPC or public IP whitelist. A cluster supports up to 300 IP addresses or CIDR blocks. Separate multiple entries with commas, and do not add spaces around them.
You can also click Add IP Whitelist Group to create a custom group.
Whitelist groups are for management purposes only and do not affect access; all IP addresses across all groups have the same permissions.
Type
Format and example
Notes
IPv4 address
单个IP:
192.168.0.1网段:
192.168.0.0/24
禁止访问:
127.0.0.1允许所有访问:
0.0.0.0/0Important存在高危风险,强烈建议不要配置
0.0.0.0/0。部分集群版本(如7.16/8.5)和地域不支持
0.0.0.0/0,请以控制台界面或者报错提示为准。
IPv6地址格式
(仅v2部署架构且所属地域为杭州的集群支持)
单个IP:
2401:XXXX:1000:24::5网段:
2401:XXXX:1000::/48
禁止所有访问:
::1允许所有访问
::/0Important存在高危风险,强烈建议不要配置
::/0。部分集群版本不支持
::/0,请以控制台界面或者配置提示信息为准。
After you complete the configuration, click Confirm.
Protocols and Certificates
Public HTTPS: Uses certificates from a trusted Certificate Authority (CA). Clients connect directly using the
https://protocol and require no special configuration.HTTPS in a VPC: Uses a self-signed certificate to encrypt traffic. Because VPC traffic does not traverse the public internet, there is no risk of man-in-the-middle attacks. Using the
-kparameter to skip certificate validation allows for secure access.
Connect to a cluster
Syntax
# Public network HTTPS
curl -u '<UserName>:<YourPassword>' 'https://<YourEsHost>:port'

# Private network HTTP
curl -u '<UserName>:<YourPassword>' 'http://<YourEsHost>:port'

# Private network HTTPS (Use -k to skip certificate validation)
curl -k -u '<UserName>:<YourPassword>' 'https://<YourEsHost>:port'
Parameter | Description |
UserName | 默认访问用户名为elastic,该用户具有集群最高权限(可理解为管理员账户)。 出于安全考虑,不建议在生产环境中直接使用此默认管理员账户,您可以通过Elasticsearch X-Pack的RBAC(Role-based Access Control)机制,自定义角色并分配权限,然后将角色分配给用户,实现权限精细化管控,具体操作请参见通过Elasticsearch X-Pack角色管理实现用户权限管控。 |
YourPassword | The password for the UserName. |
https | The access protocol. HTTP is enabled by default. Enable and use the HTTPS protocol to ensure data confidentiality, security, and integrity during transmission. Log in to the Elasticsearch console. Go to the Basic Information page of the instance. In the navigation pane on the left, choose Configuration and Management>Security Settings. Enable the HTTPS protocol. Important
|
YourEsHost | The cluster endpoint that you obtained in the prerequisites:
|
port | The access port for the cluster. The default port is 9200 for both VPC and public access. |
Connection example
# Access the service over the public network by using HTTPS
curl -u 'user123:Passw0rd!' 'https://es-xx-xxxxxxxxxxxxxxxxx.public.elasticsearch.aliyuncs.com:9200'

# Access the service over a private network by using HTTP
curl -u 'user123:Passw0rd!' 'http://es-cn-0pp1****.elasticsearch.aliyuncs.com:9200'

# Access the service over a private network by using HTTPS (-k skips certificate validation)
curl -k -u 'user123:Passw0rd!' 'https://es-cn-0pp1****.elasticsearch.aliyuncs.com:9200'
A successful connection returns the following cluster information. You can refer to the Elasticsearch REST APIs to manage the cluster or perform index operations.
{
  "name" : "es-cn-aic**************-master-i-2",
  "cluster_name" : "es-cn-aic**************",
  "cluster_uuid" : "InmpfI1oQB2ijtdZ******",
  "version" : {
    "number" : "8.17.0",
    "build_flavor" : "default",
    "build_type" : "docker",
    "build_hash" : "0bdf7********************************50279ae7c",
    "build_date" : "2025-03-05T02:31:55.853663566Z",
    "build_snapshot" : false,
    "lucene_version" : "10.0.0",
    "minimum_wire_compatibility_version" : "7.17.0",
    "minimum_index_compatibility_version" : "7.0.0"
  },
  "tagline" : "You Know, for Search"
}