When you use Kubernetes clusters for Enterprise Distributed Application Service (EDAS), we recommend that you use Secrets to store sensitive information such as passwords and certificates. This topic describes how to manage Secrets.
Prerequisites
- A Kubernetes cluster is created in the Container Service for Kubernetes (ACK) console.
- To use an ACK cluster in Enterprise Distributed Application Service (EDAS), create a managed Kubernetes cluster or a dedicated Kubernetes cluster in the Container Service for Kubernetes (ACK) console. For more information, see the following topics:
- To use a serverless Kubernetes cluster in EDAS, create a serverless Kubernetes cluster in the Container Service for Kubernetes (ACK) console. For more information, see Create an ASK cluster.
- The created Kubernetes cluster is imported to EDAS. For more information, see Import a Kubernetes cluster to the EDAS console.
Background information
You can use Secrets to store sensitive information that needs to be kept confidential, such as passwords and certificates. Secrets can be passed to containers when you create or deploy applications. If you modify a Secret, the modification takes effect after you redeploy the relevant application.
- Use Secrets to configure environment variables for containers. For more information, see Configure environment variables.
- Mount Secrets as files to the directories of containers. For more information, see Configure mount directories.
- Store HTTPS certificate information in a Secret and use the Secret to configure an Ingress for an application. For more information, see Create an NGINX Ingress for an application.
Create a Secret
- Log on to the EDAS console.
- In the left-side navigation pane, choose .
- On the Secrets page, select a region in the top navigation bar.
- On the Secret page, click Create Secrets.
- In the Create Secrets panel, set the parameters as required and click Yes.
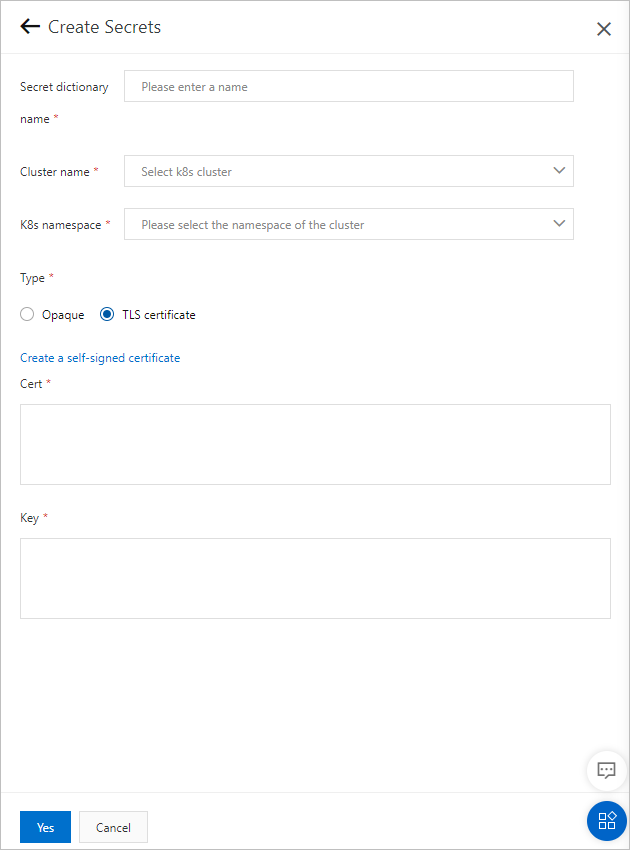
Parameter Description Secret dictionary name The name of the Secret. The name can contain lowercase letters, hyphens (-), and digits. The name must start with a letter and cannot end with a hyphen (-). Cluster name The Kubernetes cluster for which you want to create the Secret. Select the Kubernetes cluster from the drop-down list. K8s namespace The Kubernetes namespace of the cluster. Internal system objects are allocated to different Kubernetes namespaces to form logically isolated projects, groups, or user groups. This way, different groups can be separately managed but can also share the resources of the entire cluster. Valid values: - default: the default Kubernetes namespace. If no Kubernetes namespace is specified for an object, the default Kubernetes namespace is used.
- kube-system: the Kubernetes namespace for the objects that are created by the system.
- kube-public: the Kubernetes namespace that is automatically created and can be read by all users, including users who are not authenticated.
Type The type of the Secret. Valid values: Opaque and TLS certificate. - Opaque: The Secret is used to store custom information. If you select Opaque, the Base64 encoded data check box is displayed.
If you want to upload Base64-encoded data that is converted from binary data, select the Base64 encoded data check box. In this case, you must enter Base64-encoded data for the Secret. EDAS does not encode the data that you enter.
- TLS certificate: The Secret is used to store your Transport Layer Security (TLS) certificate and the keys involved. This type of Secret is generally used to configure Ingresses for applications. In EDAS, an Ingress is a collection of routing rules that are used to route external HTTPS requests to internal services.
Opaque The following parameters are displayed if you set the Type parameter to Opaque and click Add: - Mapping parameters:
- Key: the key of the sensitive information. The key can contain letters, digits, hyphens (-), underscores (_), and periods (.).
- Value: the value of the sensitive information.
Alternatively, you can click Import Configuration and select an option to import an on-premises configuration file. The file can be up to 1,024 KB in size and must be in the
JSON, YAML, or .propertiesformat. If you want to upload Base64-encoded data that is converted from binary data, select the Base64 encoded data check box. In this case, you must enter Base64-encoded data for the Secret. EDAS does not encode the data that you enter.
TLS certificate If you set the Type parameter to TLS certificate, you can create a self-signed certificate or manually specify the keys of your TLS certificate. - To manually specify the keys of your TLS certificate, set the Cert parameter to specify the public key and the Key parameter to specify the private key.
- To create a self-signed certificate, click Create a self-signed certificate and set the Domain, The key length, Certificate start time, and Certificate expiration time parameters.
View a Secret
- Log on to the EDAS console.
- In the left-side navigation pane, choose .
- On the Secrets page, select a region in the top navigation bar.
- On the Secret page, find the Secret that you want to view and click Details. You can search for the required Secret by the Secret dictionary name, Cluster name, Cluster ID, or K8sNamespace parameter.
- On the details page of the Secret, view the basic information of the Secret and the key-value pair data contained in the Secret. If the Secret stores the information about a TLS certificate, you can also view the details of the certificate on the page, including the domain name associated with the certificate, the status of the certificate, and the service provider that issued the certificate.
Modify a Secret
- Log on to the EDAS console.
- In the left-side navigation pane, choose .
- On the Secrets page, select a region in the top navigation bar.
- On the Secret page, find the Secret that you want to modify and click Edit. You can search for the required Secret by the Secret dictionary name, Cluster name, Cluster ID, or K8sNamespace parameter.
- In the editing panel, modify the keys and values in the Secret based on your requirements and click Yes. Note If the Secret is used by an application, redeploy the application after you modify the Secret. Otherwise, the Secret modification does not take effect in the application.
View the Ingress associated with a Secret
- Log on to the EDAS console.
- In the left-side navigation pane, choose .
- On the Secrets page, select a region in the top navigation bar.
- On the Secret page, find the required Secret and click View associated apps. You can search for the required Secret by the Secret dictionary name, Cluster name, Cluster ID, or K8sNamespace parameter.
- On the page that appears, view the Ingress that is associated with the Secret. Click the name of the Ingress to view its details.
Delete a Secret
- Log on to the EDAS console.
- In the left-side navigation pane, choose .
- On the Secrets page, select a region in the top navigation bar.
- On the Secret page, find the Secret that you want to delete and click Delete. You can search for the required Secret by the Secret dictionary name, Cluster name, Cluster ID, or K8sNamespace parameter.
- In the message that appears, click Yes. Note If the Secret is used by an application, we recommend that you delete the Secret after you disassociate the Secret from the application.