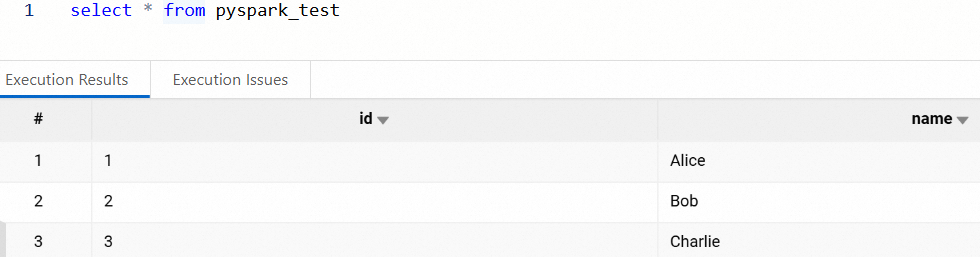
This tutorial walks you through an end-to-end workflow: run an EMR Serverless Spark batch task that writes sample data to a Paimon table managed by Data Lake Formation (DLF), then verify that the data was written correctly and is queryable.
Prerequisites
Before you begin, ensure that you have:
-
A DLF data catalog. For more information, see Data Catalog
-
A workspace configured to use DLF. For more information, see Create a workspace
Step 1: Prepare the code
The sample code creates a DataFrame with three rows and writes it to a Paimon table named pyspark_test, then queries the table to confirm the write succeeded.
Java
Download SparkExample-1.0-SNAPSHOT.jar to use the prebuilt JAR file directly. To build from source, add the following Maven dependencies (Spark 3.5.2, scope provided):
Maven dependencies
<dependency>
    <groupId>org.apache.spark</groupId>
    <artifactId>spark-core_2.12</artifactId>
    <version>3.5.2</version>
    <scope>provided</scope>
</dependency>
<dependency>
    <groupId>org.apache.spark</groupId>
    <artifactId>spark-sql_2.12</artifactId>
    <version>3.5.2</version>
    <scope>provided</scope>
</dependency>
<dependency>
    <groupId>org.apache.spark</groupId>
    <artifactId>spark-hive_2.12</artifactId>
    <version>3.5.2</version>
    <scope>provided</scope>
</dependency>
Code example
package org.example;

import org.apache.spark.sql.Dataset;
import org.apache.spark.sql.Row;
import org.apache.spark.sql.RowFactory;
import org.apache.spark.sql.SparkSession;
import org.apache.spark.sql.types.DataTypes;
import org.apache.spark.sql.types.StructField;
import org.apache.spark.sql.types.StructType;

import java.util.Arrays;
import java.util.List;

public class DlfAccess {
    public static void main(String[] args) {
        // enableHiveSupport() is required so that Spark can read the DLF catalog
        SparkSession spark = SparkSession.builder()
                .appName("DLF Example")
                .enableHiveSupport()
                .getOrCreate();

        // Build a three-row test DataFrame
        List<Row> data = Arrays.asList(
                RowFactory.create(1, "Alice"),
                RowFactory.create(2, "Bob"),
                RowFactory.create(3, "Charlie")
        );

        StructType schema = DataTypes.createStructType(new StructField[] {
                DataTypes.createStructField("id",   DataTypes.IntegerType, false),
                DataTypes.createStructField("name", DataTypes.StringType,  false)
        });

        Dataset<Row> df = spark.createDataFrame(data, schema);

        // Drop the table if it already exists, then write in Paimon format
        spark.sql("drop table if exists pyspark_test");
        df.write().format("paimon").mode("overwrite").saveAsTable("pyspark_test");

        // Query the first 10 rows to verify the write succeeded
        Dataset<Row> result = spark.sql("select * from pyspark_test limit 10");
        result.show();

        spark.stop();
    }
}
Python
If your workspace uses DLF 1.0 (legacy), add spark.sql.extensions org.apache.paimon.spark.extensions.PaimonSparkSessionExtensions to your Spark configuration before running the task.
Code example
from pyspark.sql import SparkSession

# enableHiveSupport() is required so that Spark can read the DLF catalog
spark = SparkSession.builder \
    .appName("DLF test") \
    .enableHiveSupport() \
    .getOrCreate()

# Test data: three rows with id and name columns
data = [
    (1, "Alice"),
    (2, "Bob"),
    (3, "Charlie")
]

# Drop the table if it already exists, then write in Paimon format
spark.sql("drop table if exists pyspark_test")
df = spark.createDataFrame(data, schema='id int, name string')
df.write.format('paimon').mode("overwrite").saveAsTable("pyspark_test")

# Query the table to verify the write succeeded
spark.sql("select * from pyspark_test").show()
Step 2: Upload the file
-
Log on to the EMR console.
-
In the left navigation pane, choose EMR Serverless > Spark.
-
On the Spark page, click the name of your workspace.
-
In the left navigation pane, click Artifacts.
-
On the Artifacts page, click Upload File.
-
In the Upload File dialog box, click the upload area to select your Python file or JAR file, or drag the file into the upload area.
Step 3: Create and run the batch task
-
In the left navigation pane, click Development.
-
On the Development tab, click the
 icon to create a new task.
 -
In the dialog box, enter a Name, select PySpark or JAR under Application(Batch), and click OK.
-
In the upper-right corner, select the target queue. For details on adding a queue, see Manage resource queues.
-
Configure the parameters for your task type, leave all other parameters at their default values, and click Run.
JAR
Parameter Value Main JAR Resource Select the JAR file you uploaded. Main Class Enter org.example.DlfAccess.PySpark
Parameter Value Main Python Resource Select Workspace, then select the Python file you uploaded on the Artifacts page.
Step 4: Verify the results
After the task completes, use one of the following methods to confirm that the data was written correctly.
| Method | Best for |
|---|---|
| Log query | Checking execution details and debug output |
| DLF console | Confirming the table was created in the catalog |
| SQL development | Querying the data to verify content is readable |
Method 1: View logs
-
In the Exection Records section, click Logs in the Actions column for the task.
-
On the Log Exploration tab, review the output. A successful run shows the three rows printed by
show().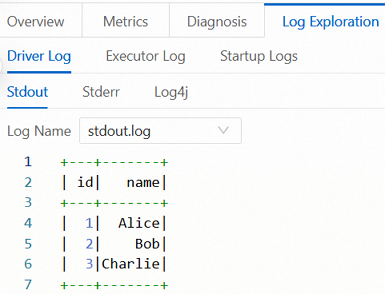
Method 2: Check the DLF console
-
Log on to the DLF console.
-
Navigate to the catalog and database associated with your workspace, and confirm that the
pyspark_testtable appears.
Method 3: Run a SQL query
In Data Development, create a SQL development task and run the following query to verify the data:
SELECT * FROM pyspark_test;For details, see SparkSQL Development.