Use the built-in SQL editor in EMR Serverless Spark to write and run Spark SQL jobs interactively. After a job runs, access the Spark UI to inspect execution status, resource usage, and logs.
Prerequisites
Before you begin, make sure you have:
-
A workspace. See Create a workspace.
-
An SQL session instance. See Manage SQL sessions.
Create a Spark SQL job
DLF Catalog parameters are loaded during SparkSession initialization. Setting Catalog-related parameters such as spark.sql.catalog.dlf.warehouse dynamically in PySpark code by using spark.conf.set() does not take effect. To correctly configure these parameters, specify them as startup parameters when you submit a job. For example, add spark.sql.catalog.dlf.warehouse=oss://your-bucket/warehouse-path in the Configuration section of the EMR Serverless Spark console or by using the --conf parameter in the CLI.
-
Go to the development page.
-
Log on to the EMR console.
-
In the navigation pane on the left, choose EMR Serverless \> Spark.
-
On the Spark page, click the name of the target workspace.
-
On the EMR Serverless Spark page, click Development in the navigation pane on the left.
-
-
Create a job.
-
On the Development tab, click the
 icon.
icon. -
In the dialog box, enter a Name, set Type to SparkSQL, and click OK.
-
In the upper-right corner, select a data catalog, a database, and a running SQL session instance. To create a new SQL session instance, select Connect to SQL Session from the drop-down list. See Manage SQL sessions for details.

-
Enter SQL statements in the editor.
Example 1: Basic SQL operations
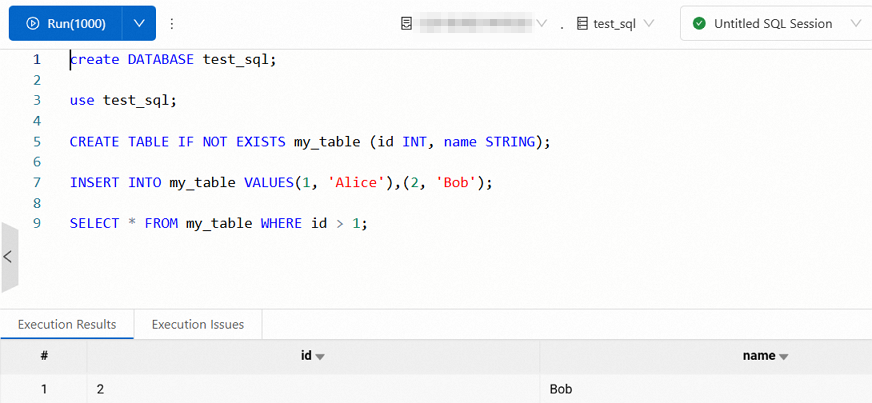
Create a database, switch to it, create a table, insert rows, and query the data.
create DATABASE test_sql;

use test_sql;

CREATE TABLE IF NOT EXISTS my_table (id INT, name STRING);

INSERT INTO my_table VALUES(1, 'Alice'),(2, 'Bob');

SELECT * FROM my_table WHERE id > 1;
The results are shown in the following figure.
Example 2: CSV-based external table
Create an external table backed by a CSV file in Object Storage Service (OSS) and run an analytics query. Replace
oss://<bucketname>/user/with your actual bucket path.-
Create the external table. Define a table named
orderswith the following fields:-
order_id: The order ID. -
order_date: The order timestamp, for example,'2025-07-01 10:00:00'. -
order_category: The product category, for example,'Electronics'or'Apparel'. -
order_revenue: The order amount.
CREATE TABLE orders ( order_id STRING, -- Order ID order_date STRING, -- Order timestamp order_category STRING, -- Product category order_revenue DOUBLE -- Order amount ) USING CSV OPTIONS ( path 'oss://<bucketname>/user/', header 'true' ); -
-
Insert test data.
INSERT OVERWRITE TABLE orders VALUES ('o1', '2025-07-01 10:00:00', 'Electronics', 5999.0), ('o2', '2025-07-02 11:30:00', 'Apparel', 299.0), ('o3', '2025-07-03 14:45:00', 'Electronics', 899.0), ('o4', '2025-07-04 09:15:00', 'Home Goods', 99.0), ('o5', '2025-07-05 16:20:00', 'Electronics', 1999.0), ('o6', '2025-07-06 08:00:00', 'Apparel', 199.0), ('o7', '2025-07-07 12:10:00', 'Electronics', 799.0), ('o8', '2025-07-08 18:30:00', 'Home Goods', 59.0), ('o9', '2025-07-09 20:00:00', 'Electronics', 399.0), ('o10', '2025-07-10 07:45:00', 'Apparel', 599.0), ('o11', '2025-07-11 09:00:00', 'Electronics', 1299.0), ('o12', '2025-07-12 13:20:00', 'Home Goods', 159.0), ('o13', '2025-07-13 17:15:00', 'Apparel', 499.0), ('o14', '2025-07-14 21:30:00', 'Electronics', 999.0), ('o15', '2025-07-15 06:10:00', 'Home Goods', 299.0); -
Run an analytics query. The following query returns sales performance by category over the 15-day period — order count, total GMV (Gross Merchandise Value), average order amount, and latest order time — for categories with total revenue above 1,000, sorted by GMV in descending order.
SELECT
    order_category,
    COUNT(order_id)    AS order_count,
    SUM(order_revenue) AS gmv,
    AVG(order_revenue) AS avg_order_amount,
    MAX(order_date)    AS latest_order_date
FROM orders
WHERE
    CAST(order_date AS TIMESTAMP) BETWEEN '2025-07-01' AND '2025-07-15'
GROUP BY order_category
HAVING SUM(order_revenue) > 1000
ORDER BY gmv DESC, order_category ASC;
Example 3: Create a Hive Parquet table (DLF Format Table)
By default, EMR Serverless Spark uses Apache Paimon as the table format. To create a Hive Parquet table instead, you must override the default settings in the job startup parameters.
Startup parameters
Before you create a Hive Parquet table, add the following Spark configuration parameters to prevent the Paimon catalog from intercepting table creation:
spark.sql.catalog.spark_catalog=org.apache.spark.sql.hive.HiveCatalog
spark.sql.defaultFileFormat=parquet
You can add these parameters in the Configuration section of the EMR Serverless Spark console or by using the
--confparameter in the CLI.SQL method
Use the
CREATE TABLE ... USING PARQUETsyntax to create a Hive Parquet table. Do not useSTORED AS PARQUET.CREATE TABLE my_parquet_table ( id INT, name STRING, created_at TIMESTAMP ) USING PARQUET;DataFrame API method
Use
df.write.format("parquet").saveAsTable(...)to write data as a Hive Parquet table.df.write.format("parquet").saveAsTable("my_parquet_table")NoteIf your workspace is bound to a DLF Catalog, we recommend that you create tables by using Spark sessions or SQL statements to ensure consistency with the metadata catalog.
-
-
(Optional) Click the Version Information tab on the right to compare versions. The editor highlights the differences in SQL code between versions.
-
-
Run and publish the job.
-
Click Run. Results appear on the Execution Results tab. If an error occurs, check the Execution Issues tab. The run history panel on the right shows records from the last three days.
-
After confirming the job runs correctly, click Publish in the upper-right corner.
-
In the Publish dialog box, enter release notes and click OK.
-
Access the Spark UI
The Spark UI shows task execution status, resource usage, and log information — useful for analyzing and optimizing your Spark jobs.
Access from the execution results
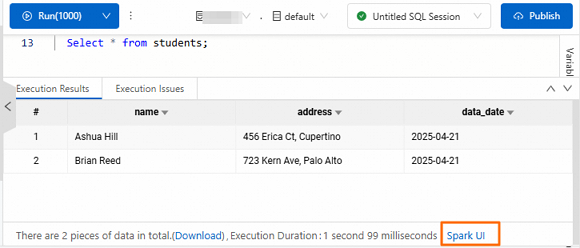
This method requires the following engine versions or later: esr-4.2.0 (esr-4.x), esr-3.2.0 (esr-3.x), or esr-2.6.0 (esr-2.x).
After the SQL statement runs, click Spark UI at the bottom of the Execution Results tab.
Access from the session instance
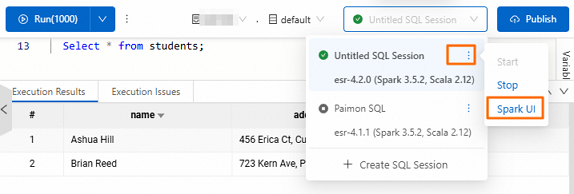
After the SQL statement runs, find the session instance and choose  \> Spark UI.
Keyboard shortcuts
| Function | Windows | Mac | Description |
|---|---|---|---|
| Run current script | Ctrl + Enter |
Control + Enter |
Runs all SQL statements, or only the highlighted selection. Same as clicking Run. |
| Format SQL | Ctrl + P |
Control + P |
Formats the SQL structure: standardizes indentation, line breaks, and keyword casing. |
| Find text | Ctrl + F |
Control + F |
Searches for keywords in the current script. |
| Save task | Ctrl + S |
Control + S |
Saves the current unpublished job to prevent data loss. |
What's next
Schedule the job to run periodically by creating a workflow. See Create a workflow. For a complete scheduling example, see Quick start for Spark SQL development.
FAQ
Can the download limit of 10,000 rows for query results be exceeded?
No. The query result download in EMR Serverless Spark data development is subject to a hard platform limit. You can download a maximum of 10,000 rows, and the total file size cannot exceed 10 MB. This limit cannot be modified through configuration.
To export larger datasets, use one of the following methods:
-
Submit a job by using spark-submit and write the results to Object Storage Service (OSS) or Hadoop Distributed File System (HDFS).
-
Use an offline synchronization task in DataWorks to export the data.
Does EMR Serverless Spark provide public APIs for Spark History?
Yes. EMR Serverless Spark provides public APIs. For the complete list of available API operations, see API overview.