This topic describes how to integrate YARN with Ranger and configure permissions.
Background information
If YARN is integrated with Ranger, you can use Ranger to configure permissions only on scheduler queues. Permissions on fair queues cannot be configured. The permissions that you configured on YARN queues by using Ranger and the Capacity Scheduler configurations of YARN take effect at the same time. The following figure shows the authentication process. 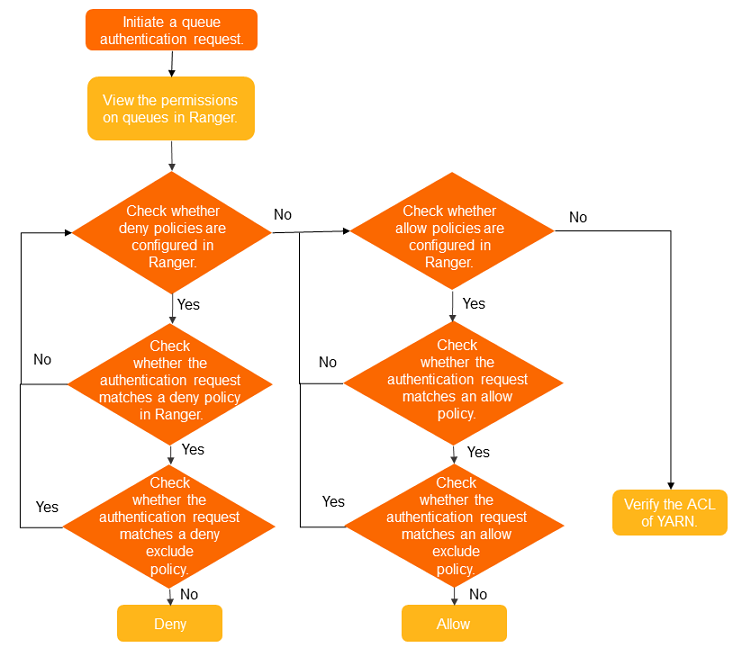
Prerequisites
You have an EMR cluster that runs a version earlier than EMR-5.11.0 or EMR-3.45.0, with both the Ranger and OpenLDAP services installed. For more information, see Create a cluster.
For clusters that run EMR-5.11.0 or later and EMR-3.45.0 or later, RangerUserSync automatically integrates with LDAP if the OpenLDAP service is installed. To check the current user source for RangerUserSync, go to the Configure tab of the Ranger service and search for the ranger.usersync.sync.source configuration item. The value is either 'unix' or 'ldap'.
Limitations
YARN must use the Capacity Scheduler, and its access control list (ACL) feature must be enabled. Ensure that no unnecessary permissions are granted. For more information, see YARN schedulers and YARN high-security features.
Confirm the following configurations:
-
In the yarn-site.xml file of the YARN service, the
yarn.resourcemanager.scheduler.class=org.apache.hadoop.yarn.server.resourcemanager.scheduler.capacity.CapacitySchedulerparameter is set. -
The YARN ACL feature must be enabled, which requires the
yarn.acl.enable=trueparameter to be set. -
In the capacity-scheduler.xml file for the YARN service, verify the following Capacity Scheduler configurations:
yarn.scheduler.capacity.root.acl_submit_applications=is set to a single space, andyarn.scheduler.capacity.root.acl_administer_queue= hadoopis set with a leading space beforehadoop. This configuration grants queue administration permissions for all queues to the hadoop group by default. -
Do not configure any other
acl_submit_applicationsoracl_administer_queueparameters, except for the root queue ACL. This prevents YARN ACLs from interfering with Ranger authentication.
Procedure
-
Go to the cluster services page.
-
Log on to the EMR console.
-
In the Actions column for the cluster you want to manage, click Services.
-
-
Enable YARN in Ranger.
-
On the Services page, in the Ranger-plugin service section, click Status.
-
In the Service Overview section, enable the enableYARN switch.
-
In the dialog box that appears, click OK.
-
-
Restart the YARN ResourceManager.
-
On the Services page, select
 > YARN.
 -
On the Status page of the YARN service, find ResourceManager and, in the Actions column, click Restart.
-
In the dialog box that appears, enter an Execution Reason and click OK.
-
In the Confirm dialog box, click OK.
-
Example: Configure permissions
After you enable YARN in Ranger, Ranger adds a YARN service by default. You can use this service to grant queue management permissions to a user, such as emr-user.
-
Go to the Ranger UI. For more information, see Ranger.
-
Click the configured emr-yarn service.
In the Service Manager list, expand the YARN service to find emr-yarn.
-
In the upper-right corner, click Add New Policy.
-
Configure the policy parameters based on your requirements.
Parameter
Description
Policy Name
The name of the policy. You can specify a custom name.
Queue
The name of the queue. Example:
root.default.recursive
Specifies whether child queues inherit the permissions.
Select Group
The user group to which you want to attach the policy.
Select User
The user to whom this policy applies. Example:
emr-user.Permissions
The permissions to grant. Example:
admin-queue. -
Click Add.
Once added, the policy grants the specified permissions to
emr-user. This user can now submit jobs to theroot.defaultqueue.NoteAfter you add, remove, or modify a policy, it takes about one minute for the configuration to take effect.