The transparent caching feature of JindoFSx for Apache Hadoop Distributed File System (HDFS) allows you to use idle storage resources of computing clusters to cache data of remote HDFS clusters. This prevents computing clusters from occupying an excessive amount of bandwidth and ensures sufficient bandwidth for core clusters. If an HDFS cluster is separated from a computing cluster, and the access performance of the HDFS cluster cannot meet your requirements, you can cache data in or near the computing cluster to accelerate access.
Prerequisites
A cluster of EMR V3.42.0 or a later minor version, or a cluster of EMR V5.6.0 or a later minor version is created in the EMR console, and the JindoData service is selected from the optional services when you create the cluster. For more information, see Create a cluster.
Procedure
Step 1: Configure the server
Go to the common tab of the JindoData service.
Log on to the EMR console.
In the top navigation bar, select the region where your cluster resides and select a resource group based on your business requirements.
On the EMR on ECS page, find the cluster that you want to manage and click Services in the Actions column.
Click Configure in the JindoData section.
Click the common tab.
Add configuration items.
Click Add Configuration Item.
In the Add Configuration Item dialog box, add the parameters that are described in the following table.
For more information about how to add configuration items, see Add configuration items.
Cluster type
Parameter
Description
Common cluster
jindofsx.hdfs.user
The username that you want to use to access HDFS. Example: hadoop.
High availability (HA) cluster
jindofsx.hdfs.XXX.dfs.ha.namenodes
The value of the
dfs.ha.namenodes.XXXparameter in the hdfs-site.xml file. Examples: nn1, nn2, and nn3.jindofsx.hdfs.XXX.dfs.namenode.rpc-address.nn1
The value of the
dfs.namenode.rpc-address.XXX.nn1parameter in the hdfs-site.xml file. Example: master-1-1:8020.jindofsx.hdfs.XXX.dfs.namenode.rpc-address.nn2
The value of the
dfs.namenode.rpc-address.XXX.nn2parameter in the hdfs-site.xml file. Example: master-1-2:8020.jindofsx.hdfs.XXX.dfs.namenode.rpc-address.nn3
The value of the
dfs.namenode.rpc-address.XXX.nn3parameter in the hdfs-site.xml file. Example: master-1-3:8020.NoteYou can add configuration items based on the type of your cluster.
XXXindicates the value of thedfs.nameservicesparameter that you configured in the hdfs-site.xml file. Example:hdfs-cluster.Click OK.
In the dialog box that appears, configure the Execution Reason parameter and click Save.
Restart the JindoData service.
On the Services tab of the JindoData service, choose .
In the Restart JINDODATA Services dialog box, specify the execution reason and click OK.
In the Confirm message, click OK.
Step 2: Configure JindoSDK
This step is to configure the client. You do not need to restart the JindoData service after you complete this step.
Go to the Configure tab.
Log on to the EMR console.
In the top navigation bar, select the region where your cluster resides and select a resource group based on your business requirements.
On the EMR on ECS page, find the cluster that you want to manage and click Services in the Actions column.
On the Services tab, click Configure in the HADOOP-COMMON section.
Click the core-site.xml tab.
Add and modify the configuration items that are described in the following table.
For more information about how to add a configuration item, see Add configuration items. For more information about how to modify a configuration item, see Modify configuration items.
Item
Required
Parameter
Description
Configure the implementation class of the unified namespace
Yes
fs.hdfs.impl
Set the value to
com.aliyun.jindodata.hdfs.JindoHdfsFileSystem.Yes
fs.AbstractFileSystem.hdfs.impl
Set the value to
com.aliyun.jindodata.hdfs.HDFS.Configure the xengine type
Yes
fs.xengine
Set the value to
jindofsx.Configure the endpoint of JindoFSx Namespace Service
Yes
fs.jindofsx.namespace.rpc.address
Set the value in the format of ${headerhost}:8101. Example: master-1-1:8101.
NoteFor more information about how to configure and use the Namespace service in high availability mode, see Configure and use the JindoFSx Namespace service in high availability mode.
Enable data caching for access acceleration
Yes
fs.jindofsx.data.cache.enable
Specifies whether to enable data caching. Valid values:
false: disables data caching. This is the default value.
true: enables data caching.
Configure HA Namenodes
NoteYou must configure these parameters for an HA cluster.
No
fs.jindofsx.hdfs.XXX.dfs.ha.namenodes
The value of the
dfs.ha.namenodes.XXXparameter in the hdfs-site.xml file. Examples: nn1, nn2, and nn3.No
fs.jindofsx.hdfs.XXX.dfs.namenode.rpc-address.nn1
The value of the
dfs.namenode.rpc-address.XXX.nn1parameter in the hdfs-site.xml file. Example: master-1-1:8020.No
fs.jindofsx.hdfs.XXX.dfs.namenode.rpc-address.nn2
The value of the
dfs.namenode.rpc-address.XXX.nn2parameter in the hdfs-site.xml file. Example: master-1-2:8020.No
fs.jindofsx.hdfs.XXX.dfs.namenode.rpc-address.nn3
The value of the
dfs.namenode.rpc-address.XXX.nn3parameter in the hdfs-site.xml file. Example: master-1-3:8020.Enable metadata caching
No
fs.jindofsx.meta.cache.enable
Specifies whether to enable metadata caching. Valid values:
false: disables metadata caching. This is the default value.
true: enables metadata caching.
Enable small-file caching
No
fs.jindofsx.slice.cache.enable
Specifies whether to enable caching of small files. Valid values:
false: disables caching of small files. This is the default value.
true: enables caching of small files.
Enable short-circuit read
No
fs.jindofsx.short.circuit.enable
Specifies whether to enable short-circuit read. Valid values:
true: enables short-circuit read. This is the default value.
false: disables short-circuit read.
Save the configurations.
Click Save on the Configure tab.
In the dialog box that appears, configure the Execution Reason parameter, turn on Automatically Update Configurations, and then click Save.
Step 3: Control disk space usage
After you enable the caching features, JindoFSx manages cached data. JindoFSx clears cached data based on the disk space usage that you configure for cached data. Configure the disk space usage for cached data based on your business requirements. JindoFSx uses HDFS as the data storage backend. You can store large volumes of data in HDFS. However, the capacity of local disks is limited. JindoFSx deletes cold data in local disks. You can configure the storage.watermark.high.ratio and storage.watermark.low.ratio parameters to adjust the space usage of local disks. You can set each of the parameters to a value that ranges from 0 to 1.
Modify disk usage configurations.
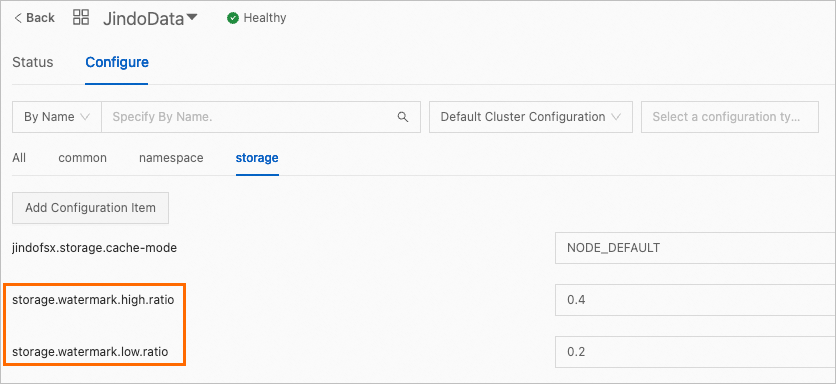
On the Configure tab of the JindoData service page, modify the following parameters on the storage tab.
Parameter
Description
storage.watermark.low.ratio
The lower limit of disk usage. After automatic data deletion is triggered, JindoFSx starts to delete data until the disk usage of cached data is reduced to this limit. Default value: 0.2.
storage.watermark.high.ratio
The upper limit of disk usage. When the disk usage of cached data reaches this limit, automatic data deletion is triggered. Default value: 0.4. If you require a higher disk usage, you can set this parameter to a larger value.
NoteWhen you configure the parameters, make sure that the upper limit is greater than the lower limit.
Save the configurations.
Click Save.
In the dialog box that appears, configure the Execution Reason parameter and click Save.
Restart the JindoData service.
On the JindoData service page, choose in the upper-right corner.
In the Restart JINDODATA Services dialog box, configure the Execution Reason parameter, retain the default values for other parameters, and then click OK.
In the Confirm message, click OK.
Step 4: Access HDFS
After you read data from OSS-HDFS by using the hdfs:// prefix, the data is automatically cached to JindoFSx if data caching is enabled. This way, when you read the same data by using the hdfs:// prefix again, the cached data is read.