Use EMR Hive nodes in DataWorks to transform raw OSS data into a user profile dataset. This tutorial walks you through a three-stage pipeline: cleanse raw web logs, join them with user records, and aggregate the results into a consumable ADS table.
Pipeline overview:
| Stage | Node | Input | Output |
|---|---|---|---|
| Cleanse (ODS → DWD) | dwd_log_info_di_emr | ods_raw_log_d_emr | Structured log records with region, device, and identity fields |
| Join (DWD → DWS) | dws_user_info_all_di_emr | dwd_log_info_di_emr + ods_user_info_d_emr | Combined log and user demographics |
| Summarize (DWS → ADS) | ads_user_info_1d_emr | dws_user_info_all_di_emr | Daily user profile with page view (PV) counts |
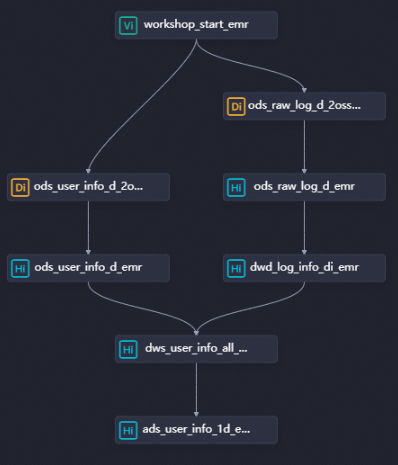
Node dependency: dwd_log_info_di_emr → dws_user_info_all_di_emr → ads_user_info_1d_emr
Prerequisites
Before you begin, make sure that you have:
Synchronized the source data as described in Synchronize data
An Object Storage Service (OSS) bucket prepared for the environment (referenced in Step 2)
Step 1: Design the workflow
In the Scheduled Workflow pane of the DataStudio page, double-click the workflow. On the workflow configuration tab, click EMR Hive in the EMR section. In the Create Node dialog box, set Name and click Confirm.
Create the following three EMR Hive nodes, then configure their dependencies as shown in the figure:
dwd_log_info_di_emr— cleanses raw OSS log datadws_user_info_all_di_emr— joins cleansed logs with basic user informationads_user_info_1d_emr— generates the final user profile data
Step 2: Register a UDF for IP-to-region lookup
The raw logs store visitor IP addresses, but the pipeline needs region labels. Register a User-Defined Function (UDF) that translates IP addresses into region names.
Upload the JAR resource
Download the ip2region-emr.jar package.
On the DataStudio page, find the WorkShop workflow, right-click EMR, and choose Create Resource > EMR JAR. Configure the following parameters in the dialog box: Set other parameters based on your requirements, or keep the defaults.
Parameter Value Storage path The OSS bucket you prepared File The downloaded ip2region-emr.jar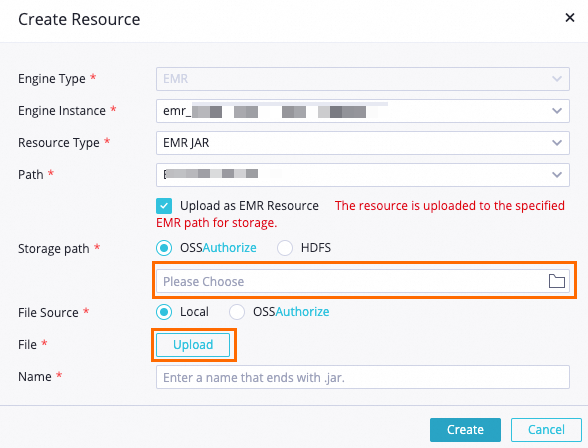
Click the
 icon in the toolbar to commit the resource to the EMR project in the development environment.
Register the function
On the DataStudio page, find the WorkShop workflow, right-click EMR, and select Create Function.
In the Create Function dialog box, set Name to
getregionand click Create. Configure the following parameters on the tab that appears: Set other parameters based on your requirements, or keep the defaults.Parameter Value Resource ip2region-emr.jarClass Name org.alidata.emr.udf.Ip2Region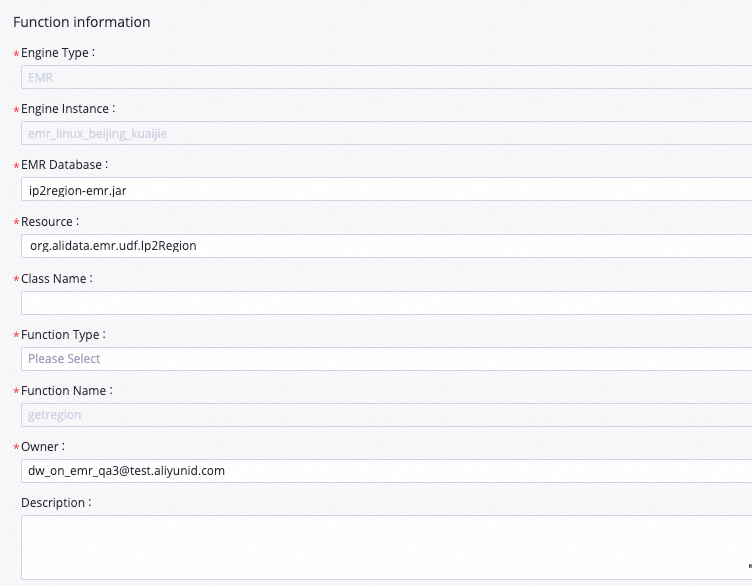
Click the
icon in the toolbar to commit the function to the EMR project in the development environment.
After this step, you can call getregion(ip) in any HiveQL statement within the project.
Step 3: Configure the EMR Hive nodes
If multiple EMR compute engines are associated with DataStudio in your workspace, select the appropriate compute engine for each node. If only one compute engine is associated, skip this selection.
Configure dwd_log_info_di_emr (cleanse raw logs)
This node parses the raw log table (ods_raw_log_d_emr) and writes structured records to dwd_log_info_di_emr. Each raw log row is a single string delimited by ##@@, with fields in the order: ip, uid, time, request, status, bytes, referer, agent.
Add the HiveQL code
Double-click the dwd_log_info_di_emr node to open its configuration tab. Enter the following statements:
-- Create the DWD-layer table for cleansed log data.
CREATE TABLE IF NOT EXISTS dwd_log_info_di_emr (
  ip       STRING COMMENT 'Visitor IP address',
  uid      STRING COMMENT 'User ID',
  `time`   STRING COMMENT 'Request timestamp (yyyymmddhh:mi:ss)',
  status   STRING COMMENT 'HTTP status code returned by the server',
  bytes    STRING COMMENT 'Bytes returned to the client',
  region   STRING COMMENT 'Region derived from the IP address via UDF',
  method   STRING COMMENT 'HTTP method (GET, POST, etc.)',
  url      STRING COMMENT 'Request URL path',
  protocol STRING COMMENT 'HTTP version',
  referer  STRING COMMENT 'Referring URL (domain only)',
  device   STRING COMMENT 'Device type: android, iphone, ipad, macintosh, windows_phone, windows_pc, or unknown',
  identity STRING COMMENT 'Access type: crawler, feed, user, or unknown'
)
PARTITIONED BY (dt STRING);

ALTER TABLE dwd_log_info_di_emr ADD IF NOT EXISTS PARTITION (dt='${bizdate}');

SET hive.vectorized.execution.enabled = false;

-- Parse and cleanse raw log data for the current business date.
-- Each raw row is a single string with fields separated by ##@@.
-- Field order: [0]=ip, [1]=uid, [2]=tm, [3]=request, [4]=status, [5]=bytes, [6]=referer, [7]=agent
INSERT OVERWRITE TABLE dwd_log_info_di_emr PARTITION (dt='${bizdate}')
SELECT
    ip
  , uid
  , tm
  , status
  , bytes
  , getregion(ip)                                            AS region   -- UDF: translates IP to region name
  , regexp_substr(request, '(^[^ ]+ )')                     AS method   -- Extracts HTTP method from request string
  , regexp_extract(request, '^[^ ]+ (.*) [^ ]+$')           AS url      -- Extracts URL path from request string
  , regexp_extract(request, '.* ([^ ]+$)')                   AS protocol -- Extracts HTTP version from request string
  , regexp_extract(referer, '^[^/]+://([^/]+){1}')           AS referer  -- Strips path; keeps only the referring domain
  , CASE
      WHEN lower(agent) RLIKE 'android'       THEN 'android'
      WHEN lower(agent) RLIKE 'iphone'        THEN 'iphone'
      WHEN lower(agent) RLIKE 'ipad'          THEN 'ipad'
      WHEN lower(agent) RLIKE 'macintosh'     THEN 'macintosh'
      WHEN lower(agent) RLIKE 'windows phone' THEN 'windows_phone'
      WHEN lower(agent) RLIKE 'windows'       THEN 'windows_pc'
      ELSE 'unknown'
    END AS device   -- Derived from the User-Agent string
  , CASE
      WHEN lower(agent) RLIKE '(bot|spider|crawler|slurp)'                              THEN 'crawler'
      WHEN lower(agent) RLIKE 'feed'
        OR regexp_extract(request, '^[^ ]+ (.*) [^ ]+$') RLIKE 'feed'                  THEN 'feed'
      WHEN lower(agent) NOT RLIKE '(bot|spider|crawler|feed|slurp)'
        AND agent RLIKE '^[Mozilla|Opera]'
        AND regexp_extract(request, '^[^ ]+ (.*) [^ ]+$') NOT RLIKE 'feed'             THEN 'user'
      ELSE 'unknown'
    END AS identity -- Derived from the User-Agent string and URL path
FROM (
  -- Split each raw log row into individual fields using the ##@@ delimiter.
  SELECT
      SPLIT(col, '##@@')[0] AS ip
    , SPLIT(col, '##@@')[1] AS uid
    , SPLIT(col, '##@@')[2] AS tm
    , SPLIT(col, '##@@')[3] AS request
    , SPLIT(col, '##@@')[4] AS status
    , SPLIT(col, '##@@')[5] AS bytes
    , SPLIT(col, '##@@')[6] AS referer
    , SPLIT(col, '##@@')[7] AS agent
  FROM ods_raw_log_d_emr
  WHERE dt = '${bizdate}'
) a;
Configure scheduling properties
| Configuration item | Value |
|---|---|
| Add Parameter (in the Scheduling Parameter section) | Name: bizdate / Value: $[yyyymmdd-1] |
| Dependencies | Set the output table to workspacename.dwd_log_info_di_emr |
The Scheduling Cycle is set to Day. Skip the Scheduled time field — the run time is inherited from the workshop_start_emr root node, which triggers all descendant nodes after 00:30 every day.After you save these settings, the dwd_log_info_di_emr node runs automatically once the ancestor node ods_raw_log_d_emr finishes syncing data from OSS.
Save the node configuration
Click the ![]() icon in the top toolbar to save the node.
icon in the top toolbar to save the node.
Configure dws_user_info_all_di_emr (join logs with user records)
This node joins the cleansed log data with the user demographics table and writes the combined records to dws_user_info_all_di_emr.
Add the HiveQL code
Double-click the dws_user_info_all_di_emr node to open its configuration tab. Enter the following statements:
-- Create the DWS-layer table combining log behavior and user demographics.
CREATE TABLE IF NOT EXISTS dws_user_info_all_di_emr (
  uid       STRING COMMENT 'User ID',
  gender    STRING COMMENT 'Gender',
  age_range STRING COMMENT 'Age range',
  zodiac    STRING COMMENT 'Zodiac sign',
  region    STRING COMMENT 'Region derived from IP address',
  device    STRING COMMENT 'Device type',
  identity  STRING COMMENT 'Access type: crawler, feed, user, or unknown',
  method    STRING COMMENT 'HTTP method',
  url       STRING COMMENT 'Request URL path',
  referer   STRING COMMENT 'Referring domain',
  `time`    STRING COMMENT 'Request timestamp (yyyymmddhh:mi:ss)'
)
PARTITIONED BY (dt STRING);

ALTER TABLE dws_user_info_all_di_emr ADD IF NOT EXISTS PARTITION (dt='${bizdate}');

-- Join cleansed log data (left) with user demographics (right) on uid.
-- COALESCE handles cases where a uid appears in logs but not in the user table.
INSERT OVERWRITE TABLE dws_user_info_all_di_emr PARTITION (dt='${bizdate}')
SELECT
    COALESCE(a.uid, b.uid) AS uid
  , b.gender
  , b.age_range
  , b.zodiac
  , a.region
  , a.device
  , a.identity
  , a.method
  , a.url
  , a.referer
  , a.`time`
FROM (
  SELECT * FROM dwd_log_info_di_emr WHERE dt = '${bizdate}'
) a
LEFT OUTER JOIN (
  SELECT * FROM ods_user_info_d_emr WHERE dt = '${bizdate}'
) b ON a.uid = b.uid;
Configure scheduling properties
| Configuration item | Value |
|---|---|
| Add Parameter (in the Scheduling Parameter section) | Name: bizdate / Value: $[yyyymmdd-1] |
| Dependencies | Set the output table to workspacename.dws_user_info_all_di_emr |
The Scheduling Cycle is set to Day. Skip the Scheduled time field — the run time is determined by the workshop_start_emr root node.After you save these settings, the dws_user_info_all_di_emr node runs automatically once both ancestor nodes (ods_user_info_d_emr and dwd_log_info_di_emr) have finished.
Save the node configuration
Click the ![]() icon in the top toolbar to save the node.
icon in the top toolbar to save the node.
Configure ads_user_info_1d_emr (generate user profiles)
This node aggregates the joined data into a daily user profile, grouped by uid, and writes the results to ads_user_info_1d_emr.
Add the HiveQL code
Double-click the ads_user_info_1d_emr node to open its configuration tab. Enter the following statements:
-- Create the ADS-layer table for daily user profiles.
CREATE TABLE IF NOT EXISTS ads_user_info_1d_emr (
  uid       STRING COMMENT 'User ID',
  region    STRING COMMENT 'Region derived from IP address',
  device    STRING COMMENT 'Device type',
  pv        BIGINT COMMENT 'Page view count',
  gender    STRING COMMENT 'Gender',
  age_range STRING COMMENT 'Age range',
  zodiac    STRING COMMENT 'Zodiac sign'
)
PARTITIONED BY (dt STRING);

ALTER TABLE ads_user_info_1d_emr ADD IF NOT EXISTS PARTITION (dt='${bizdate}');

-- Aggregate per-user behavior for the current business date.
-- COUNT(0) counts all log rows per uid as the page view total.
INSERT OVERWRITE TABLE ads_user_info_1d_emr PARTITION (dt='${bizdate}')
SELECT
    uid
  , MAX(region)
  , MAX(device)
  , COUNT(0)    AS pv
  , MAX(gender)
  , MAX(age_range)
  , MAX(zodiac)
FROM dws_user_info_all_di_emr
WHERE dt = '${bizdate}'
GROUP BY uid;
Configure scheduling properties
| Configuration item | Value |
|---|---|
| Add Parameter (in the Scheduling Parameter section) | Name: bizdate / Value: $[yyyymmdd-1] |
| Dependencies | Set the output table to workspacename.ads_user_info_1d_emr |
The Scheduling Cycle is set to Day. Skip the Scheduled time field — the run time is determined by the workshop_start_emr root node.After you save these settings, the ads_user_info_1d_emr node runs automatically once dws_user_info_all_di_emr finishes.
Save the node configuration
Click the ![]() icon in the top toolbar to save the node.
icon in the top toolbar to save the node.
Step 4: Test and commit the workflow
On the workflow configuration tab, click the
 icon to run the workflow.
When the
 icon appears next to all nodes, click the
  icon to commit.
In the Commit dialog box, select the nodes to commit, enter a description, and select Ignore I/O Inconsistency Alerts.
Click Confirm.
On the Deployment Package Creation page, deploy the nodes.
Step 5: Run nodes in the production environment
Deployed nodes generate instances scheduled for the next day. Use the data backfill feature to trigger an immediate run and verify that the pipeline works end to end in production.
Click Operation Center in the upper-right corner (or in the top toolbar of the workflow configuration tab).
In the left-side navigation pane, choose Auto Triggered Node O&M > Auto Triggered Nodes. Click the name of the
workshop_start_emrzero load node.In the directed acyclic graph (DAG) on the right, right-click the
workshop_start_emrnode and choose Run > Current and Descendant Nodes Retroactively.In the Backfill Data panel, select the nodes to backfill, set the Data Timestamp parameter, and click Submit and Redirect. The data backfill instances page opens.
Click Refresh until all nodes show a successful status.
What's next
To monitor the quality of data generated by these nodes, configure data quality rules in DataWorks. For more information about backfilling data and managing backfill instances, see Backfill data and view data backfill instances (new version).