To perform operations such as logon-free management, command execution, or file transfer using the console or an API, you must install and run Cloud Assistant Agent on the target Elastic Compute Server (ECS) instance.
Usage notes
Cloud Assistant Agent can be installed on the following operating systems (OS):
Linux: Alibaba Cloud Linux, AlmaLinux 8+, Anolis OS 7+, CentOS 5+, Debian 8+, Ubuntu 12+, RHEL 5+, SUSE 11+, Fedora 33+, CoreOS, and OpenSUSE.
FreeBSD: 11+.
Windows: Server 2012+.
Cloud Assistant Agent is pre-installed on all ECS instances created from public images since December 1, 2017.
Procedure
Console
Go to the ECS console - Cloud Assistant.
In the top navigation bar, select the resource group and region for your target resources.
Click the ECS Instances tab to view the Cloud Assistant status of ECS instances in the current region.
Normal: The agent is installed.
Not Installed: Click Install. After the installation is complete, you may need to restart the instance and verify that the status changes to Normal.

Abnormal: Refer to Handle exceptions for Cloud Assistant.
On a Linux instance
Step 1: Check if Cloud Assistant Agent is installed
Identify the init system type.
The init system is responsible for loading and managing service processes at system startup. Commands for Cloud Assistant Agent vary by init system.
systemd: Alibaba Cloud Linux, CentOS 7+, RHEL 7+, Fedora 15+, Ubuntu 15.04+, Debian 8+, and others.Upstart: Ubuntu 6.10-14.10, RHEL 6, CentOS 6, and others.SysVinit: RHEL 5, CentOS 5, Debian 6, and others.
Verify the agent installation.
systemd
systemctl status aliyun.serviceIf the output contains
Unit aliyun.service could not be found, the agent is not installed.upstart
/sbin/initctl status aliyun-serviceIf the output contains
initctl: Unknown job: aliyun-service, the agent is not installed.sysvinit
/etc/init.d/aliyun-service statusIf the output is empty, the agent is not installed.
Step 2: Download and install Cloud Assistant Agent
This script installs the latest version of the agent by default. To install a specific version, modify VERSION=latest.
#!/bin/bash

VERSION=latest
PACKAGE=
PKG_URI=

REGION=$(curl http://100.100.100.200/latest/meta-data/region-id)
DOMAIN=aliyun-client-assist-${REGION}.oss-${REGION}-internal.aliyuncs.com

arch=$(uname -m)
echo "[main] arch = ${arch}"
case $arch in
    "i386"|"i686"|"x86_64"|"amd64")
        if command -v rpm; then
            PACKAGE="aliyun_assist_${VERSION}.rpm"
        else
            PACKAGE="aliyun_assist_${VERSION}.deb"
        fi
        PKG_URI="https://$DOMAIN/linux/$PACKAGE"
        ;;
    *)
        if command -v rpm; then
            PACKAGE="aliyun-assist-${VERSION}-1.aarch64.rpm"
        else
            PACKAGE="aliyun-assist_${VERSION}-1_arm64.deb"
        fi
        PKG_URI="https://$DOMAIN/arm/$PACKAGE"
esac

if command -v wget; then
    sudo wget $PKG_URI
elif command -v curl; then
    curl -o $PACKAGE $PKG_URI
else
    echo "[WARN] command wget/curl not found, exit"
    exit 1;
fi;

if command -v rpm; then
    sudo rpm -ivh --force $PACKAGE
elif command -v dpkg; then
    sudo dpkg -i $PACKAGE
else
    echo "[WARN] command rpm/dpkg not found, exit"
    exit 2;
fi

if [[ -e /etc/redhat-release ]]; then
    if sudo systemctl status qemu-guest-agent; then
        sudo systemctl stop qemu-guest-agent
        sudo systemctl disable qemu-guest-agent
        sudo systemctl restart aliyun.service
    fi
fi
On a Windows instance
Step 1: Check if Cloud Assistant Agent is installed
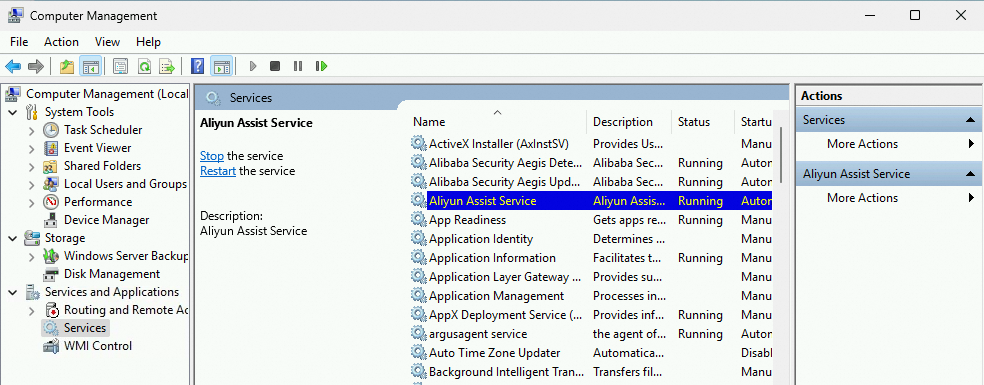
Check the service status of Cloud Assistant.
Click the Start menu and search for .
Select .
Find Aliyun Assist Service. If the service is not listed, the agent is not installed.
Step 2: Download and install Cloud Assistant Agent
Method 1: Download from a browser
Download Cloud Assistant Agent.
Replace
{regionId}in the URL with the region ID of your instance, and then open the address in a browser.https://aliyun-client-assist-{regionId}.oss-{regionId}-internal.aliyuncs.com/windows/aliyun_agent_latest_setup.exe # Example: Download URL for the China (Hangzhou) region (cn-hangzhou) https://aliyun-client-assist-cn-hangzhou.oss-cn-hangzhou-internal.aliyuncs.com/windows/aliyun_agent_latest_setup.exeInstall Cloud Assistant Agent.
Double-click the agent file and follow the installation wizard. The default installation path is
C:\ProgramData\aliyun\assist\.
Method 2: Install and start Cloud Assistant Agent by using PowerShell
Replace {regionId} in the script with the region ID of your instance, and then run the script in PowerShell.
curl -UseBasicParsing -Uri https://aliyun-client-assist-{regionId}.oss-{regionId}-internal.aliyuncs.com/windows/aliyun_agent_latest_setup.exe -OutFile 'C:\\aliyun_agent_latest_setup.exe'
;"C:\\aliyun_agent_latest_setup.exe" '/S'
API
This installation procedure is the same for all OS.
Call the DescribeCloudAssistantStatus operation to check if Cloud Assistant Agent is installed on the target ECS instance.
If
CloudAssistantStatusreturnsfalse, the agent is not installed.If the agent is not installed, call the InstallCloudAssistant operation to install it.
After the installation is complete, call the RebootInstance operation to restart the ECS instance to complete the installation.
CLI
Use Alibaba Cloud CLI to install Cloud Assistant Agent is the same for all OS. Replace <YOUR-REGION-ID> with the region ID of your ECS instance and <YOUR-INSTANCE-ID> with your instance ID.
Red Hat Enterprise Linux (RHEL) does not support installation through Alibaba Cloud CLI.
Call the DescribeCloudAssistantStatus operation to check if Cloud Assistant Agent is installed on the target ECS instance.
aliyun ecs DescribeCloudAssistantStatus --RegionId <YOUR-REGION-ID> --InstanceId.1 <YOUR-INSTANCE-ID> --output cols=CloudAssistantStatus rows=InstanceCloudAssistantStatusSet.InstanceCloudAssistantStatus[]If the command returns
CloudAssistantStatus=true, Cloud Assistant Agent is already installed.Call the InstallCloudAssistant operation to install Cloud Assistant Agent.
aliyun ecs InstallCloudAssistant --RegionId <YOUR-REGION-ID> --InstanceId.1 <YOUR-INSTANCE-ID>Call the RebootInstance operation to restart the ECS instance.
aliyun ecs RebootInstance --InstanceId <YOUR-INSTANCE-ID>
FAQ
What can I do if my OS does not support Cloud Assistant Agent?
Migrate the OS: Upgrade or migrate the current system to a supported version.
Replace the OS (system disk): Install a supported OS on the instance by replacing its system disk.
Why can't I install the latest version of Cloud Assistant Agent even though my OS is supported?
Some kernels limit which agent versions you can install.
Run uname -r to check your kernel version.Instance kernel version | Latest available version of Cloud Assistant Agent |
Linux kernel version < 2.6.32 |
|
FreeBSD kernel version < 12.x | 2.3.3.529 |
How do I install Cloud Assistant Agent on a FreeBSD OS?
For Alibaba Cloud ECS instances
#!/bin/sh

VERSION=latest
use_curl=0
which curl >/dev/null 2>&1 && use_curl=1
if [ $use_curl -eq 1 ];then
    REGION=$(curl http://100.100.100.200/latest/meta-data/region-id)
else
    REGION=$(wget -O - http://100.100.100.200/latest/meta-data/region-id)
fi
DOMAIN=aliyun-client-assist-${REGION}.oss-${REGION}-internal.aliyuncs.com
PACKAGE=aliyun_assist_${VERSION}.txz
PKG_URI="https://$DOMAIN/freebsd/$PACKAGE"

if [ $use_curl -eq 1 ];then
    curl -o $PACKAGE $PKG_URI
else
    wget -O $PACKAGE $PKG_URI
fi
pkg install -U -y $PACKAGE
service aliyun start
For managed instances (non-Alibaba Cloud servers)
#!/bin/sh

VERSION=latest
DOMAIN=aliyun-client-assist.oss-accelerate.aliyuncs.com
PACKAGE=aliyun_assist_${VERSION}.txz
PKG_URI="https://$DOMAIN/freebsd/$PACKAGE"

use_curl=0
which curl >/dev/null 2>&1 && use_curl=1
if [ $use_curl -eq 1 ];then
    curl -o $PACKAGE $PKG_URI
else
    wget -O $PACKAGE $PKG_URI
fi
pkg install -U -y $PACKAGE
service aliyun start
How do I install Cloud Assistant Agent on a managed instance (non-Alibaba Cloud server)?
Linux
This script installs the latest version of the agent by default. To install a specific version, modify VERSION=latest.#!/bin/bash
VERSION=latest
PACKAGE=
PKG_URI=
DOMAIN=aliyun-client-assist.oss-accelerate.aliyuncs.com
arch=$(uname -m)
echo "[main] arch = ${arch}"
case $arch in
"i386"|"i686"|"x86_64"|"amd64")
if command -v rpm; then
PACKAGE="aliyun_assist_${VERSION}.rpm"
else
PACKAGE="aliyun_assist_${VERSION}.deb"
fi
PKG_URI="https://$DOMAIN/linux/$PACKAGE"
;;
*)
if command -v rpm; then
PACKAGE="aliyun-assist-${VERSION}-1.aarch64.rpm"
else
PACKAGE="aliyun-assist_${VERSION}-1_arm64.deb"
fi
PKG_URI="https://$DOMAIN/arm/$PACKAGE"
esac
if command -v wget; then
sudo wget $PKG_URI
elif command -v curl; then
curl -o $PACKAGE $PKG_URI
else
echo "[WARN] command wget/curl not found, exit"
exit 1;
fi;
if command -v rpm; then
sudo rpm -ivh --force $PACKAGE
elif command -v dpkg; then
sudo dpkg -i $PACKAGE
else
echo "[WARN] command rpm/dpkg not found, exit"
exit 2;
fi
if [[ -e /etc/redhat-release ]]; then
if sudo systemctl status qemu-guest-agent; then
sudo systemctl stop qemu-guest-agent
sudo systemctl disable qemu-guest-agent
sudo systemctl restart aliyun.service
fi
fiWindows
Method 1: Download from browser.
Open the following URL in a browser to download Cloud Assistant Agent.
https://aliyun-client-assist.oss-accelerate.aliyuncs.com/windows/aliyun_agent_latest_setup.exeInstall Cloud Assistant Agent.
Double-click the agent file and follow the installation wizard. The default installation path is
C:\ProgramData\aliyun\assist\.
Method 2: Install by PowerShell
curl -UseBasicParsing -Uri https://aliyun-client-assist.oss-accelerate.aliyuncs.com/windows/aliyun_agent_latest_setup.exe -OutFile 'C:\\aliyun_agent_latest_setup.exe'
;"C:\\aliyun_agent_latest_setup.exe" '/S'
How do I install Cloud Assistant Agent from a binary package or source code?
Install from binary package
For Alibaba Cloud ECS instances
This script installs the latest version of the agent by default. To install a specific version, modify
VERSION=latest.#!/bin/bash VERSION=latest PACKAGE= PKG_URI= REGION=$(curl http://100.100.100.200/latest/meta-data/region-id) DOMAIN=aliyun-client-assist-${REGION}.oss-${REGION}-internal.aliyuncs.com arch=$(uname -m) echo "[main] arch = ${arch}" case $arch in "i386"|"i686"|"x86_64"|"amd64") PACKAGE="aliyun_assist_${VERSION}_update.zip" PKG_URI="https://$DOMAIN/linux/$PACKAGE" ;; *) PACKAGE="aliyun_assist_${VERSION}_update_arm.zip" PKG_URI="https://$DOMAIN/arm/$PACKAGE" esac if command -v wget; then sudo wget $PKG_URI elif command -v curl; then curl -o $PACKAGE $PKG_URI else echo "[WARN] command wget/curl not found, exit" exit 1 fi; TARGET_DIR=/usr/local/share/aliyun-assist sudo unzip -o $PACKAGE -d $TARGET_DIR/ TRUE_VERSION=$(cat $TARGET_DIR/version) sudo chmod a+x $TARGET_DIR/$TRUE_VERSION/update_install sudo bash $TARGET_DIR/$TRUE_VERSION/update_installFor managed instances (non-Alibaba Cloud servers)
#!/bin/bash

VERSION=latest
PACKAGE=
PKG_URI=

DOMAIN=aliyun-client-assist.oss-accelerate.aliyuncs.com

arch=$(uname -m)
echo "[main] arch = ${arch}"
case $arch in
    "i386"|"i686"|"x86_64"|"amd64")
        PACKAGE="aliyun_assist_${VERSION}_update.zip"
        PKG_URI="https://$DOMAIN/linux/$PACKAGE"
        ;;
    *)
        PACKAGE="aliyun_assist_${VERSION}_update_arm.zip"
        PKG_URI="https://$DOMAIN/arm/$PACKAGE"
esac

if command -v wget; then
    sudo wget $PKG_URI
elif command -v curl; then
    curl -o $PACKAGE $PKG_URI
else
    echo "[WARN] command wget/curl not found, exit"
    exit 1
fi;

TARGET_DIR=/usr/local/share/aliyun-assist
sudo unzip -o $PACKAGE -d $TARGET_DIR/
TRUE_VERSION=$(cat $TARGET_DIR/version)
sudo chmod a+x $TARGET_DIR/$TRUE_VERSION/update_install
sudo bash $TARGET_DIR/$TRUE_VERSION/update_install
Install from source code
The example uses yum for installation. If you are using a different Linux distribution, use the corresponding package manager.
Install Git and Go.
# Install Git
sudo yum install git -y

# Install Go
sudo yum install go -y
Download Cloud Assistant Agent source code.
sudo git clone https://github.com/aliyun/aliyun_assist_clientNavigate to the source code directory and compile the code.
# Go to the source code directory
cd ./aliyun_assist_client

# Compile the source code
sudo go build
If the command runs without errors, the installation is successful.
Why does Cloud Assistant Agent not work after being installed on a classic network instance?
On ECS instances in a classic network, Cloud Assistant Agent cannot automatically obtain region information. You must manually configure the region by creating a configuration file on the instance.
The classic network is an older network type offered by Alibaba Cloud and is no longer available for purchase. Please migrate your instances to a Virtual Private Cloud (VPC) for better performance and security.
Linux
In the agent's installation directory, create a file named
region-idthat contains the region ID of the ECS instance.For example, for the China (Hangzhou) region, create the
region-idfile in the default installation directory.CoreOS:
sudo sh -c 'echo "cn-hangzhou" > /opt/local/share/aliyun-assist/region-id'Other OS (such as Alibaba Cloud Linux, Ubuntu, Debian, RedHat, SUSE Linux Enterprise Server, and OpenSUSE):
sudo sh -c 'echo "cn-hangzhou" > /usr/local/share/aliyun-assist/region-id'
Run Cloud Assistant Agent.
aliyun-service -d
Windows
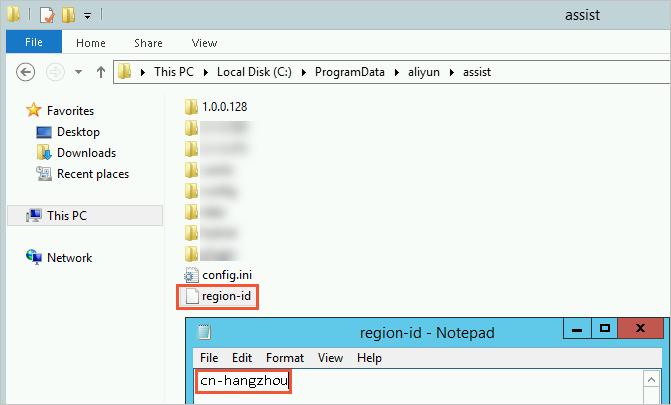
In the agent's installation directory, create a file named region-id. Do not add an extension like .txt or .conf.
Windows hides file extensions for known file types by default. You may need to change your settings to show file extensions to ensure the region-id file does not have an extension.
Enter the region ID of the ECS instance, such as cn-hangzhou, into the region-id file.
Example: The following image shows the region-id file for the cn-hangzhou region, located in the default installation path C:\ProgramData\aliyun\assist\ on a Windows Server 2012 R2 instance.