You can create a data disk from a snapshot. The data on the data disk is the same as the data on the source disk when the snapshot was created. Snapshot-based disk creation allows you to quickly replicate cloud disks in the same zone or across zones for environment cloning or data backup. This topic describes how to create a data disk from a snapshot.
Limits
You cannot create snapshots for local disks or elastic ephemeral disks. Therefore, you cannot create local disks or elastic ephemeral disks from snapshots.
Block storage devices are independent of each other. After you create block storage devices, you cannot merge the storage space of the block storage devices by formatting them. Before you create block storage devices, we recommend that you determine the required number and capacity of the block storage devices based on your business requirements.
Cloud disks created from system disk snapshots can be used only as data disks. You can use a snapshot of a system disk to roll back the system disk and restore disk data. For more information, see Roll back a disk by using a snapshot.
Prerequisites
A snapshot is created for a cloud disk and the snapshot ID is obtained. For more information, see Create a snapshot manually.
The ID of an Elastic Compute Service (ECS) instance is obtained if you want to attach the data disk to be created from a snapshot to the instance.
Procedure
The following section describes how to create a cloud disk from a snapshot on the Snapshots page in the Elastic Compute Service (ECS) console. You can perform the same operation on the cloud disk buy page or ECS instance buy page. On the cloud disk buy page, click Create from Snapshot in the Storage section. On the ECS instance buy page, click Create from Snapshot in the Data Disk section.
Go to ECS console - Snapshots.
In the top navigation bar, select the region and resource group of the resource that you want to manage.

Find the snapshot from which you want to create a cloud disk. In the Actions column, click Create Disk.
On the cloud disk buy page, configure the parameters described in the following table.
Parameter or section
Description
Attach
Specify whether to attach the cloud disk to an ECS instance.
Not Attach: creates a cloud disk without attaching the disk to an ECS instance.
If you select this option, you can create only pay-as-you-go cloud disks. If you create a cloud disk that is not a Regional Enterprise SSD (ESSD), you can attach the cloud disk only to an ECS instance that resides in the same zone. Proceed with caution when you configure the Region and Zone parameters.
Attach to ECS Instance: creates a cloud disk and attaches the disk to a specific ECS instance. If the cloud disk is not a Regional ESSD, you can attach the disk only to an ECS instance that resides in the same zone. If the cloud disk is a Regional ESSD, you can attach the disk to an ECS instance in the same region regardless of the zone. For information about the limits of Regional ESSDs, see Limits.
If you select this option, you must select a region and then select an ECS instance from the ECS Instance drop-down list.
Billing Method
Specify the billing method of the cloud disk.
Pay-as-you-go: A pay-as-you-go cloud disk can be attached to a subscription or pay-as-you-go ECS instance.
Subscription: A subscription cloud disk can be attached only to a subscription ECS instance.
Cloud Disk
The snapshot information is automatically populated.
Select a disk category and specify a disk capacity.
The disk capacity must be greater than or equal to the size of the snapshot of the historical data disk.
ImportantIf the capacity of the new disk is greater than the size of the snapshot of the source disk, you must repartition the new disk or extend partitions and file systems on the cloud disk to ensure that the excess disk capacity can be used.
If the snapshot of the source disk is less than 2,048 GiB in size and you want to specify a disk capacity that is greater than 2,048 GiB, check whether the source disk of the snapshot uses the GUID Partition Table (GPT) partition style. You can run the
fdisk -lucommand and determine the partition style of a disk based on the value of theDisk label typeparameter in the command output. If the parameter value isgpt, the disk uses the GPT partition style. If the source disk does not use the GPT partition style, we recommend that you specify a disk capacity that is less than 2,048 GiB to prevent data loss during partitioning. For more information, see Initialize a data disk (Linux).
Performance Level: You can specify performance levels only for ESSDs. You can select a performance level based on the capacity of the ESSD. The performance of an ESSD varies based on the capacity and performance level of the ESSD. For more information, see ESSDs.
Multi-attach: You can select this option to enable the multi-attach feature for ESSD-series disks. This way, you can attach each ESSD-series disk to multiple ECS instances in the same zone. For more information, see Multi-attach for cloud disks.
Encryption: Specify whether to encrypt the cloud disk. If you select this option, data stored on the created cloud disk is automatically encrypted. For more information, see Disk encryption.
Enable Performance Provision and Enable Performance Burst: You can select these options to enable the performance provision and performance burst features when you create ESSD AutoPL disks. For more information, see ESSD AutoPL disks.
Release settings: If you set the Attach parameter to Attach to ECS Instance and the Billing Method parameter to Pay-as-you-go, you can select the release options to automatically release the created cloud disk when the associated ECS instance is released and automatically delete the automatic snapshots of the created cloud disk when the disk is released.
Confirm the configurations and costs and follow the on-screen instructions to complete the purchase.
After a cloud disk is created, you can view the disk on the Cloud Disk tab. However, the cloud disk cannot be directly used on ECS instances.
Perform operations on the created cloud disk.
ImportantCloud disks created from snapshots already have partitions and file systems and do not need to be initialized. You need to only attach the cloud disk to an ECS instance and mount the file systems of the disk in the instance operating system. This way, the file systems can be recognized by the instance operating system and the cloud disk can be used for data storage.
Scenario
What to do next
You set the Attach parameter to Attach to ECS Instance when you created the cloud disk.
Mountthe partitions of the cloud disk or bring the cloud disk online.Linux instance
Connect to the ECS instance to which the cloud disk is attached and run the following command to
mounta partition of the disk:sudo mount <Disk partition name> <Mount point><Disk partition name>: Specify the name of the partition. Run thesudo fdisk -lucommand to query the partition name. Example:/dev/vdc.<Mount point>: Specify an existing directory or run thesudo mkdir -p <New directory>command to create a new directory as the mount point. Example:sudo mkdir -p /data.
Sample
mountcommand:sudo mount /dev/vdc /data.Write the new partition information to the
/etc/fstabfile. This way, the partition is automatically mounted upon system startup. For more information, see the Initialize a data disk (Linux) section of the "Initialize a data disk on a Linux instance" topic.
Windows instance
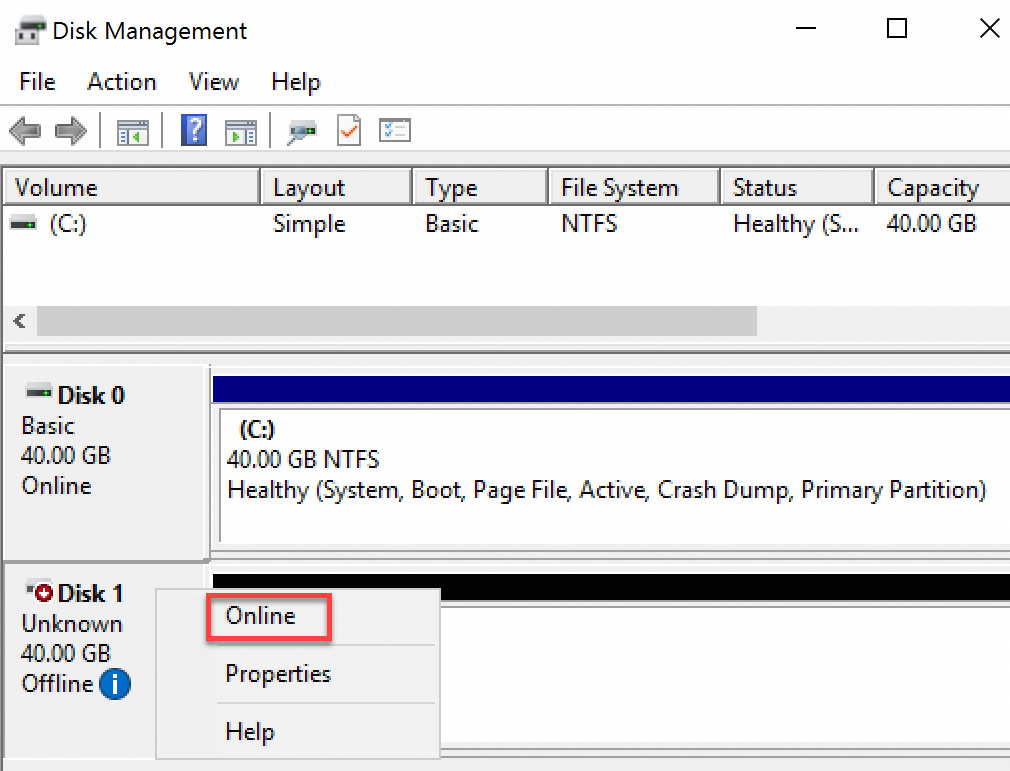
Connect to the ECS instance to which the cloud disk is attached, click the
 icon, and then select Disk Management.
 Find the cloud disk that you want to manage, right-click a blank area, and then select Online.
(Conditionally required) If the cloud disk created from a snapshot is attached to the Linux ECS instance to which the source disk of the snapshot is attached, the UUID of the new cloud disk conflicts with the UUID of the source disk. You must change the UUID of the new cloud disk. For more information, see Change the UUID of a disk.
(Conditionally required) If the cloud disk created from a snapshot is larger than the source disk of the snapshot in size, you must extend the partitions and file systems of the cloud disk before you can use the cloud disk.
If the cloud disk is attached to a Linux instance, see Extend the partitions and file systems of disks on a Linux instance.
If the cloud disk is attached to a Windows instance, see Extend the partitions and file systems of disks on Windows instances.
(Optional) Configure the partitions of the disk to automatically mount on instance startup. For more information, see the (Optional) Step 4: Configure the disk partition to automatically mount on instance startup section of the "Initialize a data disk on a Linux instance" topic.
You set the Attach parameter to Not Attach when you created the cloud disk.
Attach the cloud disk to an ECS instance and mount the file systems of the cloud disk in the operating system of the instance. For more information, see Attach a data disk.
FAQ
How do I restore the data of an ECS instance from a disk created from a snapshot when an exception occurs on the instance after an attack or intrusion?
If you created a snapshot for the system disk of the instance before an attack or intrusion occurred, you can use the snapshot to roll back the system disk and restore the disk to the state when the snapshot was created. For more information, see Roll back a disk by using a snapshot.
The snapshot created after an attack or intrusion occurred may contain malicious code or tampered data. The following operations are only for reference. You can perform the related operations based on your actual business deployment.
Create a snapshot for the system disk to back up data. For more information, see Create a snapshot manually.
Re-initialize the system disk and clear data from the system disk. For more information, see Re-initialize a system disk.
Perform the operations that are described in this topic to create a temporary pay-as-you-go cloud disk from the snapshot that you created.
Attach the temporary cloud disk that you created to the ECS instance as a data disk. For more information, see Attach a data disk.
Copy the business data from the temporary cloud disk to the system disk of the ECS instance and redeploy the business, including applications and configurations, based on your business scenario.
Detach and release the temporary cloud disk. For more information, see Detach a data disk and Release a disk.