By default, when you create an Elastic Compute Service (ECS) instance, an IPv4 address instead of an IPv6 address is assigned to the instance. If you want the instance to communicate over IPv6, configure an IPv6 address for the instance. This topic describes how to configure an IPv6 address for an ECS instance.
Prerequisites
Before you assign an IPv6 address to an instance when you create the instance in a virtual private cloud (VPC), the VPC and the vSwitch to connect to the instance are assigned IPv6 CIDR blocks. For more information, see Enable IPv6 for a VPC and Enable IPv6 for a vSwitch.
Before you assign an IPv6 address to an existing instance, the following requirements are met:
The instance supports IPv6. For information about whether an instance type supports IPv6, see Overview of instance families.
The network type of the instance is VPC. The VPC and vSwitch of the instance are assigned IPv6 CIDR blocks. For more information, see Enable IPv6 for a VPC and Enable IPv6 for a vSwitch.
The instance is in the Running or Stopped state.
Procedure
The following flowchart shows how to use IPv6 addresses.

Step 1: Create an IPv6 VPC
Before you configure an IPv6 address for an ECS instance, create an IPv6 VPC for the instance.
By default, VPCs use the IPv4 addressing protocol. You can enable the IPv6 addressing protocol based on your business requirements. For information about IPv6 addresses, see Overview.
If VPCs are not created, create a VPC and enable IPv6 for the VPC. For more information, see the Create a VPC that supports both IPv4 and IPv6 section of the "Enable IPv6 for a VPC" topic.
If VPCs are created, enable IPv6 for an existing VPC. For more information, see the Enable IPv6 for an existing VPC section of the "Enable IPv6 for a VPC" topic.
Step 2: Assign an IPv6 address
Before you configure an IPv6 address for an ECS instance, assign the IPv6 address to the instance. The IPv6 address allows the instance to access other instances or external networks over IPv6.
Scenario 1: Assign an IPv6 address to an existing instance
You can configure event notifications in EventBridge or CloudMonitor to receive notifications for IP address events. After you assign an IPv6 address to an instance, you receive a notification for the assignment. You can obtain information about the IPv6 address assignment, such as the IPv6 address and the associated elastic network interface (ENI) ID, and configure operations to be automatically performed in response. For more information, see Configure event notifications, ECS events, and the Notifications for private IPv6 address assignment events section of the "IP address event notifications" topic.
Log on to the ECS console.
In the left-side navigation pane, choose .
In the top navigation bar, select the region and resource group to which the resource belongs.

Find the instance that you want to manage. In the Actions column, choose .
In the Manage Secondary Private IP Addresses dialog box, click Assign New IP Address to the right of IPv6 Address.
To assign an IPv6 address, use one of the following methods:
Automatic assignment: Leave the field empty. The system randomly assigns an IPv6 address.
Manual assignment: Enter hexadecimal values in the field to complete the IPv6 address.
Click Confirm.
Scenario 2: Assign an IPv6 address to a new instance
For information about how to create an instance, see Create an instance by using the wizard. When you create an ECS instance, take note of the following items:
In the Basic Configurations step, search for the instance types that support IPv6 and then select an instance type from the search results.
In the Networking step, make the following configurations:
Select a VPC and vSwitch for which IPv6 is enabled.
Select Assign IPv6 Address Free of Charge.
In the Preview step, confirm that an IPv6 address is assigned.
After an IPv6 address is assigned to the instance, you can view information about the IP address in the ECS console. For more information, see View IP addresses.
(Optional) Step 3: Enable IPv6 public bandwidth
By default, the IPv6 address of an instance can be used only for communications on the internal network. To connect to the Internet by using the IPv6 address, enable IPv6 public bandwidth.
Log on to the VPC console.
In the left-side navigation pane, choose .
- In the top navigation bar, select the region where the IPv6 gateway is deployed.
On the IPv6 Gateway page, find the IPv6 gateway that corresponds to the VPC in which the instance resides and click the IPv6 gateway ID.
On the details page of the IPv6 gateway, click the IPv6 Internet Bandwidth tab, find the IPv6 address for which you want to enable Internet bandwidth, and then click Create IPv6 Internet Bandwidth in the Actions column.
On the IPv6 Internet Bandwidth (PostPay) page, specify the parameters described in the following table, click Buy Now, and then complete the payment.
Parameter
Description
Traffic
Select a billing method for the Internet bandwidth.
Valid values: Pay-By-Bandwidth and Pay-By-Data-Transfer. For more information, see Billing rules.
Bandwidth
Specify a maximum value for the Internet bandwidth.
Billing cycle
Select a billing cycle for the Internet bandwidth. Valid values: Day (By Day) and Hour (By Hour).
If you set Traffic to Pay-By-Bandwidth, you can select only Day (By Day). If you set Traffic to Pay-By-Data-Transfer, you can select only Hour (By Hour).
Step 4: Configure the IPv6 address
You can configure an IPv6 address for a network interface controller (NIC) of an ECS instance manually or by using automated tools. This way, the IPv6 address can be identified and takes effect in the operating system of the instance.
This section describes how to configure an IPv6 address for Linux and Windows ECS instances.
If you use the automatic assignment method to assign an IPv6 address to an ECS instance, make sure that the instance can connect to the Internet to download the ecs-util-ipv6 tool.
Linux ECS instance
Automatically configure an IPv6 address (recommended)
The ecs-util-ipv6 tool can be used to configure IPv6 addresses that are assigned to instances or clear IPv6 settings for instances that are not assigned IPv6 addresses.
The ecs-util-ipv6 tool has the following limits:
The ecs-util-ipv6 tool applies only to ECS instances that are deployed in VPCs and depends on instance metadata. Before you use the tool, make sure that the network service is not disabled and that outbound access to 100.100.100.200 is allowed on port 80. For more information, see Overview of ECS instance metadata.
When the ecs-util-ipv6 tool is run, NICs and the network service are restarted. This may cause a brief network interruption. Proceed with caution.
In this example, a CentOS instance is used. Perform the following steps:
Connect to the Linux instance.
For more information, see Connect to a Linux instance by using a password or key.
Run the following command to download the ecs-util-ipv6 tool:
wget https://ecs-image-utils.oss-cn-hangzhou.aliyuncs.com/ipv6/rhel/ecs-utils-ipv6The following table describes the download links of the ecs-util-ipv6 tool for different operating systems.
Series
Distribution
Download link
RHEL
CentOS 5/6/7/8
Red Hat 5/6/7
Anolis OS
Fedora
Alibaba Cloud Linux 2/3
Debian
Ubuntu 14/16/18/20
Debian 8/9/10/11
SLES
SUSE 11/12/15
OpenSUSE 15/42
FreeBSD
FreeBSD 11
Run the following commands as an administrator to run the ecs-util-ipv6 tool:
chmod +x ./ecs-utils-ipv6
./ecs-utils-ipv6
(Optional) If the instance runs a Ubuntu 14 public image, restart the instance for the configurations to take effect. For more information, see Restart an instance.
NoteIf the instance is assigned an IPv6 address, the IPv6 address is automatically configured. Otherwise, the existing IPv6 settings are automatically cleared.
You can run the following commands to enable IPv6, disable IPv6, or manually and automatically configure IPv6 addresses for NICs. By default, IPv6 addresses are automatically configured.
./ecs-utils-ipv6 #By default, no parameters are specified and multiple IPv6 addresses are automatically configured for multiple NICs. ./ecs-utils-ipv6 --enable #Enable IPv6. ./ecs-utils-ipv6 --disable #Disable IPv6. ./ecs-utils-ipv6 --static <NIC name> #Automatically configure an IPv6 address for an NIC. ./ecs-utils-ipv6 --static <NIC name> <IPv6 address> <Subnet prefix length> <IPv6 gateway> #Manually configure one or more IPv6 addresses for one or more NICs. Separate the addresses with spaces and enclose each address in double quotation marks (" ").NoteReplace
<NIC name>,<IPv6 address>,<Subnet prefix length>, and<IPv6 gateway>with the actual values.If you want to configure IPv6 addresses for multiple instances at the same time, we recommend that you use Cloud Assistant or user data to configure a script that automates the configuration process. For more information, see Overview of Cloud Assistant and Overview of ECS instance user data. Sample bash script that is supported for RHEL operating systems:
#!/bin/sh
install_dir=/usr/sbin
install_path="$install_dir"/ecs-utils-ipv6
if [ ! -f "$install_path" ]; then
    tool_url="http://ecs-image-utils.oss-cn-hangzhou.aliyuncs.com/ipv6/rhel/ecs-utils-ipv6"
    # download the tool
    if ! wget "$tool_url" -O "$install_path"; then
        echo "[Error] download tool failed, code $?"
        exit "$?"
    fi
fi
# chmod the tool
if ! chmod +x "$install_path"; then
    echo "[Error] chmod tool failed, code $?"
    exit "$?"
fi
# run the tool
"$install_path"
Manually configure an IPv6 address for an instance that runs an Alibaba Cloud Linux 2 or 3 operating system
Connect to the Linux instance.
For more information, see Connect to a Linux instance by using a password or key.
Run the
ip addr | grep inet6orifconfig | grep inet6command to check whether IPv6 is enabled for the instance.NoteIPv6 is disabled in Alibaba Cloud Linux 2 images of the
aliyun_2_1903_64_20G_alibase_20190829.vhdversion and earlier. By default, IPv6 is enabled in Alibaba Cloud Linux 2 images of thealiyun_2_1903_x64_20G_alibase_20200221.vhdversion and later.If the command output contains
inet6information, IPv6 is enabled for the instance. In this case, you can skip the "Enable IPv6" step and proceed to configure an IPv6 address.If the command output does not contain
inet6information, IPv6 is not enabled for the instance. Proceed to enable IPv6.
Enable IPv6.
Run the following command to modify the
/etc/sysctl.confconfiguration file:vi /etc/sysctl.confPress the
Ikey to enter Insert mode, find the following content, and then replace1at the end of each line with0:net.ipv6.conf.all.disable_ipv6 = 1 net.ipv6.conf.default.disable_ipv6 = 1 net.ipv6.conf.lo.disable_ipv6 = 1To enable IPv6 for a specific NIC, use the following settings:
net.ipv6.conf.eth0.disable_ipv6 = 0Press the
Esckey, enter:wq, press the Enter key to save the changes, and then exit Insert mode.Run the following command to check whether the configurations in the
/etc/sysctl.conffile are consistent with those in the/etc/sysctl.conffile in the initram file system (initramfs):diff -u /etc/sysctl.conf <(lsinitrd -f /etc/sysctl.conf)NoteAn initramfs is configured for Alibaba Cloud Linux 2. If the configurations in the
/etc/sysctl.conffile in the initramfs are inconsistent with those in the/etc/sysctl.conffile, the system may accept the configurations in the /etc/sysctl.conf file in the initramfs.If the configurations are inconsistent, run the following command to generate a new initramfs:
sudo dracut -v -fRun the following command to restart the instance to make the configurations take effect:
rebootRun the
ifconfigcommand to check whether IPv6 is enabled.If the command output contains the following information, IPv6 is enabled.
inet6 <Unicast address that starts with fe80::>
inet6 <IPv6 address of the instance>
Configure an IPv6 address.
Run the following command to modify the NIC configuration file:
NoteReplace eth0 in the command with the actual NIC identifier.
vi /etc/sysconfig/network-scripts/ifcfg-eth0Press the
Ikey to enter Insert mode. Add the following configurations based on the actual information in the file:DHCPV6C=yes IPV6INIT=yesPress the
Esckey, enter:wq, press the Enter key to save the changes, and then exit Insert mode.Run the following command to restart the instance to make the configurations take effect:
reboot
Manually configure an IPv6 address for an instance that runs an operating system of another series
Perform the following operations to configure an IPv6 address for an instance that runs an operating system of another series, such as CentOS, Debian, Ubuntu, or Fedora.
Connect to a Linux instance.
For more information, see Connect to a Linux instance by using a password or key.
Run the
ip addr | grep inet6orifconfig | grep inet6command to check whether IPv6 is enabled for the instance.NoteBy default, IPv6 is enabled on CentOS 8, Debian 10 and later, and Ubuntu 18 and later.
If the command output contains
inet6information, IPv6 is enabled for the instance. In this case, you can skip the "Enable IPv6" step and proceed to configure an IPv6 address.If the command output does not contain
inet6information, IPv6 is not enabled for the instance. Proceed to enable IPv6.
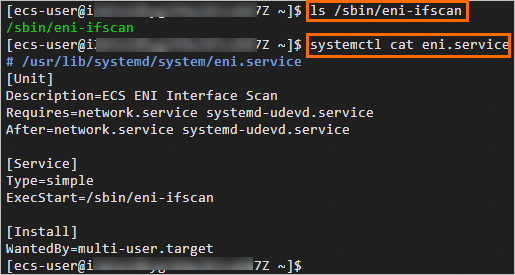
After you configure an IPv6 address for a Linux ECS instance, if the Linux ECS instance is pre-installed with a route configuration tool for multiple elastic network interfaces (ENIs), you must manually modify the eni-function file of the route configuration tool for multiple ENIs because the tool does not support IPv6 addresses by default. If you do not modify the eni-function file, the system cannot identify the IPv6 ENIs. As a result, the system cannot obtain the IPv6 address after the instance is restarted.
Run one of the following commands to check whether the route configuration tool for multiple ENIs is installed:
ls /sbin/eni-ifscansystemctl cat eni.service
If the following information is returned, the route configuration tool for multiple ENIs is pre-installed on the ECS instance. You must perform the following operations:

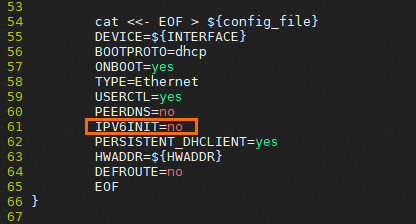
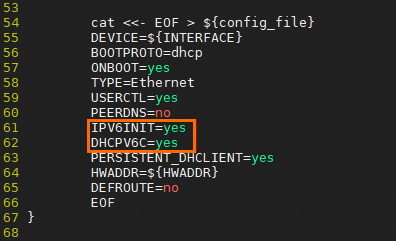
Run the following command to modify the
eni-functionfile:vim /etc/eni_utils/eni-functionPress the
Ikey to enter the edit mode and modify the following parameter information.Before the modification:
IPV6INIT=no
After the modification:
IPV6INIT=yes
DHCPV6C=yes
Press the
Esckey, enter:wq, press theEnterkey to save the changes, and then exit Insert mode.
Windows instance
Automatically configure an IPv6 address (recommended)
The ecs-util-ipv6 tool can be used to configure IPv6 addresses for instances that are assigned IPv6 addresses or clear IPv6 settings for instances that are not assigned IPv6 addresses.
The ecs-util-ipv6 tool has the following limits:
The ecs-util-ipv6 tool applies only to ECS instances that are deployed in VPCs and depends on instance metadata. Before you use the tool, make sure that the network service is not disabled and that outbound access to 100.100.100.200 is allowed on port 80. For more information, see Overview of ECS instance metadata.
When the ecs-util-ipv6 tool is run, NICs and the network service are restarted. This may cause a brief network interruption. Proceed with caution.
Connect to the Windows instance.
For more information, see Connect to a Windows instance by using a username and password.
Download a version of the ecs-util-ipv6 tool based on the operating system of the instance:
Run
ecs-utils-ipv6.exeas an administrator.ImportantIf the instance is assigned an IPv6 address, the IPv6 address is automatically configured. Otherwise, the existing IPv6 settings are automatically cleared.
If you want to configure IPv6 addresses for multiple instances at the same time, we recommend that you use Cloud Assistant or user data to configure a script that automates the configuration process. For more information, see Overview of Cloud Assistant and Instance user data. Sample PowerShell script that is supported for Windows Server 2003, 2008, 2012, 2016, 2019, and 2022 64-bit operating systems:
#powershell
$install_dir="C:\Windows\system32"
$install_path = "$install_dir\ecs-utils-ipv6.exe"

if(-not (Test-Path -Path $install_path)){
    # download the tool
    $tool_url = 'http://ecs-image-utils.oss-cn-hangzhou.aliyuncs.com/ipv6/win/64/ecs-utils-ipv6.exe'
    Invoke-WebRequest -uri $tool_url -OutFile $install_path
    Unblock-File $install_path
}

# run the tool
Start-Process -FilePath "$install_path" -ArgumentList "--noenterkey" -NoNewWindow
Manually configure an IPv6 address
To configure an IPv6 address, perform the following operations:
Connect to the Windows instance.
For more information, see Connect to a Windows instance by using a username and password.
Check whether IPv6 is enabled for the instance.
On the Windows desktop, press
Win+Rto open the Run dialog box. Then, entercmdand click OK to open Command Prompt.Run the
ipconfigcommand.If IPv6 address information is returned, IPv6 is enabled for the instance. Otherwise, IPv6 is not enabled for the instance. You must enable IPv6 for the instance.
On the instance details page, obtain the IPv6 address that is assigned in Step 2: Assign an IPv6 address.
Step 5: Add IPv6 security group rules
IPv4 communication and IPv6 communication are independent of each other. If the current security group rules do not meet your business requirements, configure IPv6 security group rules for your instances to increase network security.
Log on to the ECS console.
In the left-side navigation pane, choose .
In the top navigation bar, select the region and resource group to which the resource belongs.

Find the security group that you want to manage and click Add Rules in the Actions column.
On the details page of the security group, click the Inbound or Outbound tab in the Access Rule section.
Add security group rules. For more information, see Add a security group rule.
NoteWhen you add an IPv6 security group rule, set Authorization Object to an IPv6 CIDR block. Example:
2001:db8:1234:1a00::***. For more information about security group rules, see Security group rules.
Step 6: Test the connectivity of the IPv6 address
After you enable IPv6 public bandwidth, make sure that the IPv6 address of the instance can provide Internet connectivity.
In the following examples, the ping -6 command is run to check whether the instance can access aliyun.com by using the IPv6 address.
Linux instance
Connect to a Linux instance for which an IPv6 address is configured.
For more information, see Connect to a Linux instance by using a password or key.
Run the following command to test network connectivity:
ping -6 aliyun.comThe following command output indicates that the instance can access the website.

Windows instance
Connect to a Windows instance for which an IPv6 address is configured.
For more information, see Connect to a Windows instance by using a username and password.
On the Windows desktop, press
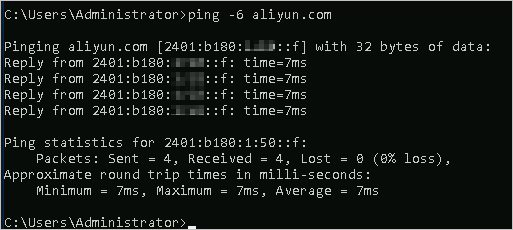
Win+Rto open the Run dialog box. Then, entercmdand click OK to open Command Prompt.Run the following command to test network connectivity:
ping -6 aliyun.comThe following command output indicates that the instance can access the website.

 > Network and Security Group > Manage Secondary Private IP Address