To enable public and private IPv6 communication within a Virtual Private Cloud (VPC), create an Elastic Compute Service (ECS) instance with an IPv6 address in an IPv6-enabled VPC and vSwitch. This topic describes how to assign, configure, and use an IPv6 address for an ECS instance.
The scarcity of IPv4 addresses often forces network engineers to spend significant time resolving issues like address conflicts. In contrast, IPv6, with its vast address space, solves the network address scarcity problem and removes many barriers for devices connecting to the internet.
Limitations
Regions that support IPv6 Gateway
IPv6 Gateway is a gateway for IPv6 traffic in a VPC. By default, an assigned IPv6 address only provides private network access. You can enable public network communication by purchasing IPv6 Internet Bandwidth for the IPv6 address in an IPv6 Gateway. For more information, see IPv6 Gateway.
Area | Regions |
Asia Pacific - China | China (Qingdao), China (Beijing), China (Zhangjiakou), China (Hohhot), China (Ulanqab), China (Hangzhou), China (Shanghai), China (Fuzhou - Local Region), China (Shenzhen), China (Heyuan), China (Guangzhou), China (Chengdu), and China (Hong Kong) |
Asia Pacific - Others | Philippines (Manila), Singapore, Japan (Tokyo), South Korea (Seoul), Indonesia (Jakarta), Malaysia (Kuala Lumpur), and Thailand (Bangkok) |
Europe & Americas | US (Virginia), US (Silicon Valley), Germany (Frankfurt), UK (London), and Mexico |
Middle East | SAU (Riyadh - Partner Region) |
ECS instance families that do not support IPv6
The ic5 intensive-computing instance family
The se1 memory-optimized instance family
The d1 big data instance family
The i2g and i1 local SSD-equipped instance families
The hfc5 (high-frequency compute-optimized) and hfg5 (high-frequency general-purpose) instance families
The ebmg5 (general-purpose) and ebmr5s (memory-optimized network-enhanced) ECS Bare Metal Instance families
The xn4, n4, mn4, and e4 previous-generation shared instance families
The scch5 high-frequency Super Computing Cluster instance family
The gn5 GPU-accelerated computed optimized instance family
The n1, n2, and e3 shared instance families
The sn2 and sn1 general-purpose instance families
Limits on the number of assignable IPv6 addresses for an ECS instance
The number of assignable IPv6 addresses per instance depends on two factors: the number of attachable ENIs and the number of IPv6 addresses allowed per ENI:
The number of IPv6 addresses that can be assigned to a single ENI depends on the instance type. For more information, see the Number of IPv6 addresses per ENI column in Instance families.
The number of ENIs that can be attached to a single instance depends on the instance type. For more information, see the Elastic Network Interface column in Instance families.
Procedure
You can use one-click deployment to quickly complete the following operations.
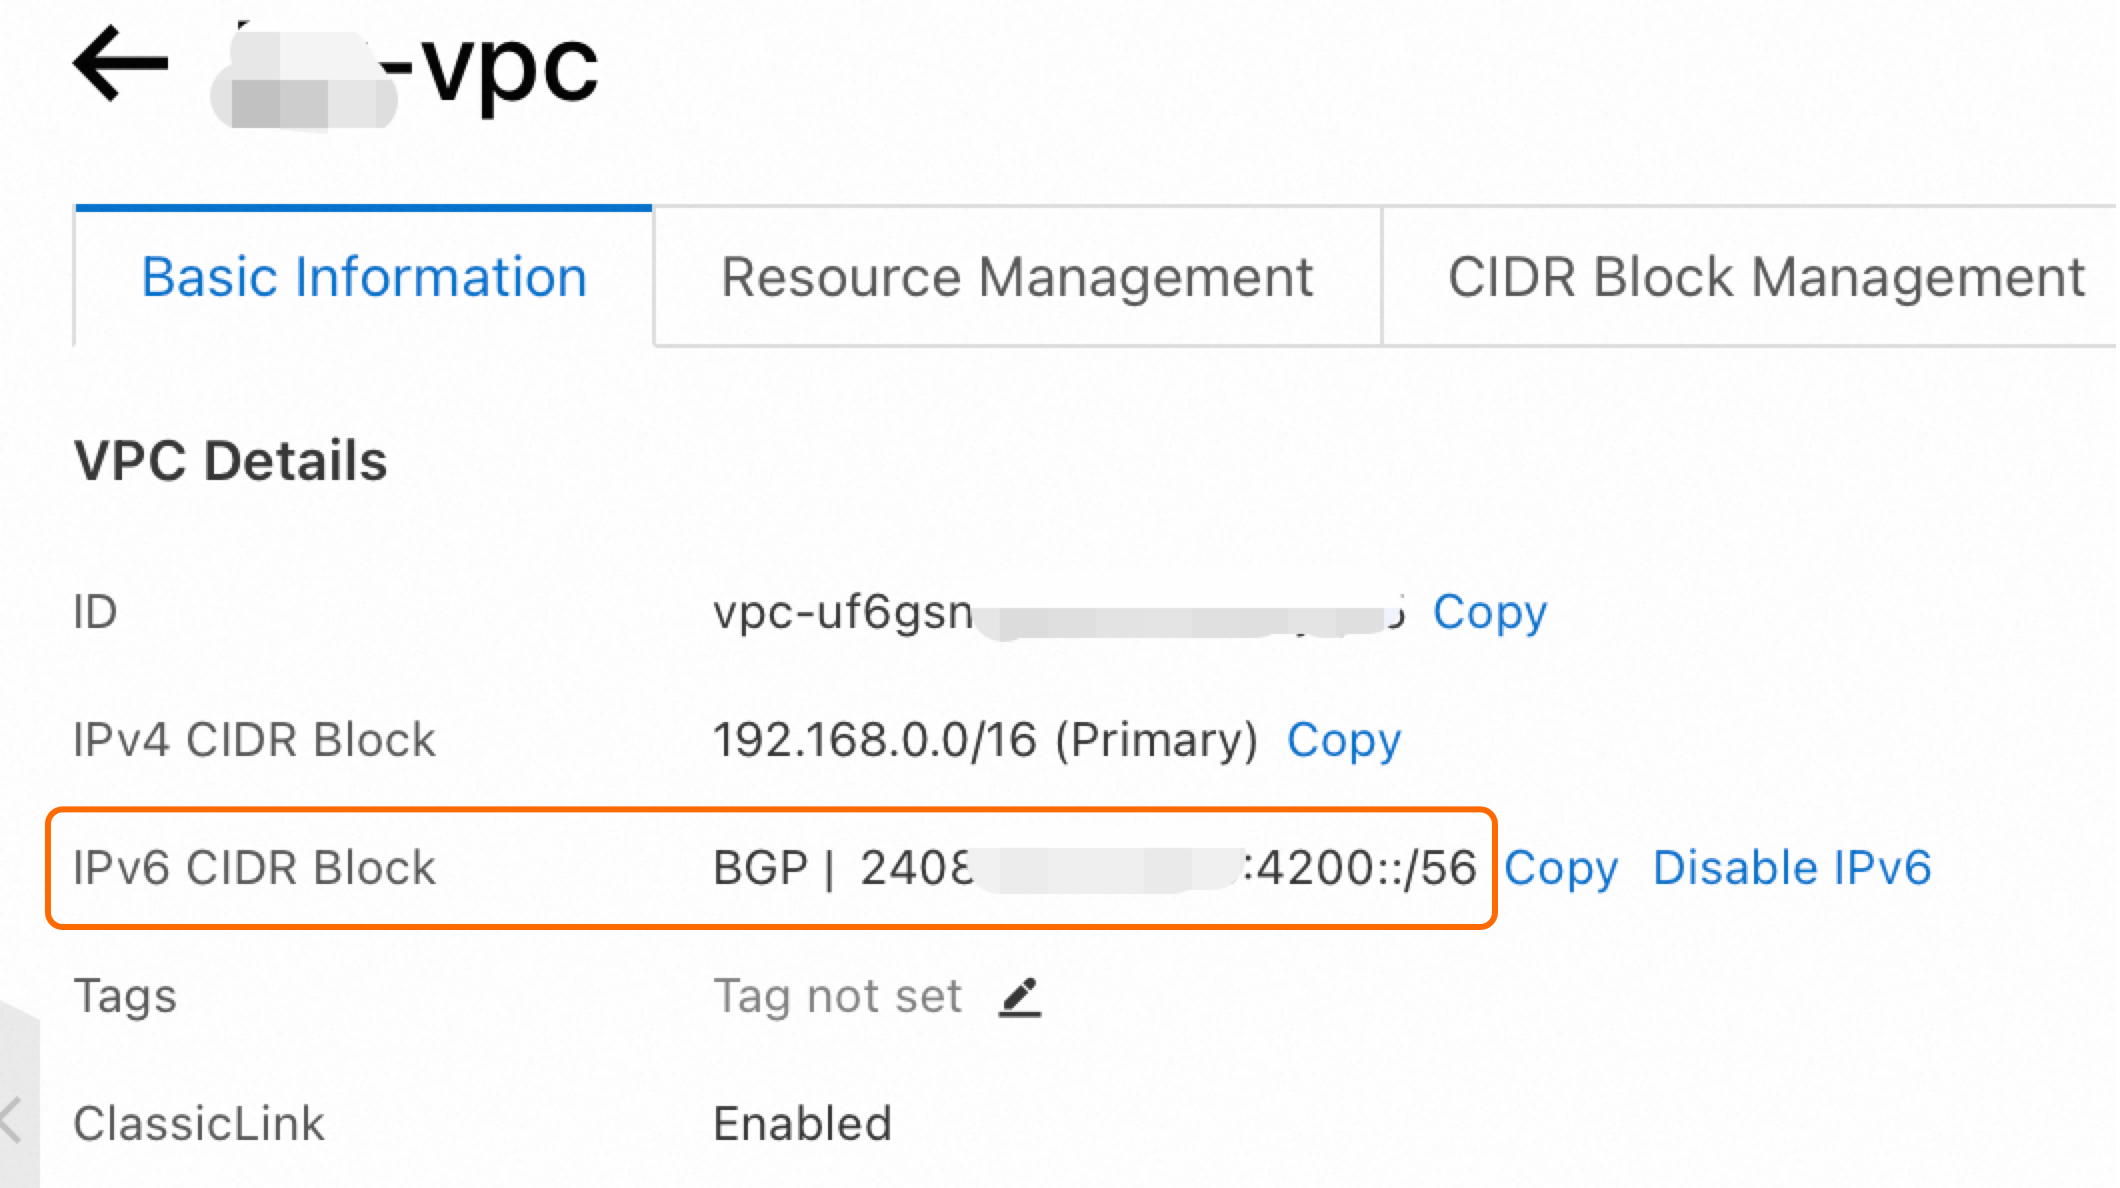
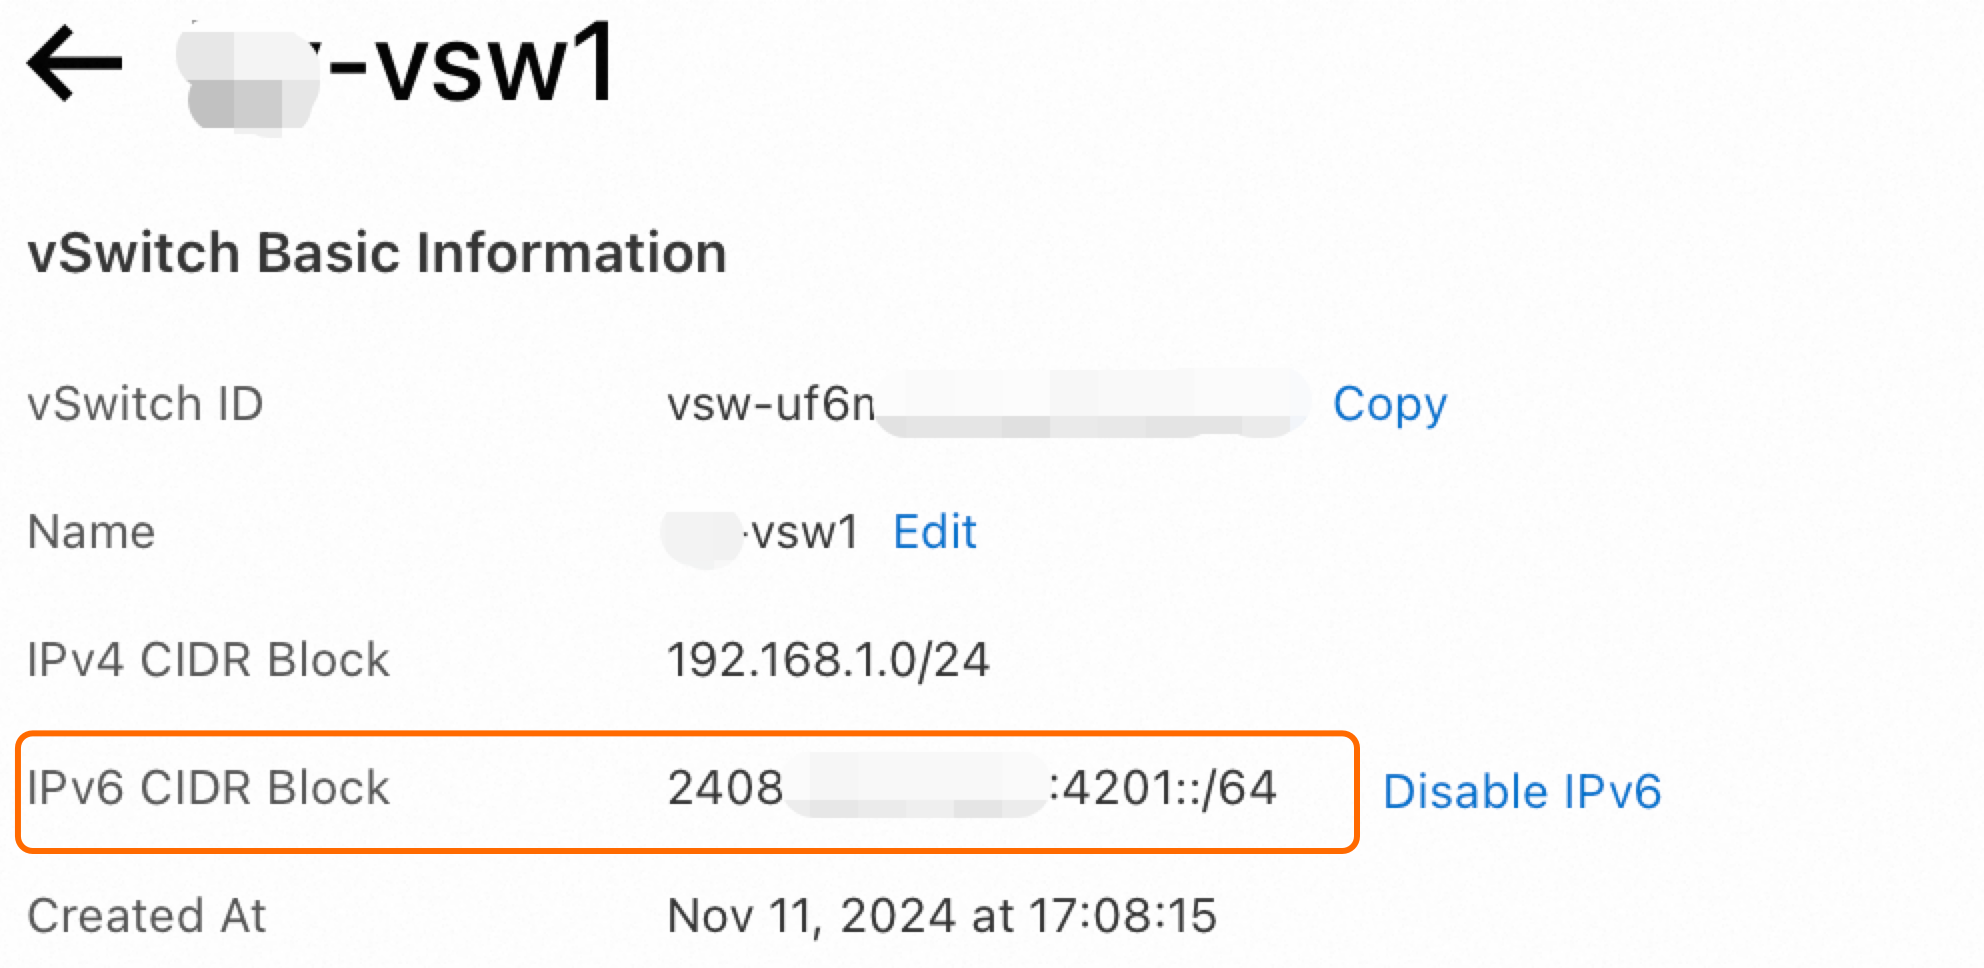
Step 1: Enable IPv6 for a VPC and a vSwitch
First, ensure that IPv6 is enabled for the VPC and vSwitch where your ECS instance resides. For more information, see Enable IPv6 for a VPC and Enable IPv6 for a vSwitch.
Step 2: Assign an IPv6 address
To allow an ECS instance to communicate with other instances or external networks over the IPv6 protocol, assign an IPv6 address to it.
Assign an IPv6 address to an existing instance
-
Go to ECS console - Instances.
-
In the top navigation bar, select the region and resource group of the resource that you want to manage.

Locate the target ECS instance and click its instance ID to open the instance details page. In the All Actions section, choose .

In the Manage Secondary Private IP Addresses dialog box, click Increase in the IPv6 section.
If you do not need to specify an IPv6 address, you can leave the IPv6 address field empty. The system automatically assigns an address.
Click Confirm.
Assign an IPv6 address when creating an instance
When creating an instance, note the following settings. For information about other configurations, see Create an instance using the custom launch tab:
Network and Zone: Select a VPC and a vSwitch that have IPv6 enabled.
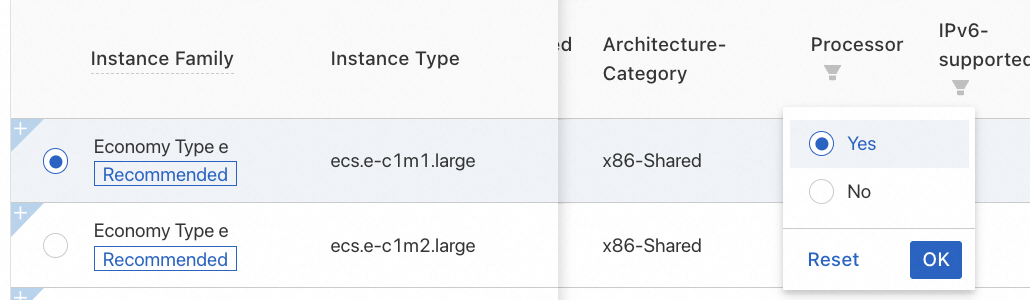
Instance: Click View more specification parameters, filter for instance types that support IPv6-supported, and then select an instance type.

Network and Security Groups: Click Elastic ENI | IPv6(Optional) and select Assign IPv6 Address Free of Charge.

After the address is assigned, you can view the IP address details in the ECS console. For more information, see IP addresses.
Step 3: Configure the IPv6 address
To allow the operating system to recognize and use the IPv6 address, configure it on the instance's network interface card (NIC).
Some images automatically configure and recognize IPv6 addresses. Follow these steps to check if the operating system has already recognized the IPv6 address.
Linux instances
Connect to the Linux instance.
For more information, see Connect to Linux.
Run the
ip -6 addr showorifconfigcommand.If the output shows one global unicast address and one link-local address, as in the figure below, the address is recognized, and you can skip the rest of this step. Otherwise, continue with the following steps.

Windows instances
Connect to the Windows instance.
For more information, see Connect to a Windows instance using Workbench.
Open the command line interface and run the
ipconfigcommand.If the output shows one global unicast address and one link-local address, as in the figure below, the address is recognized, and you can skip the rest of this step. Otherwise, continue with the following steps.

Configure the IPv6 address.
ImportantAutomatic configuration requires Cloud Assistant to be installed. If your instance does not support Cloud Assistant or you prefer not to install it, configure the IPv6 address manually.
(Recommended) Automatically configure the IPv6 address
Prerequisites
Ensure the Cloud Assistant agent is installed on the instance. If not, see Install the Cloud Assistant Agent.
This method applies only to the following operating systems: Alibaba Cloud Linux 2/3, CentOS 6/7/8, Red Hat 6/7, Anolis OS, Fedora, Ubuntu 14/16/18/20, Debian 8/9/10/11, SUSE 11/12/15, OpenSUSE 15/42, and FreeBSD 11.
ImportantThis configuration process uses Cloud Assistant and may restart the network interface or services, causing a brief network interruption. Proceed with caution.
Procedure
Connect to the Linux instance.
For more information, see Connect to a Linux instance using Workbench.
Run the following command to configure the IPv6 address.
NoteBy default, running this command checks if the
ecs-utils-ipv6plugin is installed locally and if it is the latest version. If it is not installed or the version is outdated, the system automatically downloads and installs the latest plugin version.sudo acs-plugin-manager --exec --plugin=ecs-utils-ipv6
Manual configuration (Linux)
Connect to the Linux instance.
For more information, see Connect to Linux.
Run the
ip addr | grep inet6orifconfig | grep inet6command to check whether the IPv6 service is enabled on the instance.If no
inet6information is returned, the IPv6 service is disabled and must be enabled.If information related to
inet6is returned, the IPv6 service is enabled. You must configure the IPv6 address.
Manual configuration (Windows)
Remotely connect to the Windows instance.
For more information, see Connect to a Windows instance using Workbench.
Open the command line interface and run the
ipconfigcommand to check whether the IPv6 service is enabled on the instance.If no information related to
inet6is returned, the IPv6 service is disabled. You must enable the IPv6 service.If information related to
inet6is returned, the IPv6 service is enabled. You must configure the IPv6 address.
Configure the IPv6 address.
On the instance details page, retrieve the generated IPv6 address.
(Conditional) If your instance runs Linux, perform this step.
Run the following command to check if the multi-ENI configuration tool is installed.
ls /sbin/eni-ifscanIf the command returns output, the tool is pre-installed, and you must modify the
eni-functionfile.NoteBecause this tool lacks default IPv6 support, the system does not automatically recognize the IPv6 network interface, causing the address to be lost after a restart.

Run the following command to modify the
eni-functionfile.vim /etc/eni_utils/eni-functionPress
Ito enter edit mode. ChangeIPV6INIT=notoIPV6INIT=yes, and add theDHCPV6C=yesline. Then, save and exit.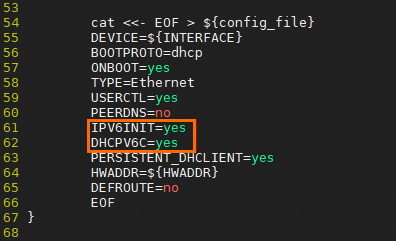
Verification: If the command output of
ifconfigoripconfigis the same as the result in Step 1, the configuration is successful.
The ECS instance can now communicate over its private IPv6 address. You can test the private connectivity as follows.
To test IPv6 network connectivity, you must ensure that both the client and server support and are configured for IPv6. In this example, for two ECS instances to communicate, both ECS01 and ECS02 must have IPv6 configured.
On instance ECS01, run the ping6 <ECS02_private_IPv6_address> command to test private communication with instance ECS02.
If you receive reply packets, communication is successful. The test confirms that IPv6 private communication from ECS01 to ECS02 is working.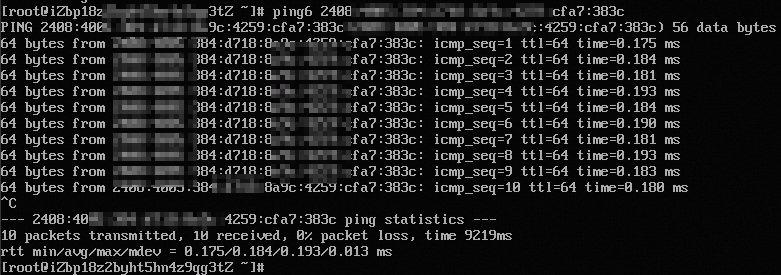
On instance ECS02, run the ping6 <ECS01_private_IPv6_address> command to test private communication with instance ECS01.
If you receive reply packets, communication is successful. The test confirms that IPv6 private communication from ECS02 to ECS01 is working.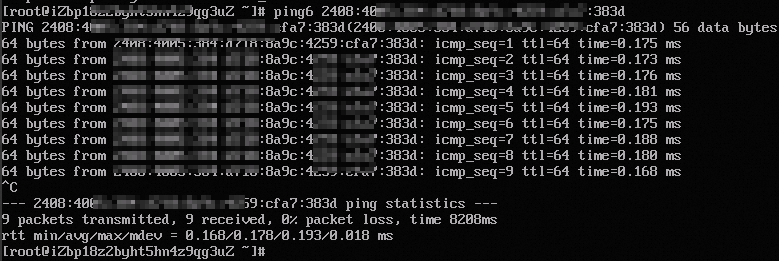
Step 4: Enable IPv6 Internet bandwidth
By default, an ECS instance's IPv6 address only provides private network access. To allow public internet access to and from the IPv6 address, enable IPv6 Internet Bandwidth by following these steps.
Log on to the VPC console.
In the navigation pane, choose .
- In the top navigation bar, select the region where the IPv6 gateway is deployed.
On the IPv6 Gateway page, find the IPv6 gateway for the instance's VPC, and then click the IPv6 gateway ID.
On the details page of the IPv6 gateway, click the IPv6 Internet Bandwidth tab, find the target IPv6 address, and then click Enable Internet Bandwidth in the Actions column.
On the IPv6 Internet Bandwidth (Pay-As-You-Go) page, configure the Internet bandwidth based on the following information, and then click Buy Now and complete the payment.
Parameter
Description
Traffic
Select a billing method for the Internet bandwidth.
The following billing methods are supported: pay-by-bandwidth and pay-by-traffic. For more information, see IPv6 gateway billing.
Bandwidth
Adjust the peak bandwidth as needed.
Billing Cycle
The billing cycle of the Internet bandwidth. The billing cycle can be Day or Hour.
If you select pay-by-bandwidth, the billing cycle is Day.
If you select pay-by-traffic, the billing cycle is Hour.
After you enable IPv6 Internet Bandwidth, you can test public IPv6 connectivity.
To test IPv6 network connectivity, you must ensure that both the client and server support and are configured for IPv6.
ping -6 aliyun.comIf the system returns output similar to the following figure, the network connection is successful.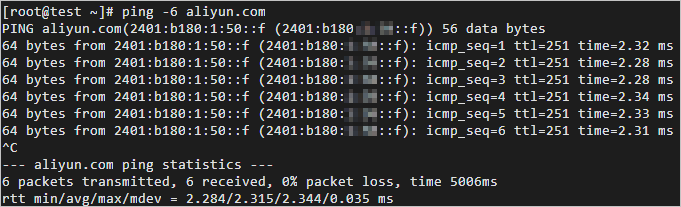
In this example, the website aliyun.com supports IPv6. After your ECS instance is configured, you can access aliyun.com over IPv6.
Other operations
Add IPv6 security group rules
IPv4 and IPv6 communication are independent. If the current security group rules are insufficient for your needs, configure new IPv6 rules for your ECS instance to enhance network security.
-
In the top navigation bar, select the region and resource group of the resource that you want to manage.
Find the target security group and click Manage Rules in the Operation column.
On the security group details page, in the Rules section, select Inbound or Outbound.
Add a security group rule. For more information, see Add a security group rule.
NoteYou can set Source to an IPv6 address range, such as
2001:db8:1234:1a00::***. For more information, see Security group rules.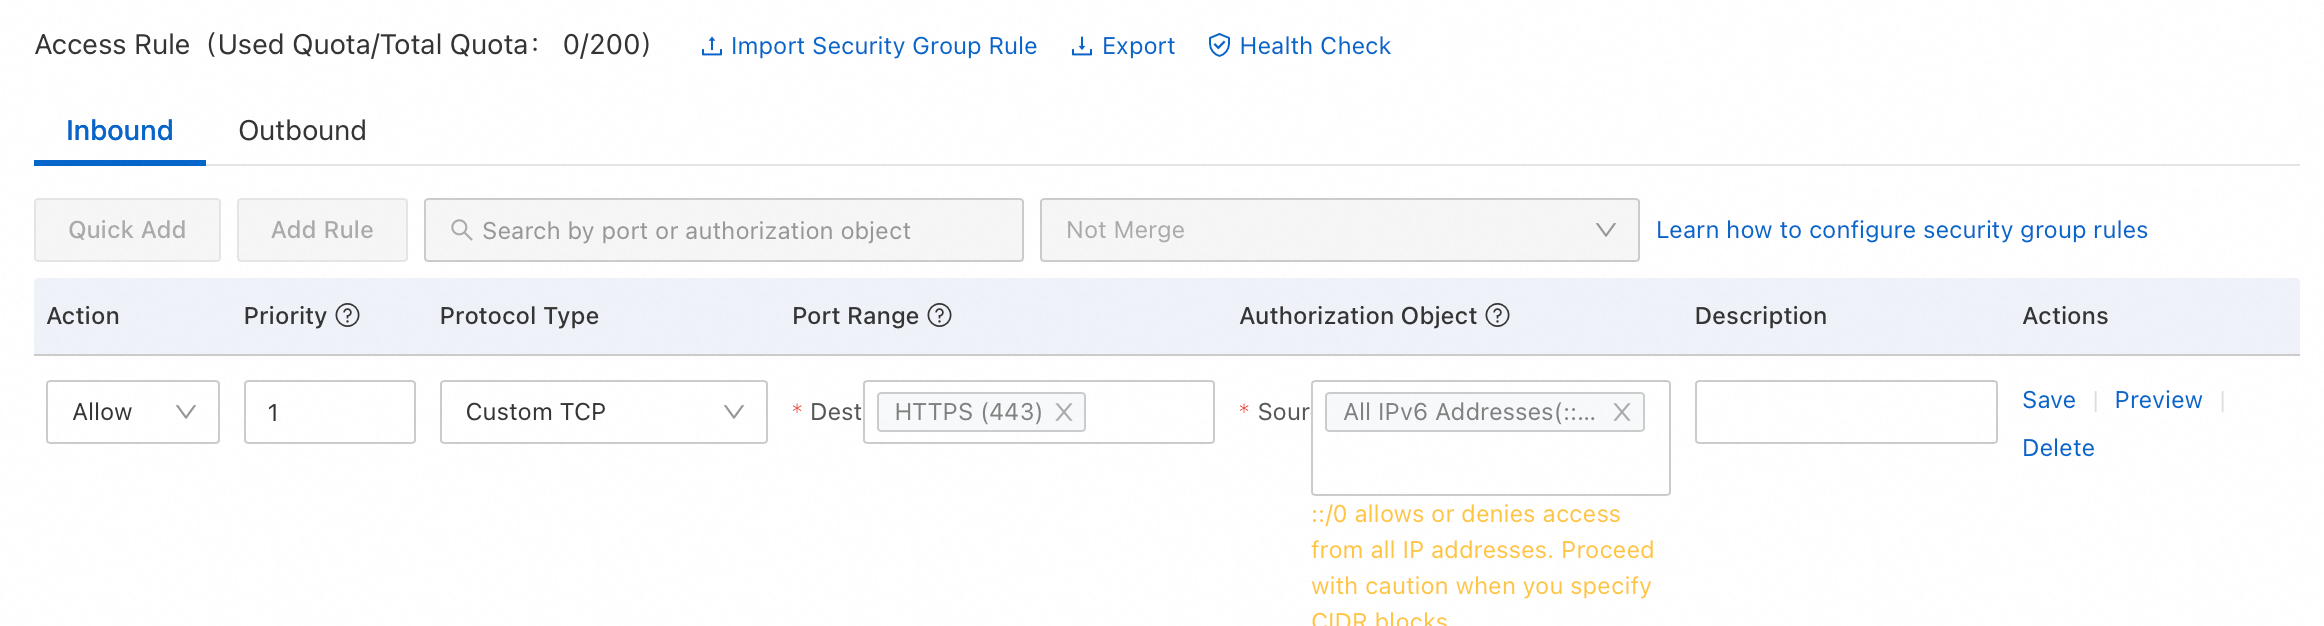
Delete an assigned IPv6 address
If an IPv6 address is no longer needed on your ECS instance, you can delete it. You can still use the IPv4 address after deleting the IPv6 address. This section describes how to delete an IPv6 address from the ECS console.
Make sure that the instance is in the Running or Stopped state.
Procedure
-
In the top navigation bar, select the region and resource group of the resource that you want to manage.
On the ENIs page, find the ENI that is attached to the target instance and has an assigned IPv6 address. In the Operation column, click Manage ENI IP Addresses.
In the Manage ENI IP Addresses dialog box, click the
 icon to the right of the target IPv6 address.
Click Confirm.
References
If an IPv6 address no longer requires internet access, you can release its Internet bandwidth. For more information, see Delete IPv6 Internet bandwidth.
You can manage IPv6 traffic within your VPC by adding and managing IPv6 routes in a route table. For more information, see Create and manage IPv6 routes.