You can build a large language model (LLM) inference environment with security measurement on a heterogeneous confidential computing instance (gn8v-tee) to protect model assets and user data throughout the inference lifecycle.
Background
Alibaba Cloud heterogeneous confidential computing instances (gn8v-tee) build upon CPU-based confidential computing instances with Intel® Trust Domain Extensions (TDX) by integrating a GPU into the trusted execution environment (TEE). This protects data transfers between the CPU and GPU and computations within the GPU. This solution integrates measurement and remote attestation capabilities of Intel TDX into an LLM inference service running on a heterogeneous confidential computing instance, creating a security validation and privacy protection workflow that keeps models and user data tamper-proof throughout the service lifecycle.
This solution adheres to the following two design principles:
-
Confidentiality: Ensures that models and user data are processed only within the secure boundary of a confidential computing instance, preventing plaintext from being exposed to the external environment.
-
Integrity: Guarantees that the code, data, and configuration of all components in the LLM inference service environment (including the inference framework, model files, and interactive interface) are tamper-resistant and verifiable through a strict third-party audit process.
Technical architecture
The following section describes the components in the architecture:
-
Client
The client provides the user interface (UI) for end-users to access the LLM service. It initiates sessions, verifies the remote environment's trustworthiness, and communicates securely with the backend service.
-
Remote attestation service
This component uses the Alibaba Cloud Remote Attestation Service to verify the security state of the model inference environment, including the platform's trusted computing base (TCB) and the inference service.
-
Inference service components
-
Ollama: A model serving framework that handles model inference service requests. This solution uses version
v0.5.7. -
DeepSeek model: This solution uses a distilled version of the DeepSeek-R1-70B (int4 quantized) model.
-
Open WebUI: A web-based interactive interface that runs inside the confidential VM and receives user model service requests through a RESTful API. This solution uses version
v0.5.20. -
CCZoo open-source project: This solution uses the Confidential AI source code. The version used in this solution is
v1.2. For more information about this open-source project, see CCZoo.
-
Confidential Computing Zoo (CCZoo) is a collection of security solutions for cloud computing scenarios that helps developers build end-to-end confidential computing solutions. The security technologies involved include, but are not limited to, TEEs (such as Intel® SGX and TDX), homomorphic encryption (HE) and its hardware acceleration, remote attestation, LibOS, and hardware-accelerated cryptography. The business scenarios include, but are not limited to, cloud-native AI inference, federated learning, big data analytics, key management, and Remote Procedure Calls (RPC), such as gRPC.
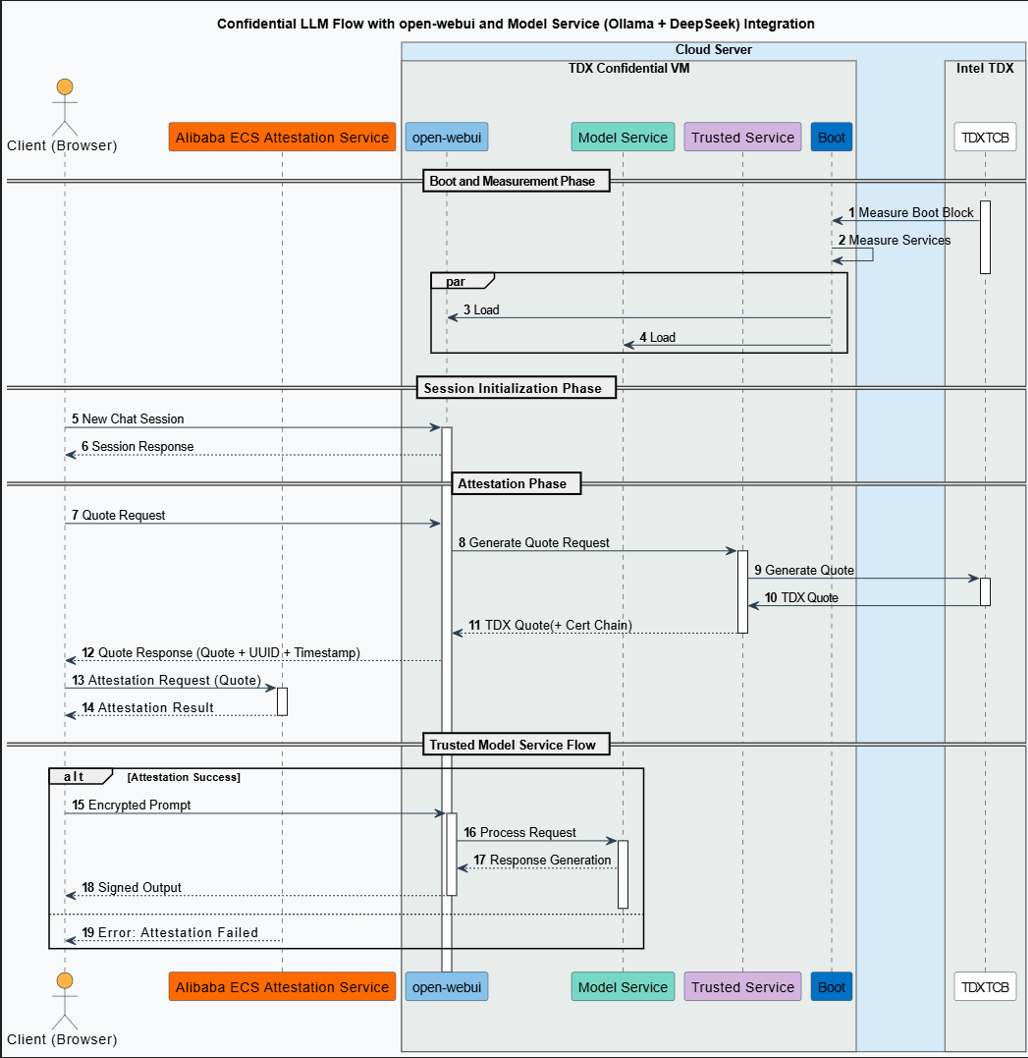
Workflow
The workflow of this solution is as follows:
-
Service startup and measurement
Runtime environment measurement: The platform TCB module measures the integrity of the runtime environment that runs the model service. The measurement results are stored in the TDX Module inside the TCB.
-
Inference session initialization
Create a session: The client (browser) sends a new session request to Open WebUI.
-
Remote attestation
-
Attestation request: When the client initiates a session request, it also requests attestation evidence (a TDX Quote) to prove the trustworthiness of the model's runtime environment. This evidence verifies all components of the remote service, including the Open WebUI session management service and the Ollama-based model service.
-
Quote generation: The Open WebUI service backend forwards the attestation request from the user session creation process to the Intel TDX-based confidential VM. The confidential VM then generates a TDX remote attestation report (TDX Quote) that includes the full certificate chain.
-
Quote verification: The client submits the received evidence (Quote) to the Remote Attestation Service for verification. The attestation service validates the evidence (including the digital signature, certificate chain, and security policy) and returns a result that confirms the security state and integrity of the remote model service environment.
-
-
Confidential large model inference service
-
Remote attestation succeeds: The client can fully trust the remote model service because its security state has been verified. For the end-user, the risk of data leakage is extremely low (although any system has some level of risk).
-
Remote attestation fails: The attestation service returns an error message. In this case, the user or system can choose to abort subsequent service requests or continue after receiving a warning about potential security risks. The remote model service may face data security risks at this point.
-
Procedure
Step 1: Create a heterogeneous confidential instance
Model data downloaded by Ollama is saved to the /usr/share/ollama/.ollama/models directory. Because model files are typically large (for example, the DeepSeek-R1 70B quantized model is about 40 GB), when you create the instance, select a cloud disk size based on the model you plan to run. We recommend a cloud disk size two to three times the model file size.
Console
Creating a heterogeneous confidential computing instance is similar to creating a standard instance but requires specific configurations. For general configurations, see Create an instance using the wizard.
Go to ECS console - Instances.
In the upper-left corner of the page, select a region and resource group.

Click Create Instance and configure the instance with the following settings.
Configuration Item
Description
Region and Zone
China (Beijing) Zone L
Instance Type
ecs.gn8v-tee.4xlarge or higher.
Image
Select the Alibaba Cloud Linux 3.2104 LTS 64-bit image.
Public IP Address
Assign Public IPv4 Address. Required to download the NVIDIA driver later.
ImportantWhen creating or restarting a confidential instance with 8 GPUs, do not attach additional secondary ENIs or data disks. This can cause a startup failure.
Complete the instance creation by following the on-screen instructions.
API/CLI
Call the RunInstances operation or use the Alibaba Cloud CLI to create a TDX-enabled ECS instance. Key parameters:
Parameter | Description | Example |
RegionId | China (Beijing) | cn-beijing |
ZoneId | Zone L | cn-beijing-l |
InstanceType | ecs.gn8v-tee.4xlarge or higher. | ecs.gn8v-tee.4xlarge |
ImageId | ID of an image that supports confidential computing. Only 64-bit Alibaba Cloud Linux 3.2104 LTS images with kernel version 5.10.134-18.al8.x86_64 or later. | aliyun_3_x64_20G_alibase_20250117.vhd |
CLI example:
<SECURITY_GROUP_ID>: security group ID.<VSWITCH_ID>: vSwitch ID.<KEY_PAIR_NAME>: SSH key pair name.
aliyun ecs RunInstances \
  --RegionId cn-beijing \
  --ZoneId cn-beijing-l \
  --SystemDisk.Category cloud_essd \
  --ImageId 'aliyun_3_x64_20G_alibase_20250117.vhd' \
  --InstanceType 'ecs.gn8v-tee.4xlarge' \
  --SecurityGroupId '<SECURITY_GROUP_ID>' \
  --VSwitchId '<VSWITCH_ID>' \
  --KeyPairName <KEY_PAIR_NAME>
Step 2: Build TDX remote attestation environment
A TDX Report is a CPU-generated data structure that represents the identity of a TDX instance. It contains key information, such as ATTRIBUTES, Runtime-extendable Measurement Registers (RTMRs), and Trusted Computing Base Security Version Numbers (TCB SVNs), and uses cryptographic methods to protect its integrity. See Intel TDX Module.
-
Add the Alibaba Cloud confidential computing yum repository.
-
Public endpoint format:
https://enclave-[Region-ID].oss-[Region-ID].aliyuncs.com/repo/alinux/enclave-expr.repo. -
VPC endpoint format:
https://enclave-[Region-ID].oss-[Region-ID]-internal.aliyuncs.com/repo/alinux/enclave-expr.repo.Replace [Region-ID] with the region ID of the TDX instance. The following example uses instance metadata to dynamically obtain the region ID:
token=$(curl -s -X PUT -H "X-aliyun-ecs-metadata-token-ttl-seconds: 5" "http://100.100.100.200/latest/api/token")
region_id=$(curl -s -H "X-aliyun-ecs-metadata-token: $token" http://100.100.100.200/latest/meta-data/region-id)

sudo yum install -y yum-utils
sudo yum-config-manager --add-repo https://enclave-${region_id}.oss-${region_id}-internal.aliyuncs.com/repo/alinux/enclave-expr.repo
-
-
Install build tools and sample code.
sudo yum groupinstall -y "Development Tools" sudo yum install -y sgxsdk libtdx-attest-devel -
Configure the Alibaba Cloud TDX remote attestation service.
Set
PCCS_URLin/etc/sgx_default_qcnl.conf. The following example uses instance metadata to dynamically obtain the region ID and configure the DCAP service:token=$(curl -s -X PUT -H "X-aliyun-ecs-metadata-token-ttl-seconds: 5" "http://100.100.100.200/latest/api/token") region_id=$(curl -s -H "X-aliyun-ecs-metadata-token: $token" http://100.100.100.200/latest/meta-data/region-id) sudo sed -i.$(date "+%m%d%y") 's|PCCS_URL=.*|PCCS_URL=https://sgx-dcap-server.${region_id}.aliyuncs.com/sgx/certification/v4/|' /etc/sgx_default_qcnl.conf
Step 3: Install Ollama
-
Run the following command to install Ollama.
curl -fsSL https://ollama.com/install.sh | shNoteThe preceding script is the official installation script provided by Ollama. If the installation fails due to network issues, you can refer to the official Ollama website and choose other installation methods. For more information, see the Ollama Linux installation guide.
Step 4: Download and run DeepSeek-R1 with Ollama
The model file is large, so the download may take a long time. We recommend that you use tmux to prevent the download from being interrupted by a network disconnection.
-
Install tmux
Run the following command to install tmux.
sudo yum install -y tmux -
Download and run DeepSeek-R1 with Ollama
Run the following commands to create a tmux session and then download and run the DeepSeek-R1 model in the session.
# Create a tmux session named run-deepseek
tmux new -s "run-deepseek"
# Download and run the deepseek-r1 model in the tmux session
ollama run deepseek-r1:70b
The following output indicates that the model has been successfully downloaded and started. You can enter
/byeto exit the model interaction....... verifying sha256 digest writing manifest success >>> >>> Send a message (/? for help) -
(Optional) Reconnect to the tmux session
If you need to restore the tmux session after a network disconnection, run the following command:
tmux attach -t run-deepseek
Step 5: Compile Open WebUI
To enable Open WebUI to use the TDX-based measurement service, download the TDX measurement plugin and compile Open WebUI from source.
The following examples use /home/ecs-user as the working directory. Replace it based on your environment.
-
Install dependencies and set up the environment
-
Install Node.js.
Run the following command to install Node.js.
sudo yum install -y nodejsNoteIf you encounter issues installing Node.js with the package manager, you can try using Node Version Manager (nvm) to install a specific version of Node.js.
# Download and install nvm curl -o- https://raw.githubusercontent.com/nvm-sh/nvm/v0.39.0/install.sh | bash # Load nvm environment variables source ~/.bashrc # Install Node.js version 20.18.1 nvm install 20.18.1 # Use this version nvm use 20.18.1 # Verify the version node --version -
Install Miniforge3 and configure its environment variables.
Run the following commands to install Miniforge3 and configure its environment variables to manage the open-webui virtual environment.
# Get the Miniforge3 installation package wget https://github.com/conda-forge/miniforge/releases/download/24.11.3-2/Miniforge3-24.11.3-2-Linux-x86_64.sh # Install miniforge3 non-interactively to the /home/ecs-user/miniforge3 directory bash Miniforge3-24.11.3-2-Linux-x86_64.sh -bu -p /home/ecs-user/miniforge3 # Set the environment variable for Miniforge3 export PATH="/home/ecs-user/miniforge3/bin:$PATH" -
Initialize Conda and verify its version.
Run the following commands to initialize Conda and verify its version.
# Initialize Conda
conda init
source ~/.bashrc
# Verify the version information
conda --version
-
-
Compile Open WebUI manually
-
Download the TDX measurement plugin.
Run the following commands to download the TDX measurement plugin and switch to the v1.2 branch.
cd /home/ecs-user git clone https://github.com/intel/confidential-computing-zoo.git git config --global --add safe.directory /home/ecs-user/confidential-computing-zoo cd confidential-computing-zoo git checkout v1.2 -
Clone the Open WebUI source code.
Run the following commands to clone the Open WebUI source code and switch to tag v0.5.20.
cd /home/ecs-user git clone https://github.com/open-webui/open-webui.git # Switch to tag v0.5.20 git config --global --add safe.directory /home/ecs-user/open-webui cd /home/ecs-user/open-webui git checkout v0.5.20 # Apply the patch from CCZoo. This patch adds TDX remote attestation features to open-webui. cd /home/ecs-user cp /home/ecs-user/confidential-computing-zoo/cczoo/confidential_ai/open-webui-patch/v0.5.20-feature-cc-tdx-v1.0.patch . git apply --ignore-whitespace --directory=open-webui/ v0.5.20-feature-cc-tdx-v1.0.patch -
Create and activate the open-webui environment.
Run the following commands to create and activate the open-webui environment, which is used to run the compiled Open WebUI.
conda create --name open-webui python=3.11 conda activate open-webui -
Install the TDX measurement plugin.
cd /home/ecs-user/confidential-computing-zoo/cczoo/confidential_ai/tdx_measurement_plugin/
pip install Cython
python setup.py install
After the command completes, run the following command to verify the installation. If no error is returned, the installation was successful.
python3 -c "import quote_generator" -
Build Open WebUI.
# Install dependencies
cd /home/ecs-user/open-webui/
# Configure the npm registry
npm config set registry http://registry.npmmirror.com
sudo npm install
# Build
sudo npm run build
After the build completes, run the following command to copy the generated build directory to the backend directory and rename it to frontend:
rm -rf ./backend/open_webui/frontend cp -r build ./backend/open_webui/frontendNoteAt this point, the Alibaba Cloud Remote Attestation Service is configured in the compiled Open WebUI. You can find the configuration information in the
/home/ecs-user/open-webui/external/acs-attest-client/index.jsfile. -
Configure the startup file for the Open WebUI backend service.
Run the following command to configure the startup file for the Open WebUI backend service and grant it executable permissions:
tee /home/ecs-user/open-webui/backend/dev.sh << 'EOF' #Set the service address and port. The default port is 8080. PORT="${PORT:-8080}" uvicorn open_webui.main:app --port $PORT --host 0.0.0.0 --forwarded-allow-ips '*' --reload EOF # Add executable permission to the startup file chmod +x /home/ecs-user/open-webui/backend/dev.sh -
Install the dependencies required for running Open WebUI.
cd /home/ecs-user/open-webui/backend/
pip install -r requirements.txt -U
conda deactivate
-
Step 6: Run Open WebUI and verify TDX attestation
-
Run the large language model and start the Open WebUI service
-
(Optional) If the Ollama service is not running, you can start it by running the following command.
ollama serve -
Run the following command to run the DeepSeek-R1 model with Ollama.
ollama run deepseek-r1:70b -
Run the following command to activate the open-webui virtual environment.
conda activate open-webui -
Run the following command to start the Open WebUI backend service.
cd /home/ecs-user/open-webui/backend && ./dev.shThe following output indicates that the Open WebUI backend service has started successfully.
......
INFO  [open_webui.env] Embedding model set: sentence-transformers/all-MiniLM-L6-v2
/root/miniforge3/envs/open-webui/lib/python3.12/site-packages/pydub/utils.py:170: RuntimeWarning: Couldn't find ffmpeg or avconv - defaulting to ffmpeg, but may not work
  warn("Couldn't find ffmpeg or avconv - defaulting to ffmpeg, but may not work", RuntimeWarning)
WARNI [langchain_community.utils.user_agent] USER_AGENT environment variable not set, consider setting it to identify your requests.
 ██████╗ ██████╗ ███████╗███╗   ██╗    ██╗    ██╗███████╗██████╗ ██╗   ██╗██╗
██╔═══██╗██╔══██╗██╔════╝████╗  ██║    ██║    ██║██╔════╝██╔══██╗██║   ██║██║
██║   ██║██████╔╝█████╗  ██╔██╗ ██║    ██║ █╗ ██║█████╗  ██████╔╝██║   ██║██║
██║   ██║██╔═══╝ ██╔══╝  ██║╚██╗██║    ██║███╗██║██╔══╝  ██╔══██╗██║   ██║██║
╚██████╔╝██║     ███████╗██║ ╚████║    ╚███╔███╔╝███████╗██████╔╝╚██████╔╝██║
 ═════╝ ╚═╝     ╚══════╝╚═╝  ╚═══╝     ╚══╝╚══╝ ╚══════╝╚═════╝  ╚═════╝ ╚═╝
v0.5.20 - building the best open-source AI user interface.
https://github.com/open-webui/open-webui
-
-
Access the Open WebUI service from a browser
-
Add a security group rule.
In the security group of your heterogeneous confidential computing instance, add a rule to allow client access to port 8080. For more information, see Add a security group rule.
-
Access the Open WebUI service from a browser.
Open your local browser and go to the following address: http://{ip_address}:{port}. Replace the parameters as needed:
-
{ip_address}: The public IP address of the instance where Open WebUI is located.
-
{port}: The default port number is 8080.
If remote attestation succeeds, a green check mark appears on the first icon in the dialog box. Otherwise, the icon is red.
After successful access, the Open WebUI chat interface for the deepseek-r1:70b model is displayed. The remote attestation status indicator icon is next to the model name in the upper-left corner.
NoteEach time you click the New Chat button, the backend service automatically fetches the Quote data from the TDX confidential computing environment, sends it to the Remote Attestation Service, and processes the returned attestation result. By default, this icon is red, which indicates that remote attestation is not complete or has failed. The icon turns green after remote attestation succeeds.
-
-
-
Verify the TDX attestation information
You can hover over the attestation status icon to see the detailed attestation information from the parsed TDX Quote.
The attestation information panel includes fields such as
jti,tee(with the value tdx),exp/iattimestamps,mr_td,rtmr_0tortmr_3,mr_seam,seam_attributes,td_attributes, andxfam, along with their corresponding hexadecimal hash values.You can view the detailed information in your browser's developer tools. An example of the output is as follows.
Attestation Display info:
{jti: 'c1e24a09-daf5-4064-a8a9-642c8c18c7fe', tee: 'tdx', exp: '2025-04-22 00:16:21 Asia/Shanghai', iat: '2025-04-21 18:16:21 Asia/Shanghai', mr_td: 'b0e52c59577523b17ad553c6fffb0f5f3496dbf3ccca69fbb2ea87cf4f938157550005c92a98130d8d30507ca5c652df', …}
exp: "2025-04-22 00:16:21 Asia/Shanghai"
iat: "2025-04-21 18:16:21 Asia/Shanghai"
jti: "c1e24a09-daf5-4064-a8a9-642c8c18c7fe"
mr_seam: "1cc6a17ab799e9a693fac7536be61c12ee1e0fabada82d0c999e08ccee2aa86de77b0870f558c570e7ffe55d6d47fa04"
mr_td: "b0e52c59577523b17ad553c6fffb0f5f3496dbf3ccca69fbb2ea87cf4f938157550005c92a98130d8d30507ca5c652df"
rtmr_0: "78be53d723b6be3f82997e3e8291f133b5d0a9905c17e5f95308c7db488e22da3405fc2e3b60f6291c38304096a17d21"
rtmr_1: "216e85c7541a45bfbb9fe0521c72886bf8f47493d6027f2e33afe50a6d2f946904350780b0f205ee447bf08d29f60e4e"
rtmr_2: "000000000000000000000000000000000000000000000000000000000000000000000000000000000000000000000000"
rtmr_3: "000000000000000000000000000000000000000000000000000000000000000000000000000000000000000000000000"
seam_attributes: "0000000000000000"
td_attributes: "0000001000000000"
tee: "tdx"
xfam: "e742060000000000"
[[Prototype]]: Object
ALL Attestation info
{jti: 'c1e24a09-daf5-4064-a8a9-642c8c18c7fe', tee: 'tdx', exp: '2025-04-22 00:16:21 Asia/Shanghai', iat: '2025-04-21 18:16:21 Asia/Shanghai', mr_td: 'b0e52c59577523b17ad553c6fffb0f5f3496dbf3ccca69fbb2ea87cf4f938157550005c92a98130d8d30507ca5c652df', …}
att_key_type: "0200"
exp: "2025-04-22 00:16:21 Asia/Shanghai"
iat: "2025-04-21 18:16:21 Asia/Shanghai"
jti: "c1e24a09-daf5-4064-a8a9-642c8c18c7fe"
mr_condif_id: "000000000000000000000000000000000000000000000000000000000000000000000000000000000000000000000000"
mr_owner: "000000000000000000000000000000000000000000000000000000000000000000000000000000000000000000000000"
mr_seam: "1cc6a17ab799e9a693fac7536be61c12ee1e0fabada82d0c999e08ccee2aa86de77b0870f558c570e7ffe55d6d47fa04"
mr_td: "b0e52c59577523b17ad553c6fffb0f5f3496dbf3ccca69fbb2ea87cf4f938157550005c92a98130d8d30507ca5c652df"
rtmr_0: "78be53d723b6be3f82997e3e8291f133b5d0a9905c17e5f95308c7db488e22da3405fc2e3b60f6291c38304096a17d21"
rtmr_1: "216e85c7541a45bfbb9fe0521c72886bf8f47493d6027f2e33afe50a6d2f946904350780b0f205ee447bf08d29f60e4e"
rtmr_2: "000000000000000000000000000000000000000000000000000000000000000000000000000000000000000000000000"
rtmr_3: "000000000000000000000000000000000000000000000000000000000000000000000000000000000000000000000000"
seam_attributes: "0000000000000000"
td_attributes: "0000001000000000"
tee: "tdx"
xfam: "e742060000000000"
[[Prototype]]: Object
mr_owner_config: "000000000000000000000000000000000000000000000000000000000000000000000000000000000000000000000000"
mr_seam: "1cc6a17ab799e9a693fac7536be61c12ee1e0fabada82d0c999e08ccee2aa86de77b0870f558c570e7ffe55d6d47fa04"
mr_servicetd: "383c87d3bbb047b2d171eaca95312ede99f258088dc788f6ae2ccf8b6dd848fe8d47629e08b3f6cbd4a0ddd47a5..."
mr_td: "b0e52c59577523b17ad553c6fffb0f5f3496dbf3ccca69fbb2ea87cf4f938157550005c92a98130d8d30507ca5c652df"
mrsigner_seam: "000000000000000000000000000000000000000000000000000000000000000000000000000000000000000000000000"
rtmr_0: "78be53d723b6be3f82997e3e8291f133b5d0a9905c17e5f95308c7db488e22da3405fc2e3b60f6291c38304096a17d21"
rtmr_1: "216e85c7541a45bfbb9fe0521c72886bf8f47493d6027f2e33afe50a6d2f946904350780b0f205ee447bf08d29f60e4e"
rtmr_2: "000000000000000000000000000000000000000000000000000000000000000000000000000000000000000000000000"
rtmr_3: "000000000000000000000000000000000000000000000000000000000000000000000000000000000000000000000000"
seam_attributes: "0000000000000000"
tcb_svn: "05010600000000000000000000000000"
td_attributes: "0000001000000000"
td_attributes.debug: false
FAQ
Slow pip package downloads
"Cannot find package" error
References
Open WebUI supports only HTTP by default. To secure data in transit, you can deploy HTTPS by using Alibaba Cloud Server Load Balancer (SLB). For more information, see Configure one-way authentication for HTTPS requests.