After you add a site to ESA, use Terraform to add managed WAF rules in batches.
Install Terraform and configure permissions
Install and configure Terraform on your computer
For more information about how to use Terraform on your computer, see Install and configure Terraform.
Create an AccessKey pair for a RAM user. An Alibaba Cloud account has all permissions on resources. If the AccessKey pair of your Alibaba Cloud account is leaked, your resources are exposed to great risks. We recommend that you use the AccessKey pair of a RAM user. For more information, see Create an AccessKey pair.
Create environment variables to store identity credentials.
You can create and view your AccessKey on the AccessKey Management page.
If the environment variables are not configured, identity verification fails when you run the Terraform template.
Use an online service (no installation or permission configuration required)
If you do not want to install Terraform, you can use the online service Cloud Shell.
Alibaba Cloud Cloud Shell is a free operations and maintenance (O&M) product. It is pre-installed with Terraform components and configured with identity credentials. Therefore, you can run Terraform commands directly in Cloud Shell. For more information, see Create resources with Terraform.
When you use Terraform in Cloud Shell, its destroy feature can cause data loss. We recommend that you use Cloud Shell only for simple and quick operations, such as debugging. For more information about the limits, see Limits.
Resources used
ESA website resource: alicloud_esa_site
WAF managed rule configuration: alicloud_esa_waf_rule
WAF managed ruleset configuration: alicloud_esa_waf_ruleset
Enable managed WAF rules for a site
Create a configuration file named
main.tf. Copy the following code into the file to create managed WAF rules for a specified site.# 1. Enter the name of the site to configure data "alicloud_esa_sites" "default" { site_name = "<span class="var-span" contenteditable="true" data-var="DOMAIN">DOMAIN"</span> # Replace DOMAIN with the actual domain name added to ESA, such as example.com } # 2. Create an http_managed WAF ruleset (used exclusively for managed rules) resource "alicloud_esa_waf_ruleset" "managed" { site_id = data.alicloud_esa_sites.default.sites[0].site_id # Site ID. Automatically retrieved based on the site_name value phase = "http_managed" # WAF processing phase. http_managed indicates a managed ruleset site_version = "0" # Site version } # 3. Configure managed rules: Set the action for multiple attack types to Block resource "alicloud_esa_waf_rule" "managed_deny" { ruleset_id = alicloud_esa_waf_ruleset.managed.ruleset_id # Do not specify the ruleset ID. ESA creates one automatically site_id = data.alicloud_esa_sites.default.sites[0].site_id phase = "http_managed" site_version = "0" config { status = "on" # Ruleset status. on enables the ruleset type = "http_managed" # Ruleset type. Managed rules expression = "true" # Request type. true applies to all incoming requests. You can also enter a specific rule expression # Configure managed rules in batches - Applies to all rules below managed_rulesets { protection_level = 2 # Protection level. See the explanation at the end of this topic action = "deny" # Action. deny blocks requests. monitor logs requests attack_type = 11 # Attack type. See the explanation at the end of this topic } managed_rulesets { protection_level = 2 action = "deny" attack_type = 12 } managed_rulesets { protection_level = 2 action = "deny" attack_type = 13 } } }Navigate to the directory that contains the configuration files. Then, run the following command to initialize the Terraform environment.
terraform init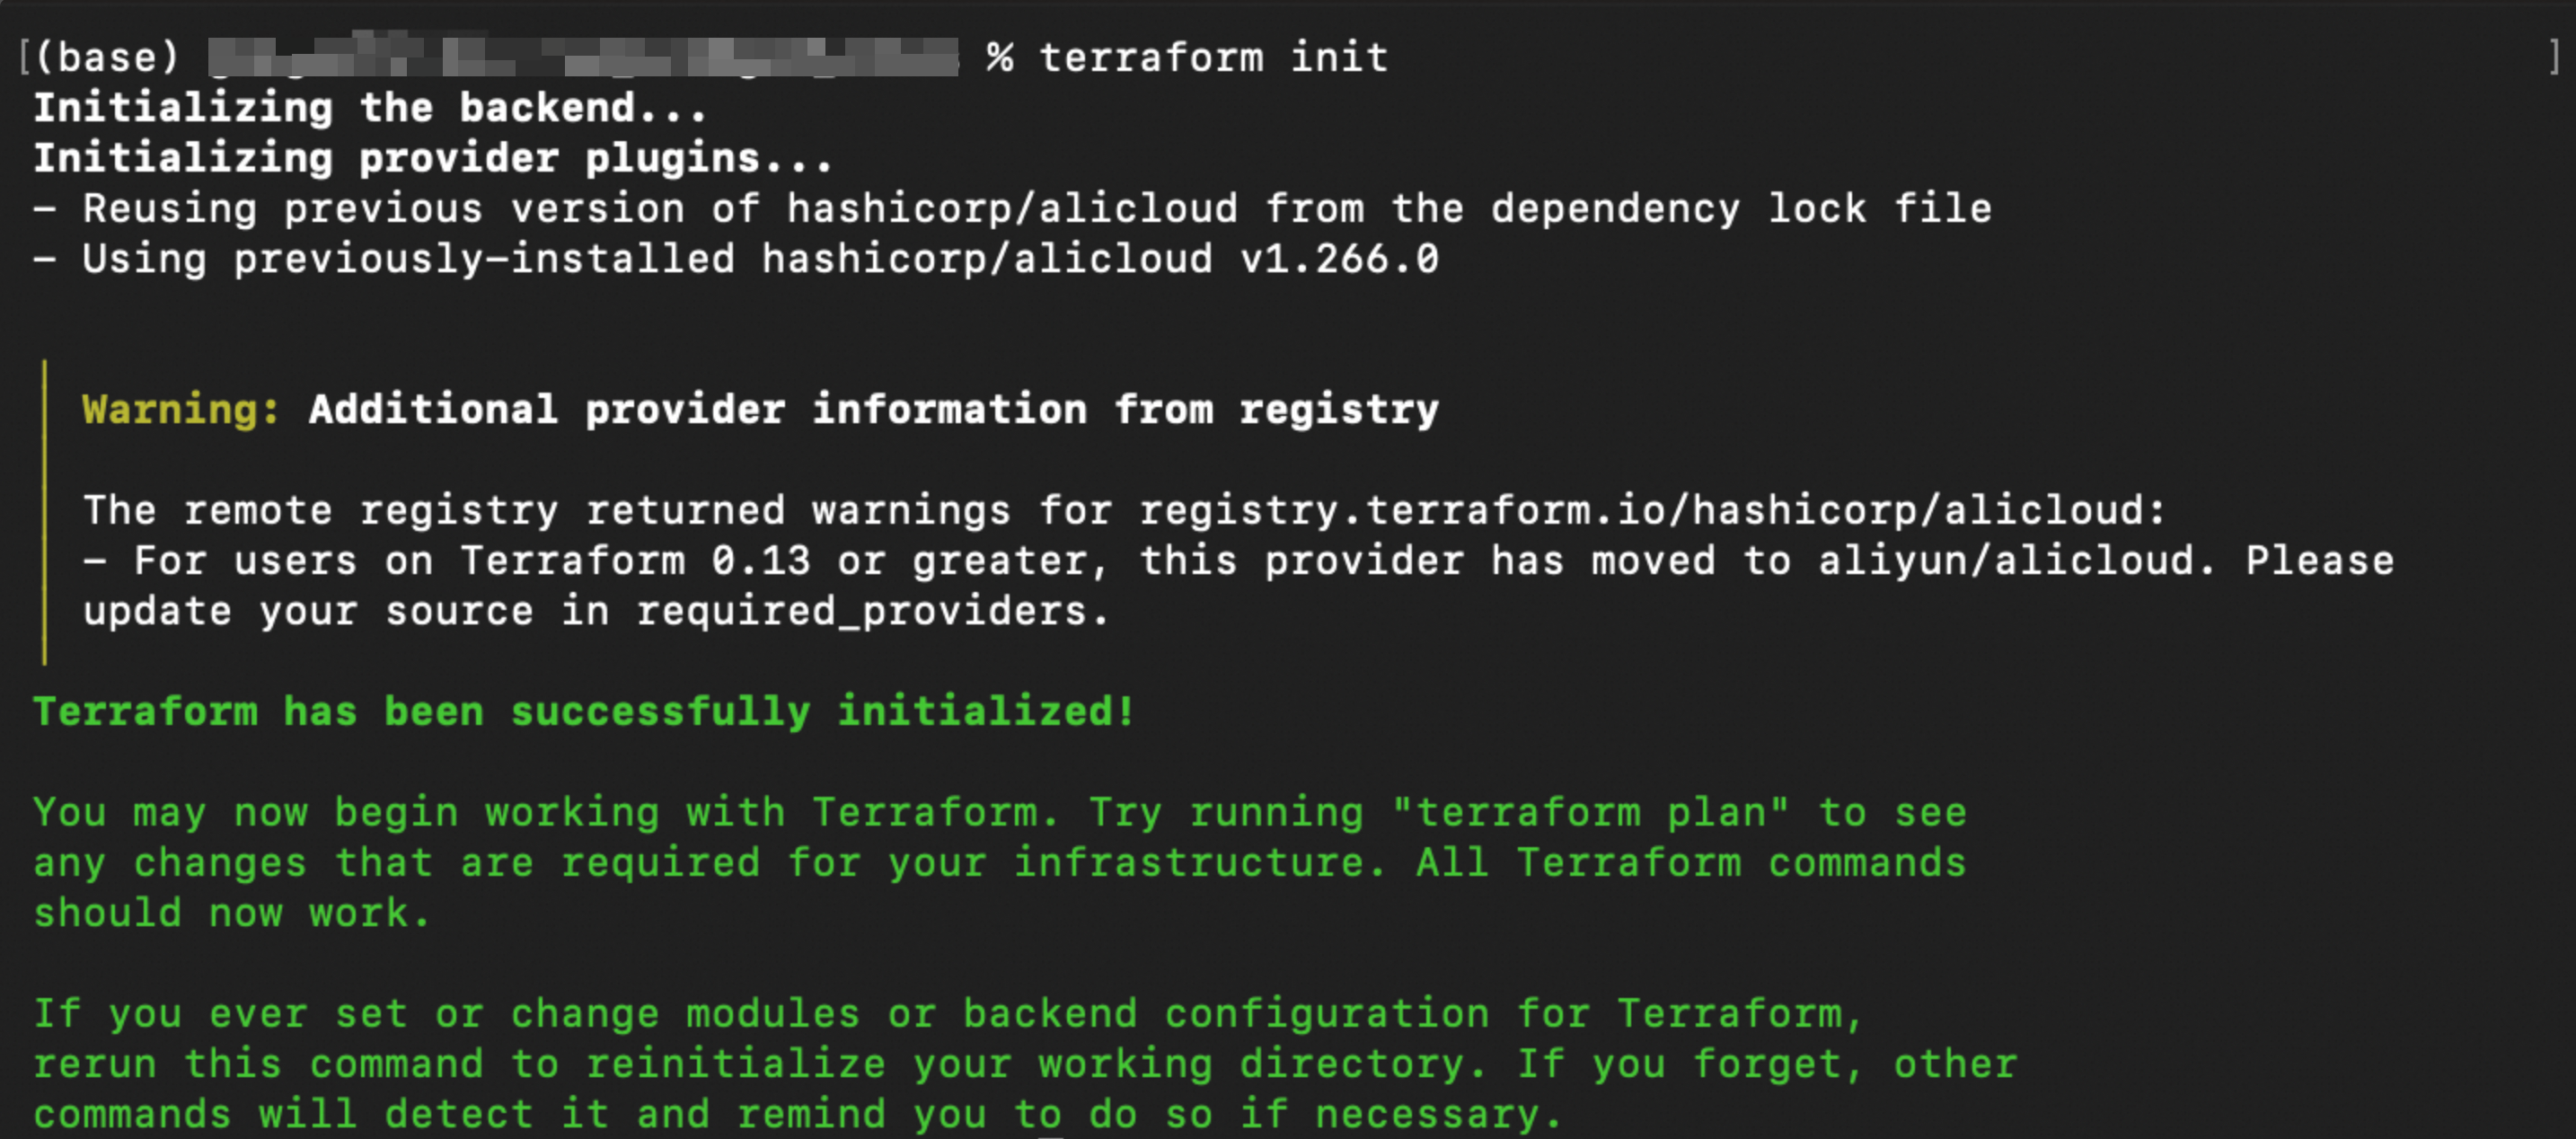
Run the following command to validate the syntax and configuration of the Terraform files.
terraform validateIf the output is similar to the following figure, the validation is successful.

Run the following command to preview the execution result.
terraform plan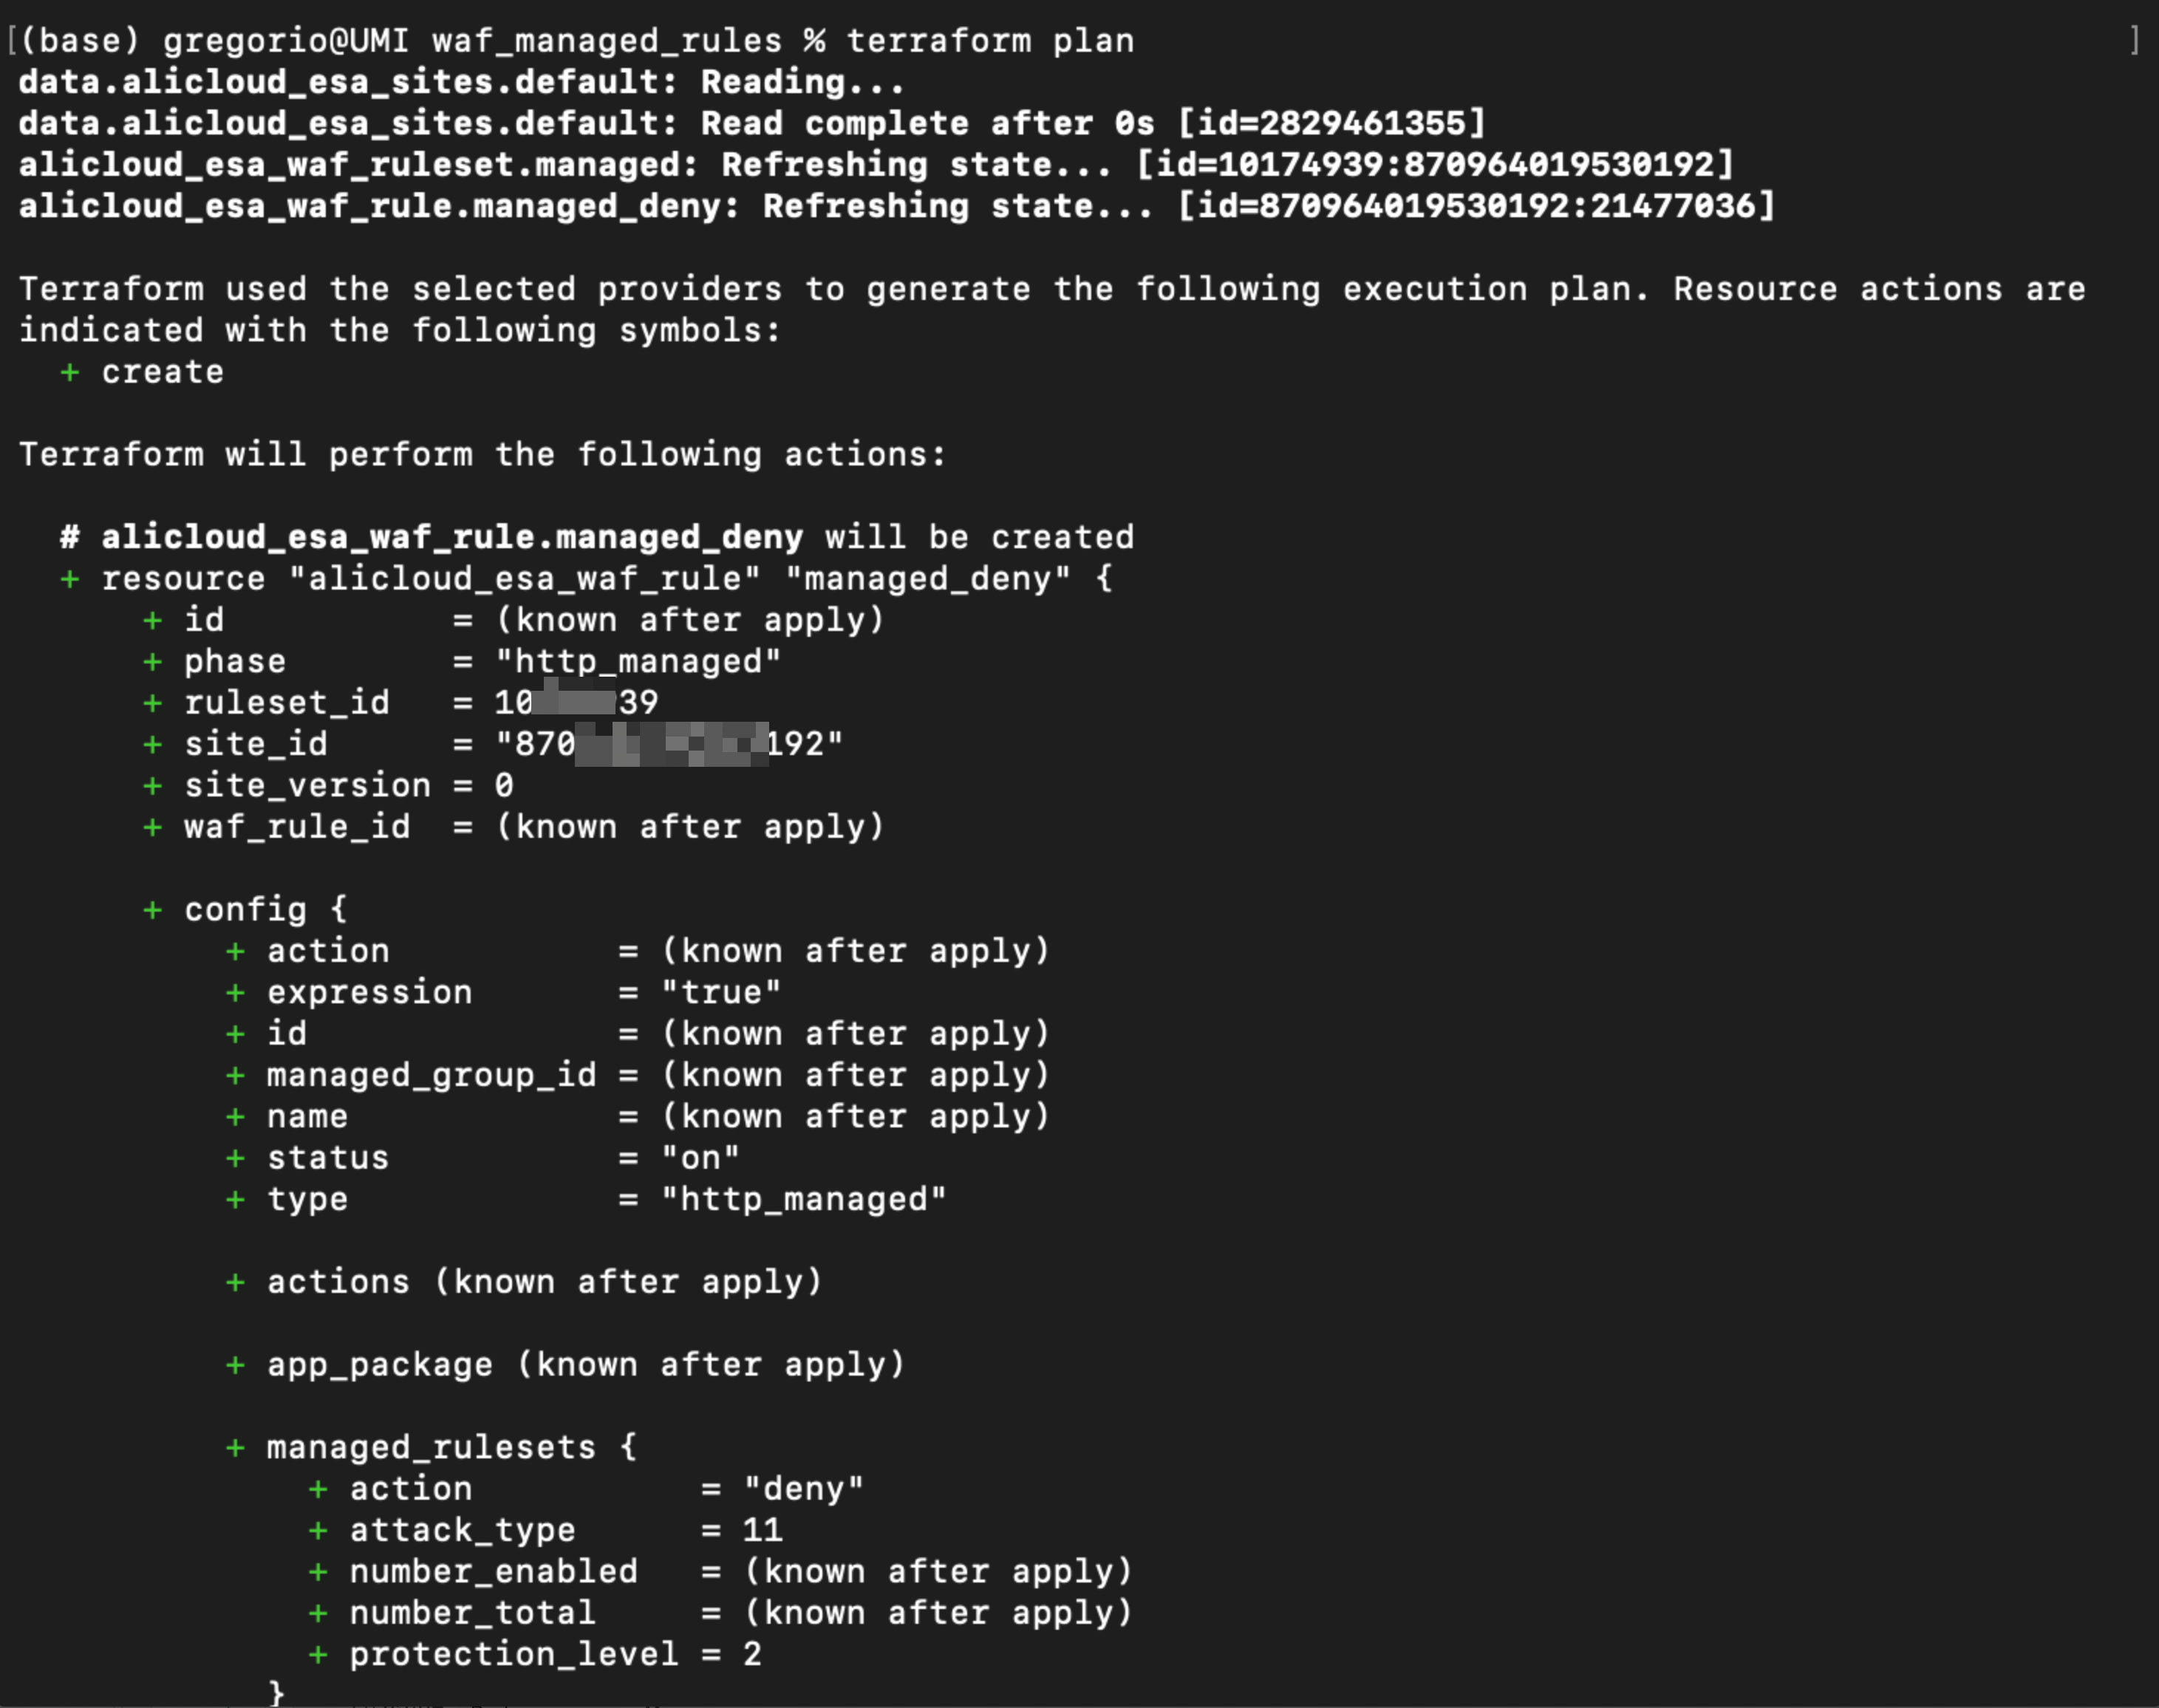
Run the following command to execute the Terraform script.
terraform apply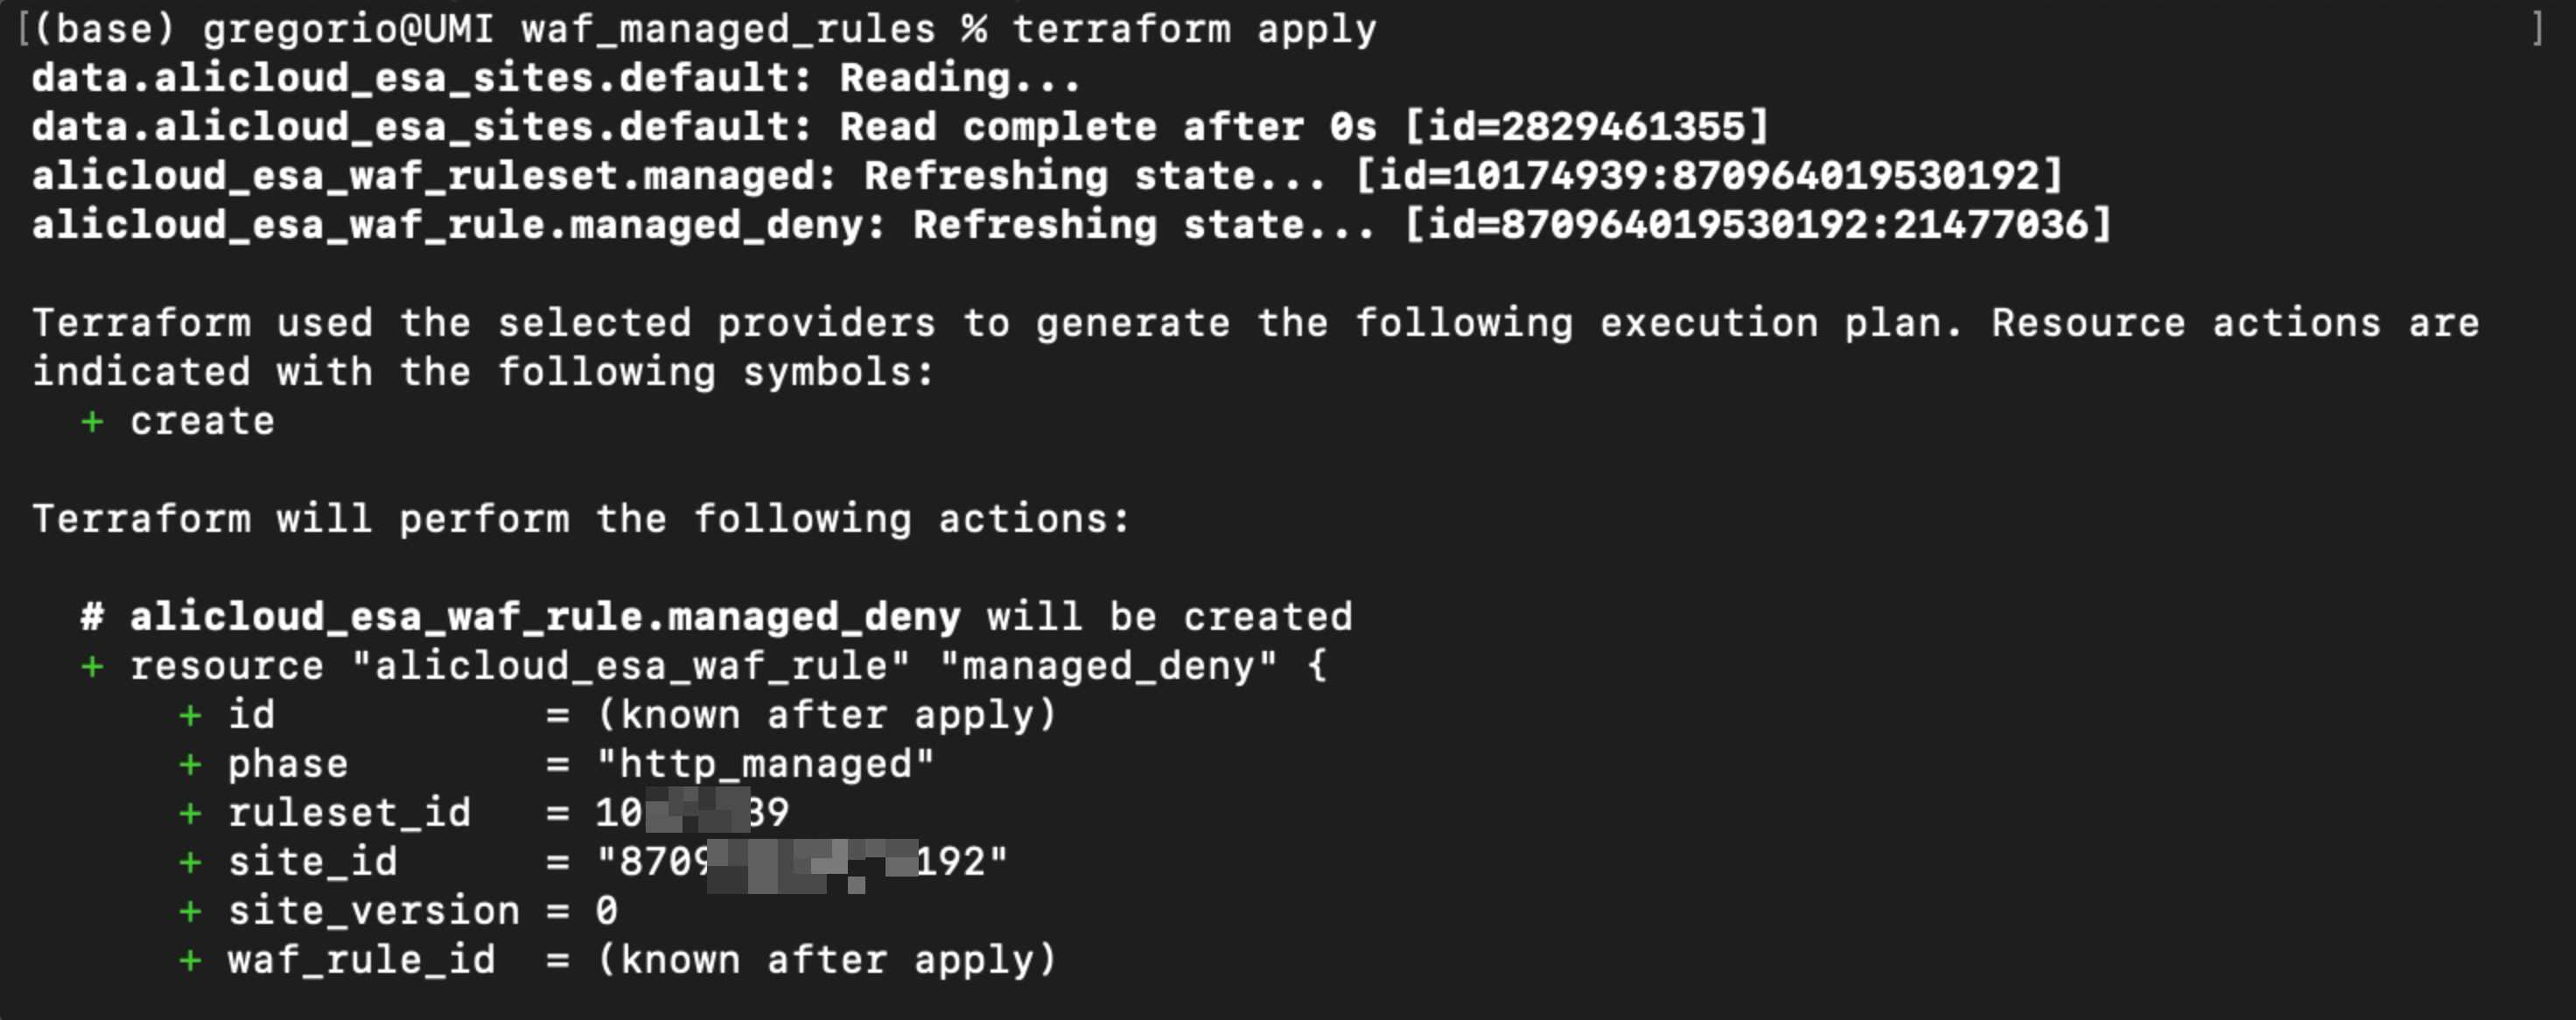
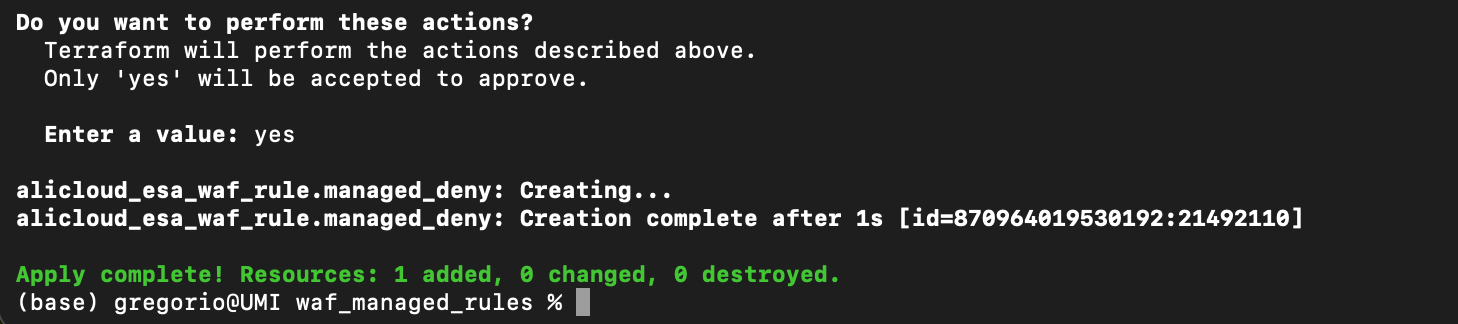
Enter
yesat the prompt to confirm execution.
Validation Results
In the ESA console, choose Site Management. In the Website column, click the target site.
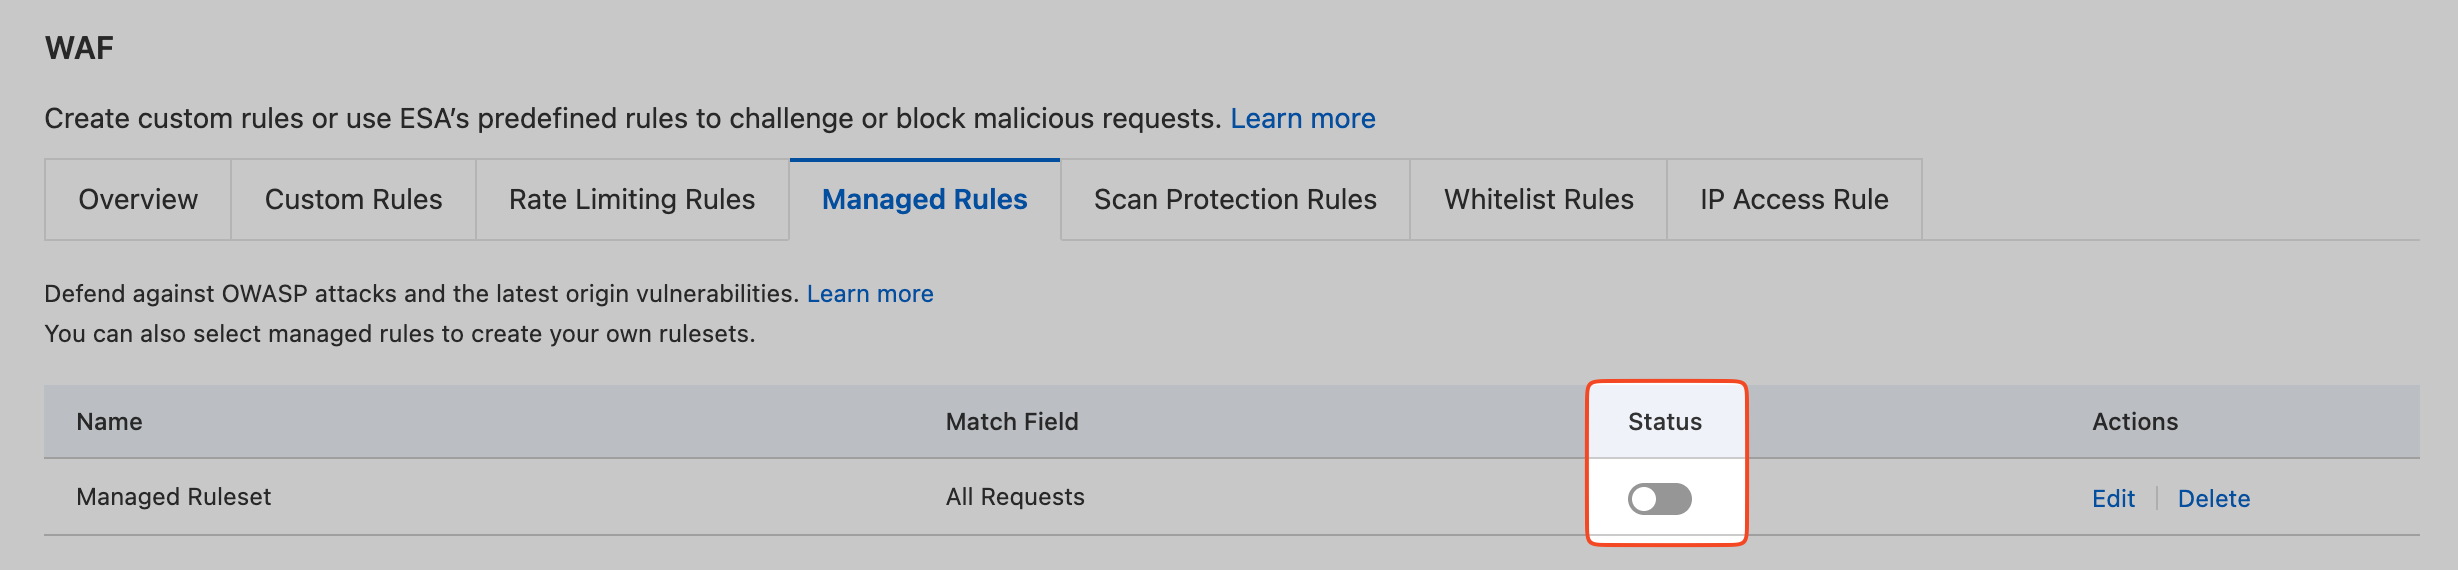
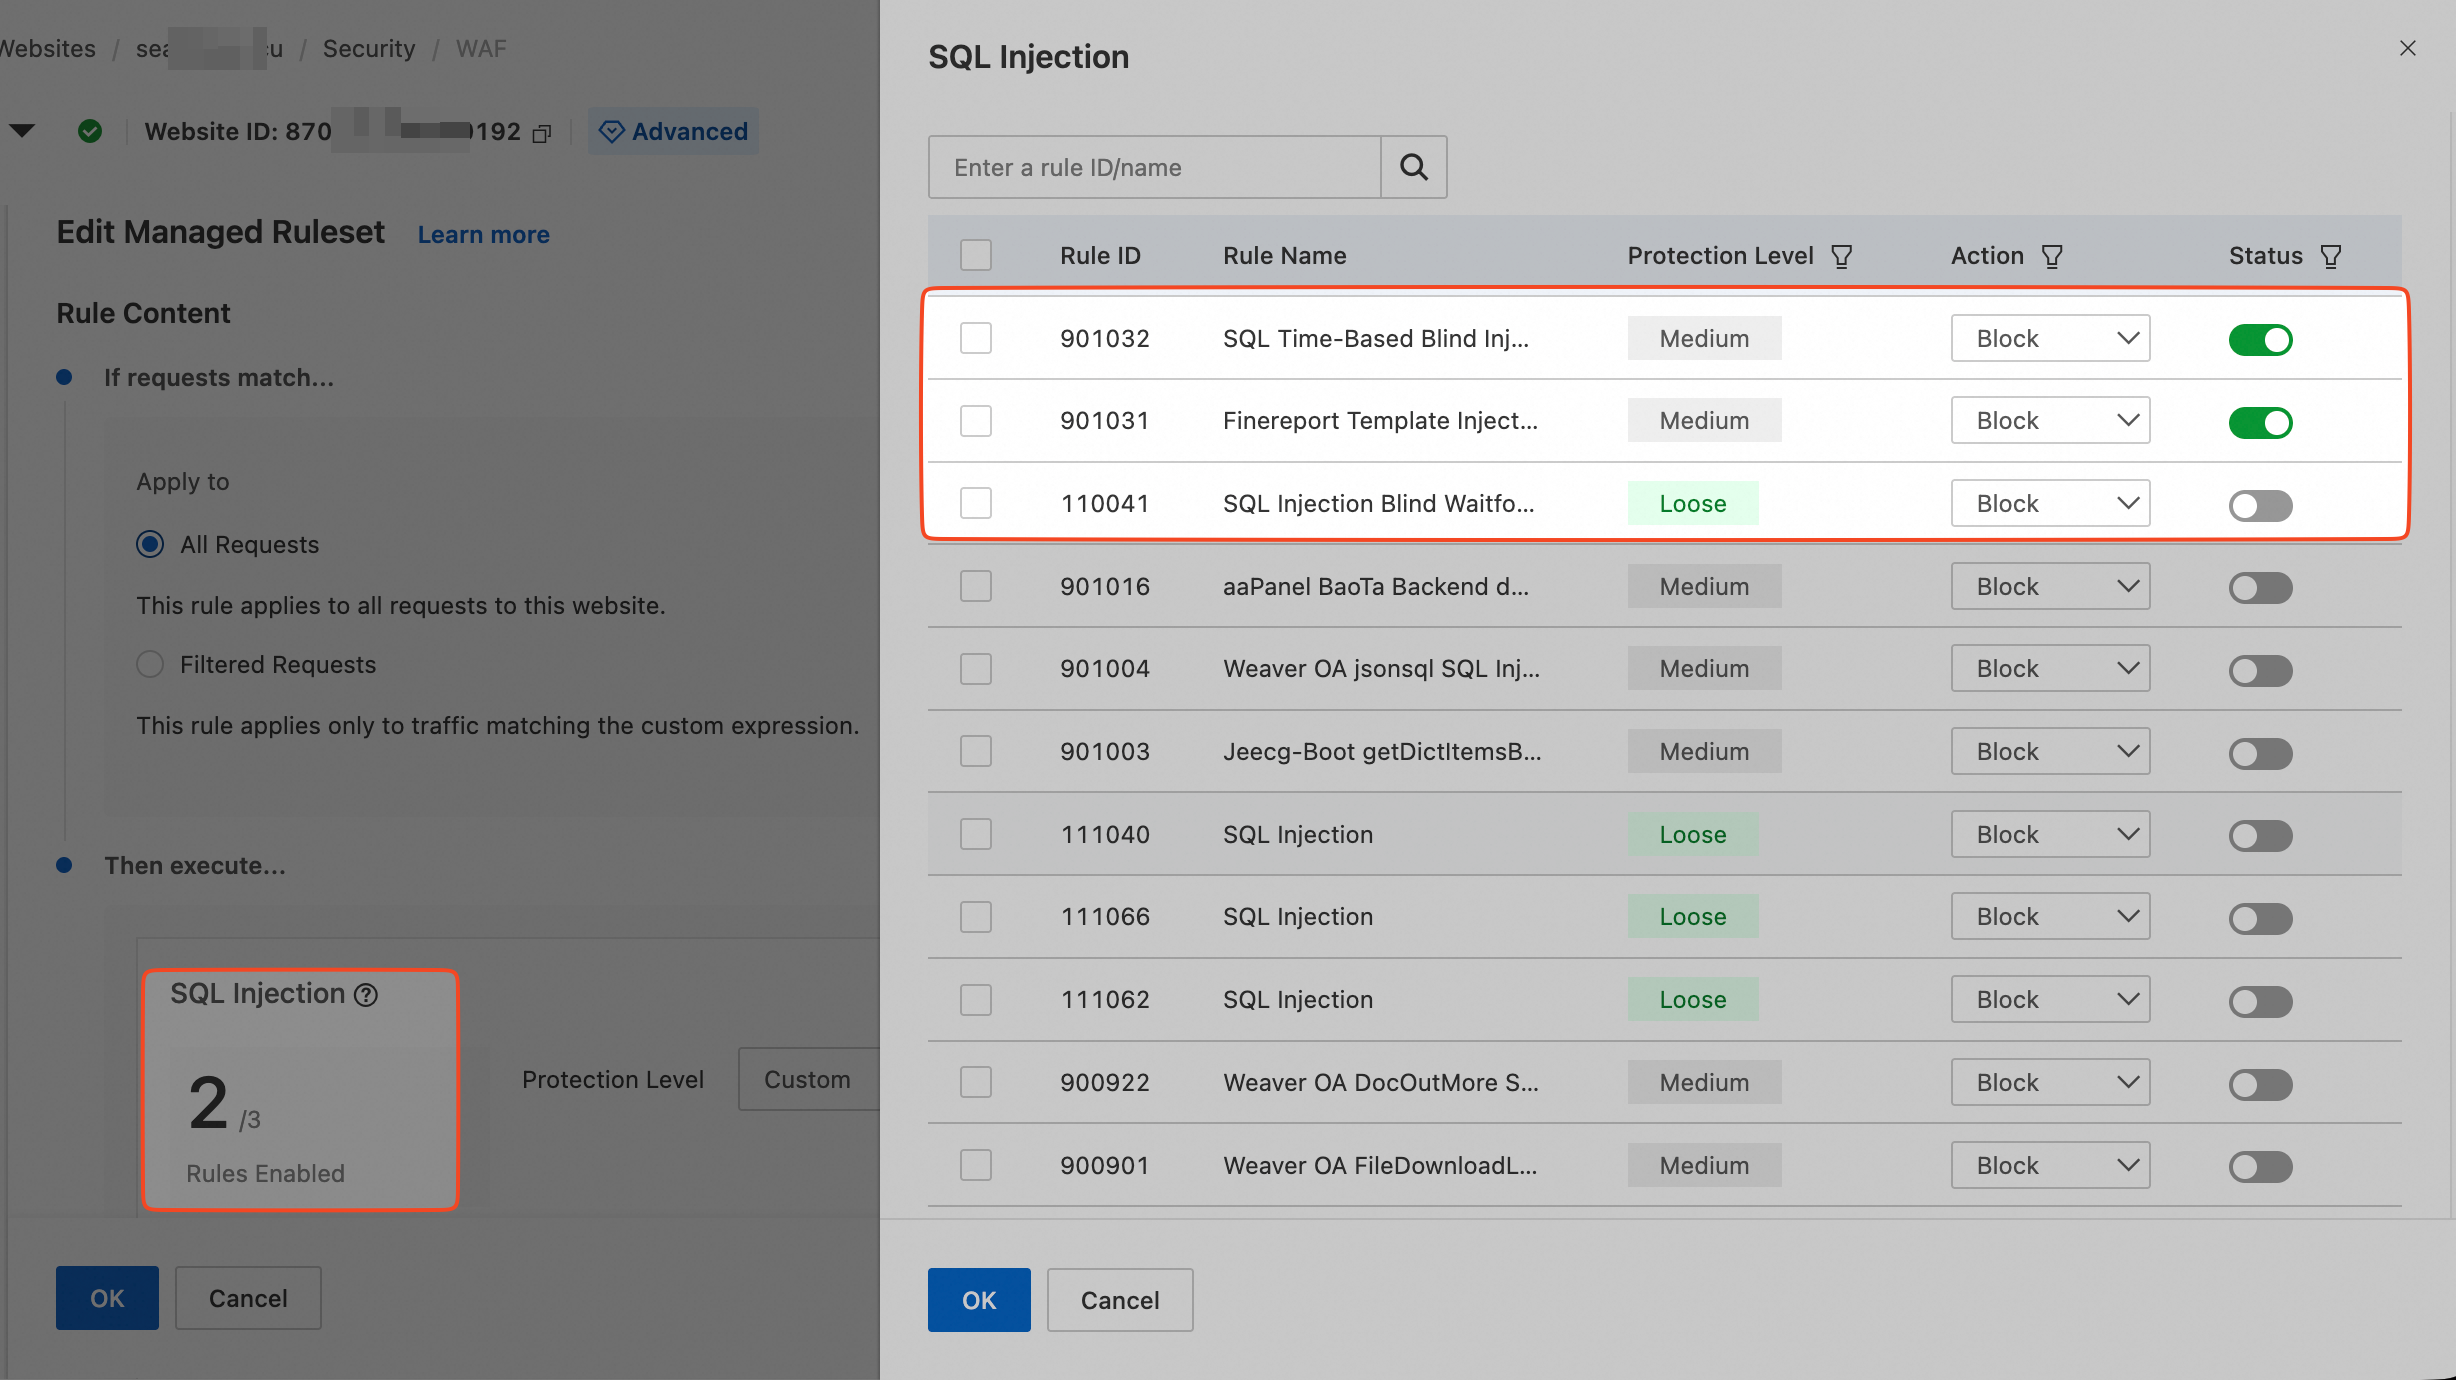
On the site details page, choose Security > WAF > Managed Rules.
The new managed rules appear on the Managed Rules tab.
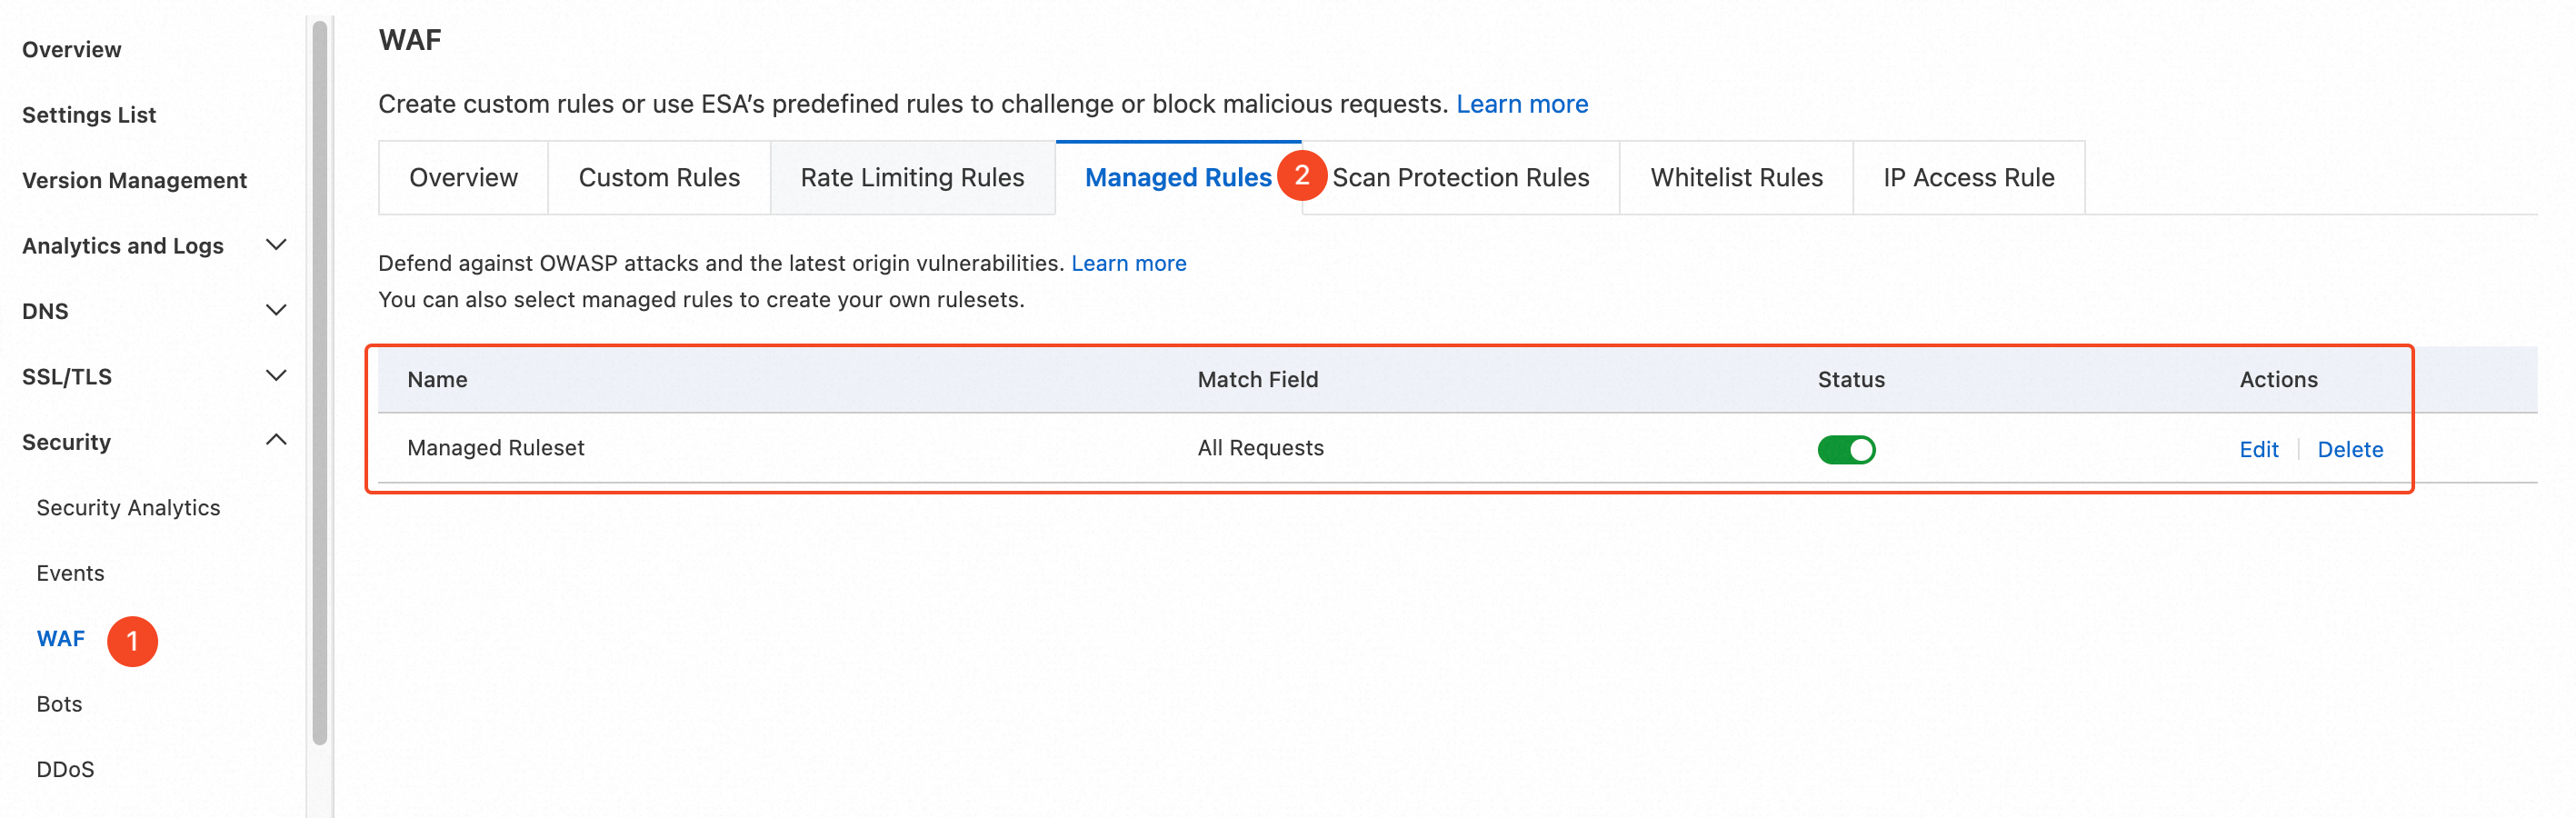
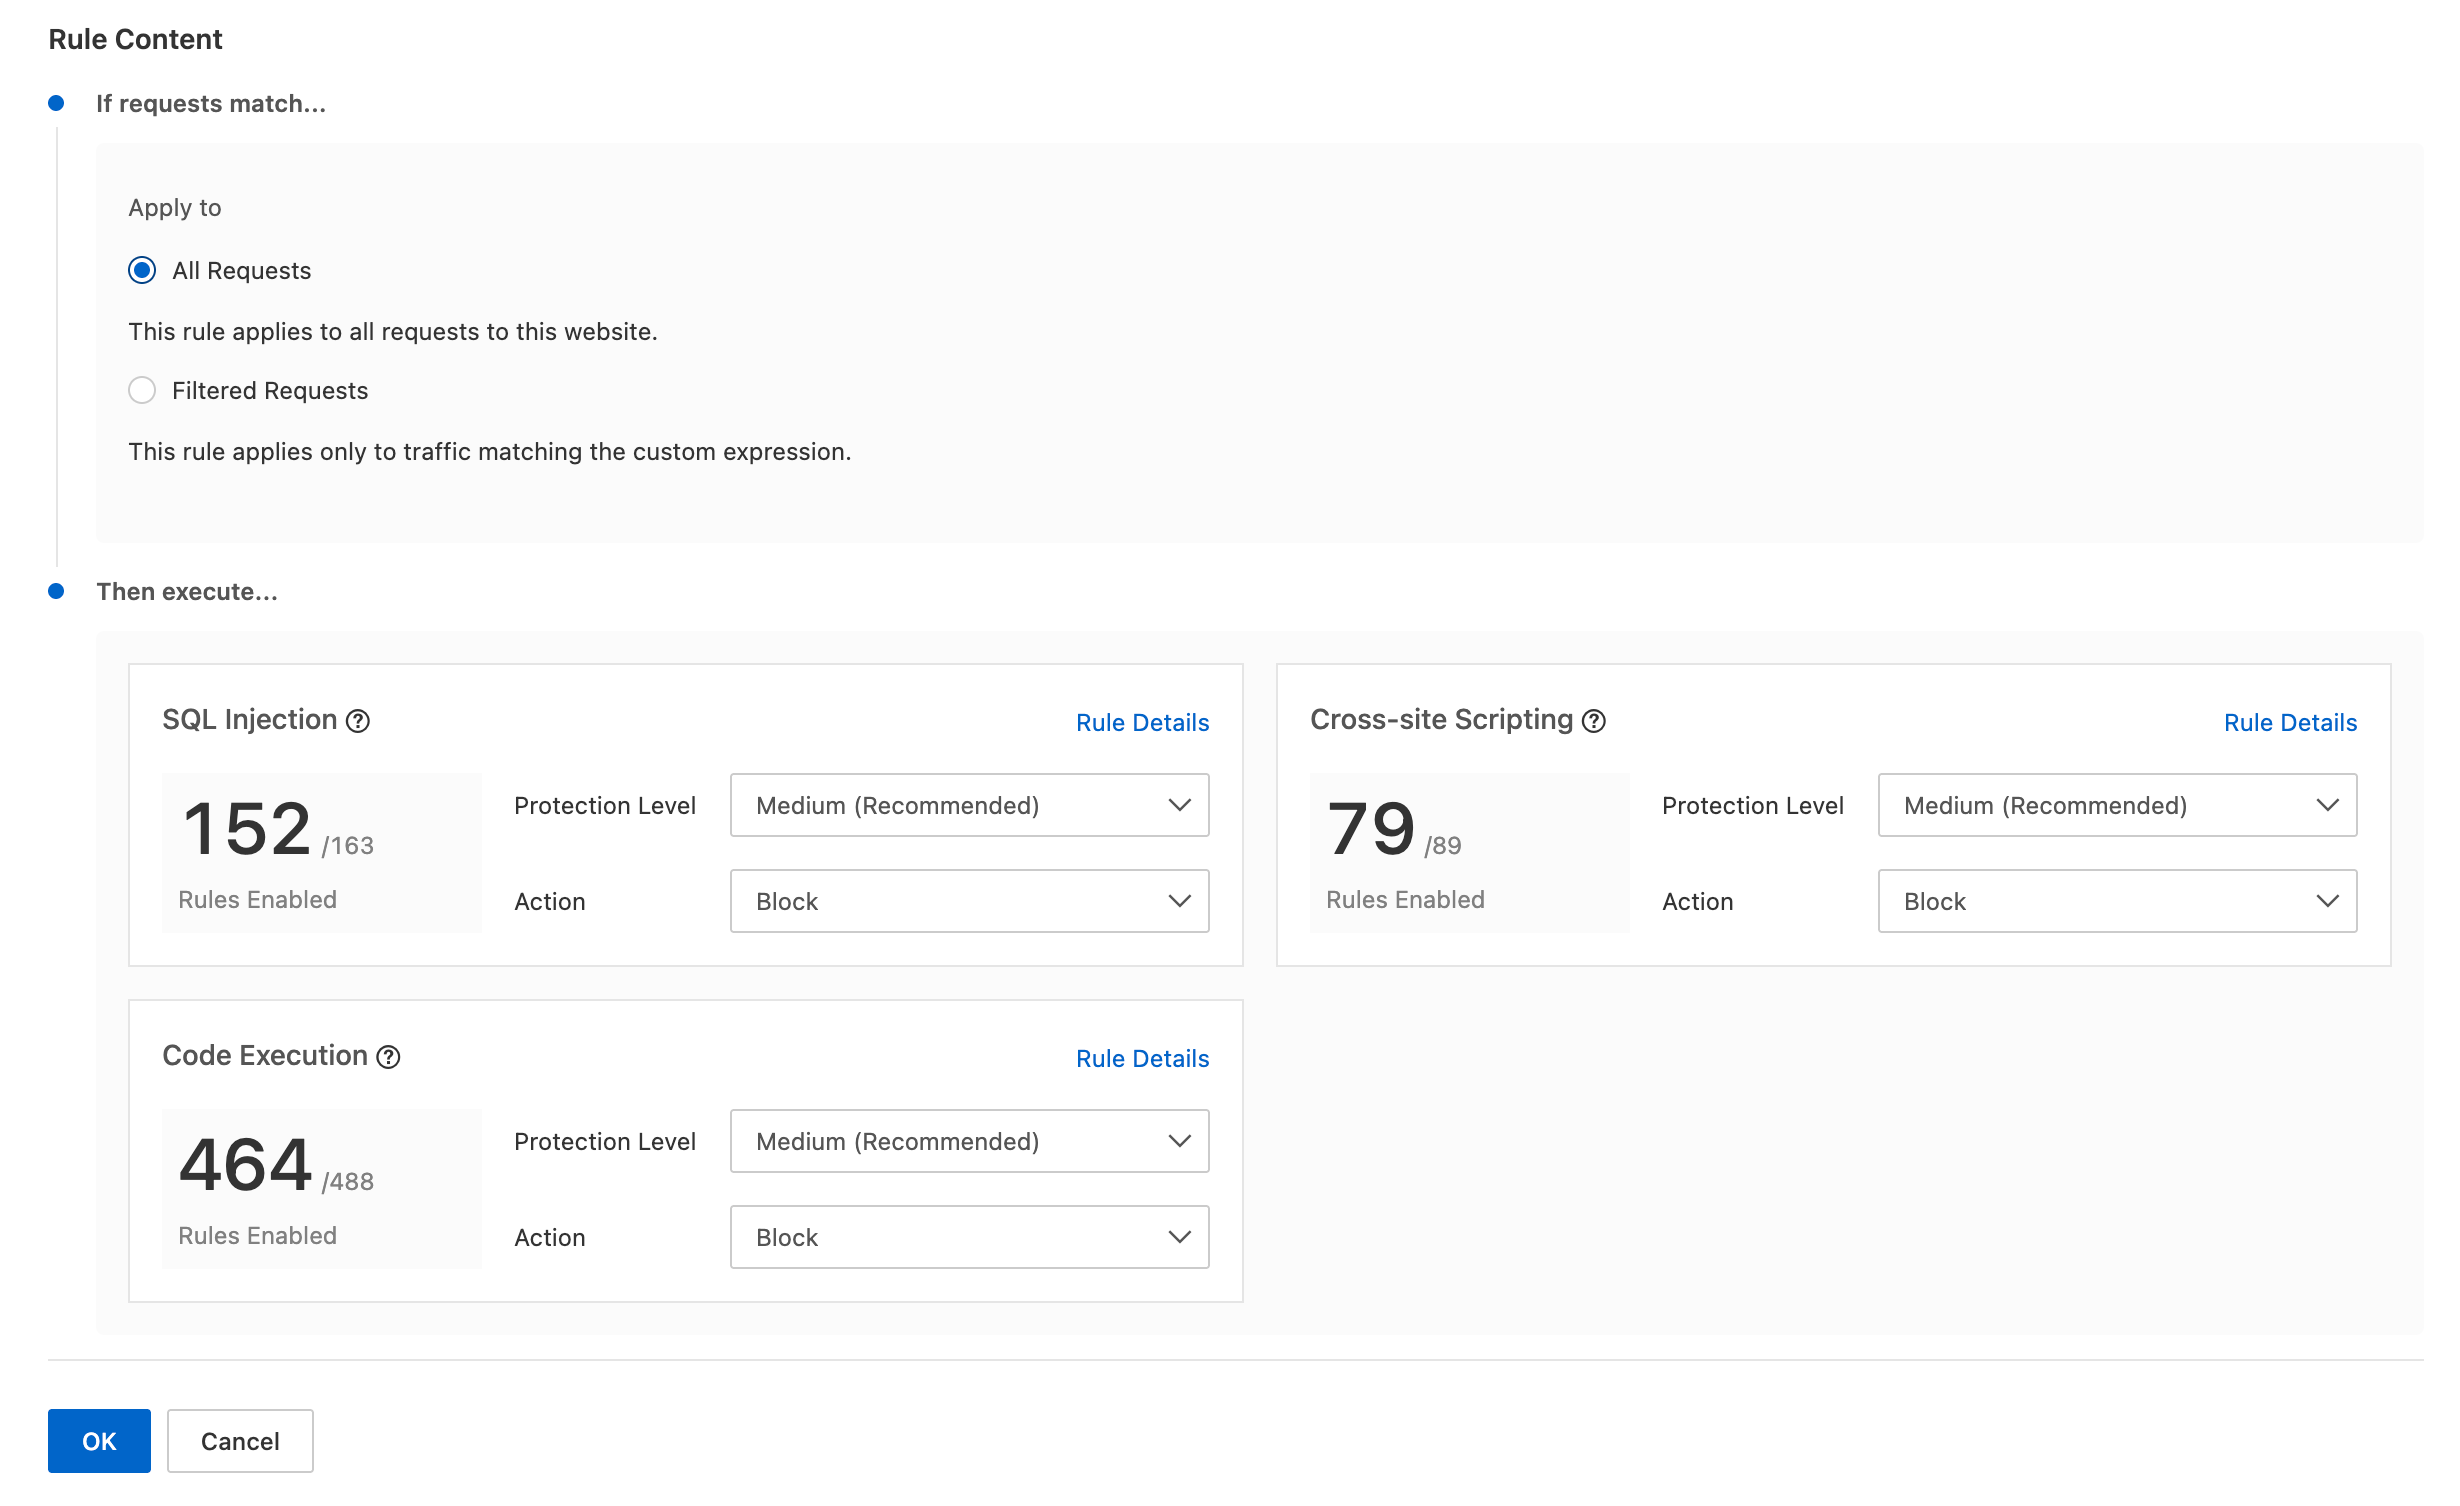
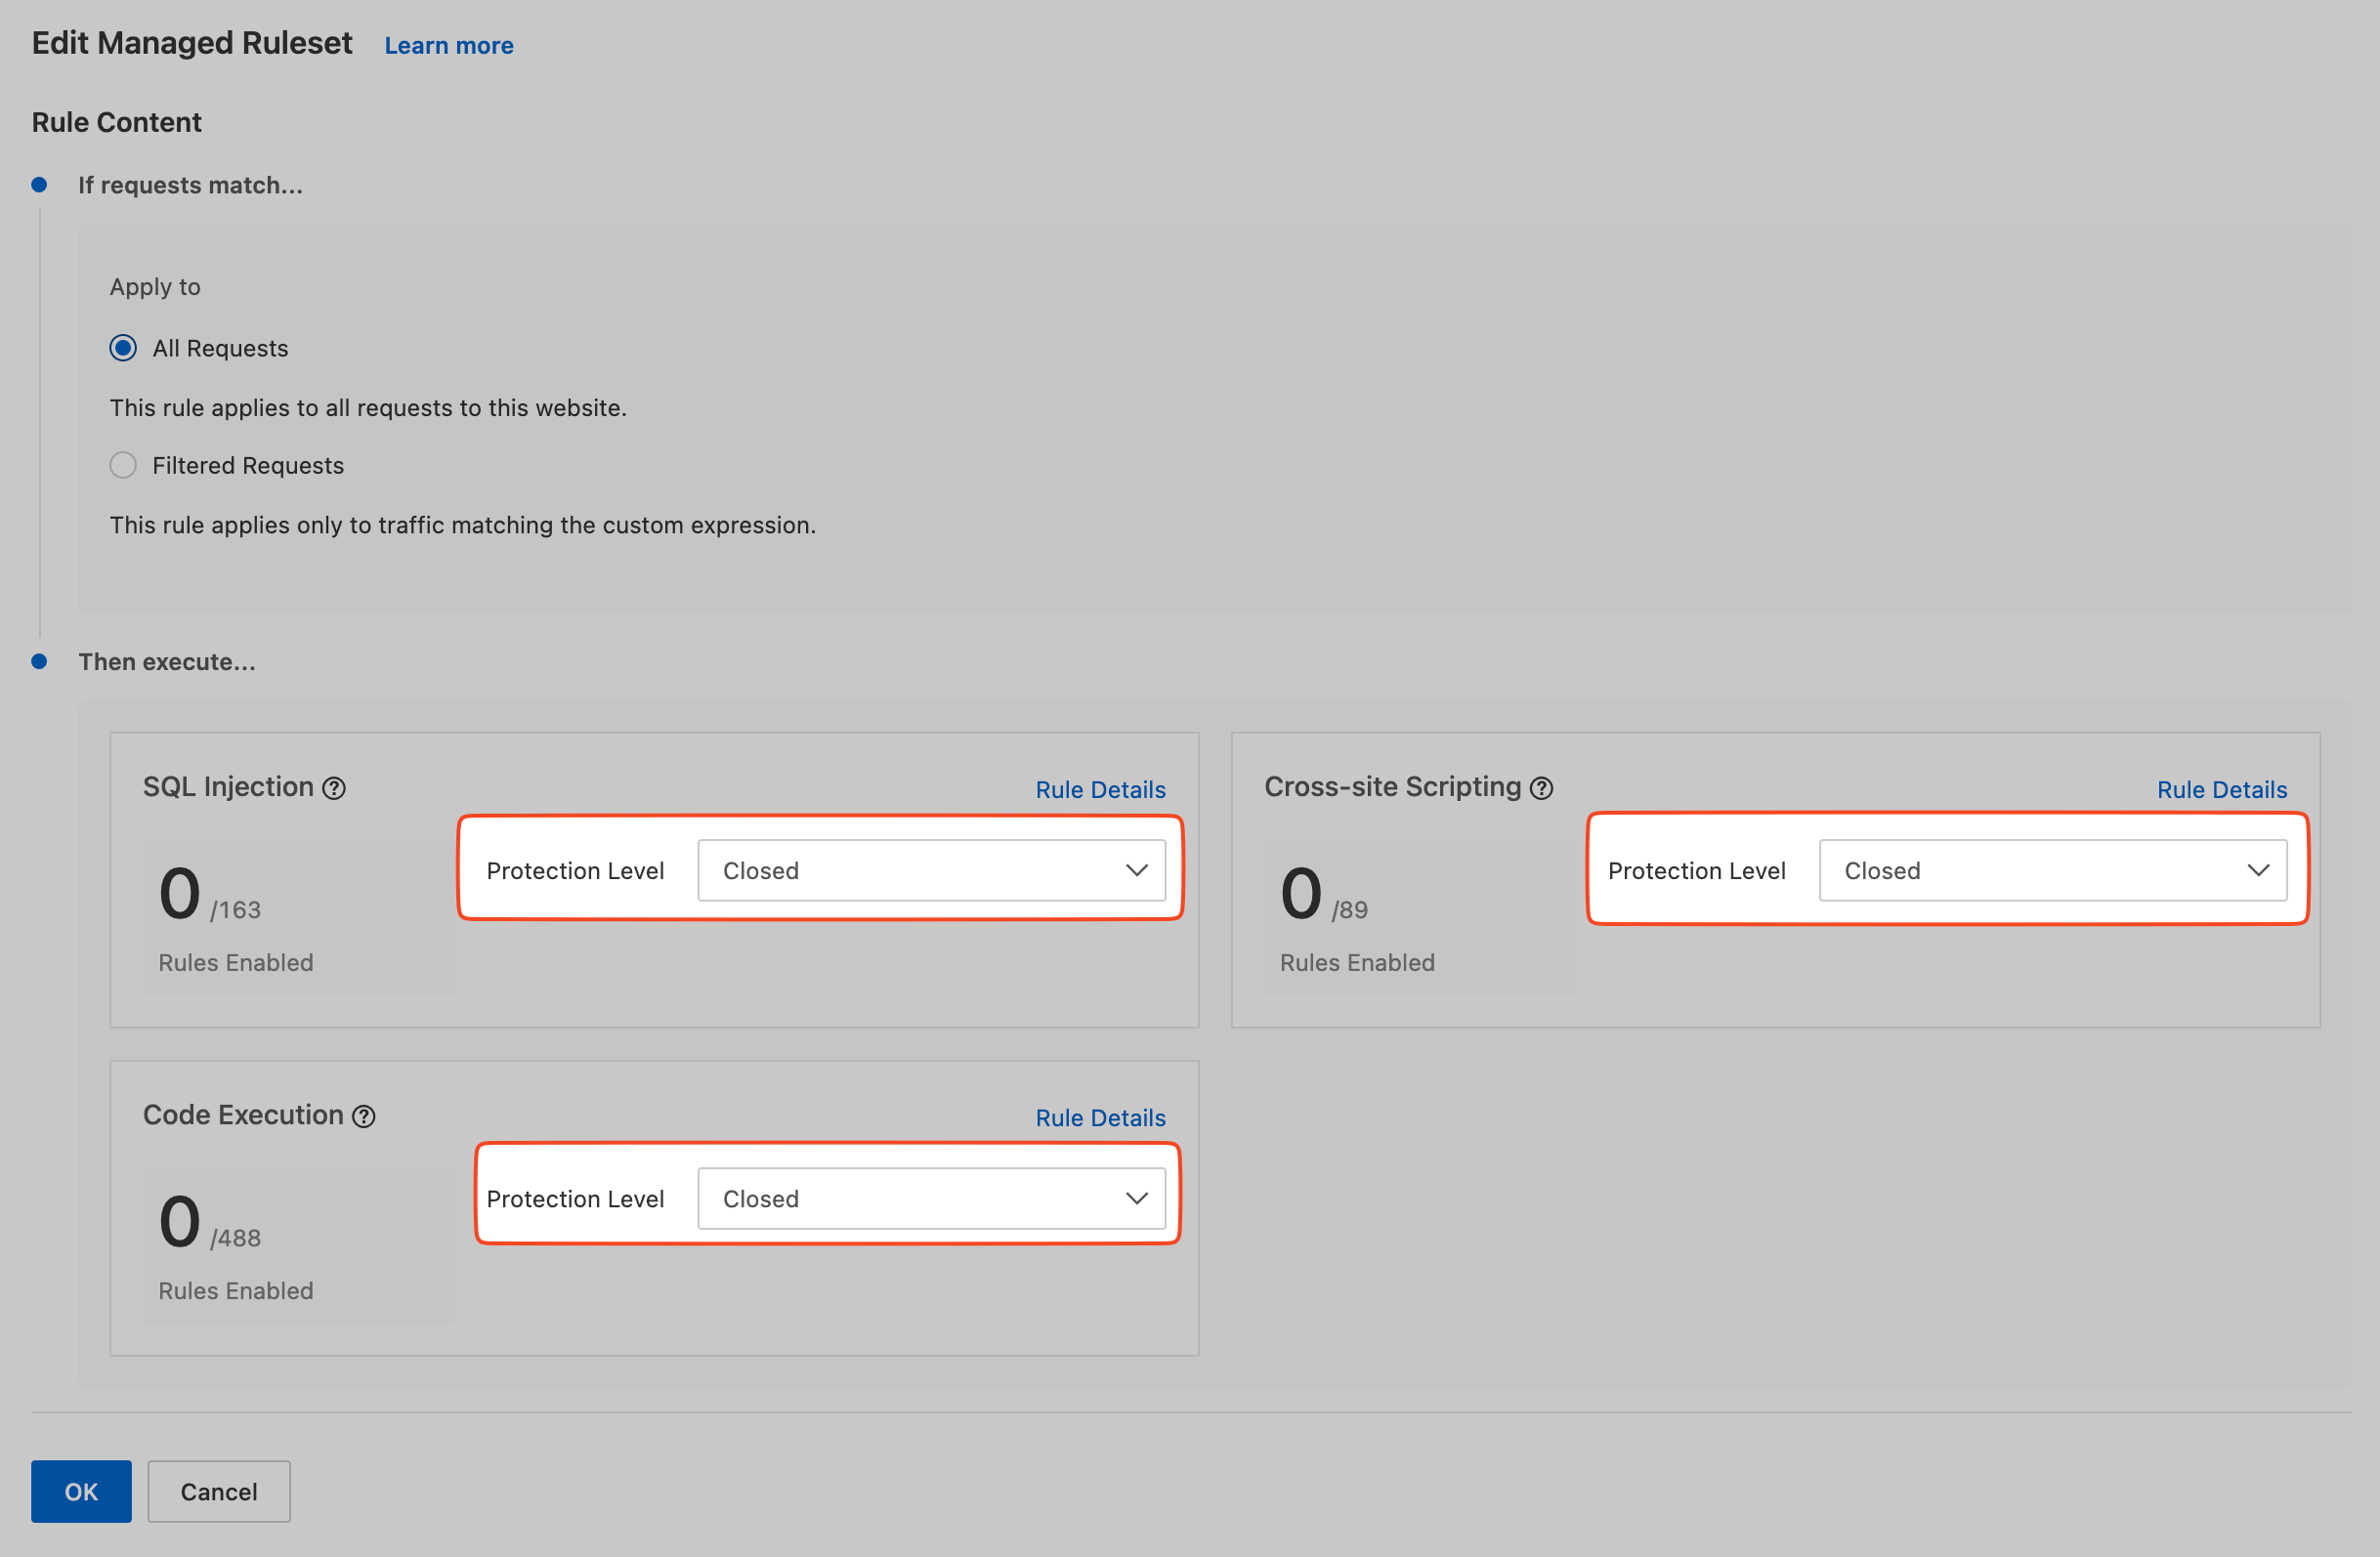
Click the Edit button to view the detailed rule set.
(Optional) Clean up resources
If you no longer need the resources created or managed by Terraform, you can run the terraform destroy command to release the resources.
terraform destroyManage existing managed rules
After you enable a managed ruleset, you can modify or delete it by specifying its ruleset ID. Each account can have only one managed ruleset.
Get the ruleset ID
You can call the ListWafRulesets operation in the Alibaba Cloud OpenAPI Explorer to obtain the ruleset ID.
In the ESA console, choose Site Management. In the Website column, click the target site.
Go to the ListSites debugging page. On the Parameter Settings tab, enter the site name in the
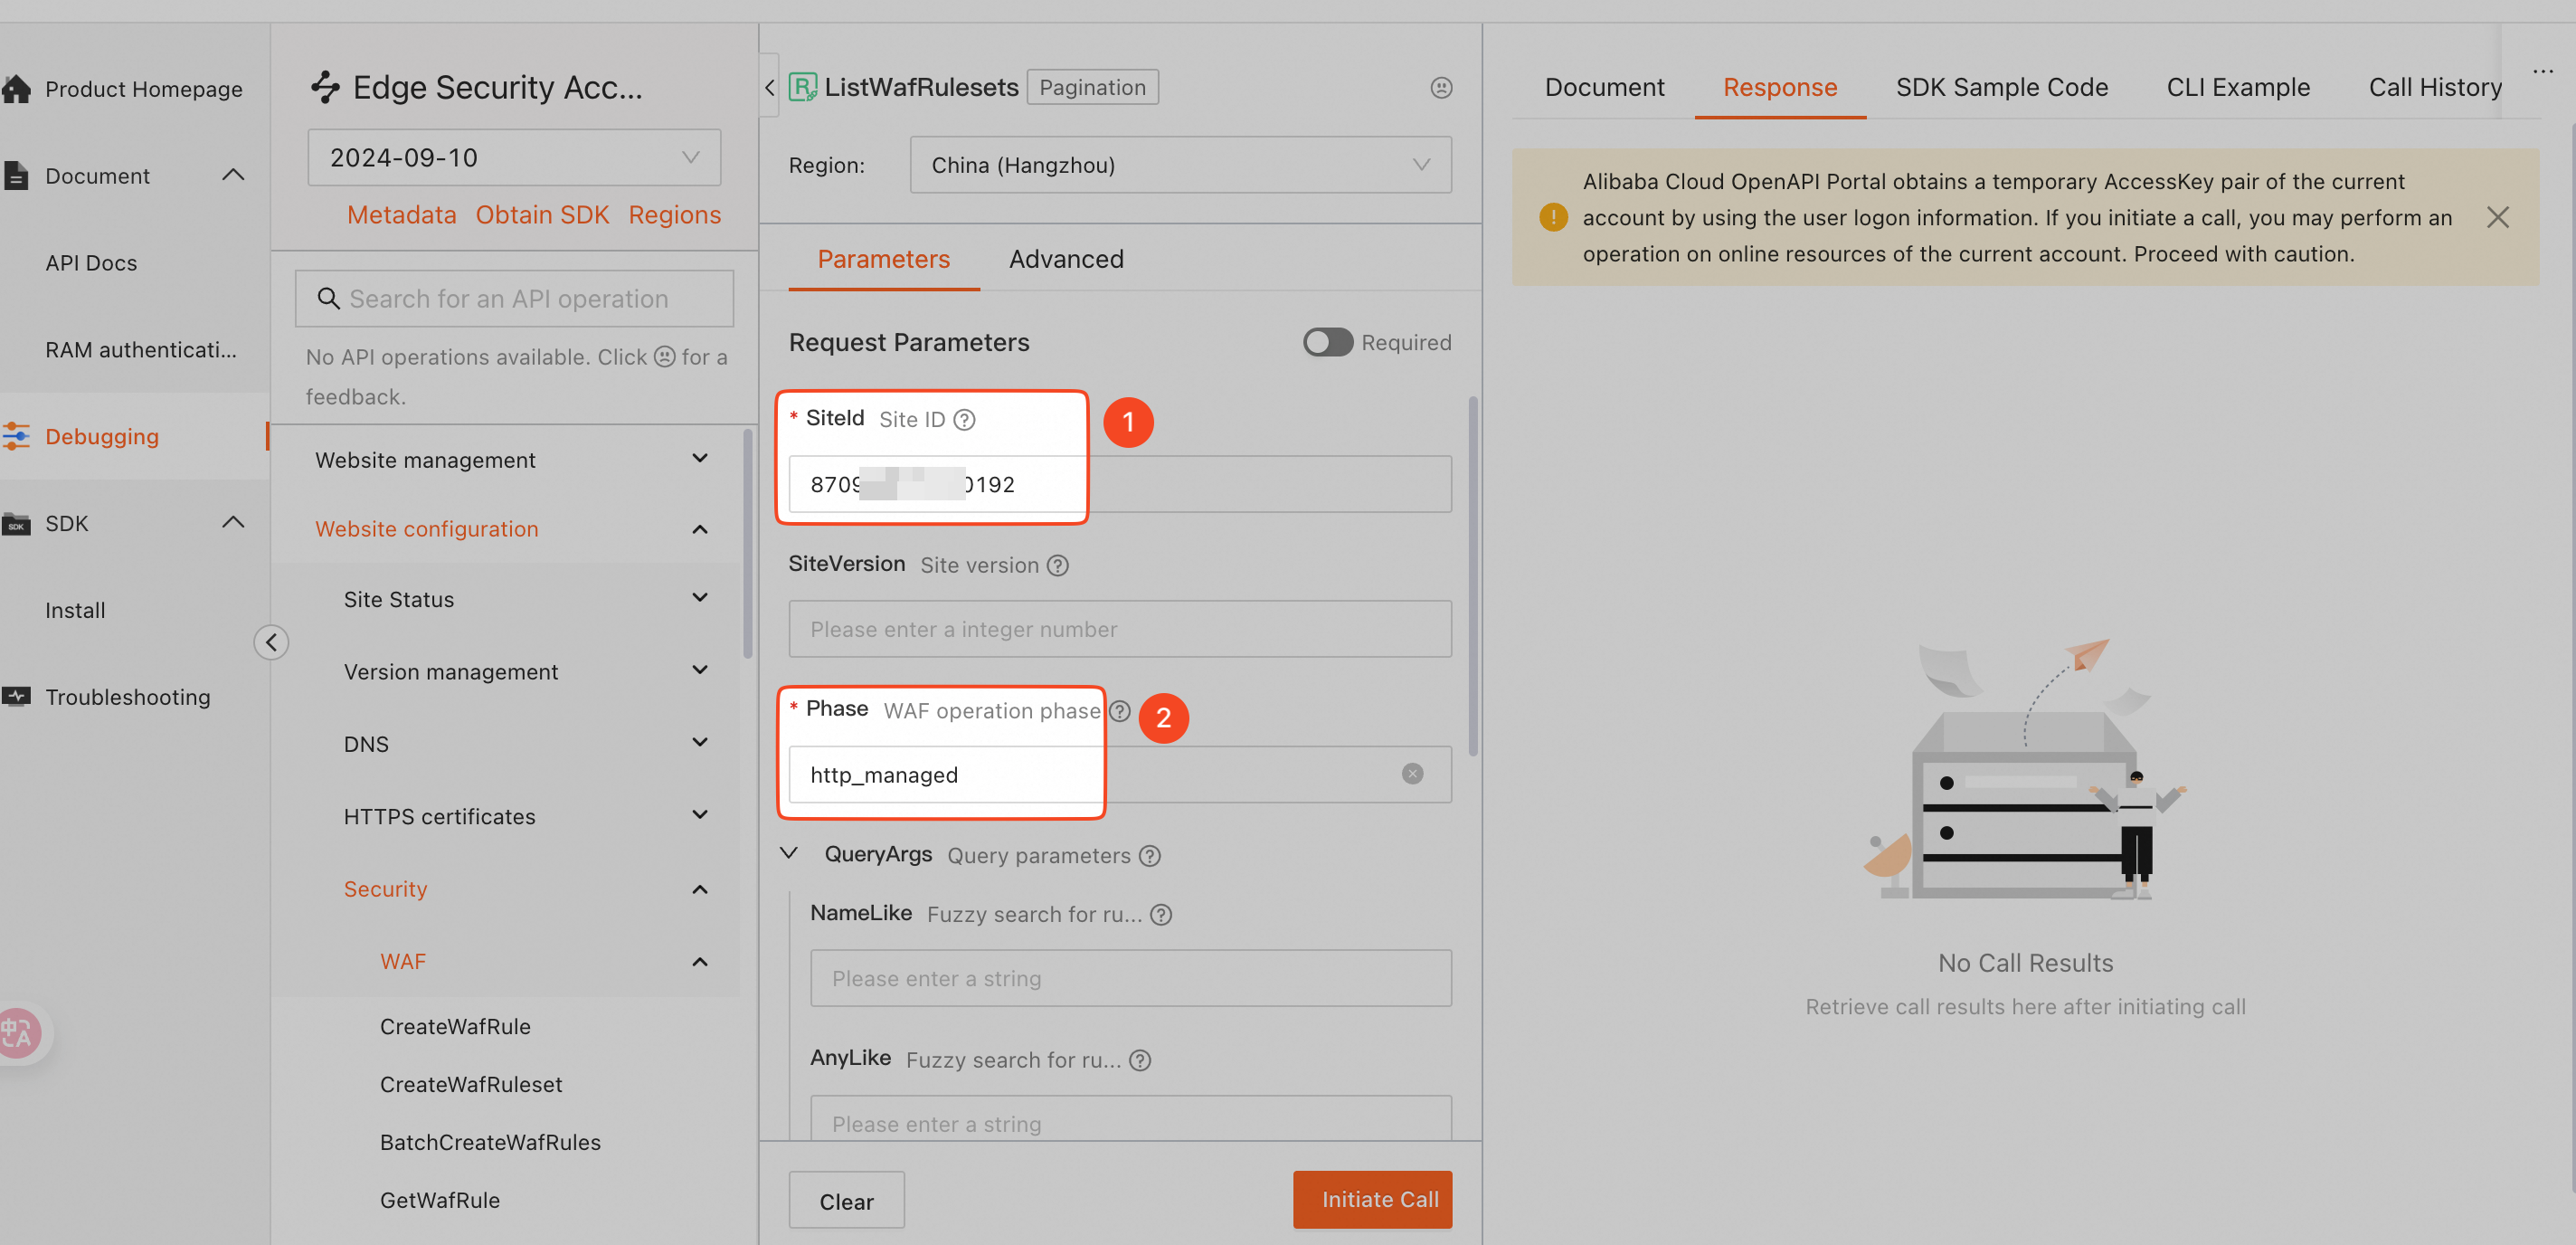
SiteNamefield. Click Call API to obtain theSiteId.Go to the ListWafRulesets debugging page. On the Parameter Settings tab, enter the following parameters and click Call API:
SiteId: Enter your site ID from the previous step, such as
8709xxxxxx30192Phase: Enter
http_managedfor the WAF processing phase
After you call the API, the response appears on the Response tab on the right. The
Rulesetsarray contains theIdfield. Its value is the ruleset ID.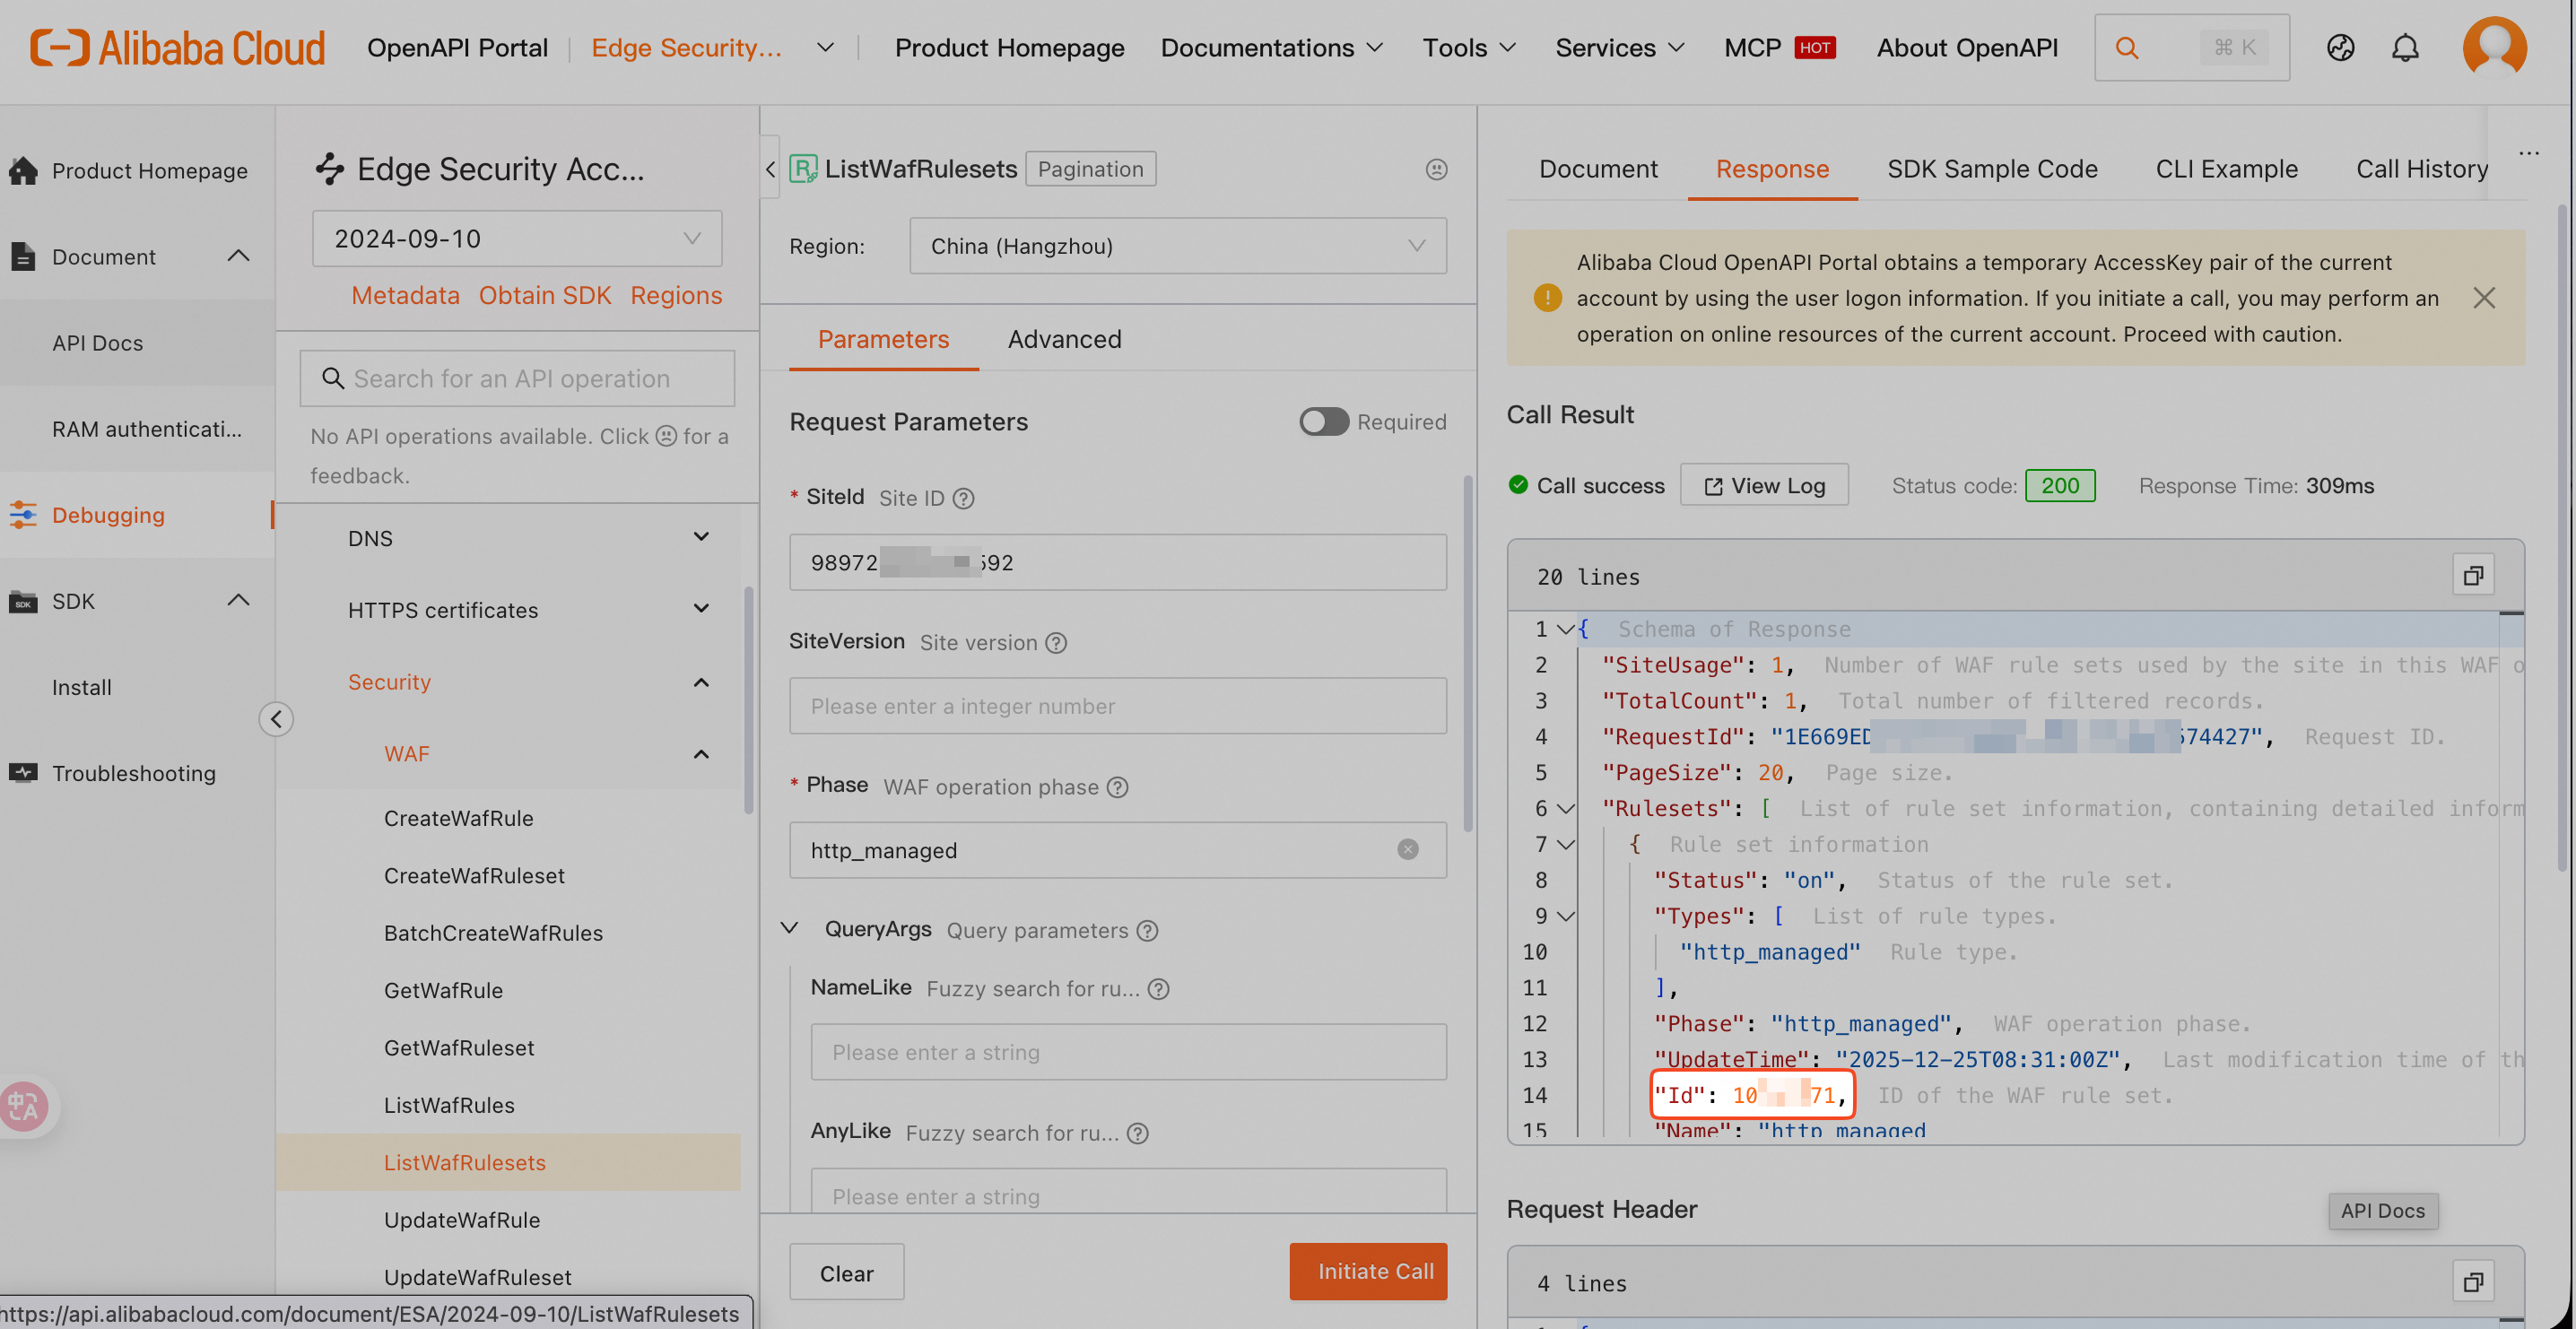
Disable all managed rules
To disable all managed rules, set the status field to off and the protection_level field to 0.
Modify
main.tfas follows:In the
resource "alicloud_esa_waf_rule" "managed_deny"block, add theruleset_idfield. Set its value to the ruleset ID obtained earlier.Change the value of the
configfieldstatustooff.Change the value of the
managed_rulesetsfieldprotection_levelto0to disable all rules.
# 1. Specify the name of the site to configure
data "alicloud_esa_sites" "default" {
  site_name = "<span class="var-span" contenteditable="true" data-var="DOMAIN">DOMAIN</span>"  # Replace DOMAIN with the actual domain that is connected to ESA, such as example.com
}

# 2. Configure managed rules: disable all rulesets
resource "alicloud_esa_waf_rule" "managed_deny" {
  ruleset_id   = "<span class="var-span" contenteditable="true" data-var="RULESET_ID">RULESET_ID</span>" # The existing ruleset ID
  site_id      = data.alicloud_esa_sites.default.sites[0].site_id
  phase        = "http_managed"
  site_version = "0"

  config {
    status       = "off"  # The rule status. Set to off to disable the rule
    type         = "http_managed"  # The ruleset type. Use http_managed for managed rules
    expression   = "true"  # The request input type. Set to true to apply the rule to all incoming requests, or specify a custom rule expression

    # Apply configuration to multiple managed rules
    managed_rulesets {
      protection_level = 0  # The protection level. For details, see the explanation at the end of this document
      action           = "deny"  # The action to take. deny blocks requests. monitor logs requests without blocking
      attack_type      = 11  # The attack type. For details, see the explanation at the end of this document
    }
    managed_rulesets {
      protection_level = 0
      action           = "deny"
      attack_type      = 12
    }
    managed_rulesets {
      protection_level = 0
      action           = "deny"
      attack_type      = 13
    }
  }
}
Run the following command to validate the syntax and configuration of the Terraform files.
terraform validateIf the output is similar to the following figure, the validation is successful.
Run the following command to preview the execution result.
terraform planRun the following command to execute the Terraform script.
terraform applyEnter
yesat the prompt to confirm execution.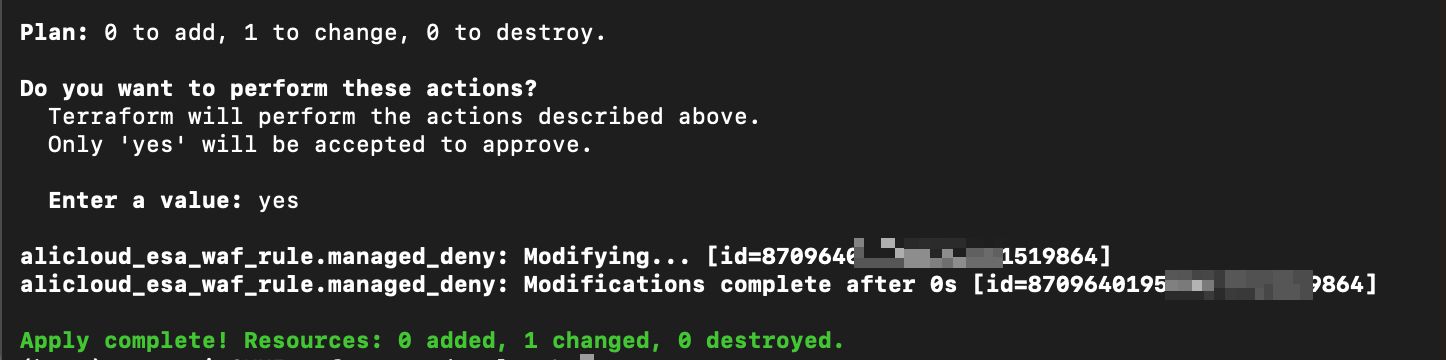
Go to the console to verify that the managed rules are disabled.
Enable or disable specific rules
To enable or disable specific managed rules in a ruleset, set protection_level to -1. Then, in the managed_rules block, set the status field for each rule.
Modify
main.tfas follows:In the
resource "alicloud_esa_waf_rule" "managed_deny"block, add theruleset_idfield. Set its value to the ruleset ID obtained earlier.Change the value of the
managed_rulesetsfieldprotection_levelto-1to enable custom settings.In the
managed_rulesetsblock, add themanaged_rulesblock for the specific managed rules you want to manage:id: The rule ID. View it in the console.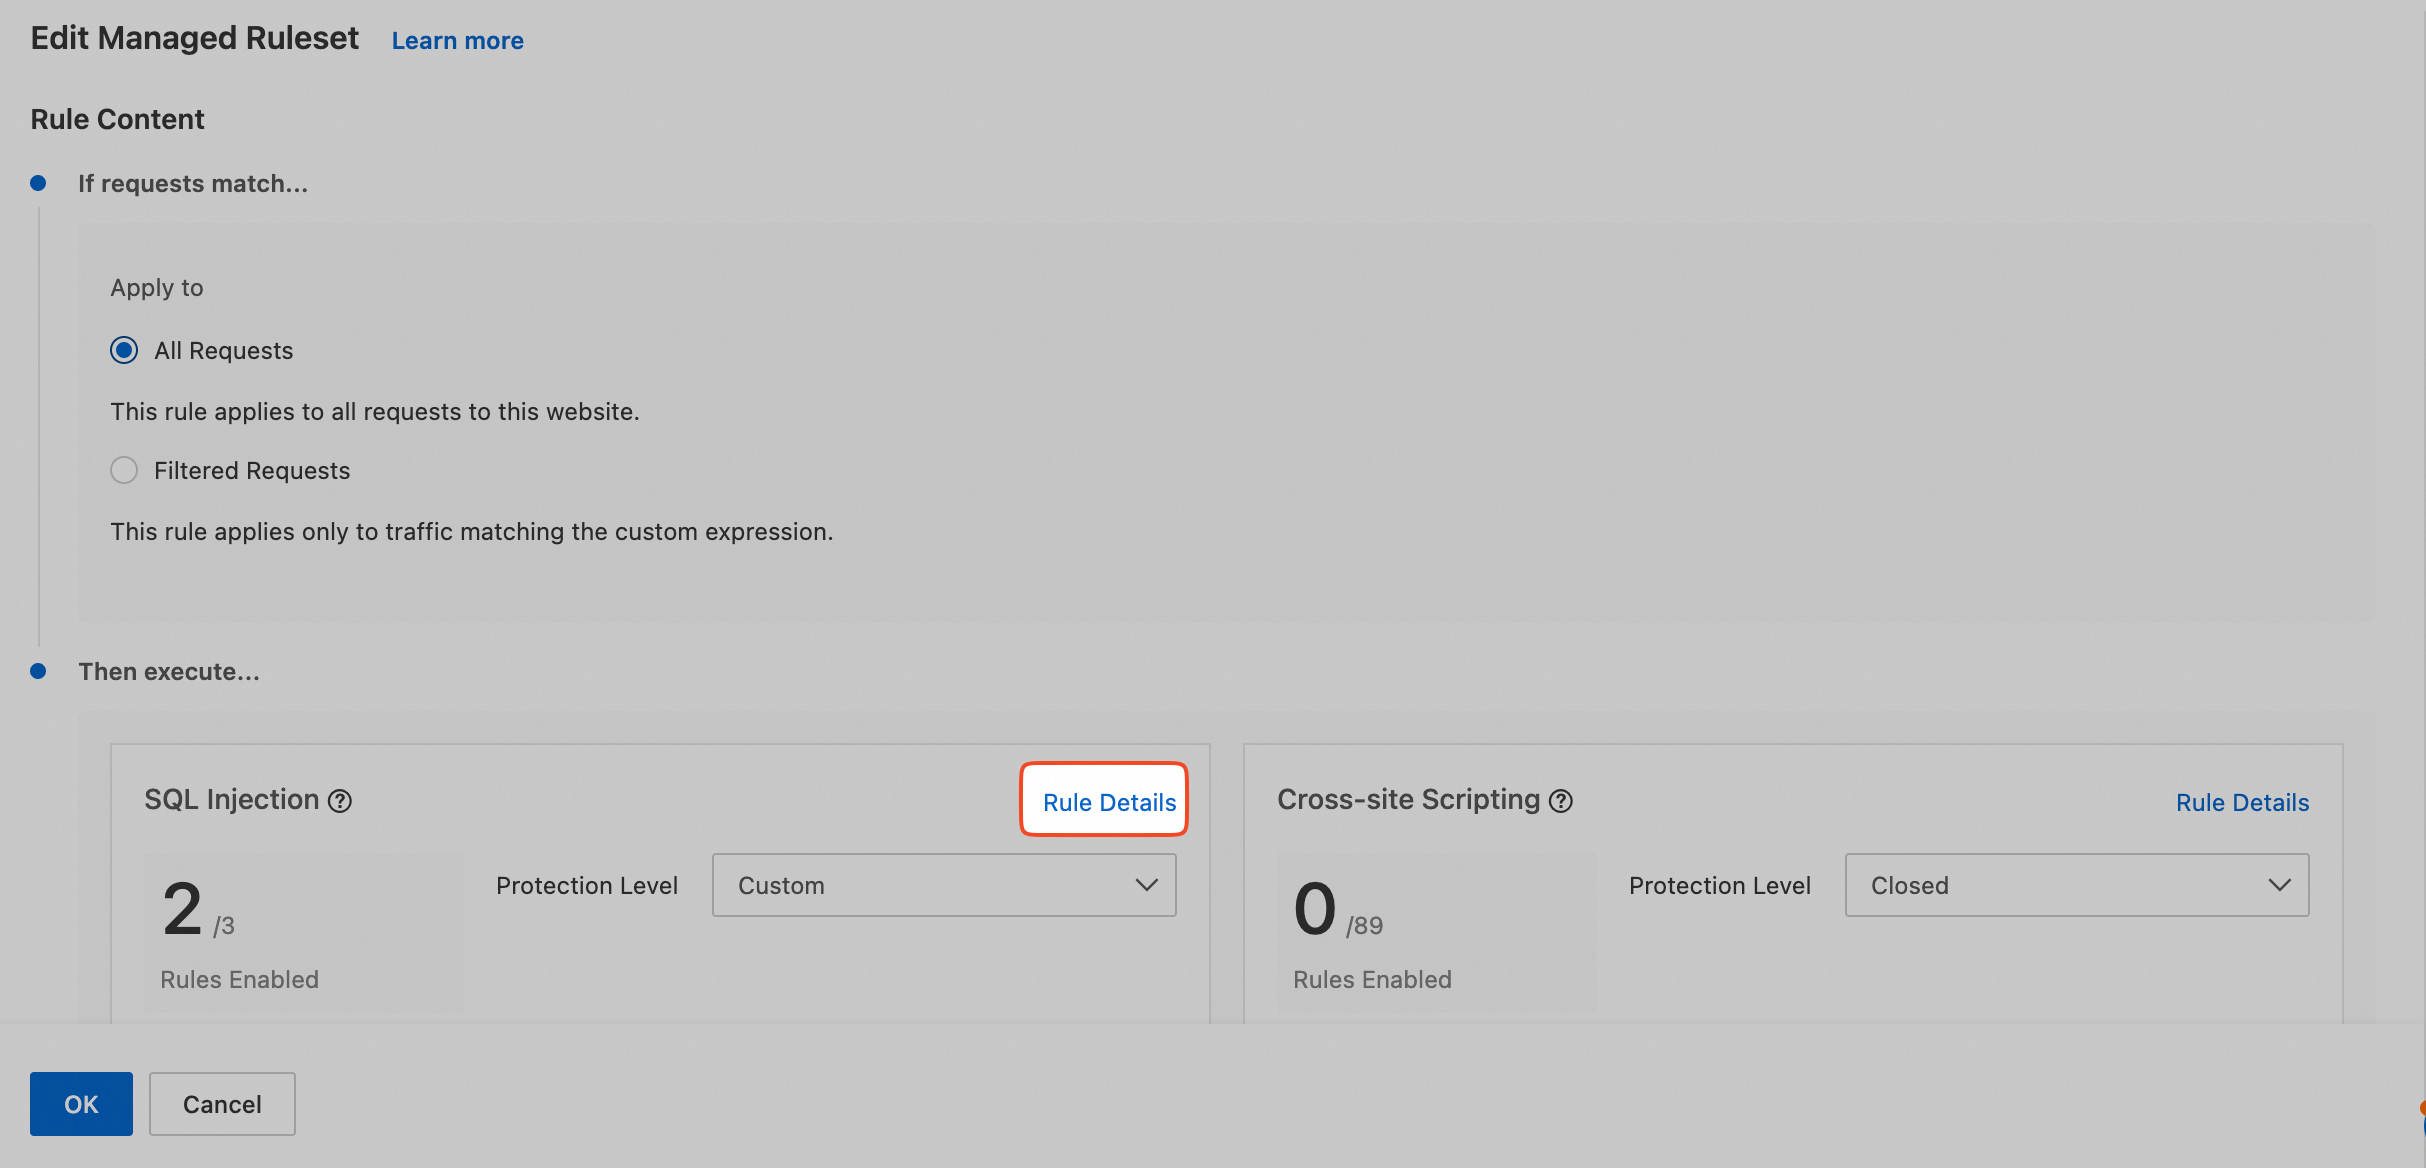
action: The action for the rule.denyblocks requests.monitorlogs requests.status: The rule status.onenables the rule.offdisables it.
# 1. Enter the name of the site to configure
data "alicloud_esa_sites" "default" {
  site_name = "<span class="var-span" contenteditable="true" data-var="DOMAIN">DOMAIN"</span>  # Replace DOMAIN with the actual domain name added to ESA, such as example.com
}

# 2. Configure managed rules: Enable SQL time-based blind injection and FineReport template injection leading to code execution in the SQL injection rule set. Disable SQL blind injection Waitfor Delay.
resource "alicloud_esa_waf_rule" "managed_deny" {
  ruleset_id   = "<span class="var-span" contenteditable="true" data-var="RULESET_ID">RULESET_ID"</span> # Existing ruleset ID
  site_id      = data.alicloud_esa_sites.default.sites[0].site_id
  phase        = "http_managed"
  site_version = "0"

  config {
    status       = "on"  # Rule status. on enables the rule
    type         = "http_managed"  # Ruleset type. Managed rules
    expression   = "true"  # Request type. true applies to all incoming requests. You can also enter a specific rule expression

    # Configure managed rules in batches - Applies to all rules below
    managed_rulesets {
      protection_level = -1  # Protection level. See the explanation at the end of this topic
      action           = "deny"  # Action. deny blocks requests. monitor logs requests
      attack_type      = 11  # Attack type. See the explanation at the end of this topic
      managed_rules {
        action = "deny"
        id     = 901032
        status = "on"
      }
      managed_rules {
        action = "deny"
        id     = 901031
        status = "on"
      }
      managed_rules {
        action = "deny"
        id     = 900661
        status = "off"
      }
    }
    managed_rulesets {
      protection_level = 0
      action           = "deny"
      attack_type      = 12
    }
    managed_rulesets {
      protection_level = 0
      action           = "deny"
      attack_type      = 13
    }
  }
}
Run the following command to validate the syntax and configuration of the Terraform files.
terraform validateIf the output is similar to the following figure, the validation is successful.
Run the following command to preview the execution result.
terraform planRun the following command to execute the Terraform script.
terraform applyEnter
yesat the prompt to confirm execution.Go to the console to view the rule details and verify the changes.
Related references
Protection levels
For the protection_level field in the alicloud_esa_waf_ruleset resource, the mapping between values and protection levels is as follows:
Level Values | Protection level | Description |
-1 | Custom | Use this value to customize rules in a specific ruleset. |
0 | Disabled | Disables the rule. |
1 | Loose | Provides basic protection. Use this level if medium-level rules cause false positives. |
2 | Medium | Recommended setting. Default protection level. |
3 | Strict | Use this level for finance-related data or other scenarios requiring strict protection. Also use it if medium-level rules miss threats. |
4 | Very strict | Use this level during major event support to ensure zero missed threats. |
Attack types
For the attack_type field in the alicloud_esa_waf_ruleset resource, the mapping between values and attack types is as follows:
Attack type value | Corresponding attack type | Description |
11 | SQL injection | SQL injection is an attack where an attacker inserts malicious SQL code into an input field to run unauthorized SQL queries. This attack exploits an application's lack of input validation. It can lead to a data breach, or the deletion or modification of database content. |
12 | Cross-site scripting | A cross-site scripting (XSS) attack occurs when an attacker inserts a malicious script into a web page. The browser then runs the script. The goal is often to steal user information, such as cookies, or to embed malicious code. XSS attacks are categorized as reflected, stored, and DOM-based. |
13 | Code execution | A remote code execution (RCE) attack lets an attacker run arbitrary code on a target system. This is usually achieved by exploiting a vulnerability, uploading a malicious file, or injecting code. RCE attacks are typically very dangerous. |
14 | CRLF | A carriage return line feed (CRLF) injection attack lets an attacker insert extra headers into an HTTP response to manipulate its structure. In some cases, an attacker can use this vulnerability to perform an XSS or HTTP response splitting attack. |
15 | Local file inclusion | In a local file inclusion (LFI) attack, an attacker exploits an application vulnerability to load a local file from the server by providing a malicious path. This attack can lead to sensitive information disclosure or even code execution. |
16 | Remote file inclusion | A remote file inclusion (RFI) attack lets an attacker make an application include a remote malicious file by providing an external URL. Similar to LFI, an RFI attack can lead to malicious code execution. |
17 | WebShell | A WebShell is a web-based reverse control tool that attackers upload to a compromised server. It lets an attacker operate the server through a web interface, such as running commands and managing files. |
19 | Cross-site request forgery | An attacker impersonates a user to perform unauthorized operations, such as transferring funds or changing a password. The attack exploits the user's logged-on state on the target site to commit fraud. |
21 | SEMA | A SEMA attack exploits improper search engine configurations. It tricks web crawlers into indexing sensitive files, which leads to the theft of confidential information. |
22 | OS command injection | An operating system (OS) command injection attack embeds malicious OS commands into a program. This causes the server to run the commands, which achieves the attacker's goal. |
23 | Expression injection | In an expression injection attack, an attacker embeds malicious expressions that the server then runs. This achieves the attacker's goal. |
24 | Java deserialization | A Java deserialization attack causes a server to run malicious code. This happens when the server deserializes a malicious object. |
25 | PHP deserialization | A PHP deserialization attack causes a server to run malicious code. This happens when the server deserializes a malicious object. |
26 | SSRF | A server-side request forgery (SSRF) attack forges server-side requests. This makes the server access internal or external resources to achieve the attacker's goal. |
27 | Path traversal | A path traversal attack injects a relative path, such as |
28 | Protocol deviation | An attacker maliciously tampers with communication protocol rules. They exploit differences in how each party interprets the protocol to trick the system into performing unintended malicious operations. |
29 | Arbitrary file upload | In an arbitrary file upload attack, an attacker uploads a malicious file. This causes the server to run the file, which achieves the attacker's goal. |
30 | .NET deserialization | Deserialization is the process of converting data from a format, such as JSON, XML, or binary, back into an object. In.NET applications, insecure deserialization can lead to arbitrary code execution. If an attacker can control the deserialized data, they can inject malicious data to run arbitrary code. |
31 | Scanner behavior | This term refers to the behavior of web application scanners. These tools automatically scan web applications to find potential security vulnerabilities. They locate common vulnerabilities, such as SQL injection and cross-site scripting, by generating and sending many requests to analyze the application's responses. |
33 | Business logic bugs | Business logic bugs are vulnerabilities in how an application implements its business workflow. These bugs usually cannot be prevented by traditional input validation and output encoding. They can let an attacker manipulate the application's normal workflow to gain unauthorized access or perform other malicious behaviors. |
34 | Arbitrary file read | An arbitrary file read vulnerability lets an attacker read any file on the system, usually through a file path parameter in an HTTP request. By exploiting this vulnerability, an attacker can access sensitive information, such as configuration files, credentials, and personal data. |
35 | Arbitrary file download | An arbitrary file download vulnerability is similar to an arbitrary file read, but it focuses on letting an attacker download any file on the system. This can lead to sensitive information disclosure or even allow an attacker to obtain a full system backup for offline analysis. |
36 | External entity injection | An XML External Entity (XXE) injection vulnerability exploits a feature of XML parsers when they process external entities. It lets an attacker read system files, perform server-side requests, or cause a denial-of-service (DoS) attack. This attack is usually carried out through XML input that contains a malicious external entity. |
20 | Other | Other vulnerability attacks that target various specific backend systems. |