If you want to use the same mitigation policies for multiple domain names in high-traffic scenarios, such as new service launches or shopping festivals, you can use a custom mitigation policy template.
DCDN will phase out scenario-specific mitigation policies for new users starting from May 1, 2025 at 00:00 (UTC+8). Current users won't be affected.
We recommend you upgrade to ESA to use Manage scenario policies. ESA provides templates for you to adjust DDoS mitigation policies automatically with enhanced protection.
Background
Dynamic Content Delivery Network (DCDN) provides custom scenario-specific DDoS mitigation policy templates. When you create a scenario-specific policy, select a template that you want to apply based on the business scenario and associate the template with the domain name to which you want to apply the policy. A scenario-specific policy is valid only during a specific period of time. During the specified period, the custom mitigation policy takes effect instead of the standard mitigation policy.
If no traffic surges occur, we recommend that you use standard mitigation policies instead of scenario-specific policies.
Supported templates
Only the Major Events template is available. More templates will be provided in the future.
Examples
If a large-scale event is held on a website, many requests are sent to the website. As a result, the website traffic is higher than usual. In this case, standard mitigation policies may report false positives. The Major Events template of Scenario-specific Policies can automatically adjust the mitigation policies during the specified period. Mitigation policies are adjusted based on the following rules:
At the beginning of an event, the Major Events template saves the original configurations of the Global Mitigation Policy and Intelligent HTTP Flood Protection features, and then automatically disables the features to prevent false positives.
At the end of the event, the Important Major Events template restores the configurations of the features.
Prerequisites
DDoS mitigation is configured for domain names. For more information, see Mitigation settings.
Procedure
-
Log on to the DCDN console.
In the navigation pane on the left, choose .
Click Create Scenario-specific Policy.
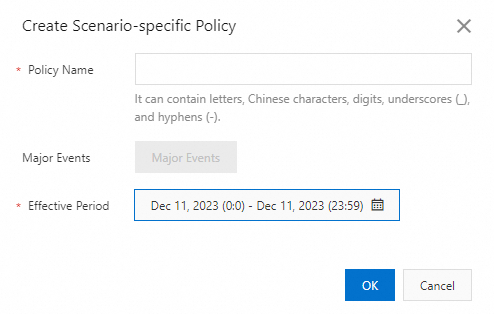
In the Create Scenario-specific Policy dialog box, configure the parameters and click OK. The following table describes the parameters.
Parameter
Description
Policy Name
The name of the custom policy. The name can contain letters, digits, underscores (_), and hyphens (-).
Major Events
The template that you want to apply to the policy. The value can only be Major Events.
Effective Period
The validity period of the policy. The policy takes effect during this period.
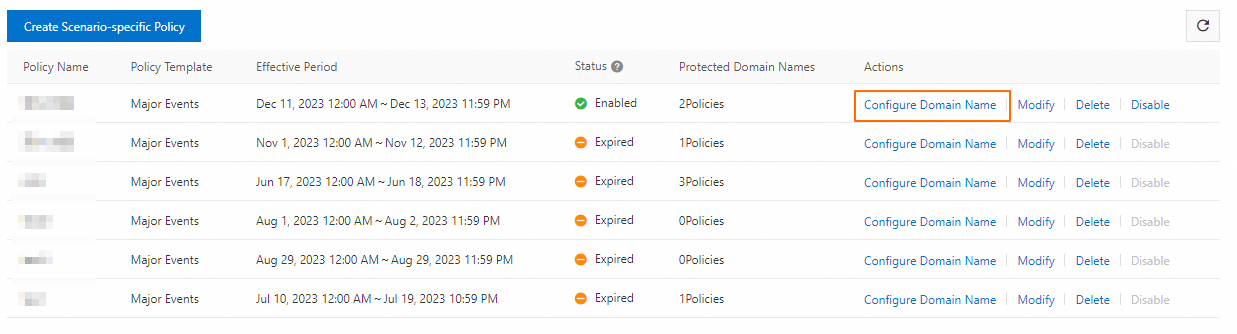
NoteAfter you create a policy, the policy is automatically enabled. You can view the policy on the Custom Policies page and check the Status of the policy to determine whether the policy takes effect. A policy may have the following states:
Pending Enabled: The policy does not take effect. The current time is earlier than the start time of the specified validity period.
Enabled: The policy is in effect. The current time is within the specified validity period.
Expired: The policy has expired. The current time is later than the specified validity period.
Disabled: the policy is disabled. The policy does not take effect even if the current time is within the specified validity period.
Find the policy that you want to manage and click Configure Domain Name in the Actions column.
On the page that appears, select domain names for which DDoS mitigation is configured and click Confirm.
NoteIf a template is applied to more than one policy, make sure that the values of the Effective Period parameter for the policies do not overlap with each other.