When you deploy multiple applications on Enterprise Distributed Application Service (EDAS) Elastic Compute Service (ECS) clusters, each application typically needs its own Classic Load Balancer (CLB) instance. To reduce costs and simplify management, you can share a single CLB instance across applications. Each application receives traffic on a different listening port while sharing the same public IP address and domain name.
To bind a CLB instance to a single application, see Configure a dedicated SLB instance for an application. This topic extends that procedure by adding a second application to the same CLB instance with a different port.
How traffic forwarding works
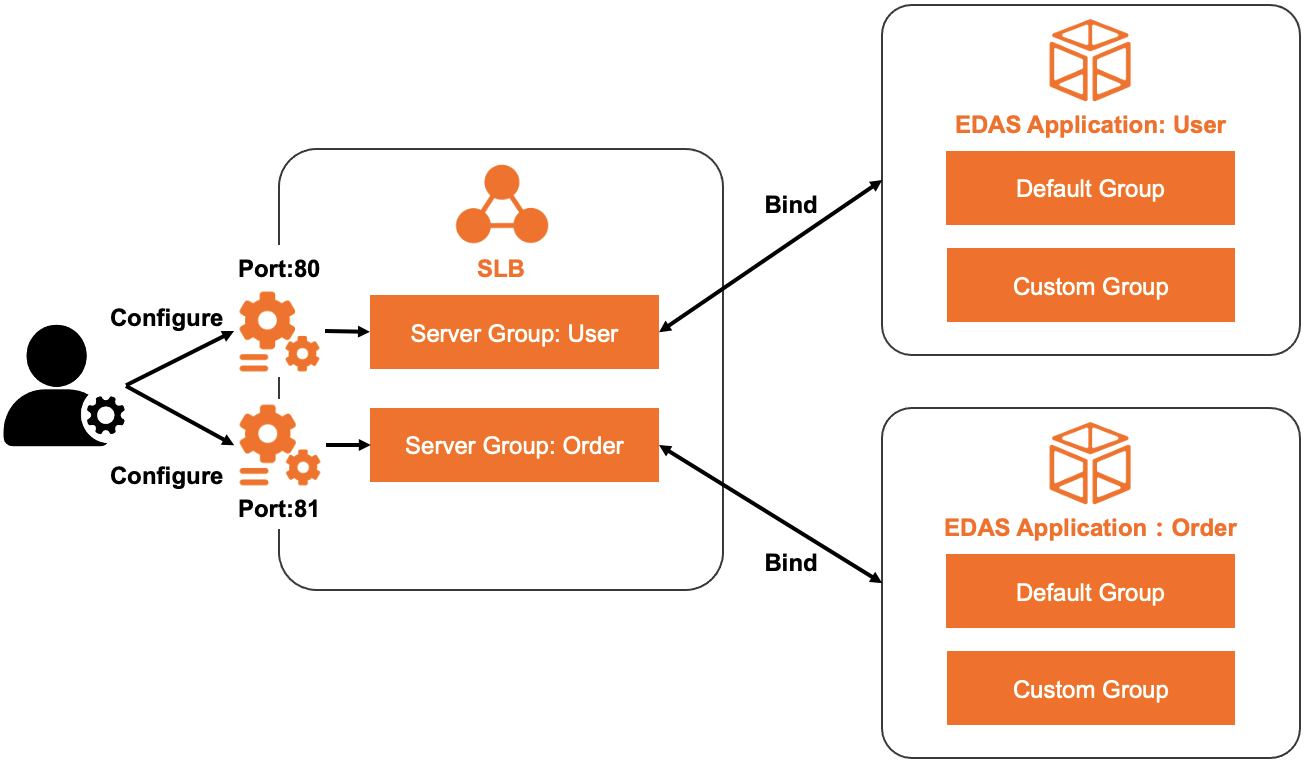
When multiple applications share one CLB instance, each application maps to its own vServer group and listening port. The CLB instance forwards each incoming request to the vServer group that matches the destination port.
For example, two applications share a CLB instance:
Port 80 forwards traffic to vServer Group A (App1 instances).
Port 81 forwards traffic to vServer Group B (App2 instances).
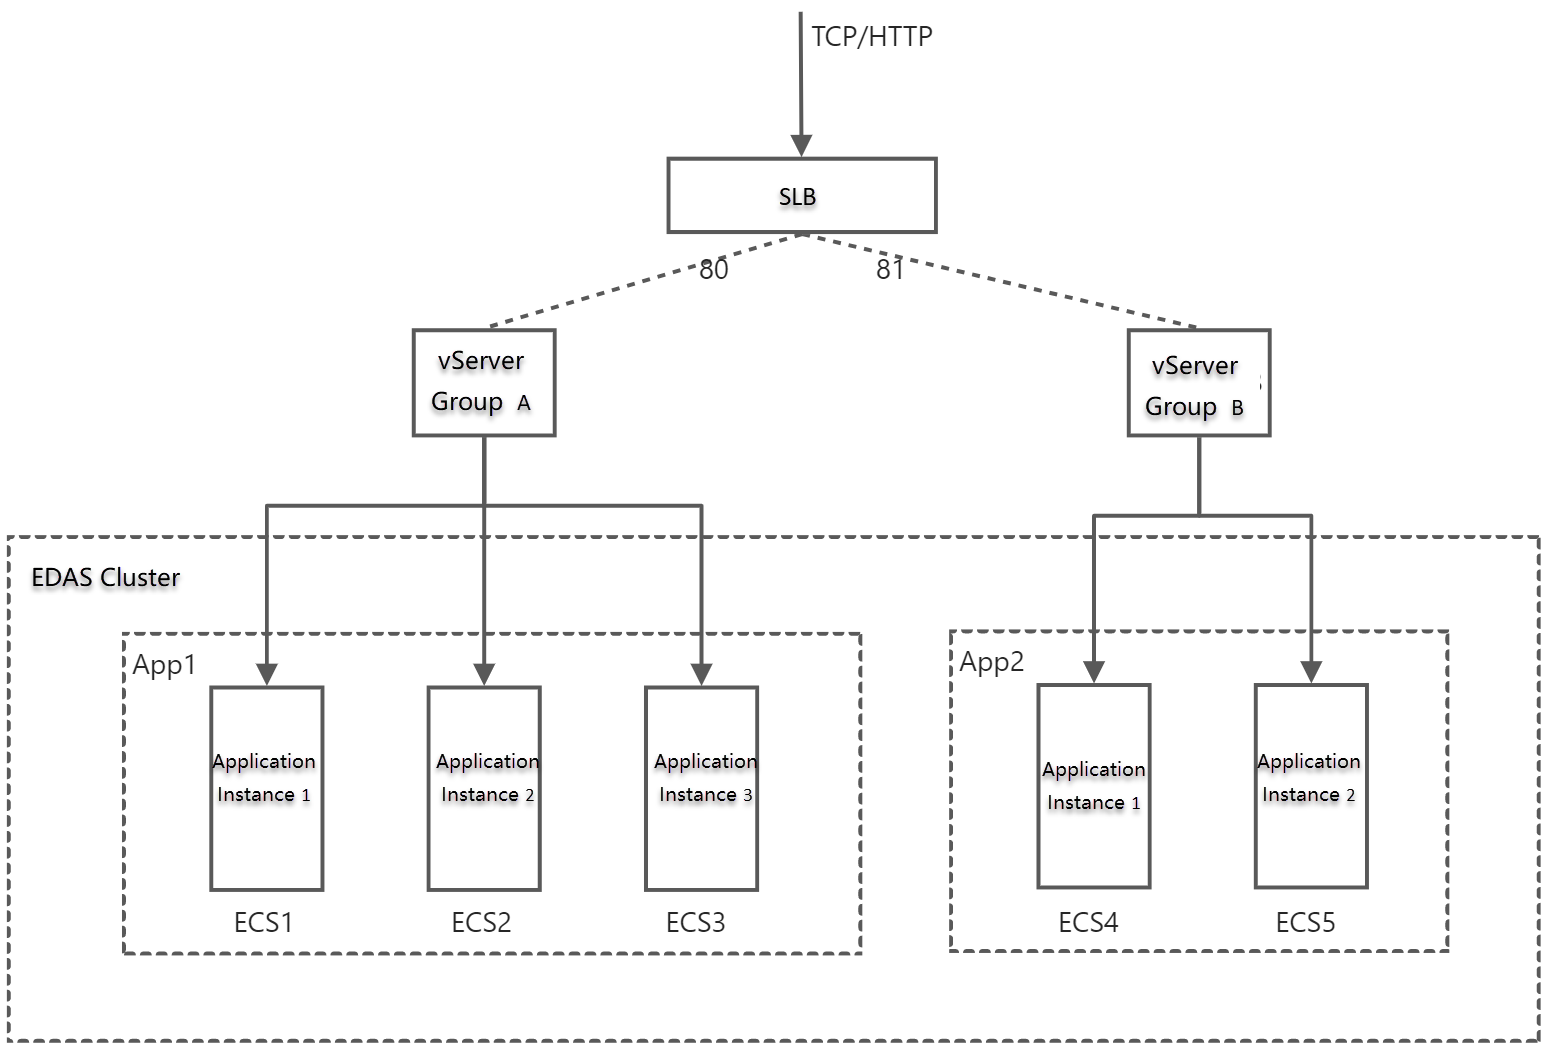
In the following scenario, a User application handles order queries and an Order application handles user logon. Both share the same public IP address and domain name, and different listening ports route traffic to the correct application.
Applications that share the same port on an ECS cluster support only HTTP listeners for traffic forwarding.
Prerequisites
Before you begin, make sure that you have:
A CLB instance. For instructions, see Create a CLB instance
Two or more applications deployed on an EDAS ECS cluster
Procedure overview
The following steps use two applications as an example. The CLB instance is named edas-test-clb, and the two applications are spring-cloud-provider (listening port 80) and spring-cloud-consumer (listening port 81).
| Step | Action |
|---|---|
| 1 | Associate the CLB instance with the first application and configure listening port 80 |
| 2 | Associate the same CLB instance with the second application and configure listening port 81 |
| 3 | Verify access to both applications |
After you complete the configuration, access the applications at:
http://123.1.XX.XX:80forspring-cloud-providerhttp://123.1.XX.XX:81forspring-cloud-consumer
where 123.1.XX.XX is the IP address of edas-test-clb.
Step 1: Associate the CLB instance with the first application
Log on to the EDAS console.
In the left-side navigation pane, choose Application Management > Applications.
In the top navigation bar, select a region and select an option from the Microservice Namespace drop-down list. From the Cluster Type drop-down list, select ECS Clusters.
Click the name of the first application.
In the Application Settings section of the Basic Information page, click Add next to SLB (Internet).
If a Server Load Balancer (SLB) instance is already configured, the IP address and port number are displayed. Click Modify to change settings or Unbind to remove the instance.
In the AddLoad Balancing(Public) wizard, complete the following steps:
Select an SLB instance
For SLBType, select CLB.
From the SLB (Internet) drop-down list, select the CLB instance you created (for example,
edas-test-clb).Click Next.
Configure a listener
Select one of the following options:
Select Existing Listening Port -- Reuse a listening port already configured on the CLB instance.
Add Listening Port -- Create a new listener with the following parameters:
| Parameter | Description |
|---|---|
| Protocol | Select TCP. TCP provides reliable content delivery at medium transfer speed, suitable for file transfer, email exchange, and remote logon. TCP listeners do not support forwarding rules. For more information, see Add a TCP listener. |
| Frontend Port Number | The port on which the CLB instance receives external traffic. For this example, enter 80. If the port is already used by another protocol, choose a different port or remove the existing listener in the SLB console first. |
| Backend Port Number | The port on which the application listens. This value is fixed and cannot be changed. |
Click Next.
Configure a vServer group
Select one of the following options:
| Option | When to use |
|---|---|
| Existing VServer Group | Reuse a vServer group already created on the CLB instance. A vServer group can be associated with only one application or application group. |
| Create VServer Group | Create a new vServer group and specify the VServer Group Name. Select this option if no vServer group exists or you need a separate group for this application. |
Do not select Default Server Group. The default server group does not support forwarding policies. To forward traffic based on listening ports, select a vServer group.
Click Next.
Confirm
Review the SLB instance settings and click Confirm.
Step 2: Verify access to the first application
Check that the first application is accessible through the CLB instance IP address and port number. For instructions, see Verification.
Step 3: Associate the CLB instance with the second application
In the EDAS console, go to the Applications page.
Click the name of the second application.
In the Application Settings section of the Basic Information page, click Add next to SLB (Internet).
In the AddLoad Balancing(Public) wizard, repeat the same steps as Step 1, with the following differences:
Select the same CLB instance (for example,
edas-test-clb).Set the Frontend Port Number to a different port (for example,
81).Create or select a different vServer group for this application.
Step 4: Verify access to both applications
After both applications are associated with the CLB instance, verify that each application is accessible at its assigned port:
First application:
http://<CLB-IP-address>:80Second application:
http://<CLB-IP-address>:81
Replace <CLB-IP-address> with the public IP address of the CLB instance.
What's next
To add more applications to the same CLB instance, repeat Step 3 for each application with a unique listening port.
To learn about dedicated SLB instances for individual applications, see Configure a dedicated SLB instance for an application.