Enterprise Distributed Application Service (EDAS) provides two ways to access application logs for troubleshooting:
| Capability | Description | When to use |
|---|---|---|
| Online viewing | View real-time log files from individual instances directly in the EDAS console, similar to running tailf on a server. | Quick troubleshooting on a specific instance |
| Simple Log Service (SLS) integration | Collect, search, and analyze logs across all instances of an application. | Distributed search, log analysis, and long-term retention |
Both capabilities are managed from the Log Directory page, where you configure which directories EDAS monitors.
Add a log directory for online viewing
Register a log directory so EDAS can display its log files in the console.
Log on to the EDAS console.
In the left-side navigation pane, choose Application Management > Applications. In the top navigation bar, select a region. In the upper part of the Applications page, select a microservices namespace from the Microservices Namespace drop-down list, and then click the name of the application.
In the left-side navigation pane of the application details page, choose Logs > Log Directory. On the Log Directory page, click + Add Online View.
In the Add Online View dialog box, enter the log directory path in the Application Log Directory field, and then click Add. The directory path must meet all of the following requirements: Example:
/home/admin/app/logs/Must be a subdirectory of
/home/adminMust contain
logorlogsin the full pathMust end with a forward slash (
/) to indicate a directory
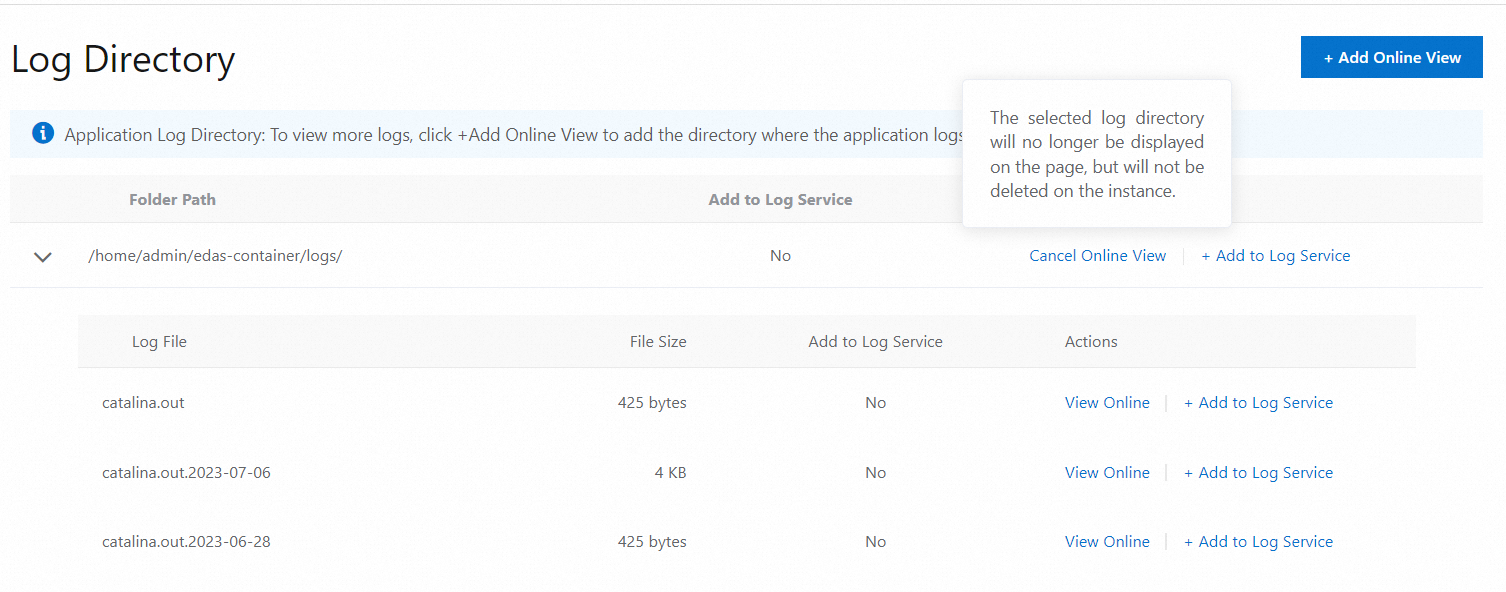
Cancel online viewing for a log directory
Canceling online viewing removes a log directory from the Log Directory page. Instance logs in that directory are no longer viewable through the console, but the actual directory and files on disk are not deleted.
The default log directory can also be removed from online viewing.
On the Log Directory page, find the target log directory and click Cancel Online View in the Actions column.
In the Cancel Online View dialog box, confirm the log directory. Optionally, select Delete associated objects from Log Service based on your requirements, and then click OK.
WarningSelecting Delete associated objects from Log Service permanently deletes the associated project, Logstore, and all data in the Logstore. This action cannot be undone.
View instance logs
After you add a log directory for online viewing, you can view real-time log content from individual application instances.
In the left-side navigation pane of the application details page, choose Logs > Log Directory.
On the Log Directory page, find the target log directory and click the > icon to expand the file list. Find the log file and click View Online in the Actions column.
On the Real-time Logs page, select an instance from the ECS Instance ID/Name/IP drop-down list to view its log output. To stream new log entries as they are written, click Enable Real-time Additions in the lower-right corner. This works like the
tailfcommand.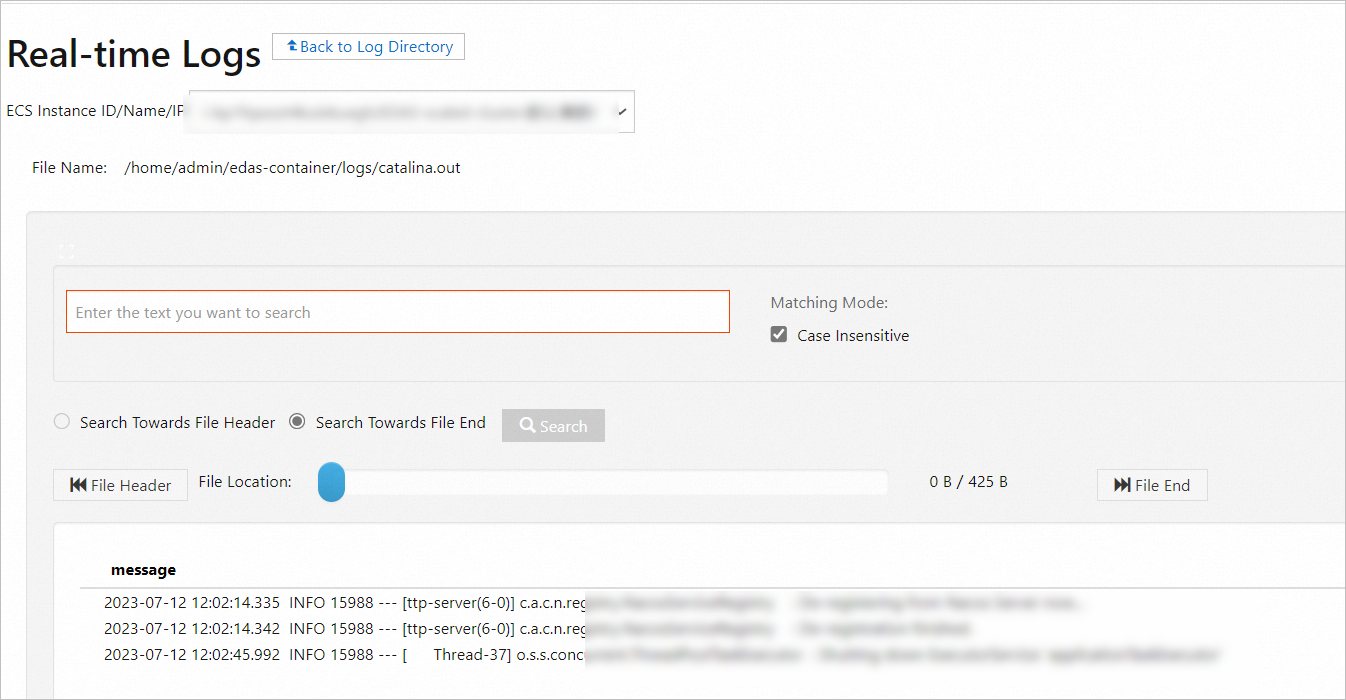
Add a log directory or file to Simple Log Service
Simple Log Service (SLS) enables distributed search and analysis across all instances of an application. After you add a log directory or file to SLS, you can search and query logs directly from the EDAS console.
Each log directory or file in SLS is associated with a project and a Logstore. For more information, see Project and Logstore.
If you already have a project and Logstore in SLS, select them during setup.
If not, EDAS creates them for you. The Logstore name follows the format
edas-logstore-<absolute-path>, for example,edas-logstore-a-homeadminlogs.
To perform this operation as a Resource Access Management (RAM) user, make sure the RAM user has the required permissions. For more information, see Authorize a RAM user to use Simple Log Service.
Procedure
In the left-side navigation pane of the application details page, choose Logs > Log Directory.
On the Log Directory page, find the target log directory or file and click Add to Log Service in the Actions column.
NoteAdding an entire directory adds all log files in that directory. In this case, distributed search applies to the entire directory, not individual files. To search a specific log file, add that file individually instead of the entire directory.
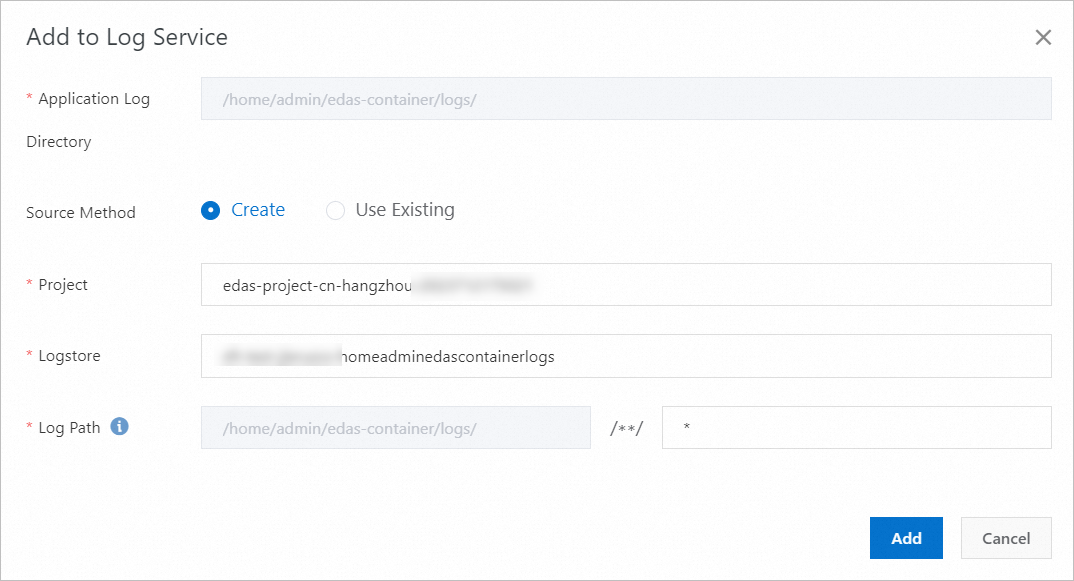
In the Add to Log Service dialog box, confirm the log directory and configure the following parameters, and then click Add.
Application Log Directory: The selected log directory. This field is read-only.
If you set Source Method to Create: | Parameter | Description | |-----------|-------------| | Project | Enter a project name. Recommended format:
edas-project-<region-id-timestamp>, for example,edas-project-cn-qingdao-. | | Logstore | Automatically generated in the formatedas-logstore-<absolute-path>, for example,edas-logstore-a-homeadminlogs. | | Log Path | (Optional) To collect a specific file in the directory, enter the file name or a partial name with wildcards. |If you set Source Method to Use Existing: | Parameter | Description | |-----------|-------------| | Project | Select an existing project from the drop-down list. | | Logstore | Select an existing Logstore from the drop-down list. | | Log Path | (Optional) To collect a specific file in the directory, enter the file name or a partial name with wildcards. |
Remove a log directory or file from Simple Log Service
Remove a log directory or file from SLS collection. The actual directory and files on disk are not deleted. Two removal options are available:
| Option | Behavior |
|---|---|
| Remove from collection rules only | SLS stops collecting new log data. The existing project and Logstore are preserved. |
| Remove and delete associated objects | SLS stops collecting new log data. The associated project and Logstore are deleted if no other applications use them. |
Deleting a project and Logstore permanently removes all data in the Logstore. This action cannot be undone.
The default log directory cannot be removed from SLS.
On the Log Directory page, find the target log directory or file and click Remove from Log Service in the Actions column.
In the Remove from Log Service dialog box, confirm the log directory or file. Optionally, select Delete associated objects from Log Service based on your requirements, and then click OK.
Search logs across instances
After you add a log directory for online viewing and add it to SLS, you can search and analyze logs across all application instances.
To perform this operation as a RAM user, make sure the RAM user has the required permissions. For more information, see Authorize a RAM user to use Simple Log Service.
In the left-side navigation pane of the application details page, choose Logs > Search Logs. Alternatively, on the Log Directory page, find a log file that has been added to SLS and click Search in the Actions column.
On the Search Logs page, select a log directory or file from the Log File drop-down list.
View the log data. SLS provides several analysis features:
Feature Description LogReduce Automatically clusters similar log entries LiveTail Streams logs in real time Query and analysis Runs structured queries on log data Enter a keyword in the search box to perform distributed search across all instances.
Authorize a RAM user to use Simple Log Service
To use SLS features (adding log directories, viewing logs, or performing distributed search) as a RAM user, grant the required permissions through the Alibaba Cloud account.
Log on to the RAM console with the Alibaba Cloud account.
In the left-side navigation pane, choose Identities > Users. On the Users page, find the target RAM user and click Add Permissions in the Actions column.
In the Add Permissions panel, enter
login the System Policy search field. Find and click AliyunLogReadOnlyAccess to add it to the selected policies, and then click OK.NoteThe Principal field is auto-populated. To grant permissions to multiple RAM users, search for additional users in the Principal field.
On the authorization result page, verify the RAM user and the granted permission, and then click Complete.