Enterprise Distributed Application Service (EDAS) provides demos for Spring Cloud, Dubbo, and High-speed Service Framework (HSF) microservice applications to help you learn how to deploy them. EDAS also provides a default Elastic Compute Service (ECS) environment for rapid application deployment. This topic describes how to deploy a microservice application in the default ECS environment.
Prerequisites
-
EDAS is activated. For more information, see Activate EDAS.
-
Auto Scaling is activated and authorized.
Background information
Default ECS environment: Each region contains a default microservices namespace. EDAS creates a default cluster in this namespace, which uses the default virtual private cloud (VPC) of the region.
Application demos: The EDAS console provides a pair of microservice application demos for the Spring Cloud, Dubbo, and HSF frameworks that you can use to perform simple service invocations. The deployment procedure is similar for demos of different frameworks. This topic uses the Spring Cloud application demo as an example. For more information about the demos, see alibabacloud-microservice-demo.
For information about how to implement features for a microservice application, see Application development overview.
Process
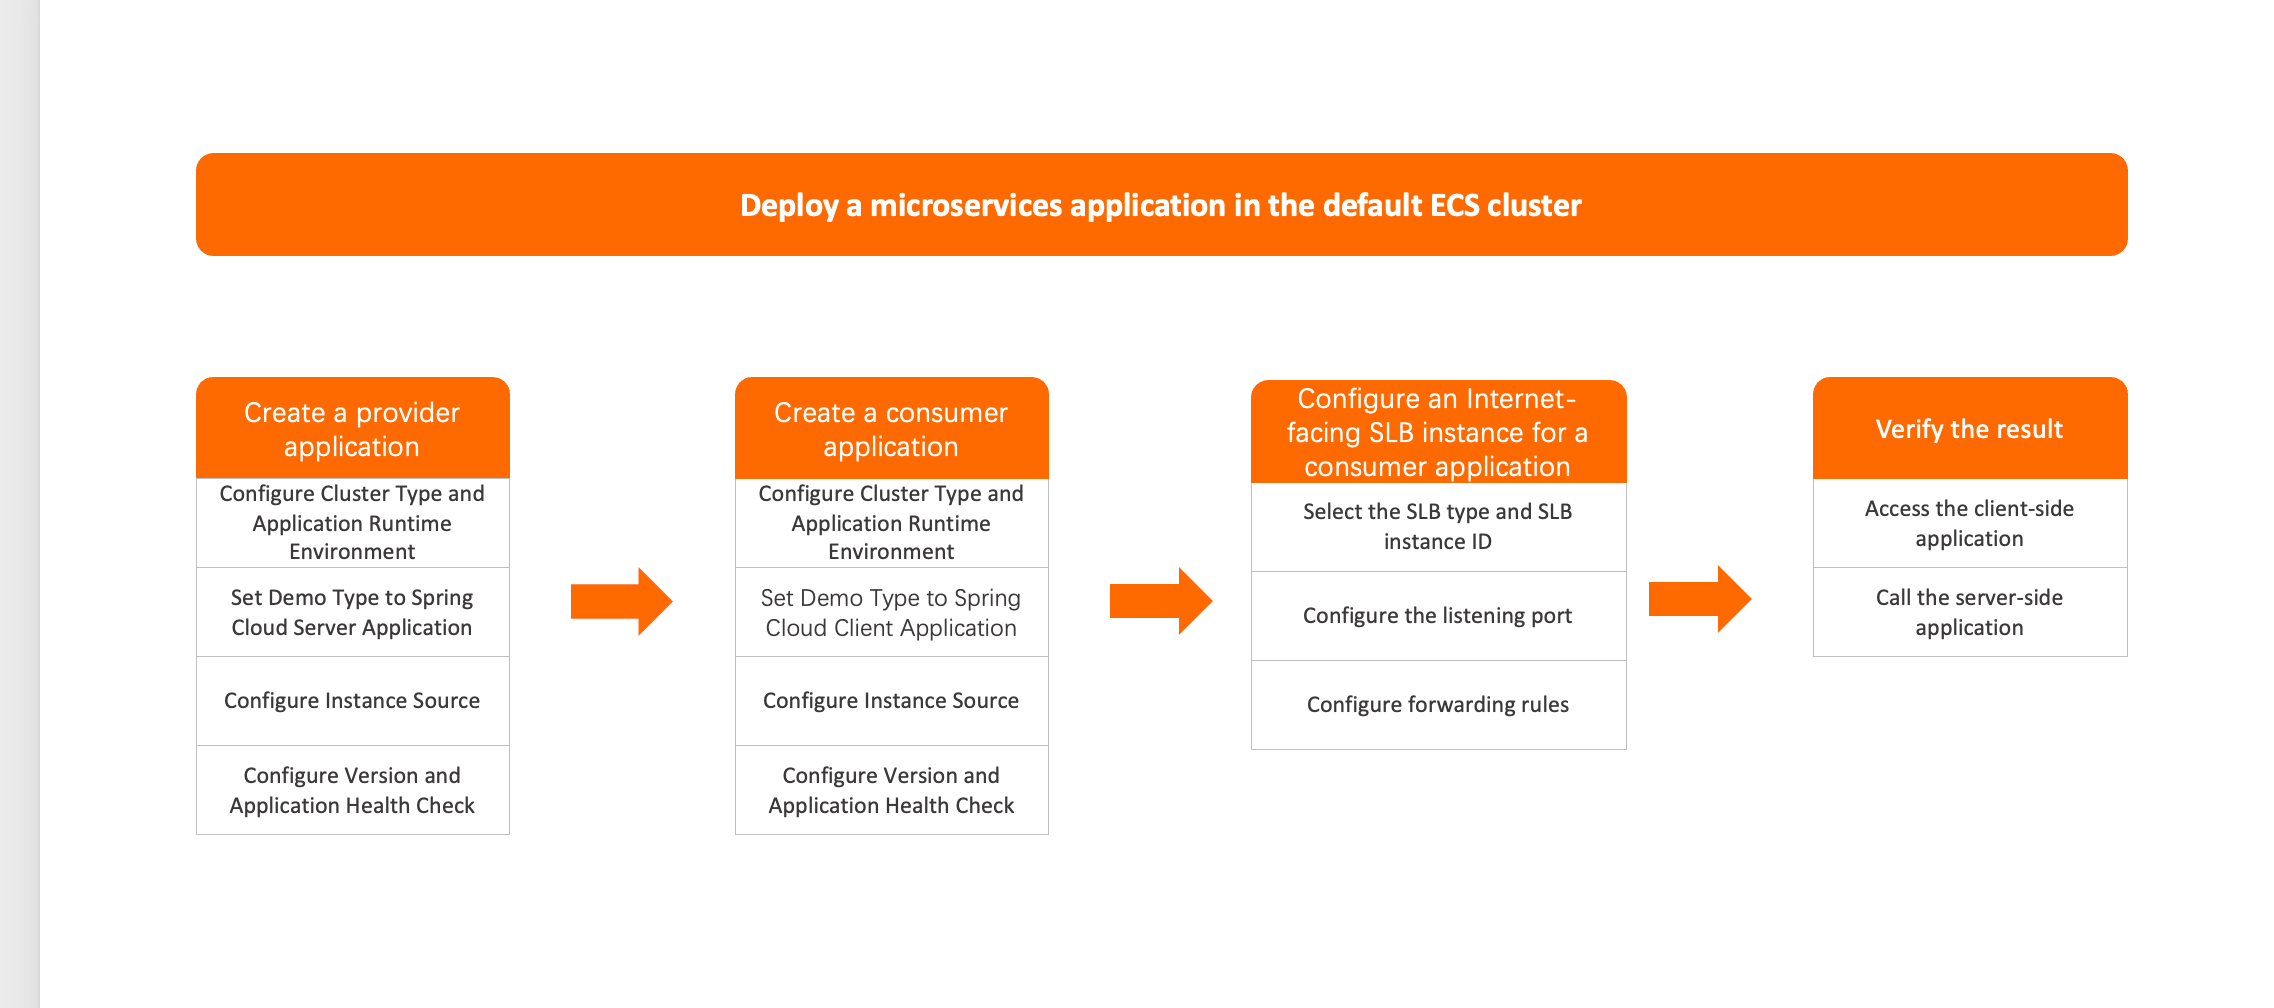
Procedure
Create a provider application
The microservice application demo contains a server-side application (provider) and a client-side application (consumer). This topic describes how to deploy the provider application. After you deploy the provider, you can follow the same steps to deploy the consumer application.
Due to the service invocation relationship, you must deploy the provider application before you deploy the consumer application. If you deploy the consumer application first, the service invocation will fail and cause an exception.
-
Log on to the EDAS console.
-
In the left-side navigation pane, choose .
- In the top navigation bar of the Applications page, select the region in which you want to deploy the application. On the page that appears, select the microservices namespace that you want to manage, and click Create Application.
-
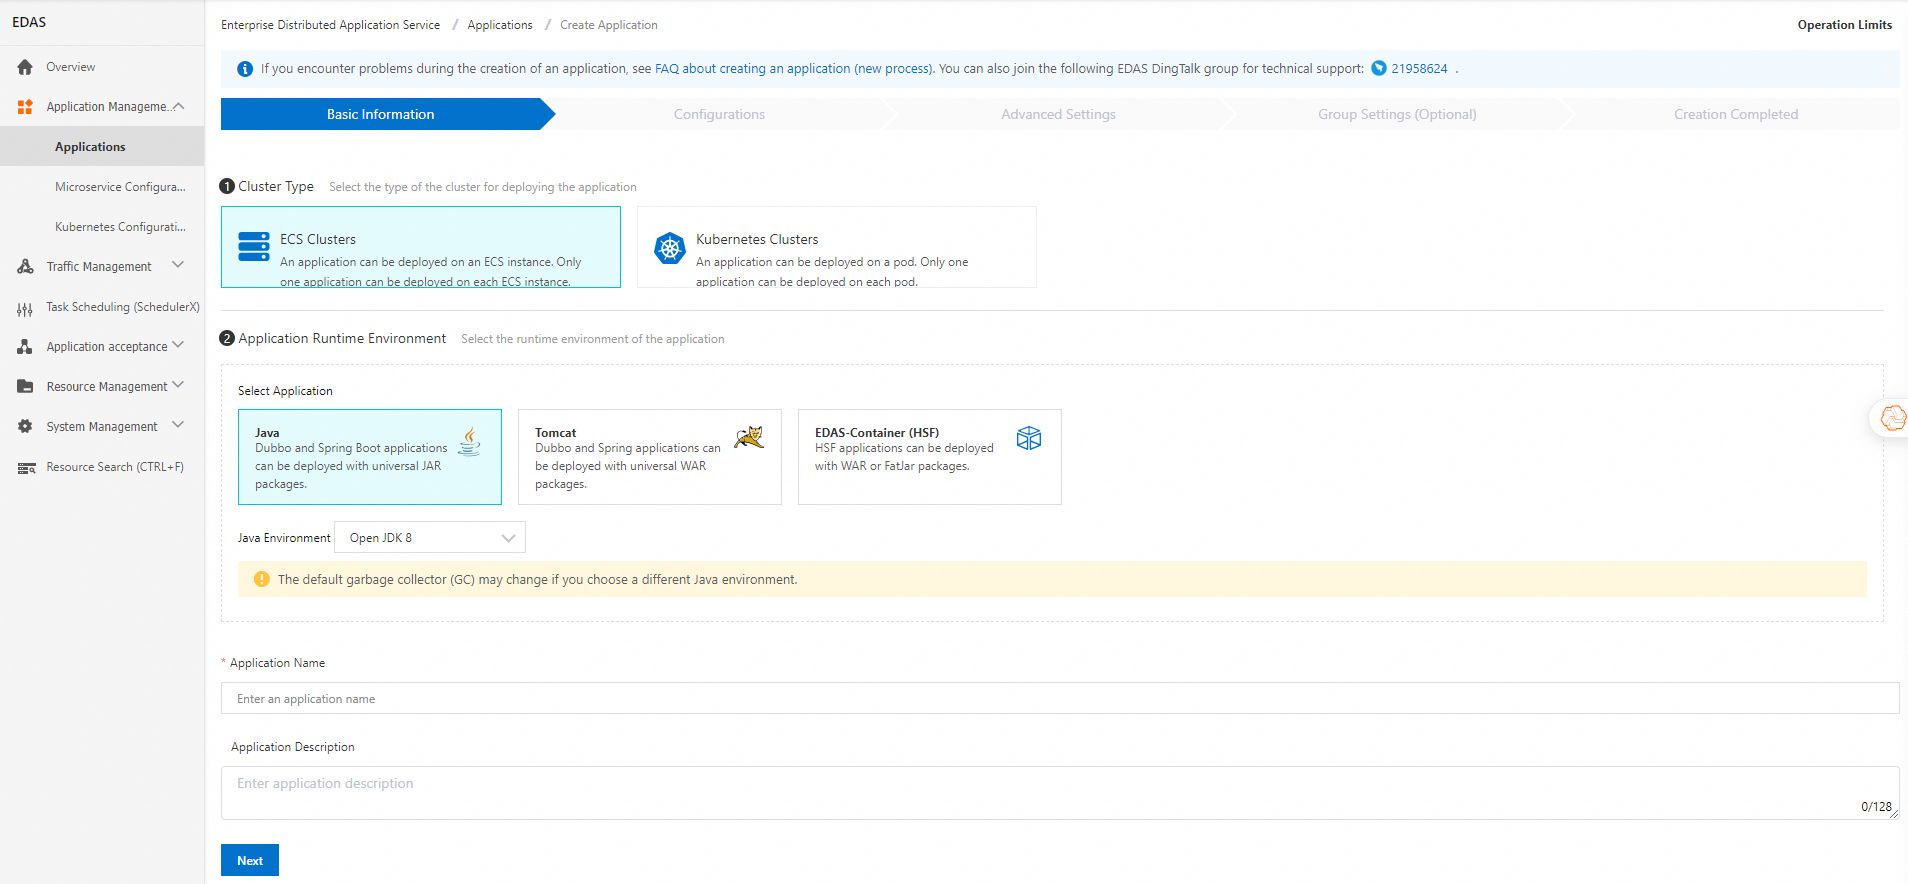
On the Basic Information tab of the Create Application page, set the basic information for the application and click Next.
-
In the Cluster Type section, click ECS Cluster.
-
In the Application Runtime Environment section, click Java. From the Java Environment drop-down list, select Open JDK 8.
This topic uses a JAR package demo of a Spring Cloud application as an example. Therefore, Java is selected as the application runtime environment. If you want to deploy a WAR package of a Spring Cloud or Dubbo application, or an HSF application, select an appropriate application runtime environment and version as prompted on the page.
-
In the Application Name text box, enter a name for the application.
-
Optional: In the Application Description text box, enter a description for the application.
-
-
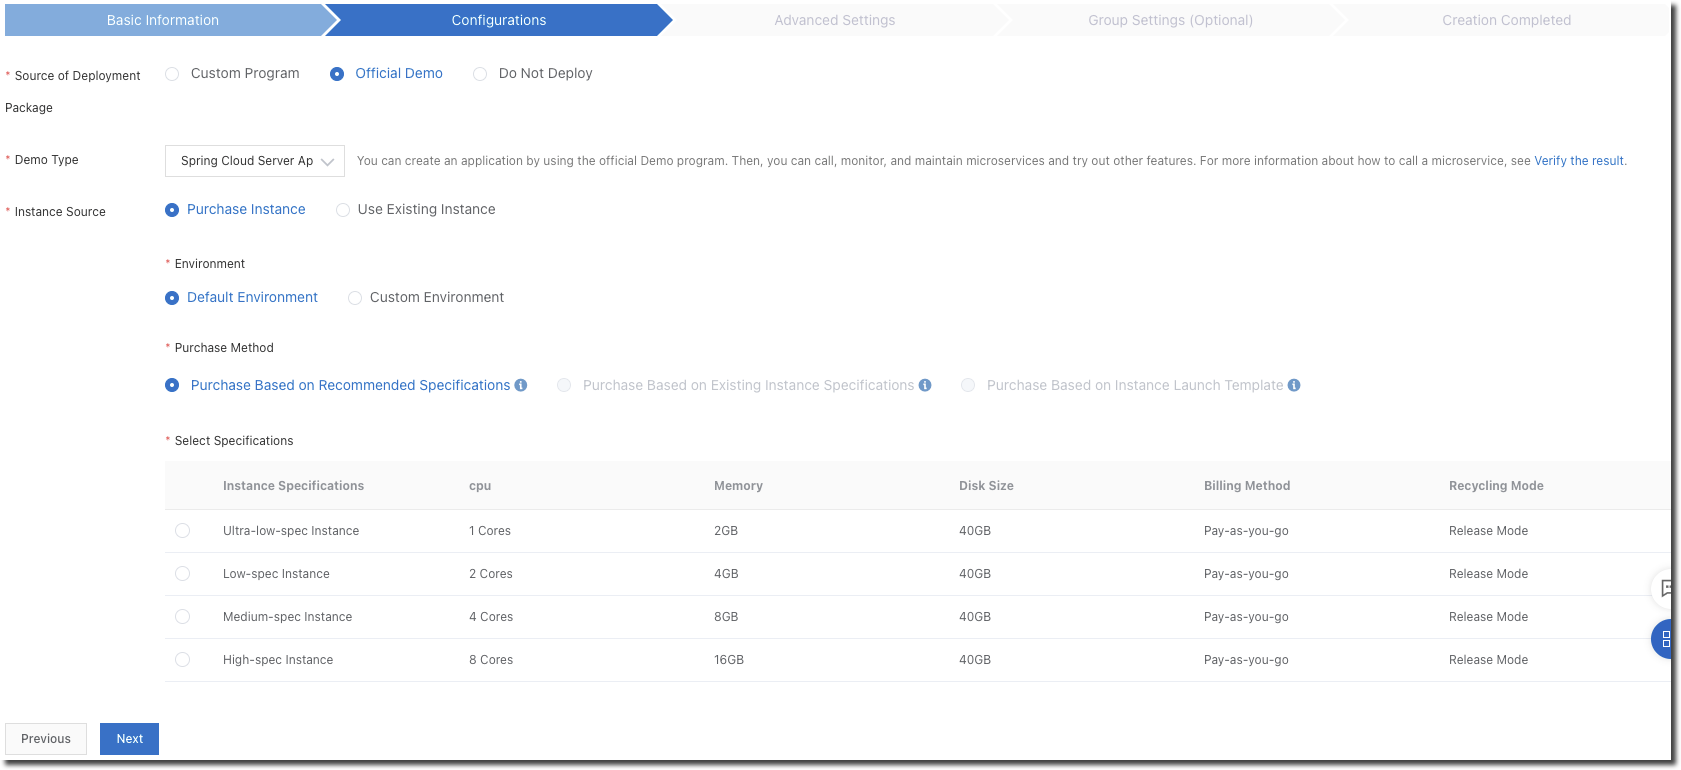
On the Application Configuration tab, configure the deployment package and environment for the application, and click Next.
Parameter
Operations
Source of Deployment Package
Select Official Demo.
Demo Type
Select Spring Cloud Provider Application.
Instance Source
Select Purchase Instance.
Environment
Select Default Environment.
Purchase Method
Select Purchase Based on Recommended Specifications.
Select Specifications
Select Ultra-low-spec Instance.
Quantity
Enter 1.
Logon Password
Enter the logon password for the ECS instance.
Terms of Service
Select Elastic Compute Service Terms of Service | Terms of Service for Images.
-
On the Advanced Settings tab, set the Version and Application Health Check, and then click Create Application.
EDAS uses the current timestamp as the default version in the
yyyymmdd.hhmmssformat. - In the Creation Completed step, confirm Basic Information, Configurations, and Advanced Settings. Then, click Create Application.
After EDAS starts to deploy the application, the message Application change in progress... is displayed in the upper part of the Basic Information tab. The deployment takes about 2 minutes.
You can also click View Details next to the message to go to the Change Details page of the application. On this page, you can check the deployment progress and log data.
Create a consumer application
To create the consumer application, follow the steps in Create a provider application.
Configure an Internet-facing SLB instance for the consumer application
Applications are created and deployed in a VPC and do not have a public IP address by default. To expose your application to the Internet, you must configure an Internet-facing Server Load Balancer (SLB) instance.
EDAS enables session persistence for managed HTTP listeners. This setting cannot be changed.
-
Log on to the EDAS console.
-
In the left-side navigation pane, choose .
-
On the Applications page, select a region from the top navigation bar. In the upper part of the page, select a microservices namespace, set Cluster Type to ECS Cluster, and then click the name of the consumer application that you created.
-
On the Basic Information page, go to the Basic Information tab. In the Application Settings section, click Add next to Load Balancer (Public).
-
In the Add Load Balancer (Public) dialog box, set the load balancer parameters as prompted. For more information, see Bind a dedicated SLB instance to an application.
Verify the result
The client-side application contains web services. After both the server-side and client-side applications are deployed, check whether you can log on to the web interface of the client-side application.