When a data disk partition is lost or its partition table is corrupted on a Linux Elastic Compute Service (ECS) instance, use fdisk or testdisk to recover the partitions or files.
Prerequisites
Before you begin, ensure that you have:
A snapshot of the data disk that lost partitions — if restoration fails, use the snapshot to roll back the disk to its previous state
See Create snapshot manually and Roll back disk using snapshot.
When to use this guide
This guide applies when you observe any of the following on your Linux ECS instance:
A data disk partition is no longer visible after mounting
fdisk -lushows a disk with noDeviceentries (missing partition table)The disk appears in the OS but no data is accessible
If the partition table is intact but files were accidentally deleted, go to Restore data with testdisk.
Tools overview
| Tool | Pre-installed | Description |
|---|---|---|
| fdisk | Yes | Linux partition management tool |
| testdisk | No | Recovers lost partitions and files on Linux disks |
| partprobe | Yes | Reloads the kernel's partition table without a system restart |
Check disk information (optional)
Run the following command to view the current disk layout:
sudo fdisk -luIf the partition table is corrupted, the output shows no Device entries:
Disk /dev/vda: 145 GiB, 155692564480 bytes, 304087040 sectors
Units: sectors of 1 * 512 = 512 bytes
Sector size (logical/physical): 512 bytes / 512 bytes
I/O size (minimum/optimal): 512 bytes / 512 bytes
Disklabel type: gpt
Disk identifier: F51132A7-xxxx-xxxx-xxxx-FD0DE6E1210C
The missing Device column confirms the partition table is corrupted. Proceed to one of the restoration methods below.
Restore partitions with fdisk
When a data disk was partitioned using default start and end sector values, re-creating the partition with fdisk is usually sufficient.
Run the fdisk command to re-create partitions on the data disk.
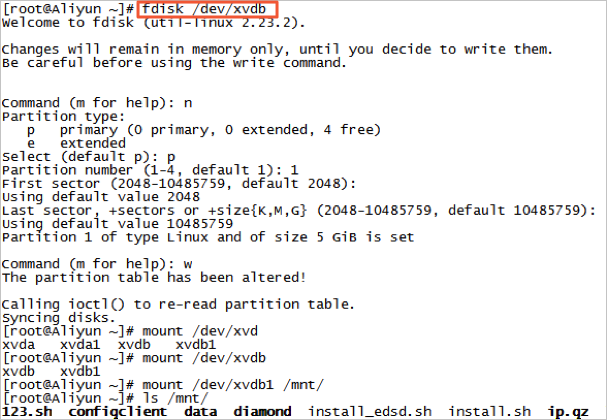
If the partition cannot be mounted after running fdisk, or if it mounts but shows no files, use testdisk to restore the partition or recover individual files.
Restore partitions with testdisk
The following steps use /dev/xvdb as an example. Replace /dev/xvdb with your actual device name.
Install testdisk.
Alibaba Cloud Linux 3, Alibaba Cloud Linux 2, CentOS 6, CentOS 7, or CentOS 8
sudo yum install -y testdiskUbuntu or Debian
sudo apt install -y testdiskRun testdisk on the target disk. Select Proceed (the default) and press Enter.
testdisk /dev/xvdb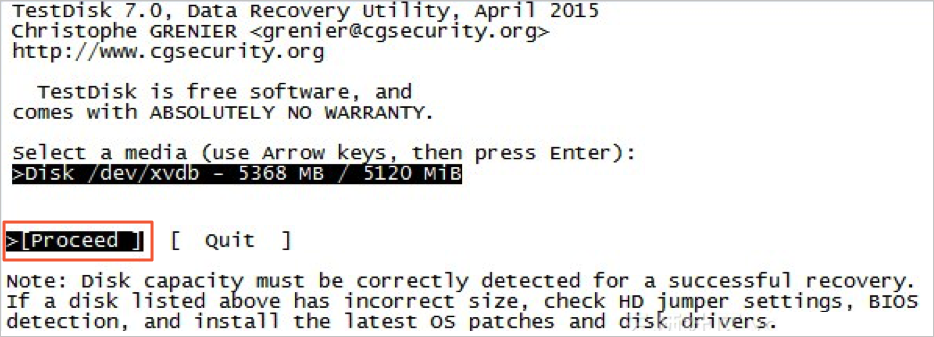
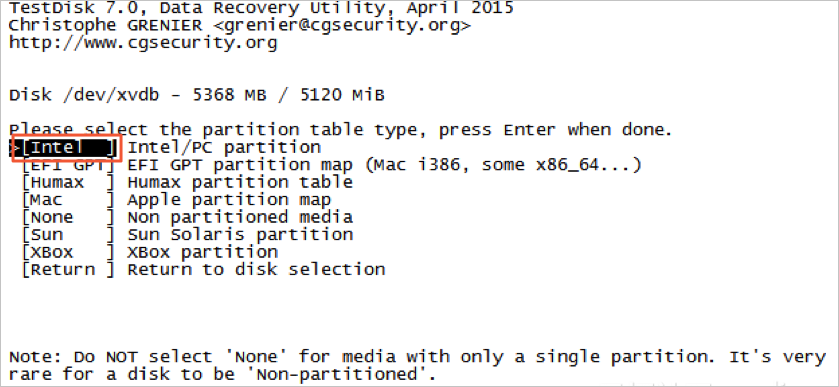
Select the partition table type. In most cases, keep the default Intel selection. If your disk uses GUID Partition Table (GPT), select EFI GPT.
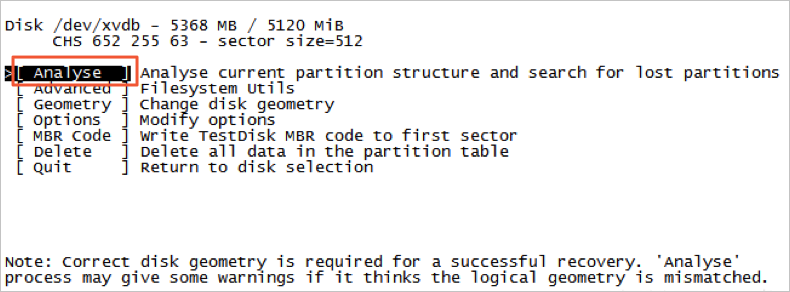
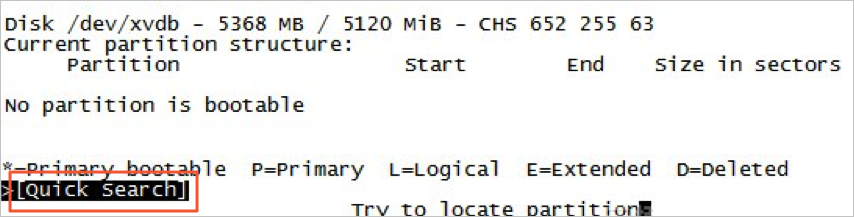
Select Analyse and press Enter.
If no partitions appear, select Quick Search and press Enter. Partition information appears in the results.
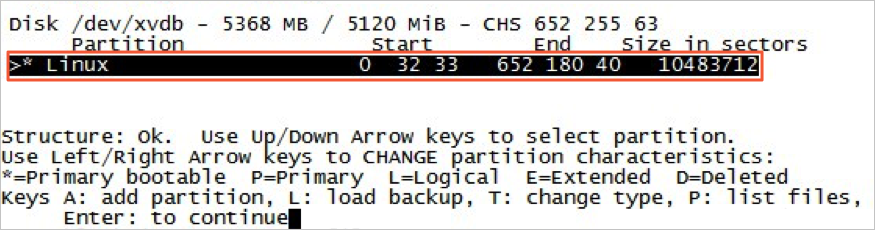
Select the partition you want to restore and press Enter.
If your partition is listed, select Write to save it. If the expected partition is not listed, select Deeper Search to scan further, then return to this step.
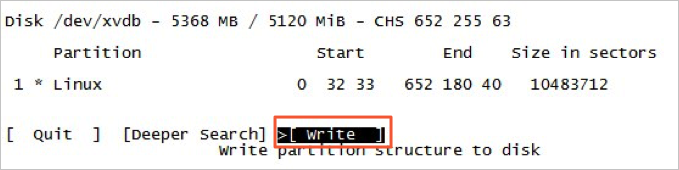
Press
Yto confirm writing the partition table.
Refresh the kernel's partition table:
partprobe /dev/xvdbRemount the partition and verify that your data is accessible.

Restore data with testdisk
If testdisk can detect a partition but cannot write it, use file recovery mode to copy individual files.
Complete steps 1–5 from Restore partitions with testdisk to scan the disk and locate the partition.
Press
Pto list files in the partition.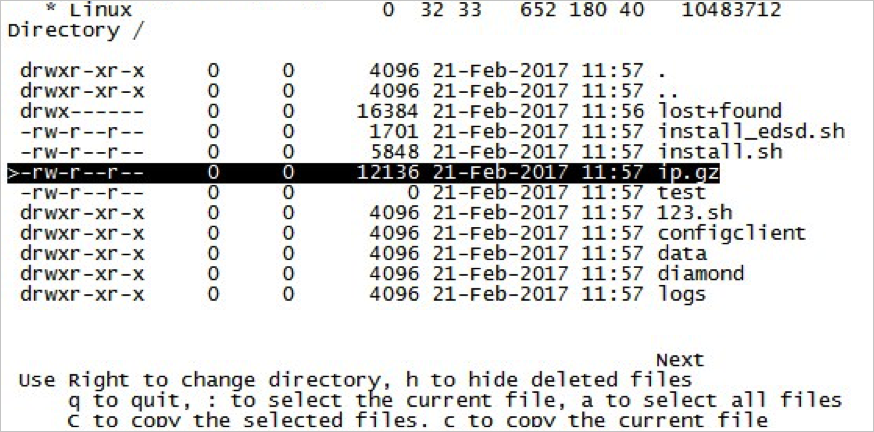
Select the file to restore and press
C.Navigate to the destination directory. In this example, the target is
/home. A message similar toCopy done! 1 ok, 0 failedconfirms the file was copied successfully.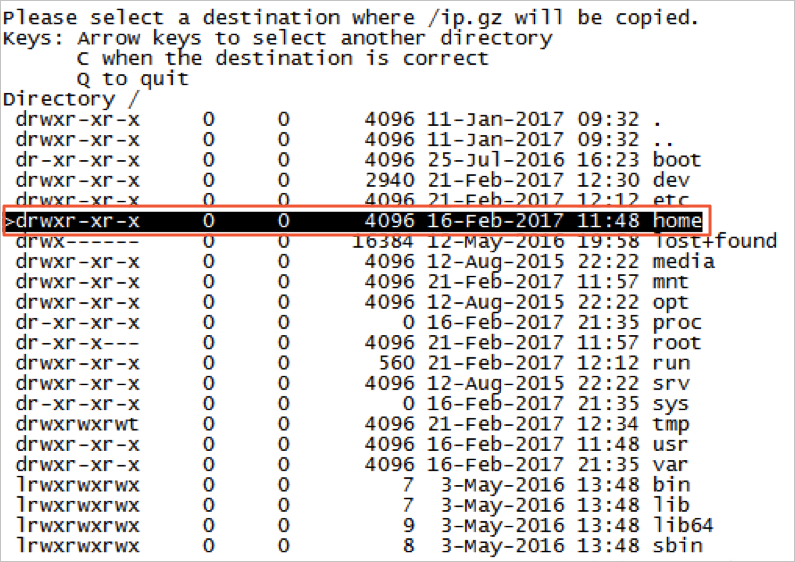
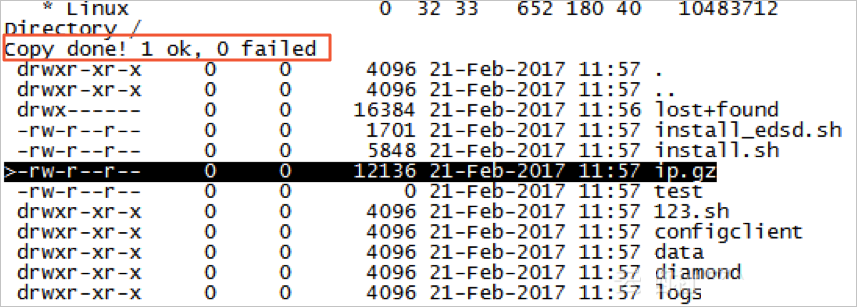
Switch to
/homeand verify the file is present.
Best practices
Partition and file recovery tools address data loss after the fact and cannot guarantee full recovery. Use the following practices to protect your data proactively.
Apply automatic snapshot policies
Apply automatic snapshot policies to system disks and data disks to create scheduled backups.
When a system disk is replaced, an instance expires, or a disk is manually released, the associated automatic snapshots may be deleted. To retain automatic snapshots when a disk is released, clear the Delete Automatic Snapshots While Releasing Disk option in the Modify Attributes dialog box in the ECS console.
See Snapshot FAQ and Create policy.
Create manual snapshots before high-risk operations
Create a snapshot before:
Updating the kernel
Upgrading or changing applications
Restoring data on a disk
Complete the snapshot before proceeding with the operation.
Use additional backup methods
For critical data, combine snapshots with one or more of the following:
Object Storage Service (OSS) backup — store copies of important files in OSS
Offline backup — maintain backups in a physically separate location
Geo-redundancy — replicate data across regions for geographic fault tolerance
Alibaba Cloud's underlying storage uses three-copy redundancy, which protects against physical disk failures. However, logical issues — such as viruses, accidental deletions, or file system corruption — are not covered by storage-layer redundancy. Snapshots and backups are your primary defense against logical data loss. For details on disk reliability, see ESSD cloud disk data reliability.
What's next
For a complete walkthrough of data recovery scenarios on Linux instances, see Best practices for restoring data on Linux instances.