Create a trusted instance with the required permissions to report trust information to Security Center.
Create a trusted instance
Console
Creating a trusted instance follows the same steps as a regular instance, with the configurations below. For general configurations, see Create an instance using the wizard.
Go to ECS console - Instances.
-
Click Create Instance.
-
In the Instance and Image section, configure the following settings.
-
Instance: Select a vTPM-enabled instance type. See Instance families that support trusted computing.
-
Images:
-
Select Trusted System.
NoteIf you select Trusted System, the Alibaba Cloud Trusted System is enabled and performs trust verification on startup. Skip this step if you build your own trusted service system.
-
Select a supported image version for your instance family.
-
-
-
In the Bandwidth and Security Group section, select a security group. If the Activate KMS dialog box appears, click Activate.
KMS must be activated. Otherwise, instance creation fails.
-
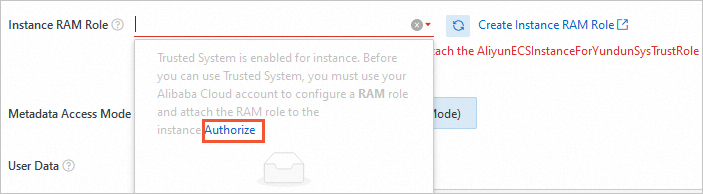
Click Advanced Options and configure Instance RAM Role .
If you selected Trusted System, assign a RAM role with trusted service permissions. Alibaba Cloud provides the AliyunECSInstanceForYundunSysTrustRole role. Follow these steps to assign it:
NoteFor custom roles, see Usage notes.
-
Click Authorize.
-
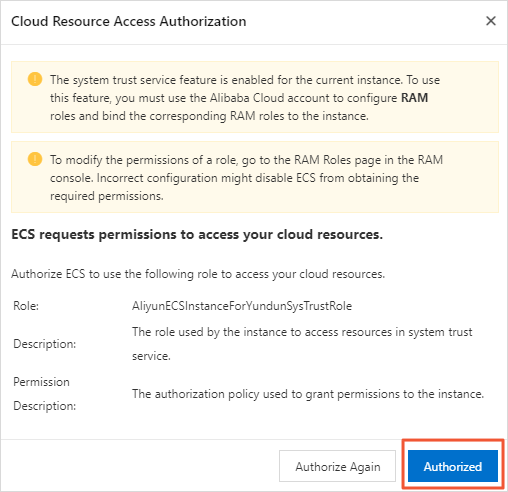
In the Authorize Access to Cloud Resources dialog box, click Authorize
-
In the new window, click Authorize.
-
Click Authorized.
-
Select the AliyunECSInstanceForYundunSysTrustRole RAM role.
 Note
NoteYou can also grant the authorization after instance creation. See Instance RAM role.
-
-
Complete the remaining configurations and create the instance.
API
When you call an API to create a trusted instance, note the following:
-
Activate KMS first. Otherwise, instance creation fails. See Activate Key Management Service.
-
If you use the Alibaba Cloud Trusted System, assign a RAM role with trusted service permissions so the instance can report trust information to Security Center on startup. See Instance RAM role. For custom RAM roles, see Usage notes.
NoteIf you build your own trusted service system, this RAM role is not required.
Call RunInstances or CreateInstance to create an instance. Configure the following parameters.
|
Parameter |
Description |
Example |
|
InstanceType |
Specify a vTPM-enabled instance type. See Instance families that support trusted computing. |
ecs.c6t.large |
|
ImageId |
Specify a trusted-instance-supported image ID. Call DescribeImages to query image IDs. |
aliyun_2_1903_x64_20G_secured_alibase_20210325.vhd |
|
SystemDisk.Category |
Only ESSDs are supported. |
cloud_essd |
|
VSwitchId |
Only VPCs are supported. Specify a vSwitch ID. |
vsw-bp134jzf285qg9u6w**** |
|
RamRoleName |
Specify the RAM role name. You can also call AttachInstanceRamRole to assign the role after instance creation. |
AliyunECSInstanceForYundunSysTrustRole |
|
UserData |
Specify the Base64-encoded installation script for the Alibaba Cloud Trusted System. For the plaintext script before Base64 encoding, see Script for installing the Alibaba Cloud Trusted System. |
|
|
SecurityOptions.TrustedSystemMode |
The trusted system mode. When you call RunInstances with InstanceType set to g7t, c7t, or r7t, set Note
To create a trusted system ECS instance by using an API, you can only call RunInstances. CreateInstance does not support |
vTPM |
Sample request:
https://ecs.aliyuncs.com/?Action=RunInstances
&RegionId=cn-hangzhou
&InstanceType=ecs.c6t.large
&ImageId=aliyun_2_1903_x64_20G_secured_alibase_20210325.vhd
&SystemDisk.Category=cloud_essd
&VSwitchId=vsw-bp134jzf285qg9u6w****
&SecurityGroupId=sg-bp1c3o8hzd14dovh****
&RamRoleName=AliyunECSInstanceForYundunSysTrustRole
&UserData=IyEvYmluL3NoCkNVUlBBVEg9YHB3ZGAKU0NSSVBUX1BBVEg9Ii9kb3dubG9hZC9saW51eC9zY3JpcHQvVHJ1c3RBZ2VudEluc3RhbGwuc2giClRPS0VOPWBjdXJsIC1zIC1YIFBVVCAtSCAiWC1hbGl5dW4tZWNzLW1ldGFkYXRhLXRva2VuLXR0bC1zZWNvbmRzOiA1IiAiaHR0cDovLzEwMC4xMDAuMTAwLjIwMC9sYXRlc3QvYXBpL3Rva2VuImAKUkVHSU9OX0lEPWBjdXJsIC1zIC1IICJYLWFsaXl1bi1lY3MtbWV0YWRhdGEtdG9rZW46ICR0b2tlbiIgaHR0cDovLzEwMC4xMDAuMTAwLjIwMC9sYXRlc3QvbWV0YS1kYXRhL3JlZ2lvbi1pZGAKVVBEQVRFX1NJVEUxPWh0dHA6Ly90cnVzdGNsaWVudC0ke1JFR0lPTl9JRH0ub3NzLSR7UkVHSU9OX0lEfS1pbnRlcm5hbC5hbGl5dW5jcy5jb20KVVBEQVRFX1NJVEUyPWh0dHA6Ly90cnVzdGNsaWVudC0ke1JFR0lPTl9JRH0ub3NzLSR7UkVHSU9OX0lEfS5hbGl5dW5jcy5jb20KVVBEQVRFX1NJVEUzPWh0dHA6Ly90LXRydXN0Y2xpZW50LSR7UkVHSU9OX0lEfS5vc3MteyRSRUdJT05fSUR9LWludGVybmFsLmFsaXl1bmNzLmNvbQpNU0dfSU5GTz0iZG93bmxvYWRpbmcgaW5zdGFsbCBzY3JpcHQgZnJvbSBzaXRlIgpNU0dfRVJSPSJkb3dubG9hZCBmaWxlIGVycm9yLiIKTVNHX09LPSJ0cnVzdCBjbGllbnQgaW5pdCBkb25lLiIKCmluc3RhbGwoKQp7CmVjaG8gIiR7TVNHX0lORk99IiIgMS4uLiIKY3VybCAtZnNTTCAiJHtVUERBVEVfU0lURTF9IiIke1NDUklQVF9QQVRIfSJ8c2gKaWYgWyAkPyA9PSAwIF07IHRoZW4KcmV0dXJuIDEKZmkKZWNobyAiJHtNU0dfSU5GT30iIiAyLi4uIgpjdXJsIC1mc1NMICIke1VQREFURV9TSVRFMn0iIiR7U0NSSVBUX1BBVEh9InxzaAppZiBbICQ/ID09IDAgXTsgdGhlbgpyZXR1cm4gMgpmaQplY2hvICIke01TR19JTkZPfSIiIDMuLi4iCmN1cmwgLWZzU0wgIiR7VVBEQVRFX1NJVEUzfSIiJHtTQ1JJUFRfUEFUSH0ifHNoCmlmIFsgJD8gPT0gMCBdOyB0aGVuCnJldHVybiAzCmZpCmVjaG8gIiIgMT4mMgpleGl0IDEKfQoKaW5zdGFsbAplY2hvICIke01TR19PS30iCgpleGl0IDAK
&<Common request parameters>
Sample responses:
-
XML format
<RunInstancesResponse> <RequestId>04F0F334-1335-436C-A1D7-6C044FE73368</RequestId> <InstanceIdSets> <InstanceIdSet>i-bp16byi4f3fti5b3****</InstanceIdSet> </InstanceIdSets> </RunInstancesResponse> -
JSON format
{
    "RequestId": "BB694A51-7860-4B5C-B906-9B4077798672",
    "InstanceIdSets": {
        "InstanceIdSet": [
            "i-bp16byi4f3fti5b3****"
        ]
    }
}
Usage notes
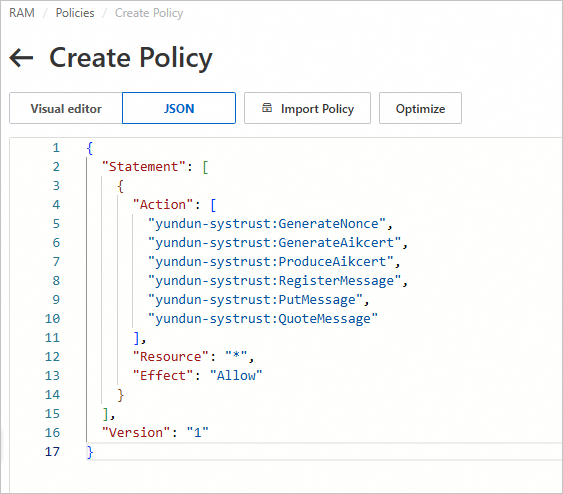
Create a custom policy with the minimum required permissions and attach it to the RAM role. You can use System Policy (AliyunSysTrustFullAccess) or Custom Policy. The following policy provides fine-grained permissions for the trusted service:
RAM permissions involve security risks. Follow the principle of least privilege and avoid granting excessive permissions. See What is Resource Access Management.
{
  "Statement": [
    {
      "Action": [
        "yundun-systrust:GenerateNonce",
        "yundun-systrust:GenerateAikcert",
        "yundun-systrust:ProduceAikcert",
        "yundun-systrust:RegisterMessage",
        "yundun-systrust:PutMessage",
        "yundun-systrust:QuoteMessage"
      ],
      "Resource": "*",
      "Effect": "Allow"
    }
  ],
  "Version": "1"
}
Script for installing the Alibaba Cloud Trusted System
#!/bin/sh
CURPATH=`pwd`
SCRIPT_PATH="/download/linux/script/TrustAgentInstall.sh"
TOKEN=`curl -s -X PUT -H "X-aliyun-ecs-metadata-token-ttl-seconds: 5" "http://100.100.100.200/latest/api/token"`
REGION_ID=`curl -s -H "X-aliyun-ecs-metadata-token: $token" http://100.100.100.200/latest/meta-data/region-id`
UPDATE_SITE1=http://trustclient-${REGION_ID}.oss-${REGION_ID}-internal.aliyuncs.com
UPDATE_SITE2=http://trustclient-${REGION_ID}.oss-${REGION_ID}.aliyuncs.com
UPDATE_SITE3=http://t-trustclient-${REGION_ID}.oss-{$REGION_ID}-internal.aliyuncs.com
MSG_INFO="downloading install script from site"
MSG_ERR="download file error."
MSG_OK="trust client init done."

install()
{
echo "${MSG_INFO}"" 1..."
curl -fsSL "${UPDATE_SITE1}""${SCRIPT_PATH}"|sh
if [ $? == 0 ]; then
return 1
fi
echo "${MSG_INFO}"" 2..."
curl -fsSL "${UPDATE_SITE2}""${SCRIPT_PATH}"|sh
if [ $? == 0 ]; then
return 2
fi
echo "${MSG_INFO}"" 3..."
curl -fsSL "${UPDATE_SITE3}""${SCRIPT_PATH}"|sh
if [ $? == 0 ]; then
return 3
fi
echo "" 1>&2
exit 1
}

install
echo "${MSG_OK}"

exit 0