Time discrepancies can result in scheduled task errors, inconsistent log timestamps, and clock skew in distributed systems. To address these aspects, you can calibrate the time for your Elastic Compute Server (ECS) instance by configuring a clock synchronization service.
How it works

Network Time Protocol (NTP): A protocol that synchronizes clocks between a client and a server to within milliseconds by calculating network latency.
Alibaba Cloud NTP server: Alibaba Cloud provides NTP servers with internal virtual private cloud (VPC) endpoints. This allows ECS instances to synchronize time with minimal network latency.
chrony/ntpd/W32time: Time synchronization services that use the NTP protocol to sync an instance’s system clock with an NTP server. On Linux/Unix systems,
chronyperforms better thanntpd. Windows systems use the built-inW32timeservice.
Verify clock accuracy
Configure clock synchronization
Linux (chrony)
ECS instances created from Alibaba Cloud public images run chrony by default for time synchronization. Some older public images run ntpd by default. You can run ps -C chronyd,ntpd -o comm= to check which process is running. If the output is ntpd, the instance uses ntpd by default. To configure time synchronization, see Linux (ntpd).
A Linux system can run only one time synchronization daemon process. You must use only one of the two services: chronyd or ntpd. Before you start one of these services, ensure that the other service is stopped and disabled.
To configure time synchronization across multiple instances, use Cloud Assistant batch execution.
1. Check and configure NTP server addresses
Edit the
chronyconfiguration file.Alibaba Cloud Linux/CentOS/RHEL
sudo vim /etc/chrony.confUbuntu/Debian
sudo vim /etc/chrony/chrony.confConfigure Alibaba Cloud NTP servers.
Use
#to comment out all lines that start with `server`, and then add the following content to the configuration file.ImportantFor fault tolerance and improved accuracy, do not use a single NTP time source. Configuring multiple sources provides redundancy and allows the system to select the best source for synchronization.
# Configuration information, including NTP server addresses, minimum polling interval, and maximum polling interval.
server ntp.cloud.aliyuncs.com minpoll 4 maxpoll 10 iburst
server ntp10.cloud.aliyuncs.com minpoll 4 maxpoll 10 iburst
server ntp11.cloud.aliyuncs.com minpoll 4 maxpoll 10 iburst
server ntp12.cloud.aliyuncs.com minpoll 4 maxpoll 10 iburst
server ntp7.cloud.aliyuncs.com minpoll 4 maxpoll 10 iburst
server ntp8.cloud.aliyuncs.com minpoll 4 maxpoll 10 iburst
server ntp9.cloud.aliyuncs.com minpoll 4 maxpoll 10 iburst
Save the configuration file and exit. Restart
chrony.sudo systemctl restart chronyd.service
2. Verify clock synchronization
The restarted service smoothly and gradually adjusts the time. Run sudo chronyc tracking to verify the synchronization status.
sudo chronyc trackingThe System time field in the output shows the offset between your system clock and the NTP time. For example, 0.000036150 seconds fast of NTP time indicates that the system clock is ahead of the NTP time.
If the time offset is large (several minutes or hours) and your workload can tolerate an abrupt time jump, consider manually synchronizing time.
Reference ID    : 64643D58 (100.100.61.88)
Stratum         : 2
Ref time (UTC)  : Sat Sep 20 07:55:33 2025
System time     : 0.000036150 seconds fast of NTP time
Last offset     : +0.000031322 seconds
RMS offset      : 0.000044841 seconds
Frequency       : 43.592 ppm slow
Residual freq   : +0.000 ppm
Skew            : 0.005 ppm
Root delay      : 0.000228760 seconds
Root dispersion : 0.010518964 seconds
Update interval : 1029.1 seconds
Leap status     : Normal
Linux (ntpd)
Some older Alibaba Cloud public images (such as CentOS 6) configure the ntpd service by default. Because the NTP project is no longer maintained, we recommend upgrading to Chrony for better performance and security.
A Linux system can run only one time synchronization daemon. You must use only one of the two services: chronyd or ntpd. Before you start one of these services, ensure that the other service is stopped and disabled.
To configure time synchronization across multiple instances, use Cloud Assistant batch execution.
1. Check and configure NTP server addresses
Edit the
NTPconfiguration file.sudo vim /etc/ntp.confConfigure Alibaba Cloud NTP servers.
Use
#to comment out all lines that start with `server`, and then add the following content to the configuration file.ImportantFor fault tolerance and improved accuracy, do not use a single NTP time source. Configuring multiple sources provides redundancy and allows the system to select the best source for synchronization.
# Configuration information, including NTP server addresses, minimum polling interval, and maximum polling interval.
server ntp10.cloud.aliyuncs.com iburst minpoll 4 maxpoll 10
server ntp11.cloud.aliyuncs.com iburst minpoll 4 maxpoll 10
server ntp12.cloud.aliyuncs.com iburst minpoll 4 maxpoll 10
server ntp7.cloud.aliyuncs.com iburst minpoll 4 maxpoll 10
server ntp8.cloud.aliyuncs.com iburst minpoll 4 maxpoll 10
server ntp9.cloud.aliyuncs.com iburst minpoll 4 maxpoll 10
Save the configuration file and exit. Restart
ntpd.Alibaba Cloud Linux/CentOS/RHEL
sudo service ntpd restartUbuntu/Debian
service ntp restart
2. Verify time synchronization
The restarted service smoothly and gradually adjusts the time. Run sudo ntpq -p to verify the synchronization status. The offset field in the output shows the difference between the local time and the server time. The key parameters are as follows:
offset: The time difference between the system time and the server time, in milliseconds. The closer theoffsetvalue is to 0, the closer the system time is to the server time.jitter: The variation in time delay. A smaller absolute value indicates higher time precision.
If the time offset is large (several minutes or hours) and your workload can tolerate an abrupt time jump, consider manually synchronizing time.
sudo ntpq -p remote refid st t when poll reach delay offset jitter
==============================================================================
LOCAL(0) .LOCL. 10 l 17 64 1 0.000 0.000 0.000
+100.100.3.1 10.137.55.181 2 u 8 16 1 30.426 -307.76 0.153
*100.100.3.2 10.137.55.181 2 u 5 16 1 26.845 -309.25 0.221
+100.100.3.3 10.137.55.181 2 u 4 16 1 28.819 -309.37 0.187
-100.100.5.1 203.107.X.XX 2 u 3 16 1 50.478 -310.70 0.164
-100.100.5.2 203.107.X.XX 2 u 2 16 1 47.235 -311.89 0.246
100.100.5.3 203.107.X.XX 2 u 1 16 1 53.661 -310.50 0.119Windows
Graphical user interface
The Windows graphical user interface (GUI) supports configuring only a single NTP server. If that node experiences network jitter or becomes unavailable, the system cannot synchronize time, which creates a single point of failure.
To ensure high availability of time synchronization in production environments, we strongly recommend that you skip the GUI configuration and instead use the command prompt to configure multiple NTP servers.
In the notification area of the taskbar, click the date and time, and then click Date and time settings.
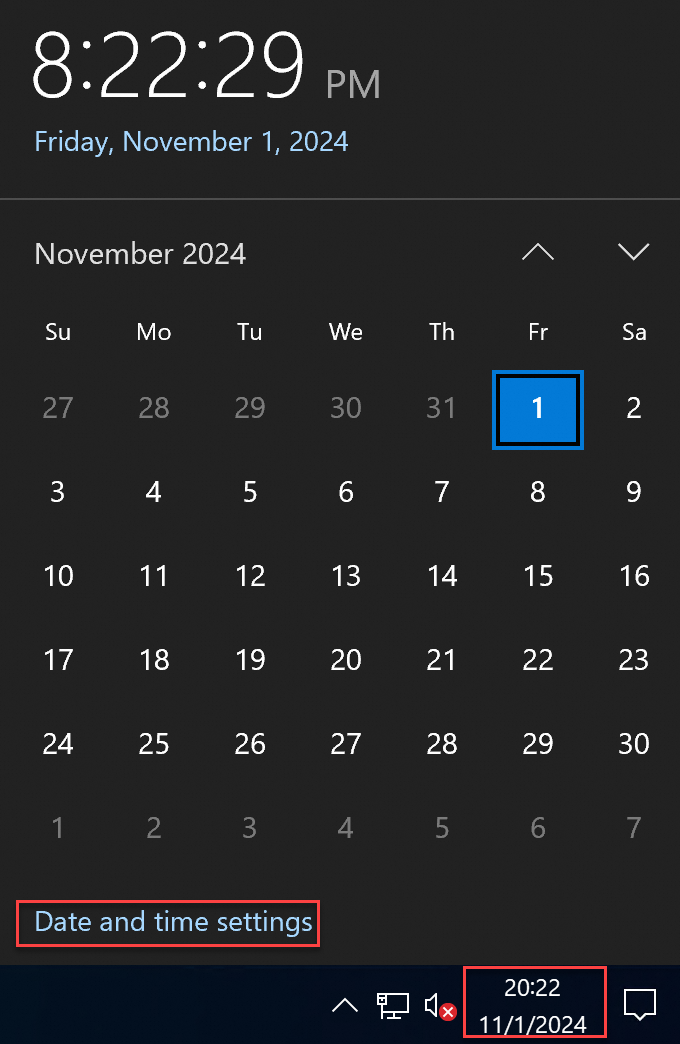
On the Settings page, click Related settings > Add clocks for different time zones.
In the Date and Time window, click Internet Time > Change settings.
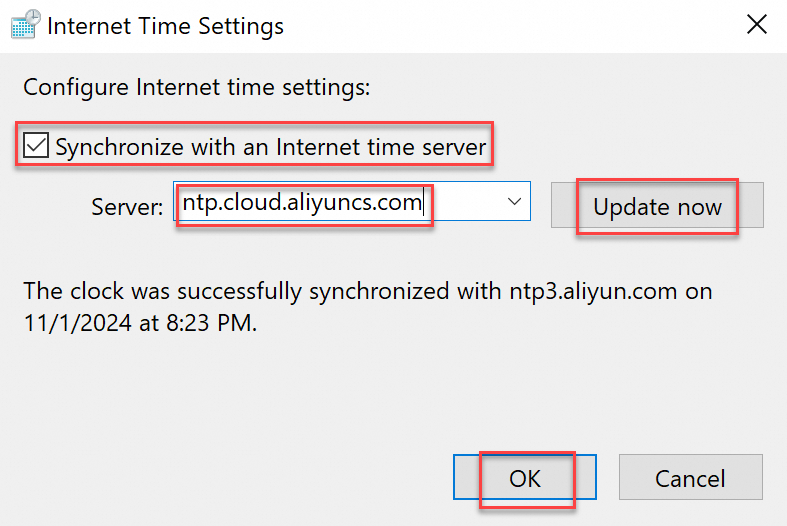
In the Internet Time Settings dialog box, select Synchronize with an Internet time server, enter
ntp.cloud.aliyuncs.com, click Update now, and then click OK.Verify time synchronization. A success message confirms synchronization with the server. If synchronization fails, check whether a firewall or security software is blocking UDP port 123.
Command-line interface (CLI)
Compared to the GUI, CLI lets you configure multiple time sources to enable automatic failover.
To configure time synchronization across multiple instances, use Cloud Assistant batch execution.
1. Configure NTP servers
We recommend replacing the default Windows Server NTP server (time.windows.com) with Alibaba Cloud NTP servers. The following steps use Windows Server 2022 as an example.
Press
Win + R, typecmd, and then pressEnterto open the command prompt.Set the NTP servers. For example, use
ntp.cloud.aliyuncs.com ntp7.cloud.aliyuncs.com ntp8.cloud.aliyuncs.com ntp11.cloud.aliyuncs.com.w32tm /config /manualpeerlist:"ntp.cloud.aliyuncs.com ntp7.cloud.aliyuncs.com ntp8.cloud.aliyuncs.com ntp11.cloud.aliyuncs.com" /syncfromflags:manual /reliable:YES /updateRestart the time service.
 net stop w32time
 net start w32time
Synchronize time with the NTP servers.
w32tm /resync
2. Verify time synchronization
Run w32tm /query /status. If the Source field shows Local CMOS Clock instead of your configured NTP server address, synchronization has failed.
w32tm /query /statusLeap Indicator: 0(no warning)
Stratum: 3 (secondary reference - syncd via (S)NTP)
Precision: -23 (119.209ns per tick)
Root Delay: 0.0020371s
Root Dispersion: 0.0191713s
Reference ID: 0x64640302 (source IP: 100.100.3.2)
Last Successful Sync Time: 2025/10/28 14:37:42
Source: ntp11.cloud.aliyuncs.com
Poll Interval: 10 (1024s)FAQ
Do I need to install or configure chronyd or ntpd inside containers (Docker/Kubernetes)?
No.
Never run chronyd or ntpd inside containers. Containers share the host’s time by default and do not require independent configuration. Running a time synchronization service inside a container causes clock resource contention with the host, which severely compromises workload stability.
How do I force manual system clock synchronization?
To avoid the risks associated with abrupt time jumps, do not manually synchronize the time. However, if the system clock deviates significantly from the standard time (for example, by several minutes or hours) and your workload can tolerate an abrupt time jump, you can perform a manual synchronization.
Linux (chrony)
Stop
chrony.sudo systemctl stop chronyd.serviceManually synchronize time.
ImportantFor fault tolerance and improved accuracy, do not use a single NTP time source. Before you manually synchronize the time, confirm that you have configured multiple Alibaba Cloud NTP servers.
sudo chronyd -qStart
chrony.sudo systemctl start chronyd.service
Linux (ntpd)
Alibaba Cloud Linux/CentOS/RHEL
Stop
ntpd.sudo service ntpd stopManually synchronize time.
ImportantThe NTP project is no longer maintained. Using
ntpdatefor manual synchronization carries a risk of abrupt time jumps. If you must use it, specify three or more time sources in the ntpdate command to mitigate risk. For more information about Alibaba Cloud NTP servers, see Alibaba Cloud NTP server domains.ImportantRunning
ntpdateperiodically using a script is not a valid replacement for an NTP daemon. NTP daemons use sophisticated algorithms to maximize time accuracy and reliability while minimizing resource usage.sudo ntpdate ntp.cloud.aliyuncs.com ntp7.cloud.aliyuncs.com ntp10.cloud.aliyuncs.com ntp11.cloud.aliyuncs.com ntp12.cloud.aliyuncs.comStart
ntpd.sudo service ntpd start
Ubuntu/Debian
Stop
ntpd.sudo service ntp stopManually synchronize time.
ImportantThe NTP project is no longer maintained. Using
ntpdatefor manual synchronization carries a risk of abrupt time jumps. If you must use it, specify three or more time sources in the ntpdate command to mitigate risk. For more information about Alibaba Cloud NTP servers, see Alibaba Cloud NTP server domains.sudo ntpdate ntp.cloud.aliyuncs.com ntp7.cloud.aliyuncs.com ntp10.cloud.aliyuncs.com ntp11.cloud.aliyuncs.com ntp12.cloud.aliyuncs.comStart
ntpd.sudo service ntp start
What are the Alibaba Cloud NTP server domain names?
The following table lists the Alibaba Cloud NTP server addresses for different networks (IPv4 only).
For Alibaba Cloud ECS instances: Use the VPC domains for lower network latency.
For non-Alibaba Cloud instances: Use the Internet domains.
VPC internal network | Public network |
ntp.cloud.aliyuncs.com ntp7.cloud.aliyuncs.com ntp8.cloud.aliyuncs.com ntp9.cloud.aliyuncs.com ntp10.cloud.aliyuncs.com ntp11.cloud.aliyuncs.com ntp12.cloud.aliyuncs.com | ntp.aliyun.com ntp1.aliyun.com ntp2.aliyun.com ntp3.aliyun.com ntp4.aliyun.com ntp5.aliyun.com ntp6.aliyun.com ntp7.aliyun.com |
Is the Alibaba Cloud NTP service free?
This service is provided at no charge. Alibaba Cloud public images include a default time synchronization configuration. By default, ECS instances created from these images use the Chrony or NTP service to synchronize time.
How do I upgrade from ntpd to chrony?
Some older Alibaba Cloud ECS images, such as CentOS 6, use the `ntpd` service. Because the NTP project is no longer maintained, we recommend that you upgrade to `chrony` if your workload does not depend on NTP.
Uninstall the
ntpservice.Alibaba Cloud Linux/CentOS/RHEL
sudo yum remove ntpUbuntu/Debian
sudo apt remove ntpInstall
Chrony.If the download fails, see How to resolve yum failures when installing chrony on CentOS 6 (EOL)?
Alibaba Cloud Linux/CentOS/RHEL
sudo yum install chronyUbuntu/Debian
sudo apt update

sudo apt install chrony
Configure
Chrony.Edit the configuration file.
Alibaba Cloud Linux/CentOS/RHEL
sudo vim /etc/chrony.confUbuntu/Debian
sudo vim /etc/chrony/chrony.confAdd NTP servers and other settings to the file. The following is a simple
chrony.confexample:# NTP server settings server ntp.cloud.aliyuncs.com minpoll 4 maxpoll 10 iburst # Specify the location of the drift file driftfile /var/lib/chrony/drift # Allow chronyd to be queried from localhost allow 127.0.0.1Parameter descriptions:
Parameter
Description
server ntp.cloud.aliyuncs.comThis is the NTP server domain name.
chronyconnects to this server for time synchronization.minpoll 4Specifies the minimum polling interval as a power of 2 in seconds.
minpoll 4means the minimum interval is 2⁴ = 16 seconds. This ensureschronysends at least one sync request every 16 seconds.maxpoll 10Specifies the maximum polling interval as a power of 2 in seconds.
maxpoll 10means the maximum interval is 2¹⁰ = 1024 seconds.iburstAn option that speeds up initial synchronization. When
chronystarts, it sends a burst of requests (typically 8) to quickly obtain accurate time from the server.Start the
chronyservice.Start the
Chronyservice and enable it to start on boot.# Start the chrony service sudo service chronyd start # Set chrony to start automatically when the system boots sudo chkconfig chronyd onCheck the
chronystatus. Use thechronyctool to check thechronystatus and synchronization.# Check the service status sudo service chronyd statusVerify time synchronization. Run the command to check the primary server status and the offset between your local clock and the time server.
sudo chronyc tracking
How to resolve yum failures when installing chrony on CentOS 6 (EOL)?
Clean old
repoconfigurations.sudo mkdir -p /etc/yum.repos.d/backup && sudo mv /etc/yum.repos.d/*.repo /etc/yum.repos.d/backup/Create a new configuration that points to the official archive. Run the following command to create a new
CentOS-Vault.repofile.sudo tee /etc/yum.repos.d/CentOS-Vault.repo <<'EOF' [C6.10-base] name=CentOS-6.10 - Base baseurl=http://vault.centos.org/6.10/os/$basearch/ gpgcheck=1 gpgkey=file:///etc/pki/rpm-gpg/RPM-GPG-KEY-CentOS-6 enabled=1 [C6.10-updates] name=CentOS-6.10 - Updates baseurl=http://vault.centos.org/6.10/updates/$basearch/ gpgcheck=1 gpgkey=file:///etc/pki/rpm-gpg/RPM-GPG-KEY-CentOS-6 enabled=1 [C6.10-extras] name=CentOS-6.10 - Extras baseurl=http://vault.centos.org/6.10/extras/$basearch/ gpgcheck=1 gpgkey=file:///etc/pki/rpm-gpg/RPM-GPG-KEY-CentOS-6 enabled=1 EOFClean and rebuild the cache.
sudo yum clean all && sudo yum makecacheDownloading chrony
sudo yum install chrony
References
For more information about Linux time concepts, operations, or changes to time configurations in Linux public images, see Linux time and time zones.
The Precision Time Protocol (PTP) time synchronization service uses hardware-level timestamps and dynamic path compensation to achieve sub-microsecond clock synchronization. This ensures timing consistency in distributed systems, which makes it ideal for scenarios that require high time precision, such as high-frequency financial trading.