You can build an FTP site on a Windows Elastic Compute Service (ECS) instance so that you can transfer files to or from the instance after you connect to the instance. This topic describes how to build an FTP site on a Windows ECS instance.
Prerequisites
An ECS instance that meets the following requirements is created:
The ECS instance is assigned a static public IP address (also called system-assigned or auto-assigned public IP address) or associated with an elastic IP address (EIP). For information about how to associate an EIP with an instance, see the Associate one or more EIPs with an instance section of the "EIPs" topic.
The ECS instance runs Windows Server 2012 R2 or later.
Step 1: Add Internet Information Services (IIS) and FTP server roles
Make sure that the IIS and FTP services are installed on the Windows ECS instance on which you want to build an FTP site. If you have not installed the IIS and FTP services on the instance, perform the following steps to install the services:
Connect to the Windows ECS instance.
For more information, see Use Workbench to connect to a Windows instance over RDP.
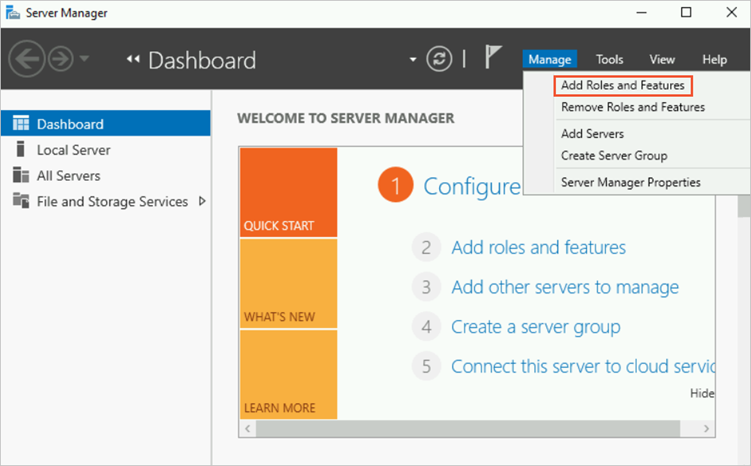
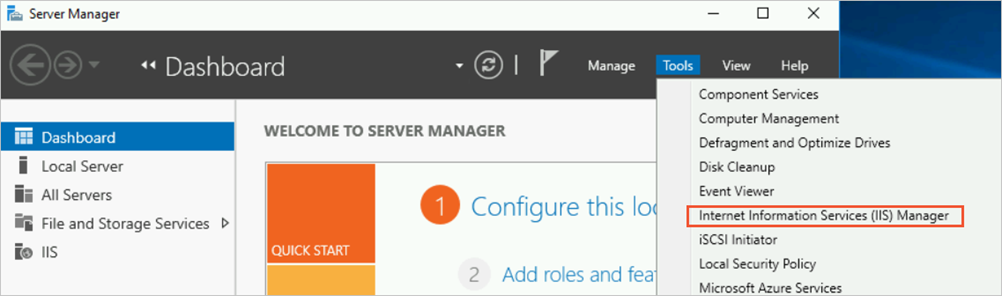
In the lower-left corner of the Windows desktop, click the
 icon. Then, find and click Server Manager.
 In the top navigation bar, choose .
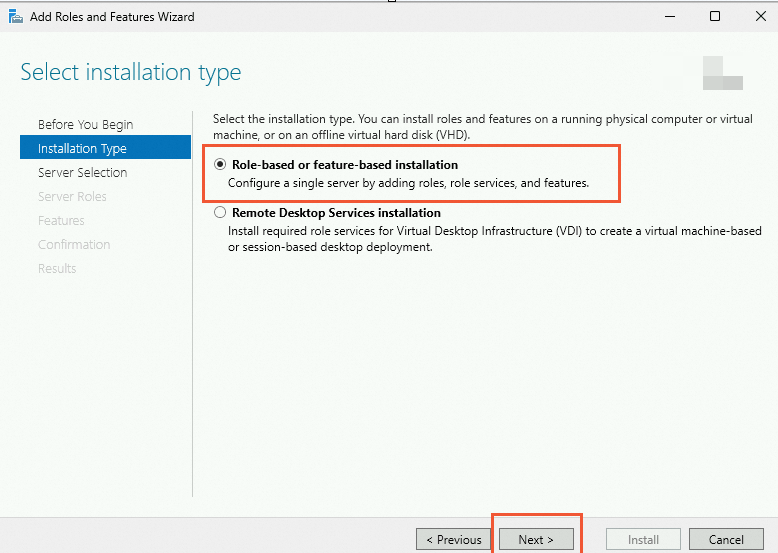
In the Before you begin step, click Next.
Select Role-based or feature-based installation and click Next.
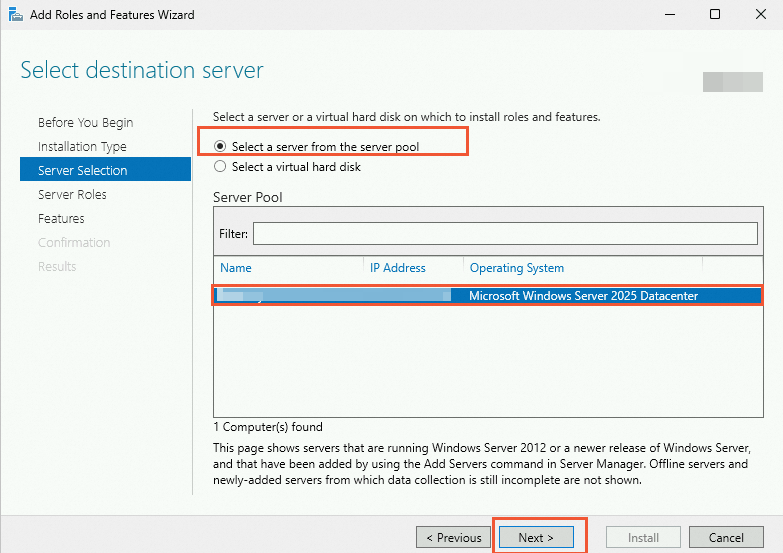
Select Select a server from the server pool, select the Windows ECS instance on which you want to build an FTP site, and then click Next.
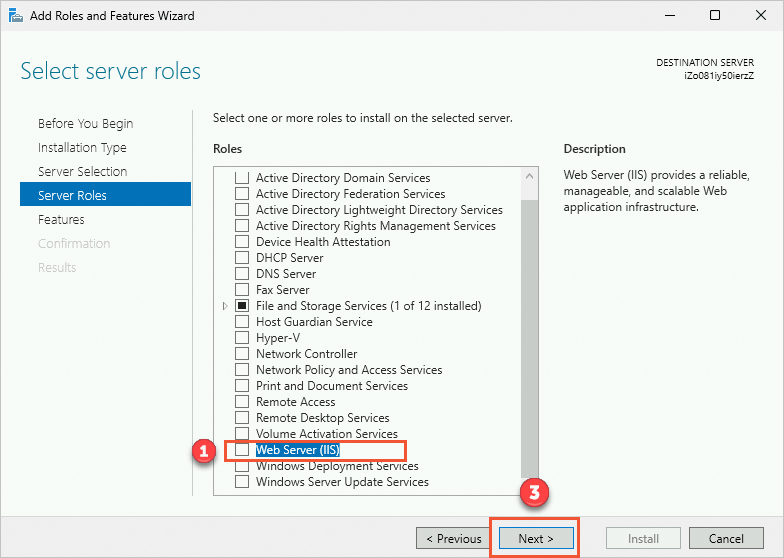
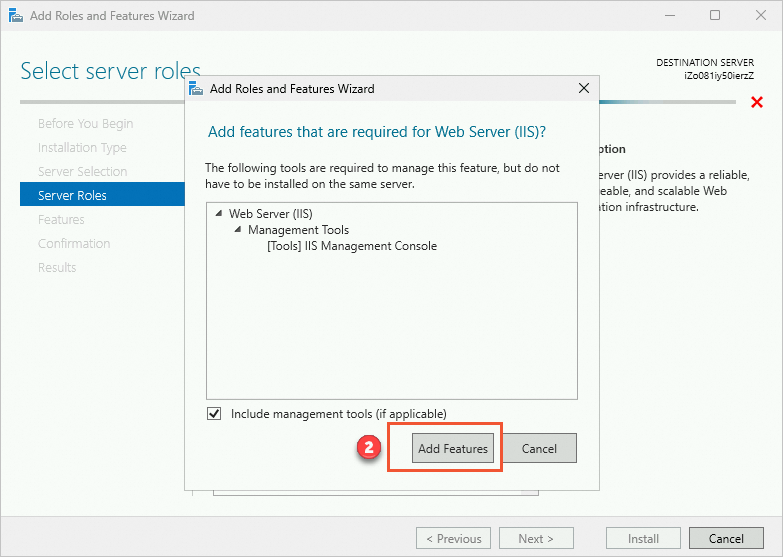
Select Web Server (IIS). In the dialog box that appears, click Add Features and then click Next.
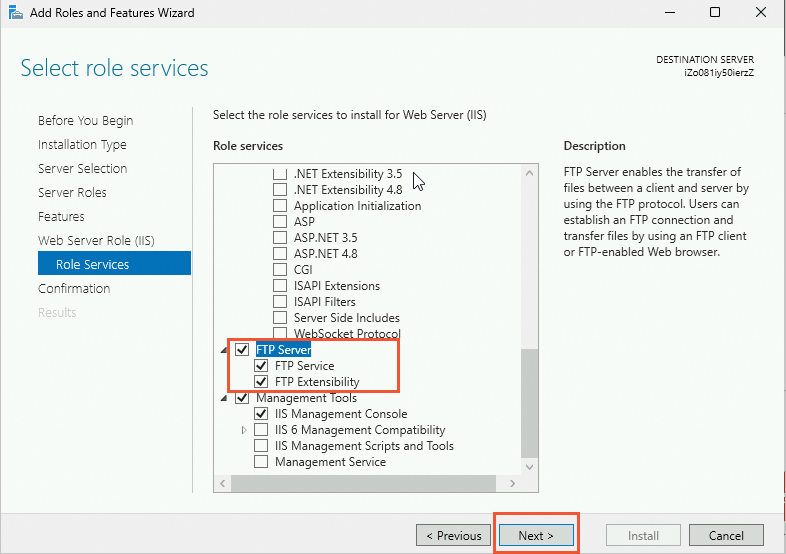
Use the default settings and click Next until you reach the Select role services step.
Select IIS Management Console and FTP Server and click Next.
Click Install. After the IIS and FTP server roles are added, click Close.
(Optional) Step 2: Create a Windows user
Create a Windows user to access the FTP site to be built. If you want to access the FTP site as an anonymous user with the anonymous or ftp username, skip the steps described in this section.
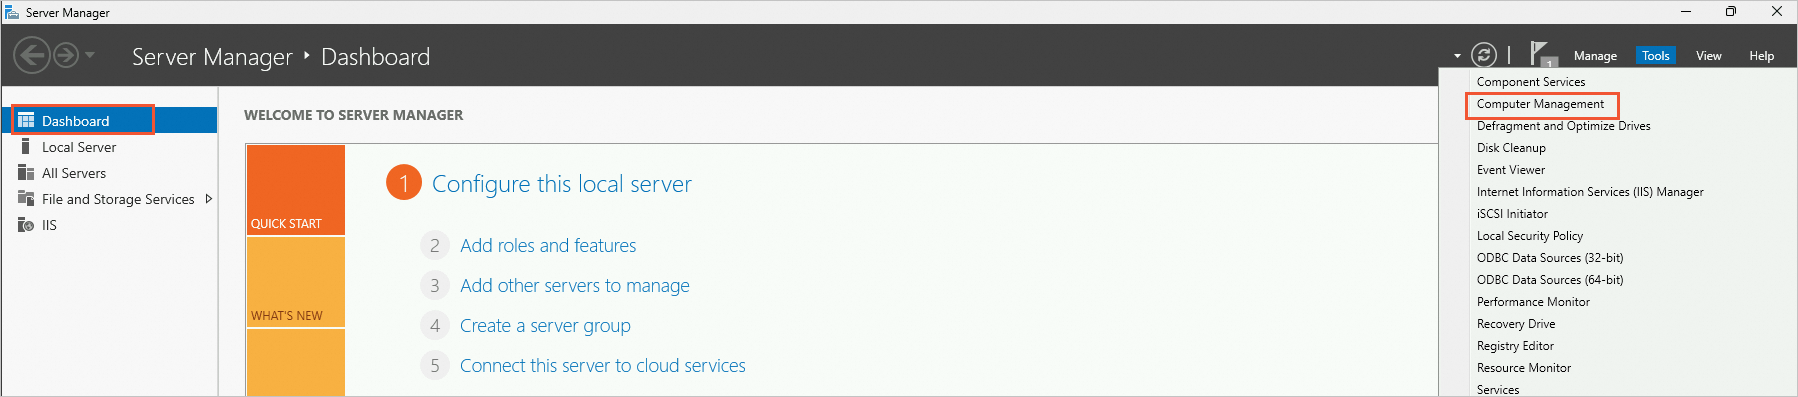
In the Server Manager window, choose .
In the left-side navigation pane, choose . Right-click the blank area in the middle pane and select New User.
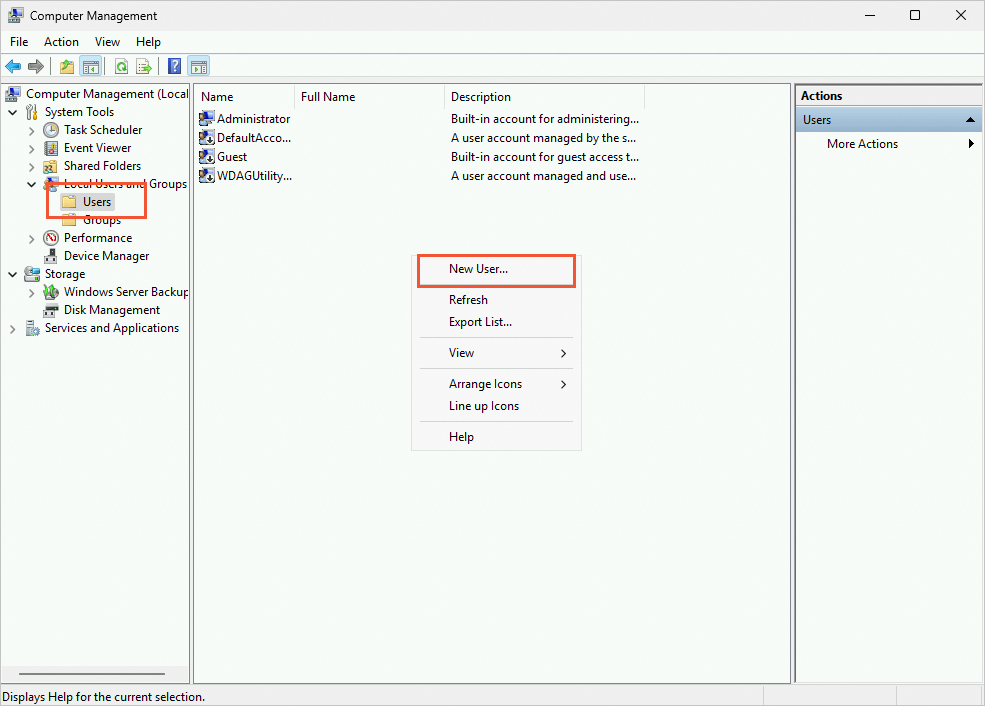
In the dialog box that appears, configure the User name and Password parameters.
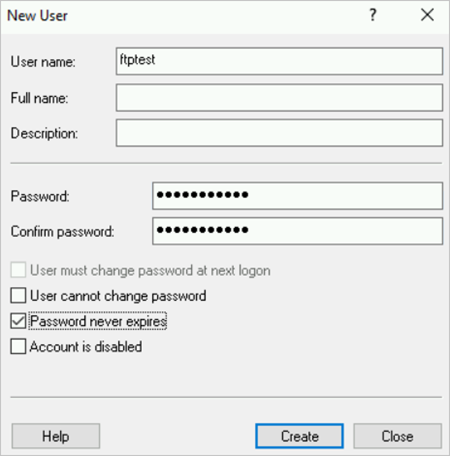 Configure the following parameters:
User name: Enter a username. In this example, the
ftptestusername is used.Password and Confirm password: Enter a password.
NoteThe password must contain uppercase letters, lowercase letters, and digits. Store your password in a secure location to prevent data security risks caused by password leaks.
Password-related settings: Select Password never expires.
Click Create and close the New User dialog box.
Step 3: Configure permissions for sharing files
Create a folder for sharing files with the FTP site and grant the access and modification permissions on the folder. Subsequently, when clients access the FTP site, all files are transferred by using this folder. Perform the following operations:
On a disk of the Windows instance, create a folder for the FTP site to use.
In this example, a folder named work is created on Disk C.
Right-click the work folder and select Properties.
Click the Security tab, select Everyone, and then click Edit.
If the Everyone option is unavailable, add the option. For information about how to add the option, see the What do I do if the Everyone option is unavailable when I configure permissions on a folder? section of the "FAQ about building an FTP site" topic.
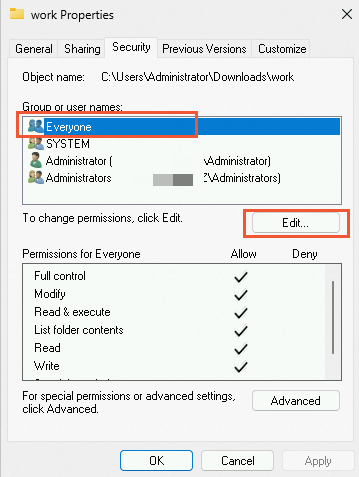
In the dialog box that appears, select Everyone, select permissions based on your business requirements, and then click OK.
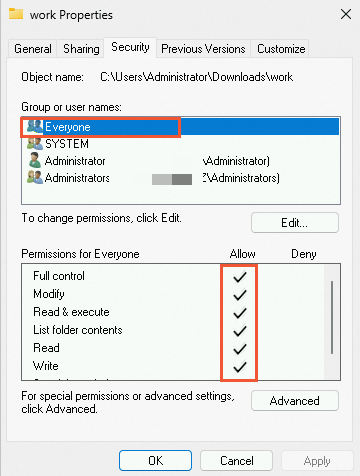
In this example, all permissions in the Allow column are selected.
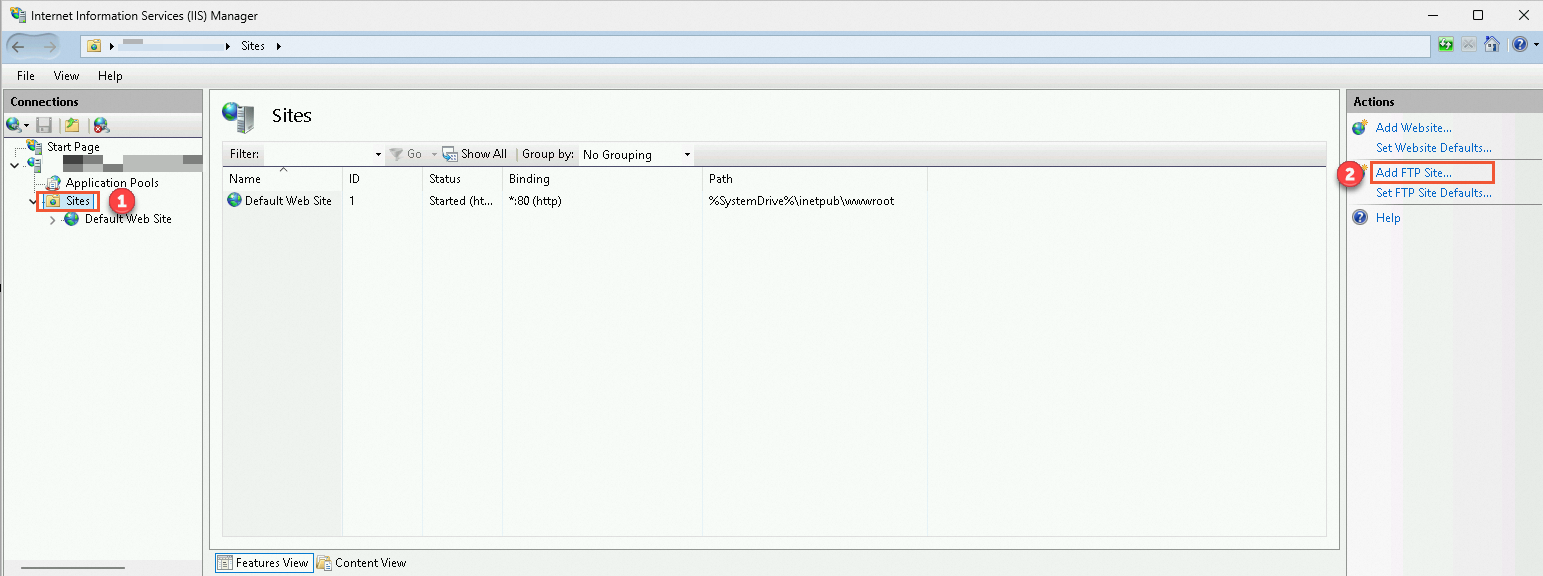
Step 4: Create and configure an FTP site
In the lower-left corner of the Windows desktop, click the
icon. Then, find and click Server Manager. In the top navigation bar, choose .
In the left-side navigation pane, choose . Then, in the Actions pane in the right part, click Add FTP Site...
In the dialog box that appears, configure parameters and click Next.
Configure the following parameters:
FTP site name: Enter a name for the FTP site. Example:
ftptest.Content Directory: Specify the path to the shared folder required by FTP. In this example, the shared folder is the work folder created on Disk C.
Configure the IP address and SSL settings and click Next.
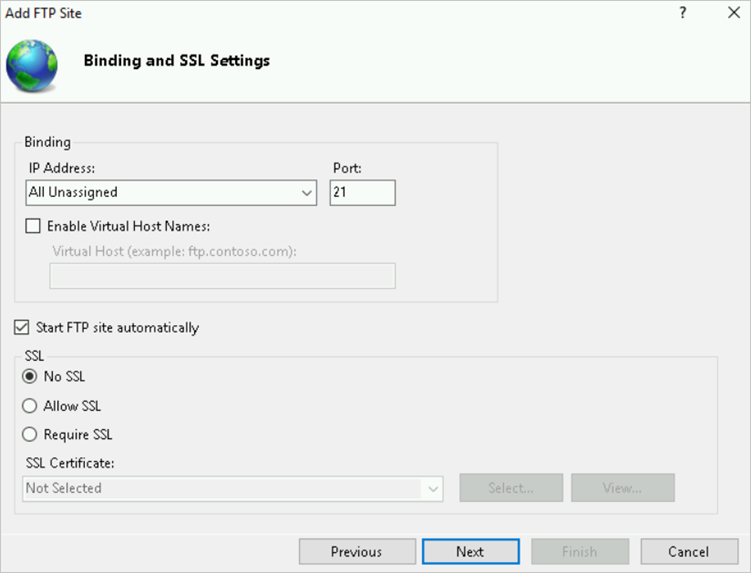 Configure the following parameters:
IP Address: Use the default settings.
SSL: In this example, No SSL is selected, which indicates that SSL encryption is not required. If you want to secure data transfers and already have an SSL certificate, select Allow SSL or Require SSL.
No SSL: SSL encryption is not required.
Allow SSL: The FTP server is allowed to support both non-SSL and SSL connections with a client.
Require SSL: SSL encryption is required for communication between the FTP server and a client.
Use the default settings for other parameters.
NoteIf you select Allow SSL or Require SSL, you must select an SSL certificate. You can select an existing SSL certificate or create a new SSL certificate. For information about how to create an SSL certificate, see the How do I create a server certificate? section of the "FAQ about building an FTP site" topic.
Configure authentication and authorization information and click Finish.
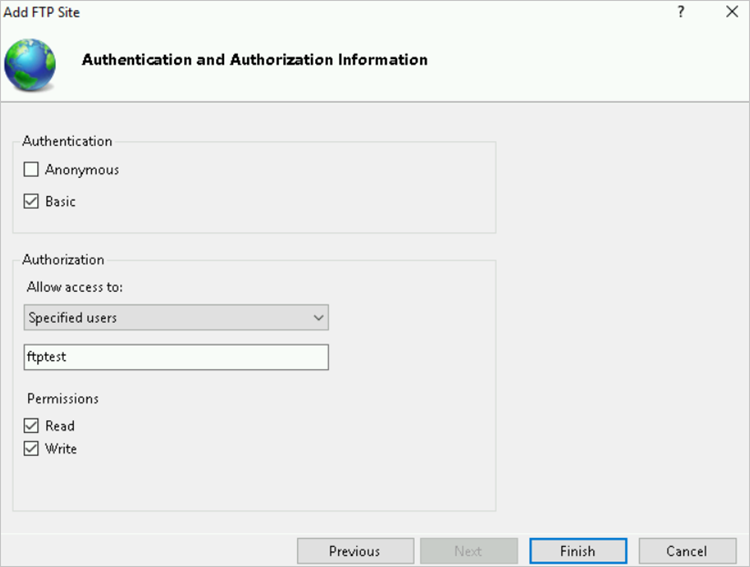 Configure the following parameters:
Authentication: In this example, only Basic is selected. Then, you can use the
ftptestuser that you created to access the FTP site. If you do not have security requirements on data transfers, you can select Anonymous so that you can access the FTP site as an anonymous user.Anonymous: allows users who provide the
anonymousorftpusername to access content.Basic: requires users to provide valid usernames and passwords to access content. Basic authentication transmits unencrypted passwords across the network. We recommend that you use basic authentication only when you are certain that the connection between the client and the FTP server is secure, such as when SSL encryption is used.
Authorization: In this example, Allow access to is set to Specified users, and ftptest is entered.
All users: All users are allowed to access the shared folder corresponding to the FTP site.
Anonymous users: Anonymous users can access the shared folder corresponding to the FTP site.
Specified roles or user groups: Only specified roles or members of specified groups can access the shared folder corresponding to the FTP site. Enter roles or groups in the corresponding field.
Specified users: Only specified users can access the shared folder corresponding to the FTP site. Enter usernames in the corresponding field. In this example, ftptest is entered.
Permissions: Select both Read and Write.
After you perform the preceding steps, you can view the built FTP site in the Internet Information Services (IIS) Manager window.
Configure the firewall of the FTP site.
In the Internet Information Services (IIS) Manager window, double-click the FTP site name
ftptestto go to the ftptest Home page.Double-click FTP Firewall Support in the list of features in the middle pane.
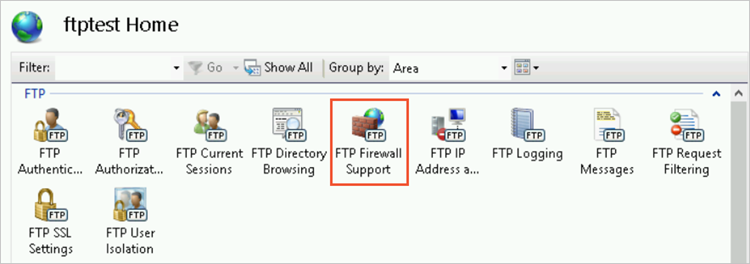
On the FTP Firewall Support page in the middle pane, configure the parameters and click Apply in the Actions pane.
Data Channel Port Range: Enter a port range for passive connections to the FTP service. Valid range for port numbers: 1024 to 65535. Specify a port range based on your business requirements.
External IP Address of Firewall: Enter the public IP address of the Windows ECS instance.
 Note
NoteFor information about the reasons for opening specific ports and suggestions on how to open ports in passive mode, see the What suggestions can I obtain when I configure ports in FTP passive mode? section of the "FAQ about building an FTP site" topic.
Open the Command Prompt window of the Windows ECS instance and run the following commands to restart the FTP service:
net stop ftpsvc

net start ftpsvc
Step 5: Configure security groups and the firewall
After you build the FTP site on the Windows ECS instance, add inbound rules to the security groups of the instance to allow traffic to port 21 and the passive port range of the FTP server. Valid port numbers for the passive port range: 1024 to 65535.
Specify the port range based on your business requirements. We recommend that you use ports with higher numbers. In this example, the port range of 40000 to 40100 is used.
In the security groups of the Windows ECS instance, add inbound rules to allow traffic to port 21 and ports in the range of 40000 to 40100.
For information about how to add a security group rule, see Add a security group rule.
 Note
NoteFor information about security groups, see Security groups for different use cases and Common ports.
(Optional) Configure the firewall of the Windows ECS instance.
By default, the firewall of the Windows ECS instance is disabled. If your firewall is enabled, open TCP port 21 and ports in the range of 40000 to 40100 for the FTP service.
For more information about firewall settings, see Build an FTP Site on IIS.
Step 6: Use a client to test access to the FTP site
You can use Windows File Explorer, command-line tools, browsers, or third-party FTP connection tools to test the FTP server. In this example, a Windows computer is used as an FTP client and Windows File Explorer is used to access the FTP site.
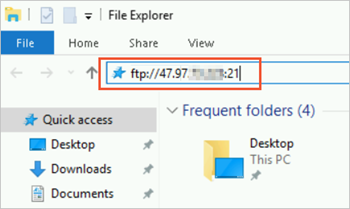
On the Windows computer, open Windows File Explorer and enter
ftp://<Public IP address of the FTP site>:21in the address bar.In this example, Windows 10 is used.
In the Log On As dialog box, configure logon credentials and click Log On.
In this example, the
ftptestusername and its password are used as credentials to log on to the FTP site.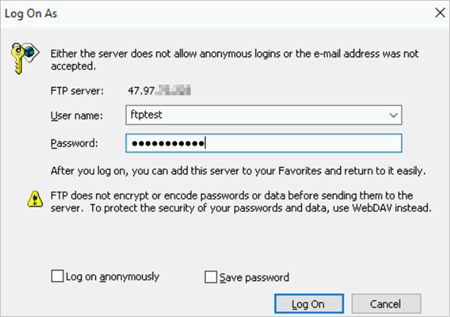 When you use Windows File Explorer to access the FTP site, if Use Passive FTP is not enabled for the IE browser on Windows, you cannot access the FTP site and the 200 and 501 error codes are returned. You can perform the following steps to enable Use Passive FTP for the IE browser and then access the FTP site again:
 On the Windows computer, open the IE browser.
In the upper-right corner, click the
 icon and select Internet options.
 Click the Advanced tab. In the Settings section, select Use Passive FTP (for firewall and DSL modem compatibility).
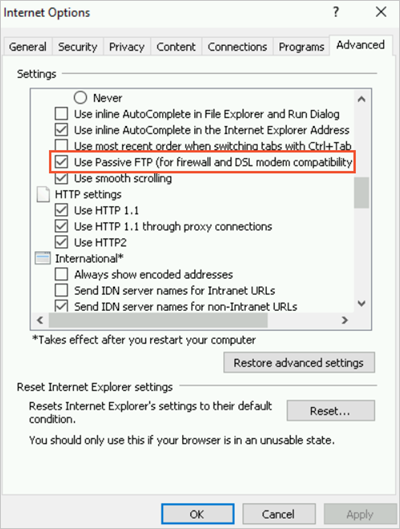
Click Apply and then click OK.
After you access the shared work folder that corresponds to the FTP site, you can create a test folder named test.
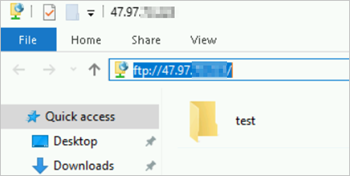 Then, you can relog on to the Windows ECS instance. If the FTP site is built and can be used for data transfers, you can find the test folder in the work folder on Disk C.
What to do next
If you want to manage files stored in Object Storage Service (OSS) by using FTP, you can install ossftp. For more information, see ossftp.
After ossftp receives a regular FTP request, ossftp maps operations on files and folders to operations on OSS objects.