Elastic Container Instance (ECI) is seamlessly integrated into Container Service for Kubernetes (ACK). You can use ACK clusters or ACK Serverless clusters to experience the container running capabilities provided by ECI. This topic describes how to use ECI instances in an ACK Serverless cluster.
Make preparations
To use ECI in ACK, you must activate the ACK and ECI services and assign the default roles to ACK.
Activate the ACK service, assign the default roles to ACK, and activate related cloud services. For more information, see Quickly create an ACK managed cluster.
Log on to the Elastic Container Instance console and follow the on-screen instructions to activate the ECI service.
Create an ACK Serverless cluster
This section describes only the basic configurations of an ACK Serverless cluster. In actual operations, configure relevant parameters and install corresponding components based on your business requirements. For more information, see Create an ACK Serverless cluster.
Go to the Create Cluster page.
Log on to the ACK console.
In the left-side navigation pane, click Clusters.
In the upper-right corner of the Clusters page, click Create Kubernetes Cluster.
In the upper part of the page, click the ACK Serverless tab, configure parameters in the Cluster Configurations step, and then click Next: Component Configurations.
The following table describes the key parameters. Configure other parameters based on your business requirements.
Parameter
Example
Description
Cluster Name
test
The name of the cluster.
Region
China (Beijing)
The region in which you want to create the cluster.
VPC
Create VPC
The virtual private cloud (VPC) to which the cluster belongs.
Create VPC: You must select a zone. The system automatically creates a VPC and a vSwitch in the zone. The system also automatically creates a NAT gateway in the VPC and configures SNAT rules for the VPC.
Select Existing VPC: Select an existing VPC and vSwitch.
Configure SNAT
Configure SNAT for VPC
If you want to enable Internet access for the cluster, you must configure SNAT rules.
If you choose to create a VPC, the system automatically configures SNAT rules for the VPC.
If you use an existing VPC, determine whether to configure SNAT rules based on your business requirements.
Service CIDR
172.21.0.0/20
The service CIDR block of the cluster. The CIDR block that you specify cannot overlap with that of the VPC or those of the existing clusters in the VPC. The CIDR block cannot be modified after the cluster is created. For more information, see Network planning of an ACK managed cluster.
Access to API Server
Expose API Server with EIP
Select or clear Expose API Server with EIP based on your requirements. The Kubernetes API server provides multiple HTTP-based RESTful API operations, which can be used to create, delete, modify, query, and monitor resources, such as pods and Services.
If you select Expose API Server with EIP, the system creates an Elastic IP Address (EIP) and associates the EIP with the SLB instance. In this case, the Kubernetes API server of the cluster is exposed to the Internet through port 6443 of the EIP. You can use kubeconfig files to connect to and manage the cluster over the Internet.
If you clear Expose API Server with EIP, no EIP is created. You can use kubeconfig files to connect to and manage the cluster only within the VPC.
Configure parameters in the Component Configurations step and click Next: Confirm Order.
Configure the components based on your business requirements. The use of components will incur related costs. In this tutorial, no components are used.
Verify the configurations, read and select the check box for the Terms of Service, and then click Create Cluster.
Go back to the Clusters page. If the cluster is in the Running state, the cluster is created.
Deploy an application in the ACK Serverless cluster
This section describes how to create an ECI instance in the ACK Serverless cluster and then deploy an application in the ECI instance.
On the Clusters page, find the ACK Serverless cluster in which you want to deploy the NGINX application and click the cluster name.
Create a Deployment to deploy the NGINX application.
In the left-side navigation pane, choose Workloads > Deployments.
In the upper-right corner of the Deployments page, click Create from YAML.
Modify the content of the YAML template and click Create.
By default, the Resource-basic Deployment sample template is selected. The YAML template declares two pods for the Deployment to be created. Each pod has an app: nginx label and runs a container where the NGINX application is deployed.
Noteimage: nginx:1.7.9in the sample template represents the NGINX 1.7.9 image that is to be pulled from Docker Hub. If Internet access is disabled for your cluster, the image cannot be pulled. Replace the image with an image in a VPC, such asimage: registry-vpc.cn-beijing.aliyuncs.com/eci_open/nginx:1.14.2.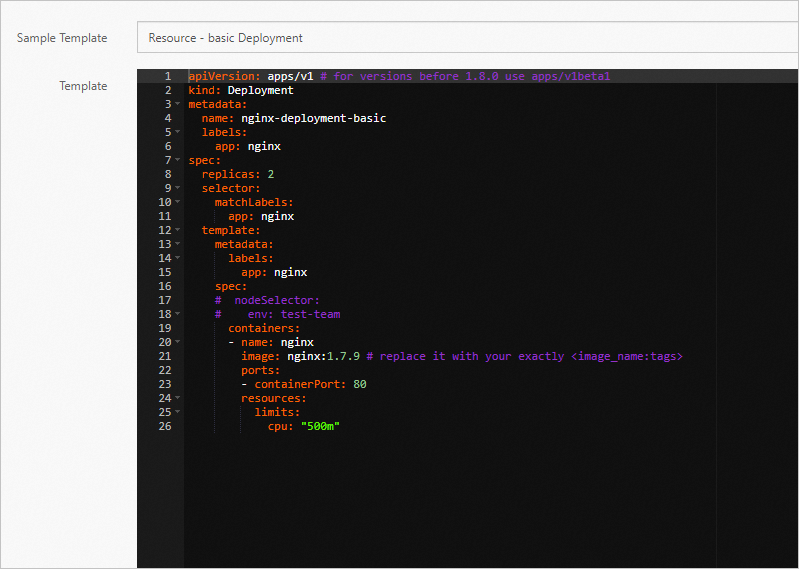
Check whether the Deployment is created.
On the Deployments page, view the information of the Deployment.
The value of
2/2in the Pods column of the Deployment indicates that the Deployment is created and the two pods in the Deployments are running.
On the Deployments page, click the name of the Deployment to view the details of the Deployment.
On the Pods tab, you can find that both pods are in the Running state. Click the name of a pod to view its details.
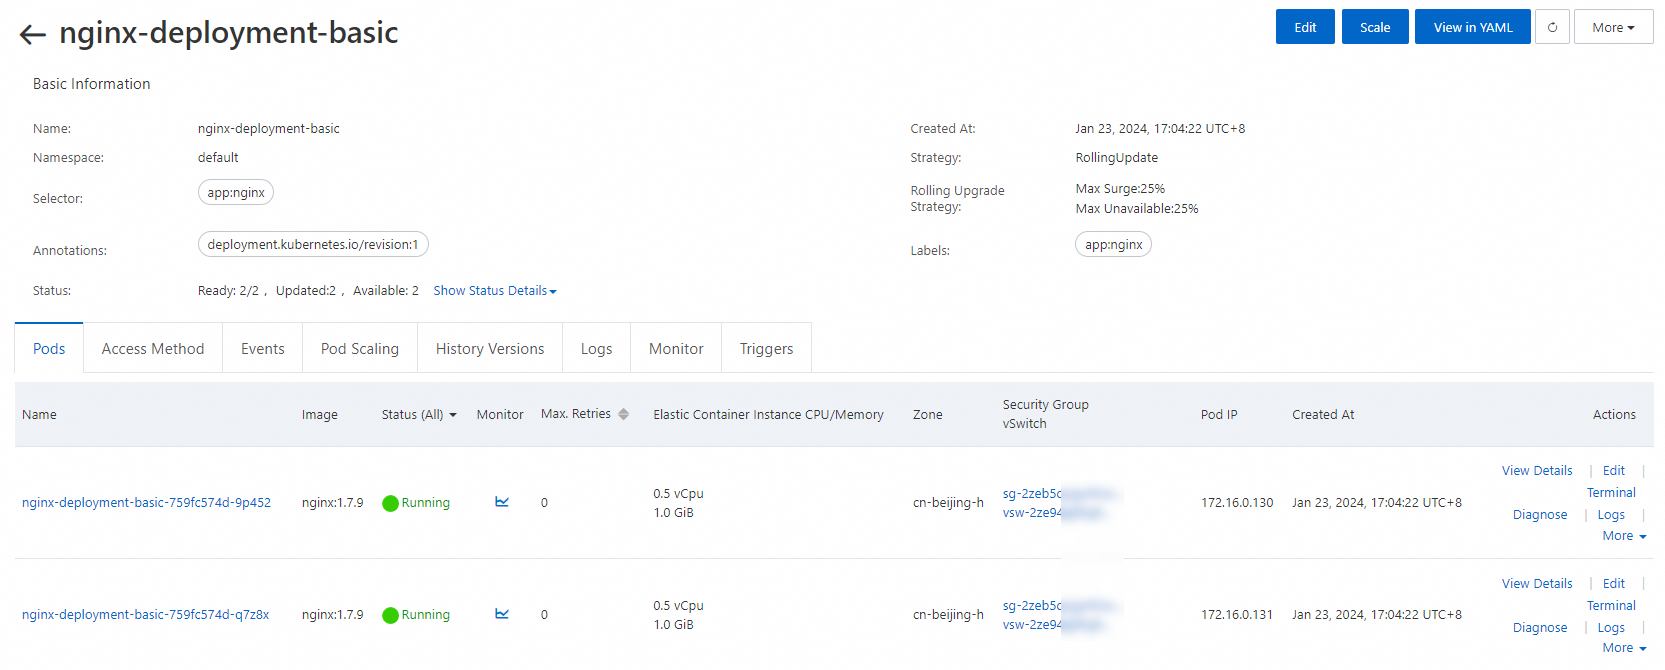
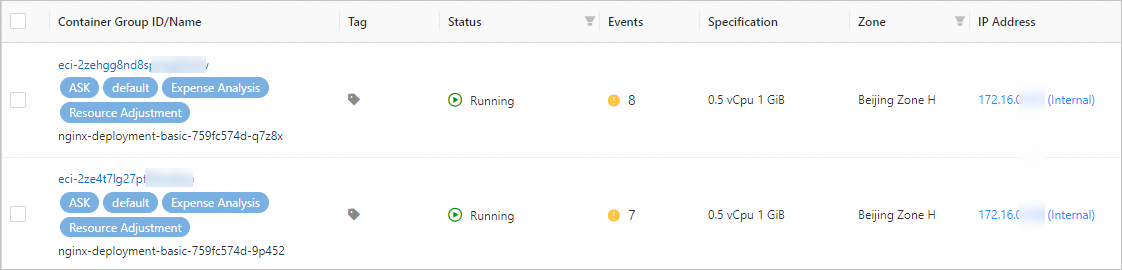
Each pod is an ECI instance. You can view the ECI instances on the Container Group page in the Elastic Container Instance console.
Create a Service for the NGINX application and configure the access mode of the NGINX application.
In the left-side navigation pane of the details page of the ACK Serverless cluster, choose Network > Services.
In the upper-right corner of the Services page, click Create Resources in YAML.
Copy the content of the following YAML file, paste the content to the Template editor, and click Create.
The following YAML file creates a Service of the LoadBalancer type. Port 80 is enabled. The pods (pods in the created Deployment) that have the app: nginx label are the backend servers of the Service.
apiVersion: v1
kind: Service
metadata:
  name: nginx-service
spec:
  ports:
  - port: 80
    protocol: TCP
  selector:
    app: nginx
  type: LoadBalancer
Check whether the Service is created.
On the Services page, click the name of the Service to view the details of the Service. The Service is automatically associated with the Deployment created in the previous step. The backend endpoints are the two pods that are contained in the Deployment.
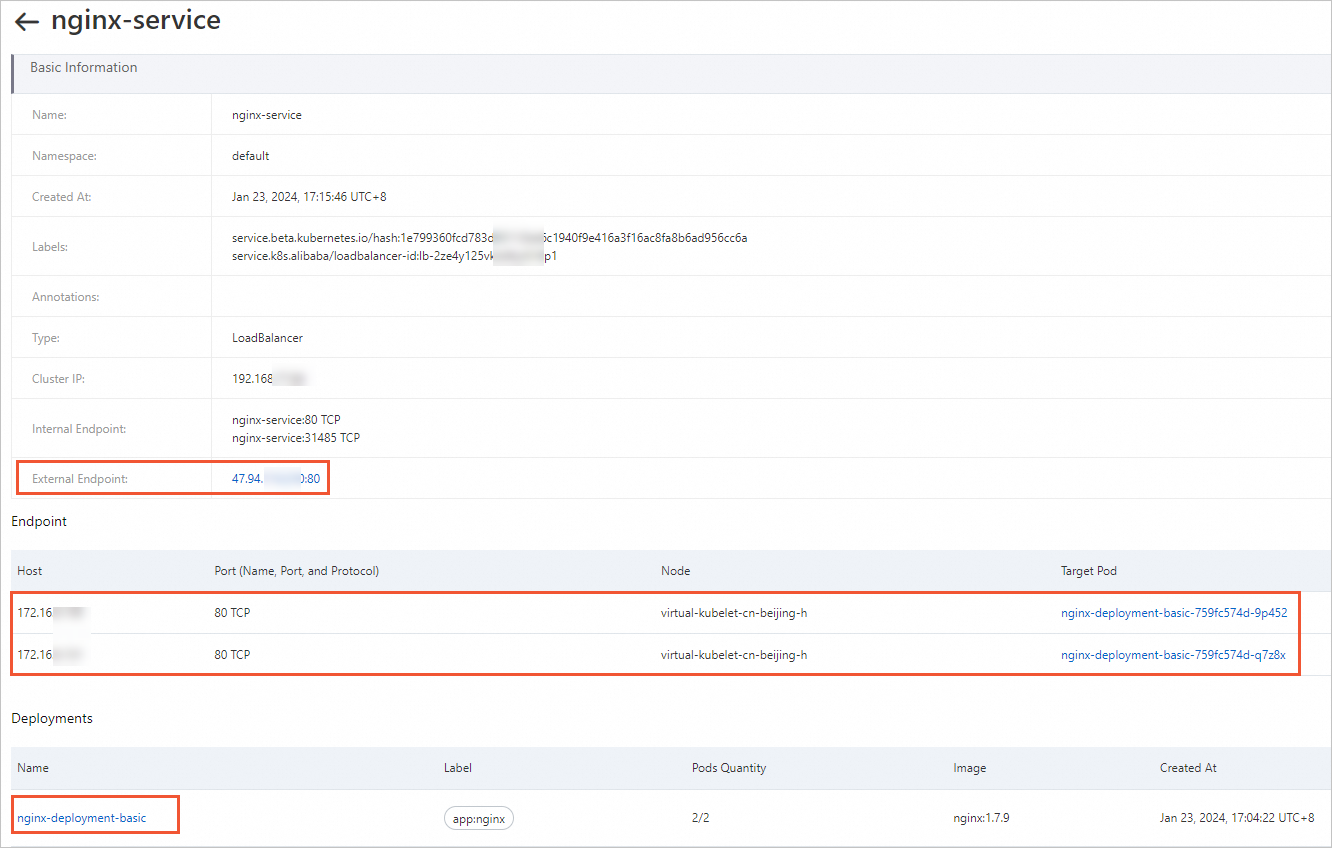
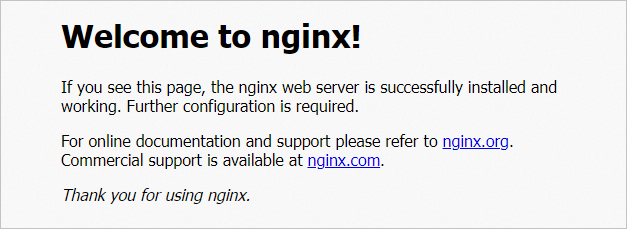
Access the NGINX application.
Click
IP Address: Port Numberin the Service External Endpoint to access the NGINX application.