A master hybrid-cloud cluster is deployed with the Open Grid Scheduler (SGE) scheduler, an existing on-premises cluster, and a new cluster on the cloud. The cluster on the cloud consists of multiple compute nodes and management nodes, and the on-premises cluster consists of compute nodes. This topic describes how to deploy a master hybrid-cloud cluster and manage on-premises compute nodes in the master hybrid-cloud cluster.
In this example, you must use the SGE scheduler. You also must submit a ticket to apply for adding your Alibaba Cloud account to the whitelist before you use the SGE scheduler.
Background information
A large number of life science enterprises have deployed data centers to perform high-performance computing on a large scale. However, the outdated IT infrastructure of data centers cannot keep up with the sharp rise of computing power requirements in life science. In some scenarios, life science enterprises may need to use the resources of data centers and build high-performance computing clusters on the cloud. To meet the requirements of these scenarios, Elastic High Performance Computing (E-HPC) provides a hybrid cloud solution to help manage computing resources across the cloud in a unified and efficient manner. Cloud resources allow the flexible scaling of E-HPC clusters.
Hybrid cloud clusters can be deployed in the following modes:
Master mode: Management nodes reside in a new cluster on the cloud.
Proxy mode: Management nodes reside in an existing cluster.
NoteIn proxy mode, an existing cluster resides in a data center or in a different region on the cloud.
Scenario
Assume that the compute nodes of the existing on-premises cluster have the following specifications:
Operating system: CentOS 7.6
ImportantThe operating system of on-premises compute nodes must be CentOS 7.
Specifications: 2 vCPUs and 4 GiB of memory
Procedure
This topic includes the following operations.
Operation | Description |
Prepare an E-HPC cluster on the cloud and configure the network. | |
Obtain the configurations of the E-HPC cluster to configure the on-premises compute nodes. | |
Deploy a scheduler client and a user management client on each on-premises compute node, and then mount a file system on each compute node. | |
Step 4: Add the on-premises compute nodes to the E-HPC cluster | Create a queue in the E-HPC cluster to manage the on-premises compute nodes, and then add the on-premises compute nodes to the queue. |
Configure the auto scaling settings for the E-HPC cluster to automatically add compute nodes to or remove compute nodes from the cluster. | |
Submit a test job to the queue to check whether the nodes are running as expected. | |
(Optional) Remove one or more on-premises compute nodes from the E-HPC cluster | Remove the on-premises compute nodes that you no longer need from the E-HPC cluster and stop their services. |
Step 1: Create an E-HPC cluster on the cloud
Create an E-HPC cluster.
For more information, see Create a cluster by using the wizard. Configure the following settings:
Deploy a tiny cluster that consists of one management node and one compute node. The compute node is optional. We recommend that you deploy the management node with an ECS instance that has 4 vCPUs and 8 GiB of memory.
Scheduler: Select opengridscheduler (SGE).
Domain account service: Select nis.
Establish a network connection between the E-HPC cluster and the data center.
You can establish a network connection between the E-HPC cluster and the data center with a VPN gateway or an Express Connect circuit.
For information about how to configure a VPN gateway, see Overview of IPsec-VPN connections or SSL-VPN overview.
For information about how to configure an Express Connect circuit, see What is a connection over an Express Connect circuit?
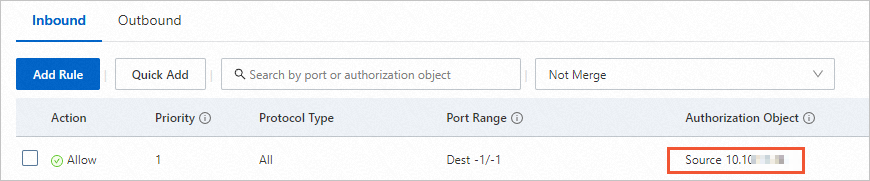
Configure the security group.
You need to configure an inbound rule for the security group to which the E-HPC cluster belongs. This allows on-premises compute nodes to access the E-HPC cluster and facilitates the unified management of the on-premises compute nodes and the E-HPC cluster.
On the details page of the E-HPC cluster, click the ID of the security group to go to the Security Groups page and add an inbound access rule. Set the CIDR blocks of the on-premises compute nodes to the source IP address, as shown in the following figure.
The following configurations are used in this topic.
Configuration item | Description |
Management node | One ECS instance is deployed. Instance type: ecs.c7a.xlarge.large. |
Compute node | One ECS instance and two local machines are deployed. Instance type: ecs.c7a.xlarge. Operating system: CentOS 7.6. |
Network | SSL-VPN is configured to establish a network connection between the E-HPC cluster and the data center. |
Step 2: Obtain the configurations of the E-HPC cluster
After you create the E-HPC cluster, you need to obtain the configurations of the E-HPC cluster to configure the on-premises compute nodes.
Log on to the E-HPC cluster. For more information, see Log on to a cluster.
Run the following command to download the script that is used to obtain the configurations:
wget https://public-ehpc-package.oss-cn-hangzhou.aliyuncs.com/scheduler/offpremise_config_fetch.shRun the following command to execute the script:
source offpremise_config_fetch.shThe output file OFFPREMISE_PARAMS contains the configurations of the E-HPC cluster. Run the
catcommand to obtain the configurations.
Step 3: Deploy the on-premises compute nodes
You need to deploy a scheduler client and a user management client on each on-premises compute node, and then mount a file system on each compute node.
Before you perform step 2, make sure that the network between the on-premises compute nodes and the E-HPC cluster is connected. If you use SSL-VPN to establish a network connection between the on-premises compute nodes and the E-HPC cluster, you must install an SSL client on each on-premises compute node.
Single on-premises compute node
Log on to an on-premises compute node and perform the following operations:
Run the following command to download the script that is used to deploy the on-premises compute node:
wget https://public-ehpc-package.oss-cn-hangzhou.aliyuncs.com/scheduler/deploy_nis_sge_client.shRun the following command to execute the script:
sh deploy_nis_sge_client.sh <Cluster configurations>Replace
<Cluster configurations>with the cluster configurations. Example:sh deploy_nis_sge_client.sh ehpc-hz-e5WF****** manager 10.18.XX.XX 000a******-vm***.cn-hangzhou.nas.aliyuncs.com:/ehpc-hz-e5WF****** manager 10.18.XX.XX
Multiple on-premises compute nodes
Log on to the on-premises configuration node or a compute node and perform the following operations. Make sure that the network between the configuration node or the compute node and other on-premises compute nodes is connected.
Run the following command to download the script that is used to deploy the on-premises compute nodes:
wget https://public-ehpc-package.oss-cn-hangzhou.aliyuncs.com/scheduler/batch_install_clients.shRun the following command to create a file named hosts:
Each row in the hosts file indicates an on-premises compute node. Format:
[host_name] [host_ip]format. Example:
Run the following command to execute the script:
sh batch_install_clients.sh <Cluster configurations> ./hostsReplace
<Cluster configurations>with the cluster configurations. Example:sh batch_install_clients.sh ehpc-hz-e5WF****** manager 10.18.XX.XX 000a******-vm***.cn-hangzhou.nas.aliyuncs.com:/ehpc-hz-e5WF****** manager 10.18.XX.XX ./hosts
Step 4: Add the on-premises compute nodes to the E-HPC cluster
On-premises compute nodes cannot be moved among queues. Therefore, you must create a queue in the E-HPC cluster to manage the on-premises compute nodes, and then add the on-premises compute nodes to the queue.
Create a queue. For more information, see Manage a queue.
Add the on-premises compute nodes to the E-HPC cluster.
On the Clusters page of the E-HPC console, find the E-HPC cluster and click Resize.
In the Resize panel, click the On-premises Node tab.
Select the created queue, enter or import the information of the on-premises compute nodes based on your needs, and then click OK.
Enter or import the following information:
Hostname: the hostname of the compute node.
Node ID/IP Address: the IP address of the compute node.
CPU: the number of CPUs of the compute node that is viewed by running the
lscpucommand.Memory: the memory size of the compute node.
ImportantMake sure that the hostname and host IP address of each on-premises compute node are valid. Otherwise, the compute node cannot be added to the cluster.
For the on-premises compute nodes that use SSL-VPN to establish network connections, enter the IP address of tun0 for the VPN gateway. You can run the
ifconfigcommand to view the IP address of tun0 for the VPN gateway.
On the Nodes page, find the E-HPC cluster and query the on-premises compute nodes by node type or queue.
Refresh the page to update the status of the on-premises compute nodes. Wait for 1 or 2 minutes. If the on-premises compute nodes enter the Running state, the nodes are added.
Step 5: Configure auto scaling
E-HPC clusters support the auto scaling feature. You can configure the auto scaling settings for the E-HPC cluster to automatically add compute nodes to or remove compute nodes from the cluster based on the real-time workloads. For more information, see Configure an auto scaling policy.
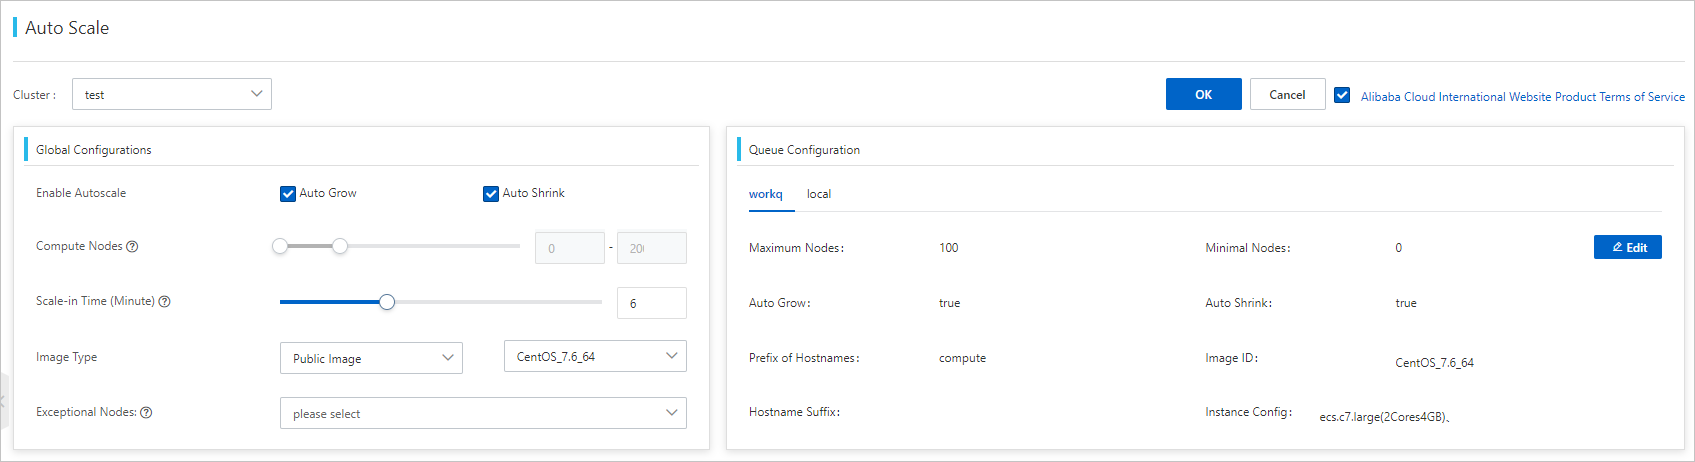
On-premises compute nodes and the queue to which the compute nodes belong does not support the auto scaling feature.
Step 6: Submit a test job
Run the following command to submit a test job to the queue to which the nodes on the cloud belong and check whether the nodes are running as expected.
qsub sample1.shThe script file sample1.sh provides an example. Replace the
-qparameter with the queue to which the nodes on the cloud belong and the-oand-eparameters with the actual paths:#!/bin/bash #$ -cwd #$ -l vf=1G #$ -q workq #$ -N sge-demo1 #$ -o /home/test/ #$ -e /home/test/ echo "demo start, sleep 10s and ping localhost" sleep 10 ping -c 10 localhost echo "demo complete"Run the following command to submit a test job to the queue to which the on-premises compute nodes belong:
qsub sample2.shThe script file sample2.sh provides an example. Replace the
-qparameter with the queue to which the nodes on the cloud belong and the-oand-eparameters with the actual paths:#!/bin/bash #$ -cwd #$ -l vf=1G #$ -q local #$ -N sge-demo2 #$ -o /home/test/ #$ -e /home/test/ echo "demo start, sleep 10s and ping localhost" sleep 10 ping -c 10 localhost echo "demo complete"
(Optional) Remove one or more on-premises compute nodes from the E-HPC cluster
Remove one or more on-premises compute nodes from the E-HPC cluster.
For more information, see Restart, reset, and delete a node.
Stop the services of the on-premises compute nodes.
Single on-premises compute node
Log on to an on-premises compute node and perform the following operations:
Run the following command to download the script that is used to stop the services:
wget https://public-ehpc-package.oss-cn-hangzhou.aliyuncs.com/scheduler/nis_sge_client_stop.shRun the following command to execute the script:
sh nis_sge_client_stop.sh <Cluster configurations>Replace
<Cluster configurations>with the cluster configurations. Example:sh nis_sge_client_stop.sh ehpc-hz-e5WF****** manager 10.18.XX.XX 000a******-vm***.cn-hangzhou.nas.aliyuncs.com:/ehpc-hz-e5WF****** manager 10.18.XX.XX
Multiple on-premises compute nodes
Log on to the on-premises configuration node or a compute node and perform the following operations. Make sure that the network between the configuration node or the compute node and other on-premises compute nodes is connected.
Run the following command to download the script that is used to stop the services:
wget https://public-ehpc-package.oss-cn-hangzhou.aliyuncs.com/scheduler/batch_stop_clients.shCreate a file named hosts.
Each row in the hosts file indicates an on-premises compute node. Format:
[host_name] [host_ip]. Example:Run the following command to execute the script:
sh batch_stop_clients.sh <Cluster configurations> ./hostsReplace
<Cluster configurations>with the cluster configurations. Example:sh batch_stop_clients.sh ehpc-hz-e5WF****** manager 10.18.XXX.XX 000a******-vm***.cn-hangzhou.nas.aliyuncs.com:/ehpc-hz-e5WF****** manager 10.18.XX.XX ./hosts