View the status, configuration, and services of an E-HPC cluster, and update its basic settings or logon password.
View cluster information
Log on to the E-HPC console.
In the left part of the top navigation bar, select a region.
In the left-side navigation pane, click Cluster.
On the Cluster Details page, select a tab to view the corresponding information.
| Tab | What you can do |
|---|---|
| Overview | Monitor node status, shared storage, cost estimates, custom service components, and cluster activities. Use this tab to get an at-a-glance view of cluster health and access logs and statistical analysis. |
| Cluster Configuration | Review basic, network, and version information for the cluster. Use this tab to modify basic settings such as the cluster name, post-processing script, and node limits. |
| Control Services | Check the status of the scheduler, domain accounts, and domain name resolution. Use this tab to view real-time service health and control plane node details, including instance ID, instance type, billing method, image ID, and operating system. |
| Custom Services | Browse all logon nodes and their details. Use this tab to inspect node status, service endpoints, and custom parameters. |
| Software Applications | Review all software applications installed on the cluster. Use this tab to check their names, versions, statuses, and creation times. |
Modify cluster configuration
Log on to the E-HPC console.
In the left part of the top navigation bar, select a region.
In the left-side navigation pane, click Cluster.
On the Cluster Details page, click the Cluster Configuration tab.
In the Basic Information section, click Edit Basic Information.
In the dialog box that appears, configure the parameters.
| Parameter | Description |
|---|---|
| Cluster Name | The name displayed in the cluster list. Update this to help distinguish the cluster from others. |
| Cluster Post-processing Script | A script that runs after compute nodes are created. Use this to apply custom initialization steps to compute nodes. |
| Maximum Number of Nodes | The maximum number of nodes allowed in the cluster. Together with Maximum Number of Cores, this setting controls the cluster size. |
| Maximum Number of Cores | The maximum number of cores allowed in the cluster. Together with Maximum Number of Nodes, this setting controls the cluster size. |
| Cluster Deletion Protection | Enable or disable deletion protection. When enabled, the cluster cannot be released until this setting is disabled—preventing accidental deletion. |
| Resource Group | The resource group to which the cluster belongs. For more information, see Resource groups. |
Click OK.
Reset the cluster password
If you forget the root user logon password for the cluster, you can reset it. Perform this operation only when no jobs are running.
Before resetting the password, note the following:
This operation resets the root user password for logon nodes, control plane nodes, and compute nodes added during scale-out. Passwords of existing compute nodes are not reset.
To prevent logon failures on newly added compute nodes, release all existing compute nodes before resetting the password. For instructions, see Delete nodes.
Disable auto scaling for the cluster and its queues before resetting the password. For instructions, see Auto scaling.
After resetting the password, restart the ECS instances from the ECS console for the new password to take effect. Restarting from within the operating system is not effective. For more information, see Restart an instance.
Log on to the E-HPC console.
In the left part of the top navigation bar, select a region.
In the left-side navigation pane, click Cluster.
On the Clusters page, find the target cluster, click the
 icon in the upper-right corner, and select Reset Cluster Password.
In the dialog box that appears, follow the on-screen instructions to complete the operation.
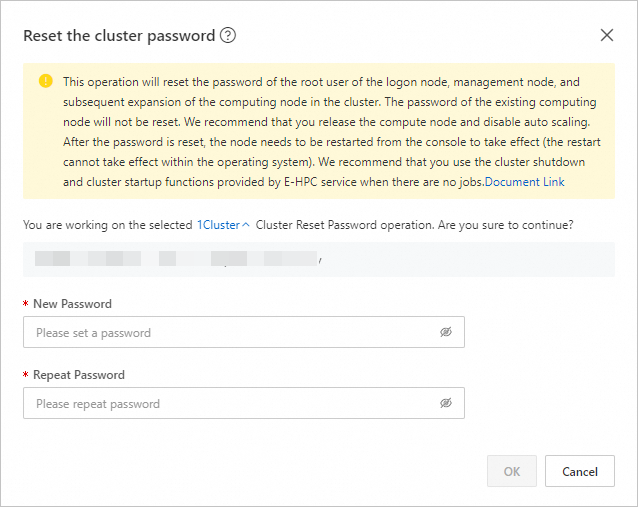
Click Confirm.
Log on to the cluster with the new root user password to verify that the password was reset successfully.
For more information, see Connect to a cluster.
API reference
To modify cluster configuration using an API operation, see UpdateCluster.