Elastic High Performance Computing (E-HPC) provides the reserved node pool feature to help you optimize node scale-ins and scale-outs for clusters. A reserved node pool provides pre-configured nodes to which fixed IP addresses and host name mappings are bound. This ensures that these pre-assinged resources can be quickly reused during dynamic scale-ins and scale-outs, thus improving cluster management efficiency and operation stability.
Application of reserved node pools in resource delivery
The following figure shows the difference between reserved node pool-based resource delivery and regular resource delivery.
Similarities
Essentially, both methods obtain network resources from a vSwitch to scale out nodes.
The overall scaling process remains unchanged.
Differences
Instead of using random IP addresses, the reserved node pool-based method uses pre-configured IP addresses and host names.
The regular method does not provide information about CIDR block usage. In comparison, the reserved node pool-based method shows clearly the usage of nodes in the pool.

Prerequisites
The cluster is in the Running state.
Use reserved node pools in clusters
Create a reserved node pool
Go to the Cluster Details page.
Log on to the E-HPC console.
In the left part of the top navigation bar, select a region.
In the left-side navigation pane, click Cluster.
On the Cluster List page, find the cluster that you want to manage and click the cluster ID.
In the left-side navigation pane, choose .
Click Preset Node Pool. In the Add Preset Node Pool tab of the Manage Preset Node Pools page, configure the following parameters.
Parameter
Description
Name
Enter a name for the reserved node pool.
NoteThe naming format for nodes created in the reserved node pool is
<prefix>[index,3]<postfix>, where postfix supports setting the ADZone name.Virtual Switch
The vSwitch to which the reserved node pool belongs.
Prefix of Hostnames
The host name prefix of the reserved nodes.
Hostname Suffix
The host name suffix of the reserved nodes.
Pool Capacity
The maximum allowed number of nodes in a reserved node pool is 500.
The number of nodes in a reserved node pool cannot exceed the number of available IP addresses in the associated vSwitch.
Click OK.
NoteCreating and updating the properties of a reserved node pool takes some time. You can check the node pool status by calling the
ListReservedNodePoolsoperation.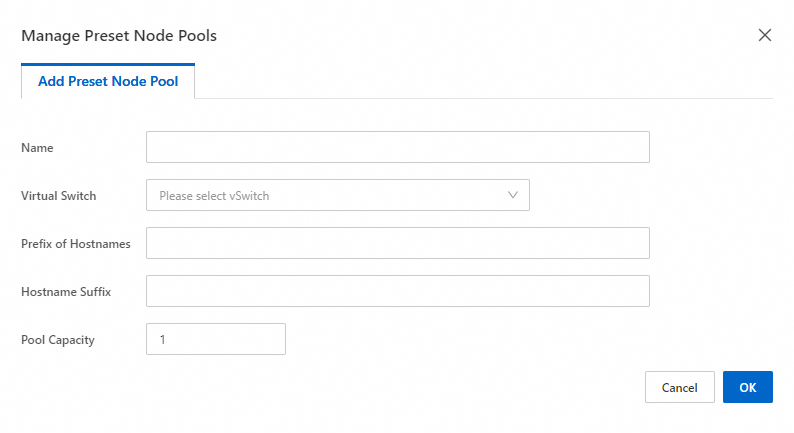
Resource delivery by using reserved node pools
The following sections describe two methods to use a reserved node pool to scale out a cluster: manually and automatically.
If the number of instances to be added in the scale-out exceeds the capacity of the reserved node pool, the delivery is performed based on the capacity.
Scale out a cluster by using a reserved node pool
Log on to the E-HPC console and go to the Cluster Details page. In the left-side navigation tree, choose .
Click Add Node. On the Add Node page, configure the following parameters.
Basic Settings
Parameter
Description
Destination Queue
Select a queue that you created in the cluster.
Nodes
Specify the number of nodes that you want to add to the cluster.
Node Configurations
Parameter
Description
Select Node Type
You can select only Create Node.
Inter-node Interconnection
Specify the network connection mode between nodes.
VPC Network: Nodes communicate over a virtual private cloud (VPC).
eRDMA Network: If the nodes use types that support ERI, the nodes can communicate over an elastic Remote Direct Memory Access (eRDMA) network.
NoteOnly some instance types support ERI. For more information, see Overview and Enable eRDMA on an enterprise-level instance.
Use Preset Node Pool
Select a created reserved node pool. The system will automatically select IP addresses and host names from unassigned reserved nodes in the reserved node pool to create compute nodes.
Instance type Group
Click Add Instance and select an instance type.
If you do not enable auto scaling, you can add only one instance type. If you enable automatic scaling, you can add multiple instance types.
Instance RAM role
Bind a Resource Access Management (RAM) role to the nodes to enable the nodes to access Alibaba Cloud services.
We recommend that you select the default role AliyunECSInstanceForEHPCRole.
Click Confirm Add.
NoteThe applications in the cluster are automatically installed on the added compute nodes, and the compute nodes are automatically initialized. Existing compute nodes are not affected by this.
You can view the status of the added nodes in the node list. When the node status is Running, the cluster is scaled out.
Create and configure a queue by using a reserved node pool
Relationship between reserved node pools and queues:
A single cluster can have multiple reserved node pools, and a reserved node pool can only belong to a single cluster.
A single queue can be bound to one reserved node pool, and a reserved node pool can be used by multiple queues.
A single reserved node pool corresponds to one vSwitch.

Log on to the E-HPC console and go to the Cluster Details page. In the left-side navigation tree, choose .
Click Create Queue. On the Create Queue page, configure the following parameters.
Basic Settings
Parameter
Description
Queue Name
Enter a queue name. The name must meet the following requirements:
The name is 1 to 15 characters in length.
The name contains one or more of the following character types: uppercase letters, lowercase letters, digits, and underscores (_).
Automatic queue scaling
Specify whether to enable Automatic Scaling. After enabling it, you can further choose whether to enable Auto Grow and Auto Shrink based on your busiess requirements.
After you enable automatic queue scaling, the system automatically adds or removes compute nodes based on the configurations and real-time workloads.
Queue Compute Nodes
Specify the number of compute nodes in the queue.
If you do not enable Automatic queue scaling, configure the initial number of compute nodes in the queue.
If you enable Automatic queue scaling, configure the minimum and maximum numbers of compute nodes in the queue.
ImportantIf you set the Minimal Nodes parameter to a non-zero value, the queue retains the number of nodes based on the value that you specify during cluster scale-ins. Idle nodes are not released. We recommend that you specify the Minimal Nodes parameter with caution to avoid wastes of resources and save costs caused by idle nodes in the queue.
Select Queue Node Configuration
Parameter
Description
Inter-node interconnection
Select a mode to interconnect nodes. Valid values:
VPC: Nodes communicate over a VPC.
eRDMA: If the nodes use types that support ERI, the nodes can communicate over the eRDMA network.
NoteOnly some instance types support ERI. For more information, see Overview and Enable eRDMA on an enterprise-level instance.
Use Preset Node Pool
Select a created reserved node pool. The system will automatically select IP addresses and host names from unassigned reserved nodes in the reserved node pool to create compute nodes.
Instance type Group
Click Add Instance and select node types.
If you do not enable auto scaling, you can add only one instance type. If you enable auto scaling, you can add multiple instance types.
Auto Scale
Parameter
Description
Scaling Policy
Select a scaling policy. Currently, only Supply Priority Policy is supported, which means the system tries to create compute nodes that meet the specification requirements in the order of the configured vSwitches from the corresponding zones.
Maximum number of single expansion nodes
Specify the number of nodes to be added or removed in each scale-out or scale-in. The default value 0 specifies that the number is unlimited.
If you are under a limited budget, we recommend that you configure this parameter based on your budget to control costs.
Instance RAM role
Bind a RAM role to the nodes to enable the nodes to access Alibaba Cloud services.
We recommend that you select the default role AliyunECSInstanceForEHPCRole.
Click Save.
On the queue list page, click the
 icon to refresh the page. If the queue exists, the queue is created.
Modify and delete a reserved node pool
Modify a reserved node pool
Go to the Cluster Details page.
Log on to the E-HPC console.
In the left part of the top navigation bar, select a region.
In the left-side navigation pane, click Cluster.
On the Cluster List page, find the cluster that you want to manage and click the cluster ID.
In the left-side navigation pane, choose .
Click Preset Node Pool. On the Manage Preset Node Pools page, you can edit the following parameters on the tab of the pool that you want to modify.
Parameter
Description
Name
Modify the name of the reserved node pool.
Pool Capacity
Modify the number of reserved nodes in the pool. If you decrease the value, a corresponding number of IP addresses are released. If you increase the value, a corresponding number of more IP addresses are occpied until all available IP addresses are occupied.
Remove
You can remove reserved nodes that are unassigned or in a conflicting state. To remove a node, click Remove in the node list.
Download List
You can download a CSV file of the reserved node list for batch import into DNS or schedulers.
Click OK.
Delete a reserved node pool
Go to the Cluster Details page.
Log on to the E-HPC console.
In the left part of the top navigation bar, select a region.
In the left-side navigation pane, click Cluster.
On the Cluster List page, find the cluster that you want to manage and click the cluster ID.
In the left-side navigation pane, choose .
Click Preset Node Pool. On the Manage Preset Node Pools page, click the Delete Node Pool button to delete the node pool.
NoteYou can delete up to 100 nodes in a reserved node pool at a time.